
Fast replies to your emails have arrived — and we’re talking fast fast. The era of having to block off an hour every day (or more) to deal with all your emails is now over.
The Reply Project is a brand new tool that straps a rocket to the process of responding to emails.
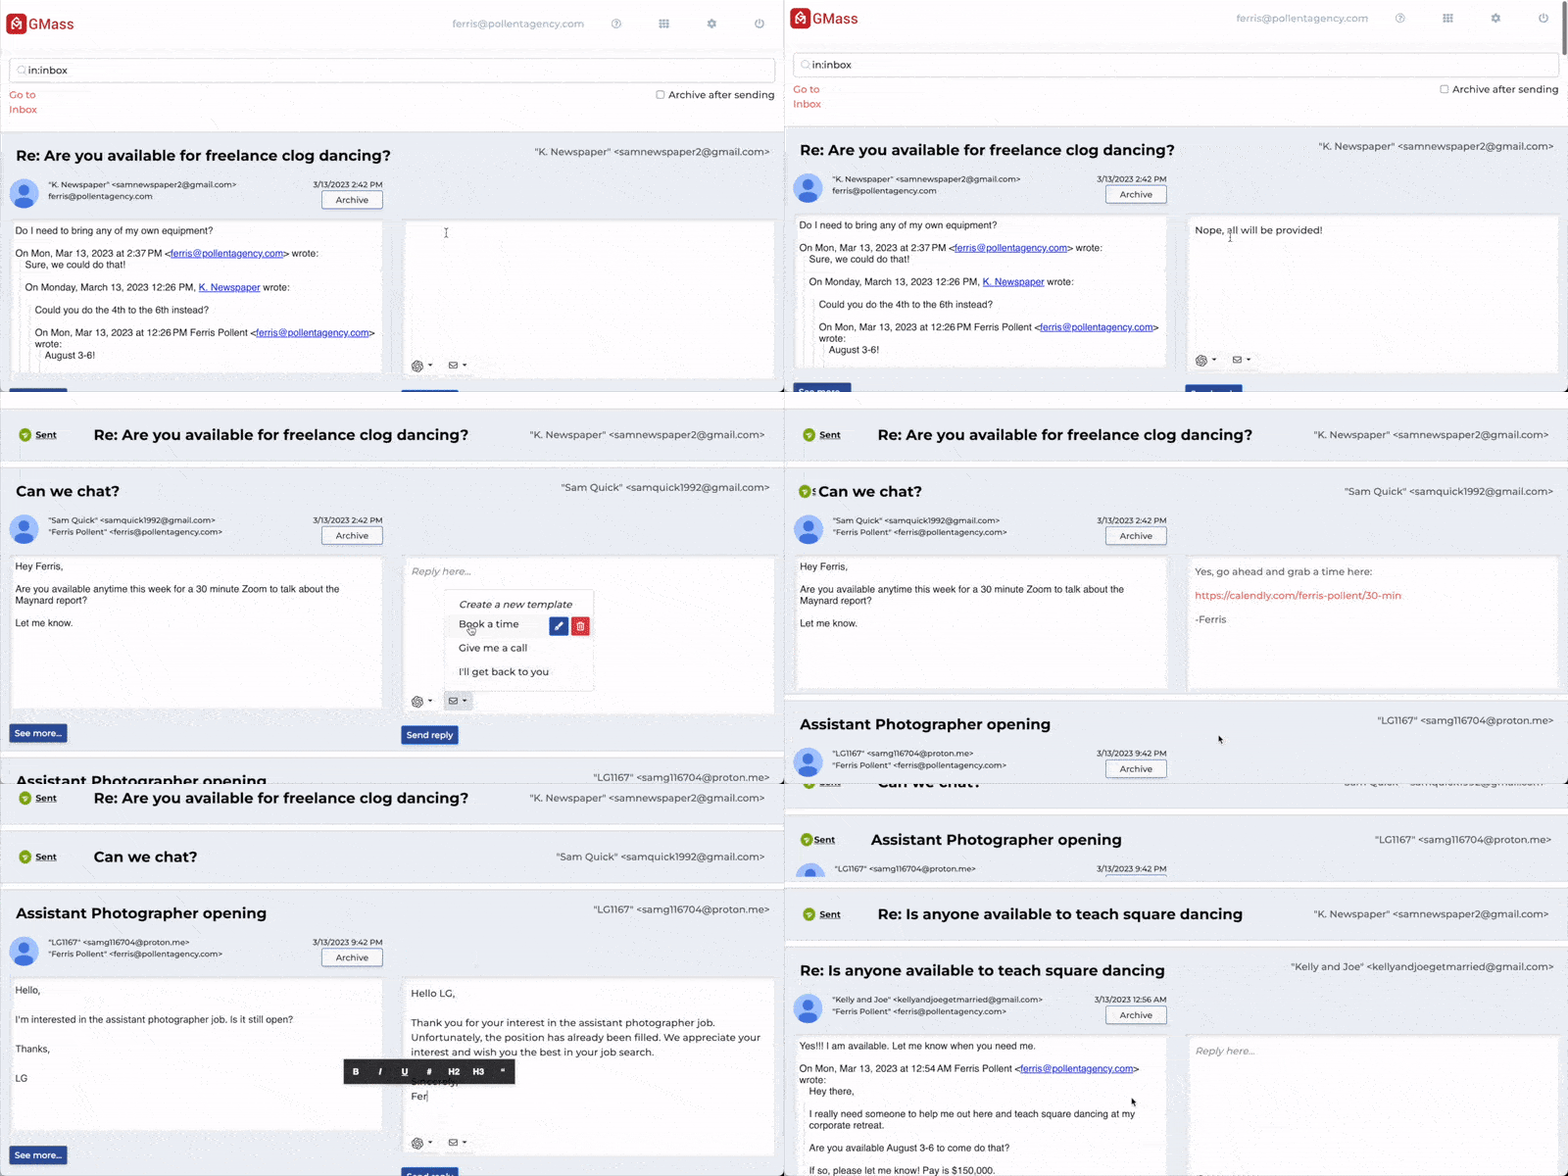
Much like GMass was the pioneer in sending faster, easier email campaigns from Gmail, The Reply Project is a pioneer in sending faster, easier replies to your messages.
With The Reply Project, you’ll see all your emails open on one screen.
You can type in quick replies — or get a boost from ChatGPT or templates to respond even faster.
We’re pretty sure there’s no more efficient way to get through your inbox than this.
This article is a guide to getting started with The Reply Project (spoiler: it takes about 15 seconds) and using it as a replacement for the main Gmail interface to blaze through the email reply process 10x faster than before.
Send Fast Replies with The Reply Project: Table of Contents
- Quickstart Guide: Start Sending Fast Replies Less Than One Minute From Right Now
- The Basics: The Different Ways The Reply Project Displays Your Emails
- Tools for Even Faster Replies: ChatGPT and Templates
- Inbox Zero in The Reply Project: Archiving and Deleting
- Searching and Global Options in The Reply Project
- Using The Reply Project Inside of GMass
- The Reply Project: FAQ
Quickstart Guide: Start Sending Fast Replies Less Than One Minute From Right Now
If you just want to get started right away, let’s make that happen.
Step 1: Go to The Reply Project page and connect your Gmail account
Head over to The Reply Project and click the button to Sign in with Google.
For a quick shortcut, you can type reply.new into your browser and it will take you to The Reply Project.

You’ll need to give The Reply Project permissions to access your Gmail inbox (even if you’ve already given permissions for GMass to do so; this is separate). And just like with GMass, your email remains safe and private.
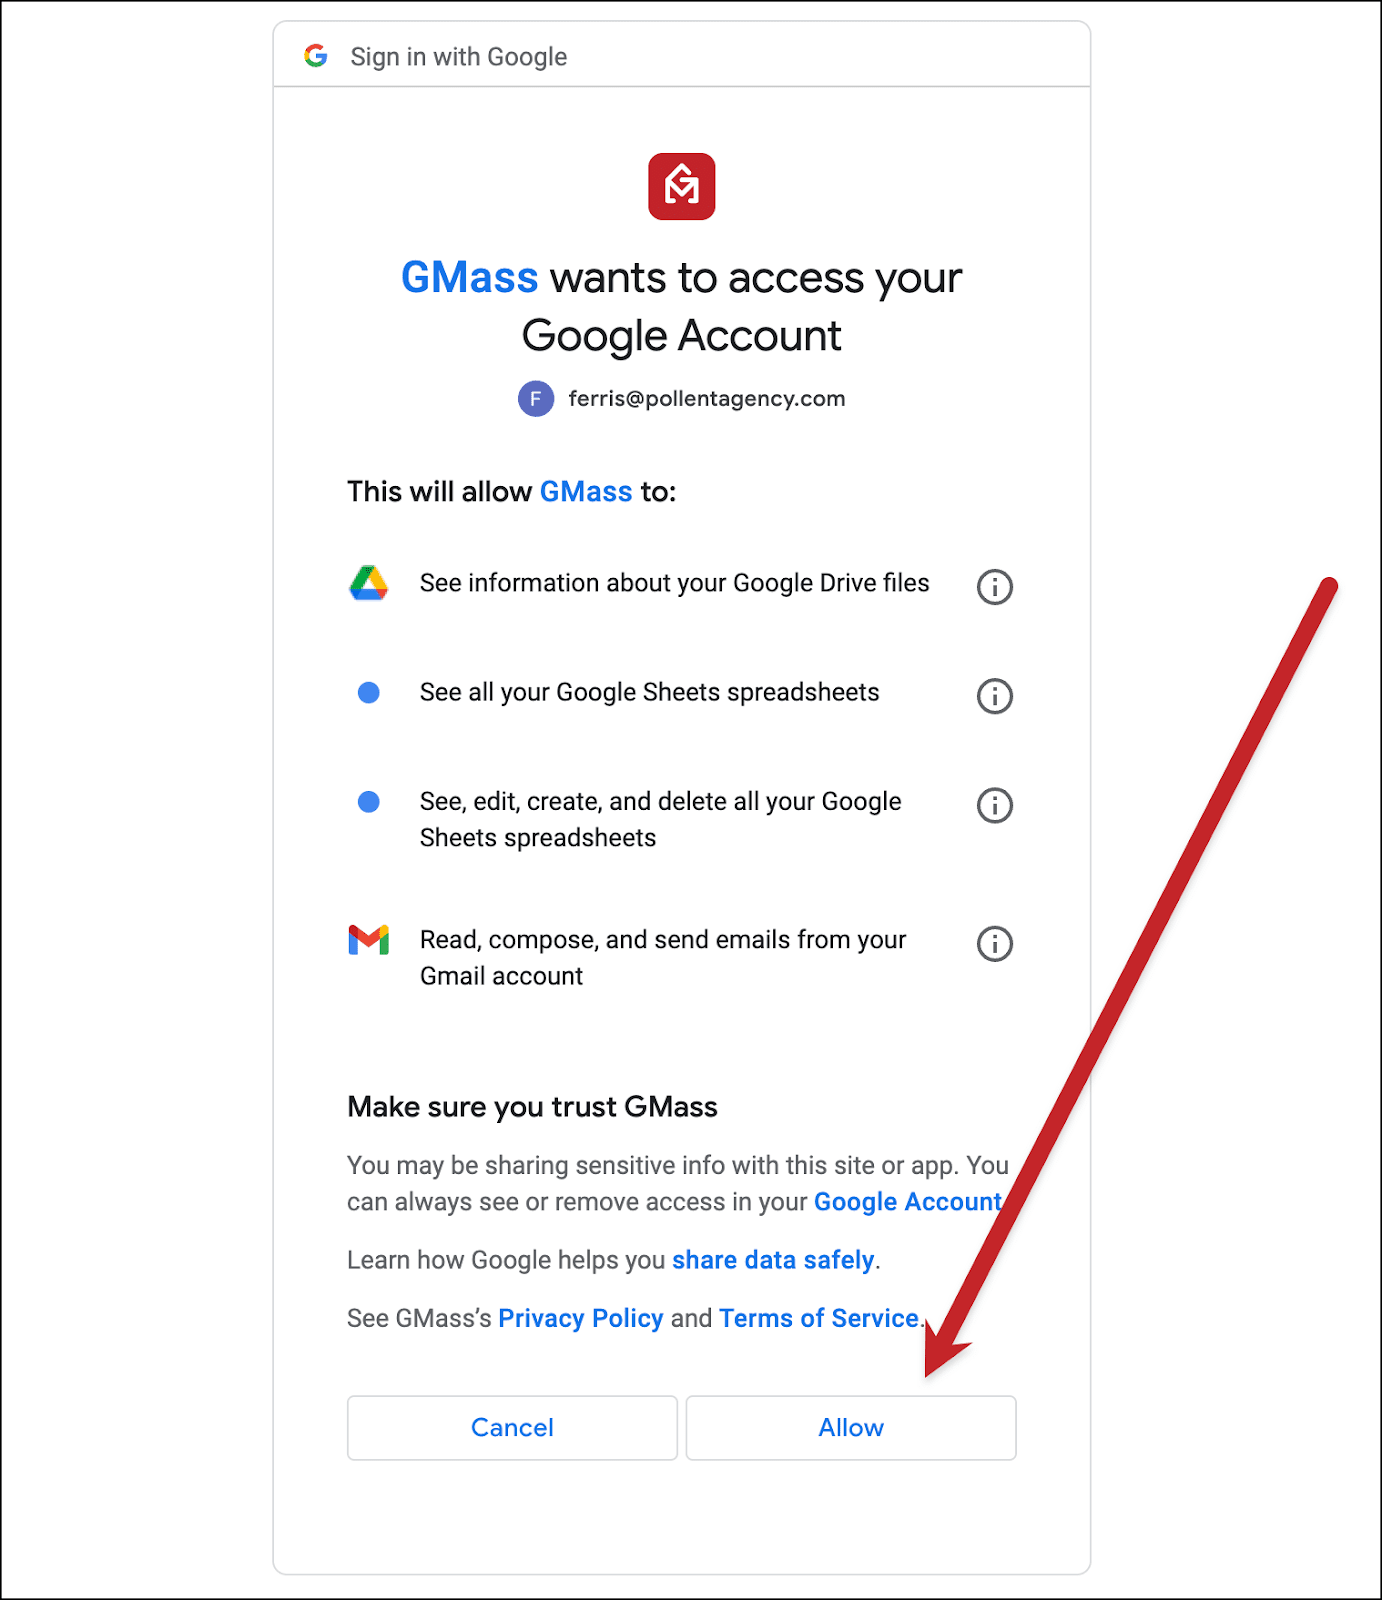
Step 2: Pull up your inbox
With The Reply Project you can view the messages in your inbox — or view the messages you see when you run any other search in Gmail. (For instance, if you wanted to reply quickly to a bunch of job applicants, you could type a keyword into the Search in mail box.)
To view the emails in your inbox, click the Go to Inbox link.

Step 3: Start sending replies
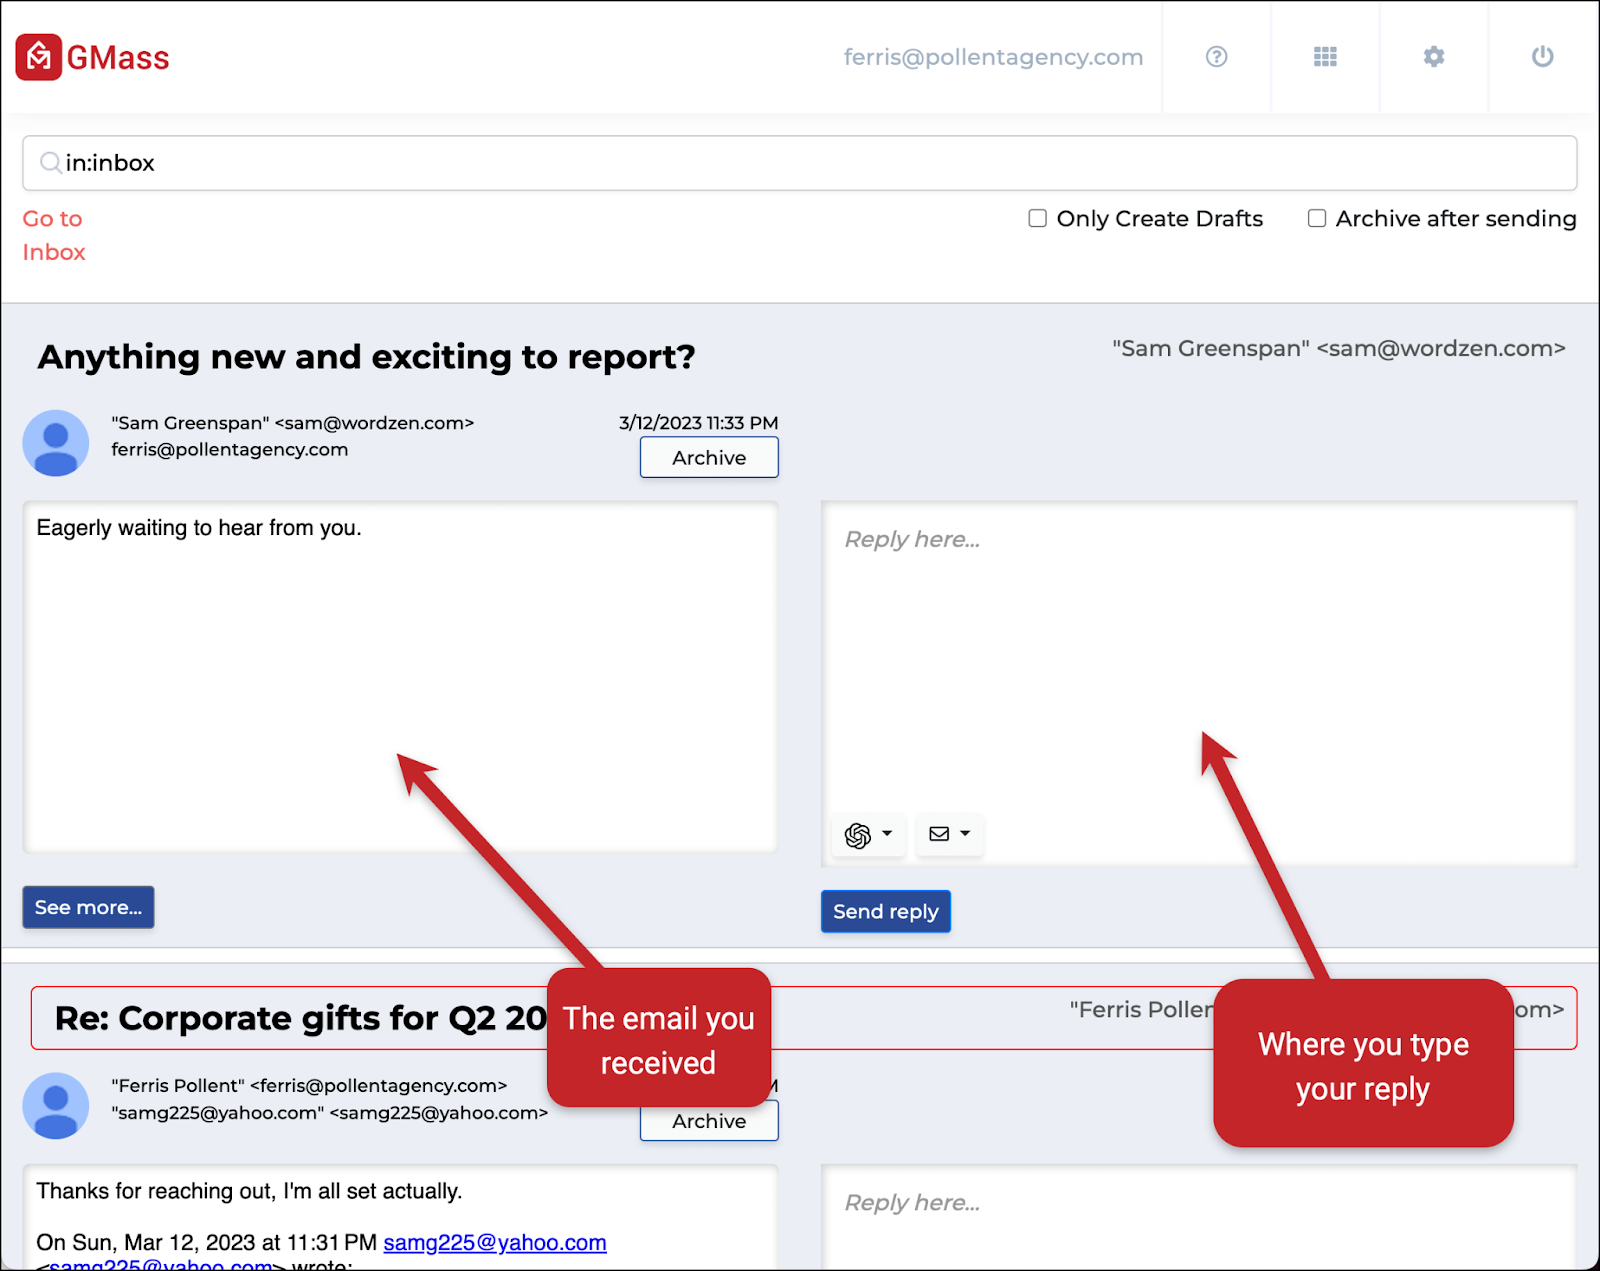
The Reply Project brings up all your emails on one screen (no more clicking into emails individually). To the right of each email is a box where you can type your reply.
If you have a Gmail signature set, the box will be pre-filled with your signature. If you don’t have one set, it will be empty (other than the Reply here… text).
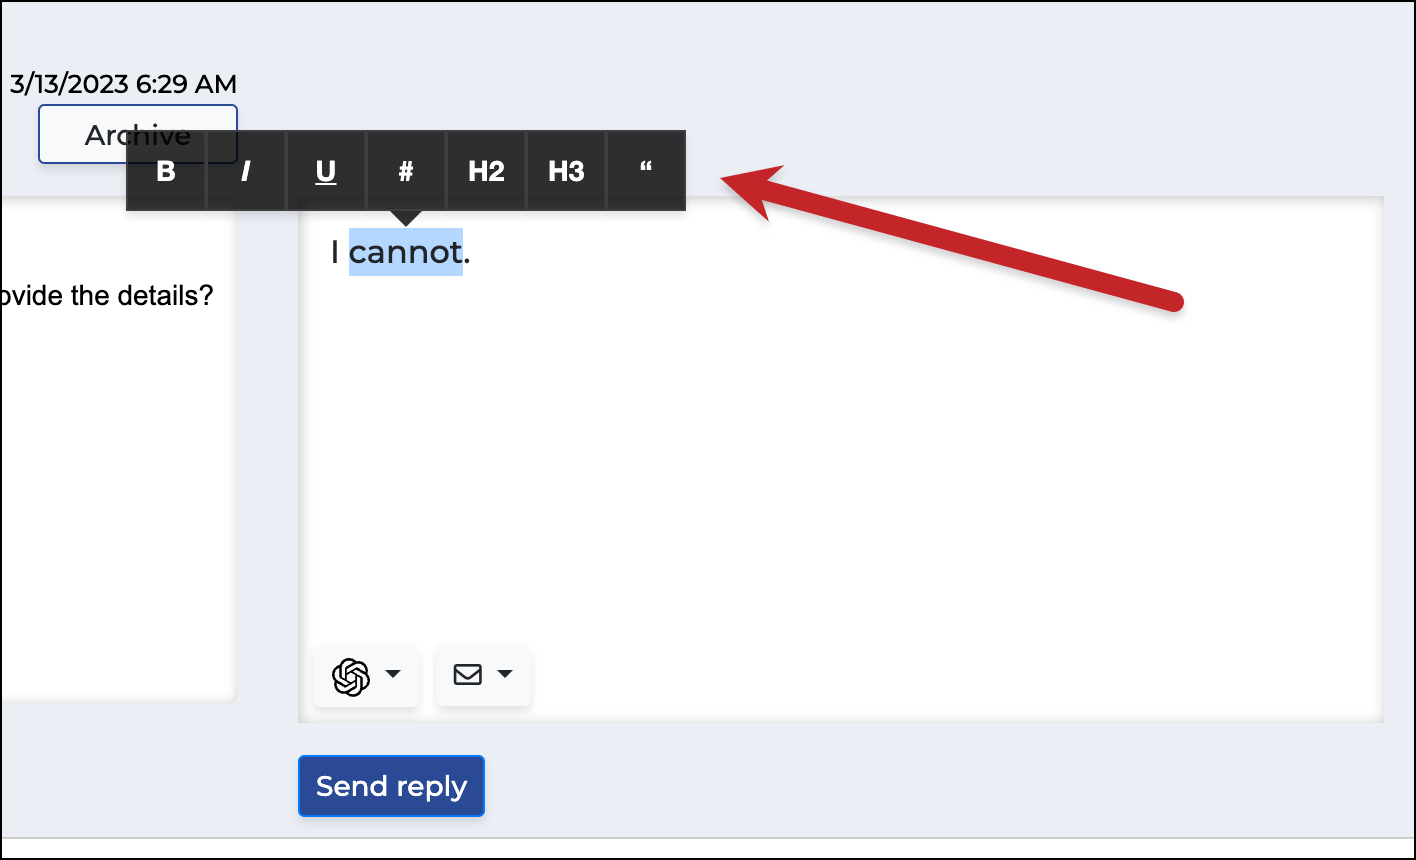
You can add rich formatting your reply by highlighting any word or words to bring up a set of options.
Once you’re ready to send a reply, click the Send reply button and Gmail will send your message.
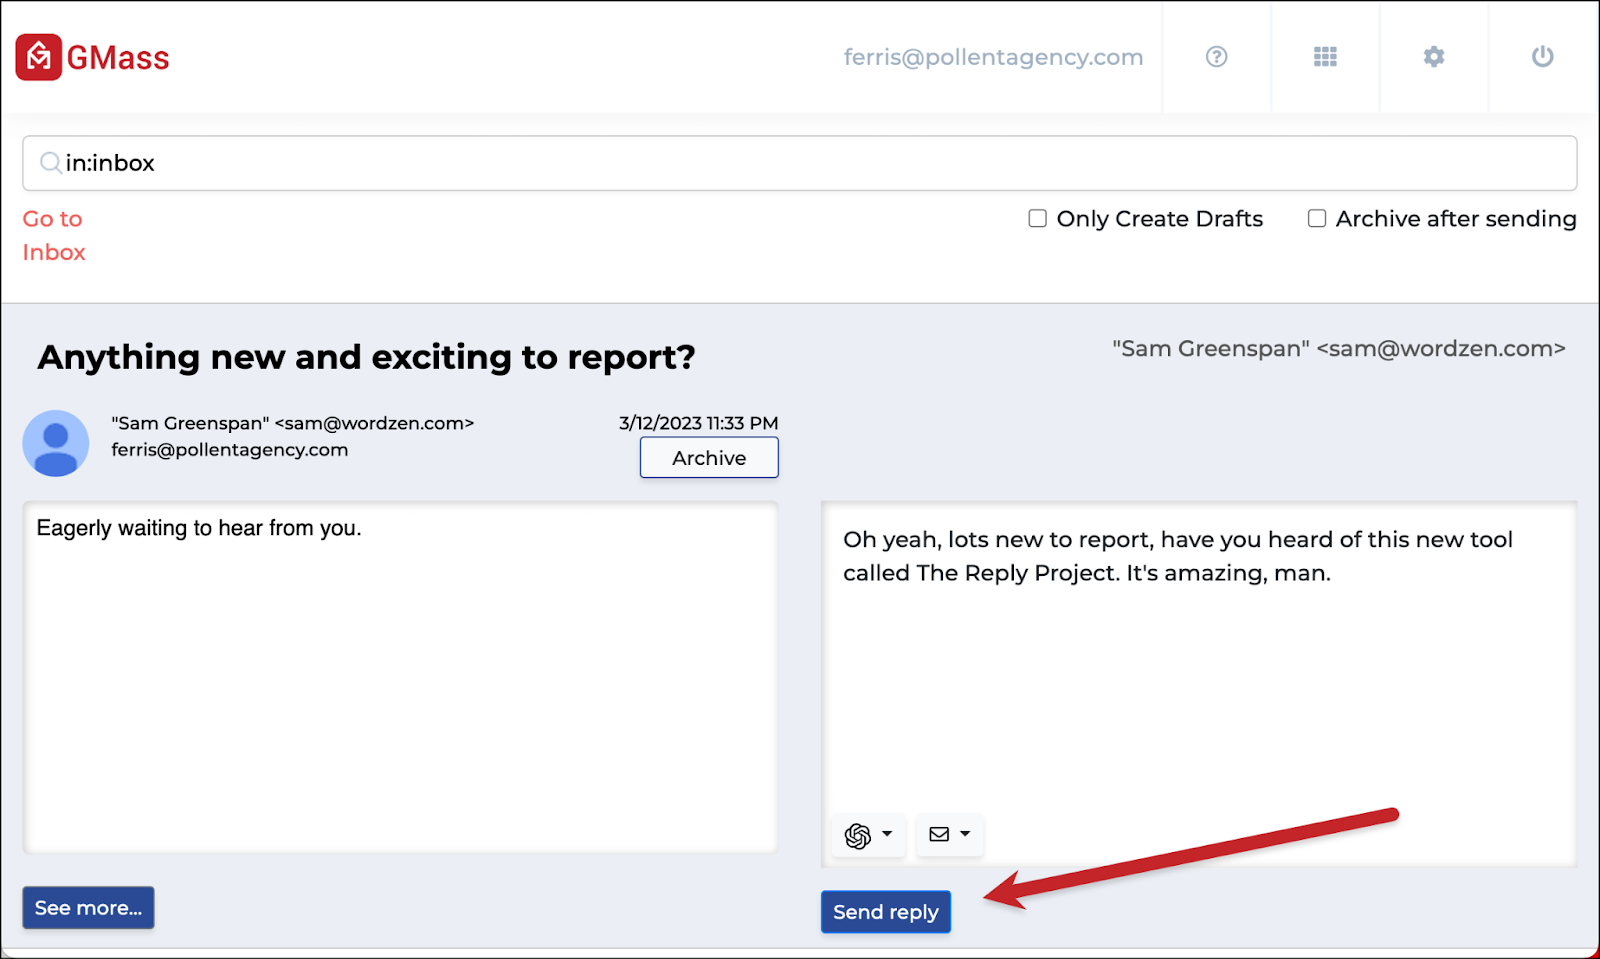
If you have multiple aliases set up in your Gmail account, The Reply Project will send from the correct one. (That is: Whichever one received the email.)
By default, The Reply Project will just reply to the sender. But if you’re responding to an email with multiple recipients and you want to reply to everyone on the thread, tick the Reply All checkbox before sending.
Once you send, The Reply Project will then minimize that email so you can focus on the rest of the items in your inbox.
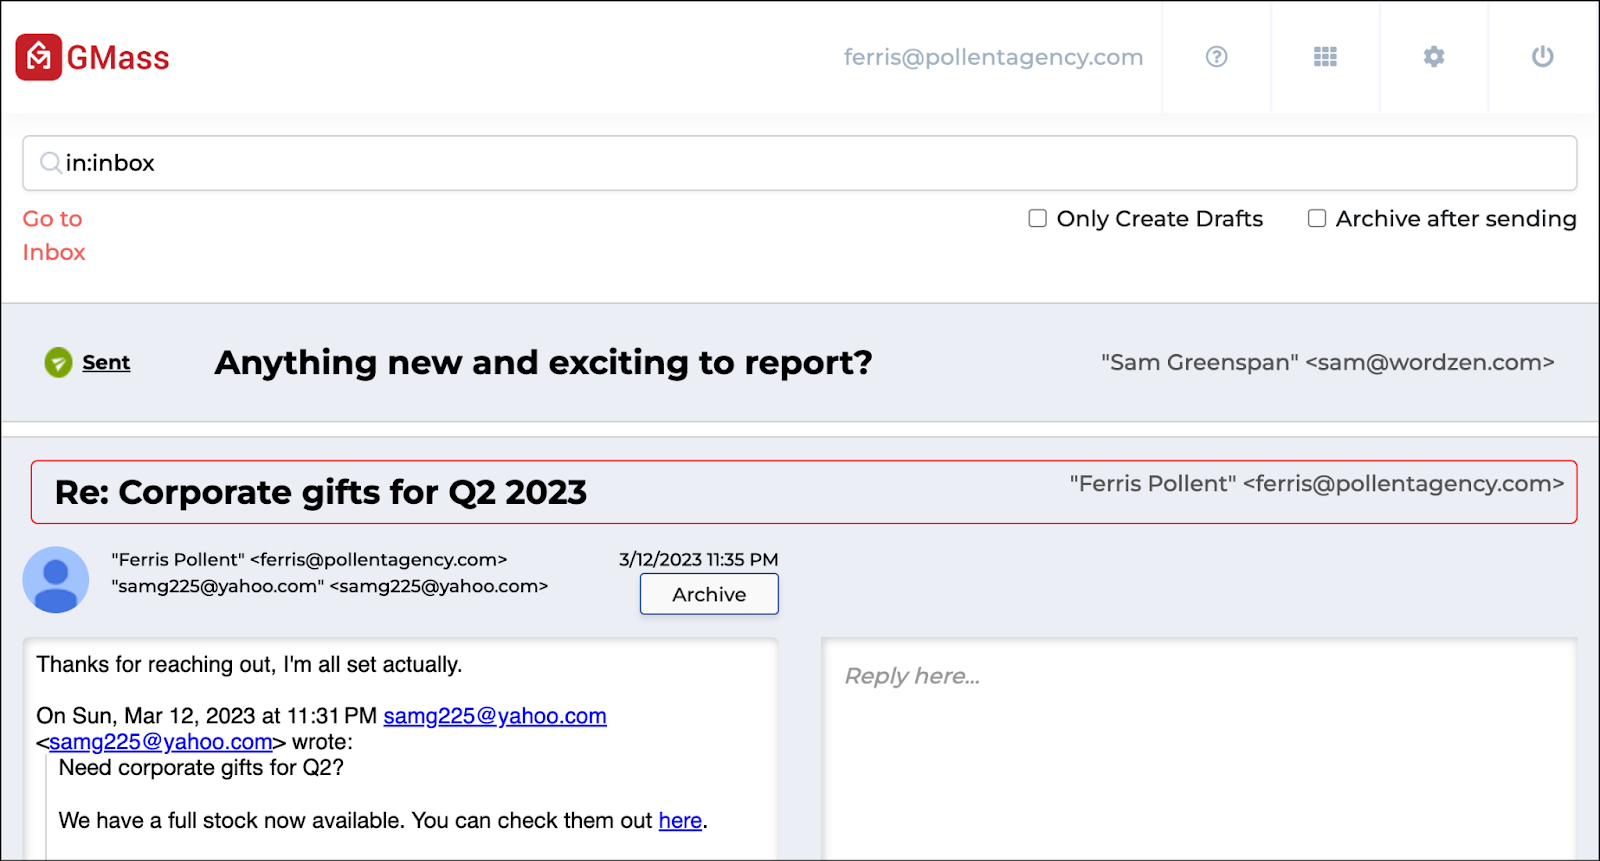
Now… as you no doubt noticed, there are some other details in the interface here.
There are the options up top, like Archive after sending. There’s an Archive and Delete button by each email. And there are the ChatGPT and Email template icons in the reply window.
I’ll cover those in detail throughout the rest of this guide.
But for now… you’re all set to get rolling with The Reply Project!
The Basics: The Different Ways The Reply Project Displays Your Emails
The Reply Project displays everything in your inbox (or that came up as a result of your search). And it displays emails in four different “states,” depending on whether they need a reply, you sent them with the tool, you archived them with the tool, or they don’t need a reply.
1. An email that needs a reply
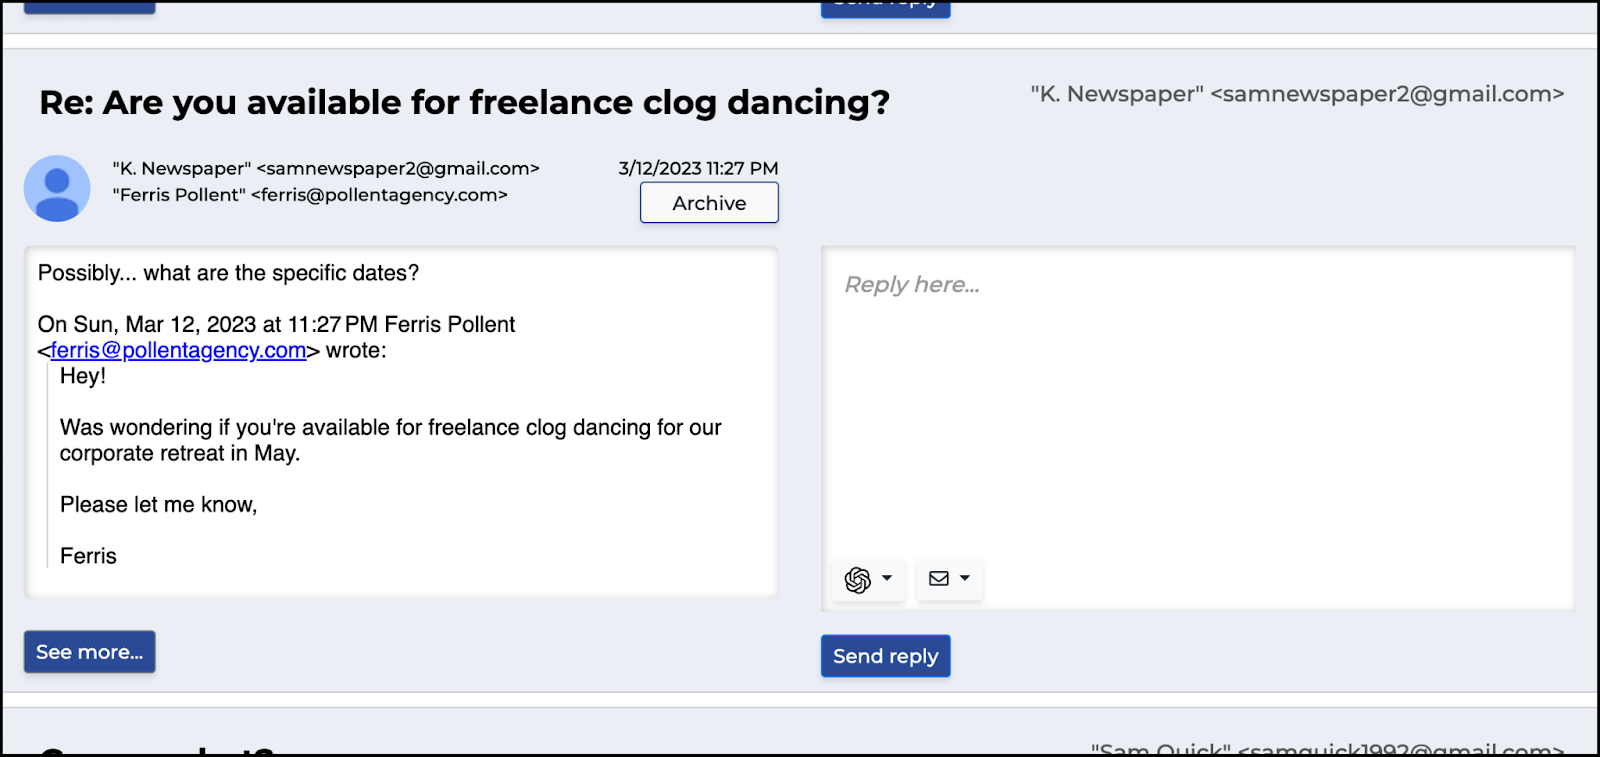
If there’s an email in need of a reply, it looks “normal” in The Reply Project. You’ll see its subject line, who it’s to and who it’s from, the date it was sent, and the entire thread history. (Click the See more… button to expand the size of the email display box.)
Here’s an example of an email that needs a reply:
2. An email you sent via The Reply Project
As I mentioned in the quickstart guide earlier, once you send a reply, The Reply Project minimizes the email down to its subject line, the recipient, and a Sent icon.

3. An email you archived via The Reply Project
When you click the Archive button on an email, The Reply Project minimizes that email on the screen.
The email will also be archived when you go back to Gmail. Like any email you archive in Gmail, you’ll still be able to find it with search or in the All Mail view. However, it has its “inbox” label removed so it’s no longer in your inbox.

4. An email where you sent the most recent message in the thread, but didn’t send it through The Reply Project
The Reply Project is bringing in all the messages from your inbox or your email search. And that means there will probably be some cases where you were the last person in the thread to send a response — and you didn’t send that email through The Reply Project.
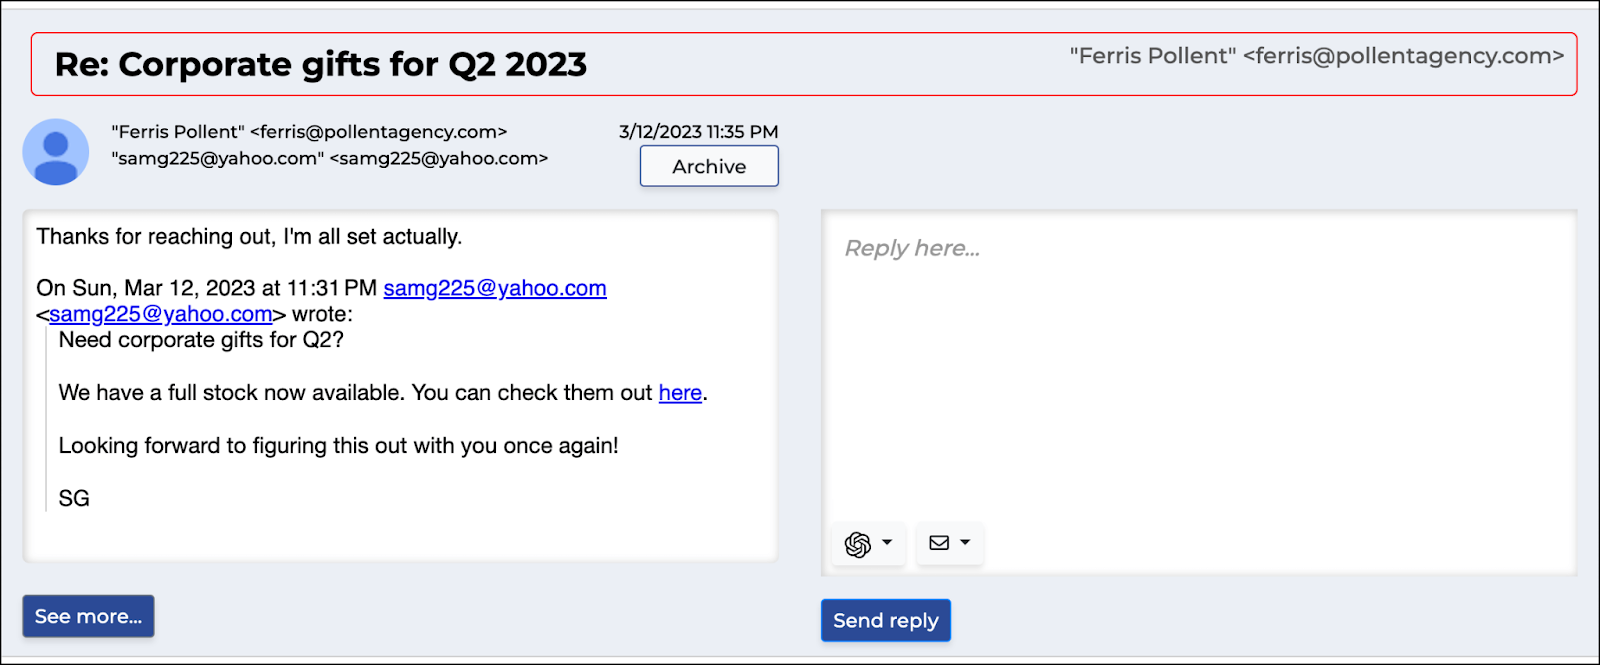
In those cases, The Reply Project puts a red outline around the subject line to warn you that the thread is not waiting on you and probably doesn’t need another reply from you right now.
Tools for Even Faster Replies: ChatGPT and Templates
The Reply Project is focused on reply speed — and sometimes, that means typing email responses is going to slow you down.
We’ve built in two options for even faster replies in the tool. You can get an assist from ChatGPT or use your own templates to really knock out your responses faster.
Using ChatGPT in The Reply Project
ChatGPT can write responses for you in The Reply Project (and you don’t need your own ChatGPT credentials to log in — we’ve got it covered.)
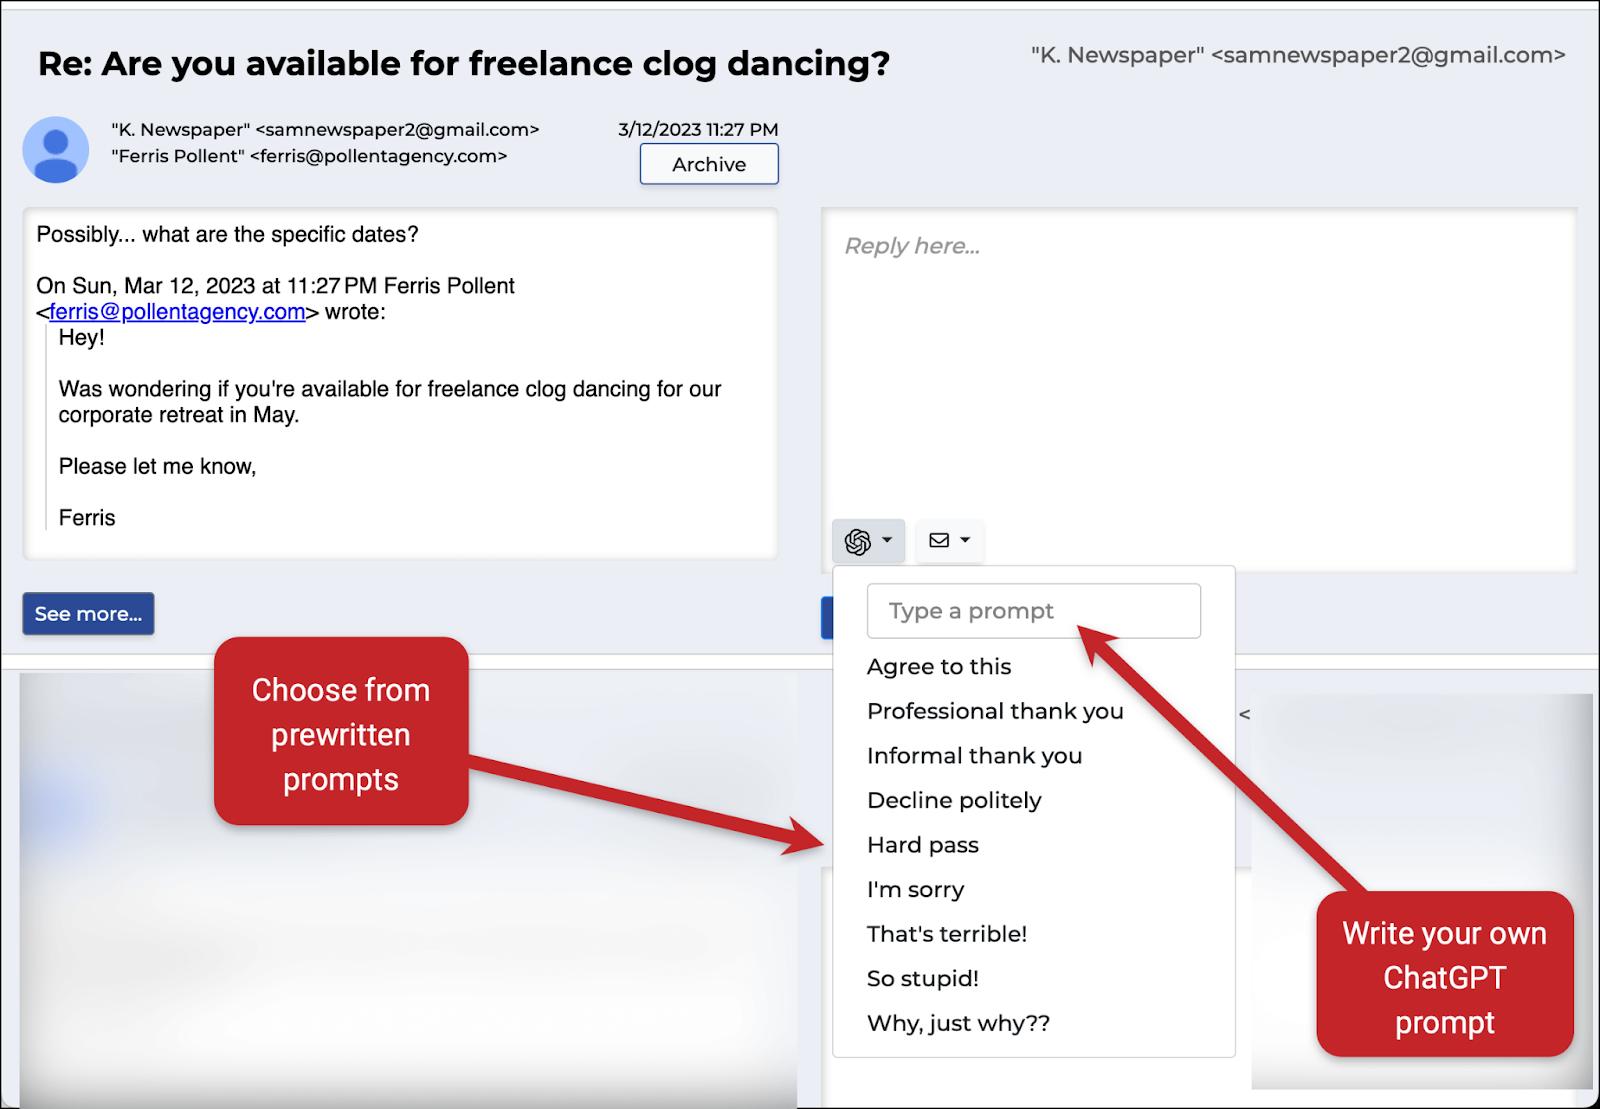
To let AI take a pass at your response for you, click the ChatGPT icon in the reply box. You can also press Control + Y on Windows or Command + Y on Mac to launch the ChatGPT prompts box for an email response.
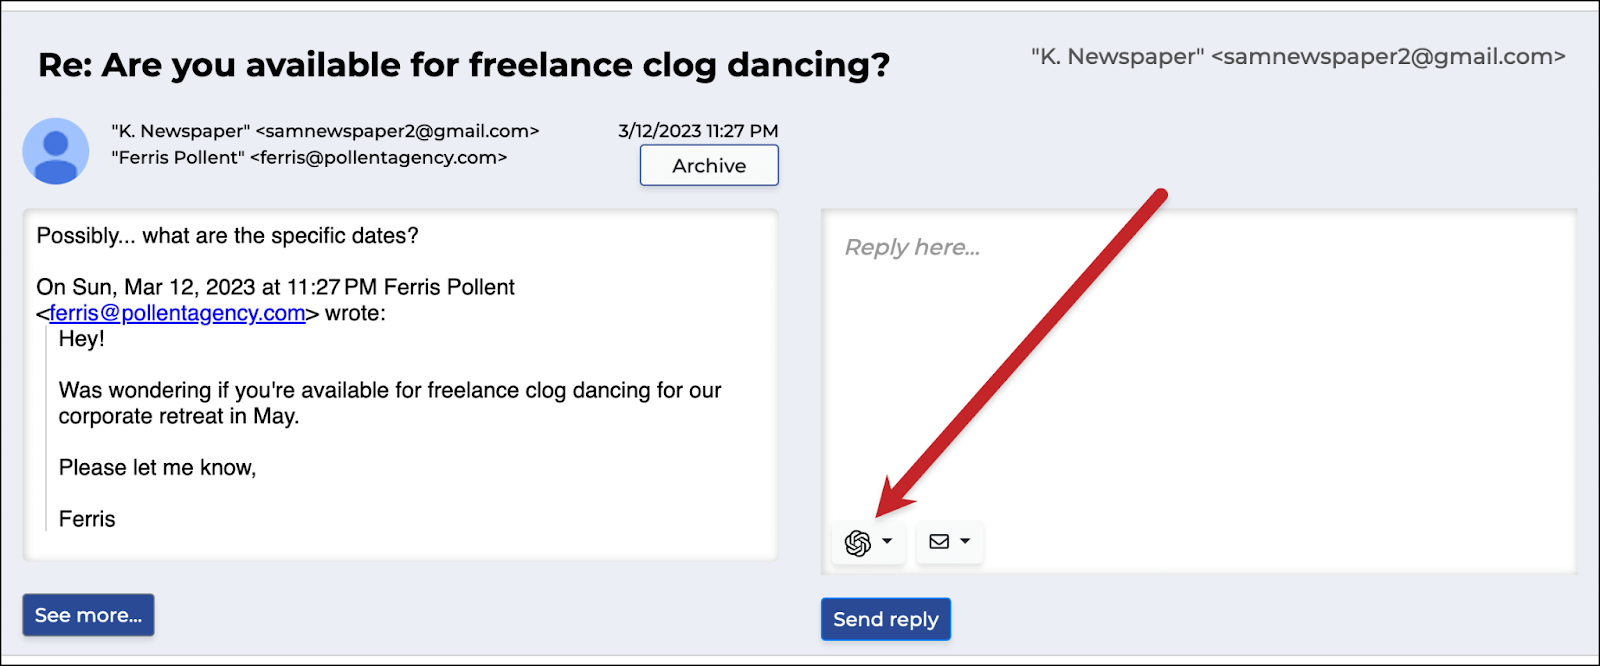
You’ll see a list of quick prompts to choose from, or you can type your own.
ChatGPT will then write a full email response. You can tweak it, edit it, delete it to try again, or send as-is.
Using your own templates
You can create templates to use and re-use in The Reply Project.
Creating a template
To create a template, click on the button with the email icon or hit Control + M on Windows or Command + M on Mac, then click Create a new template.
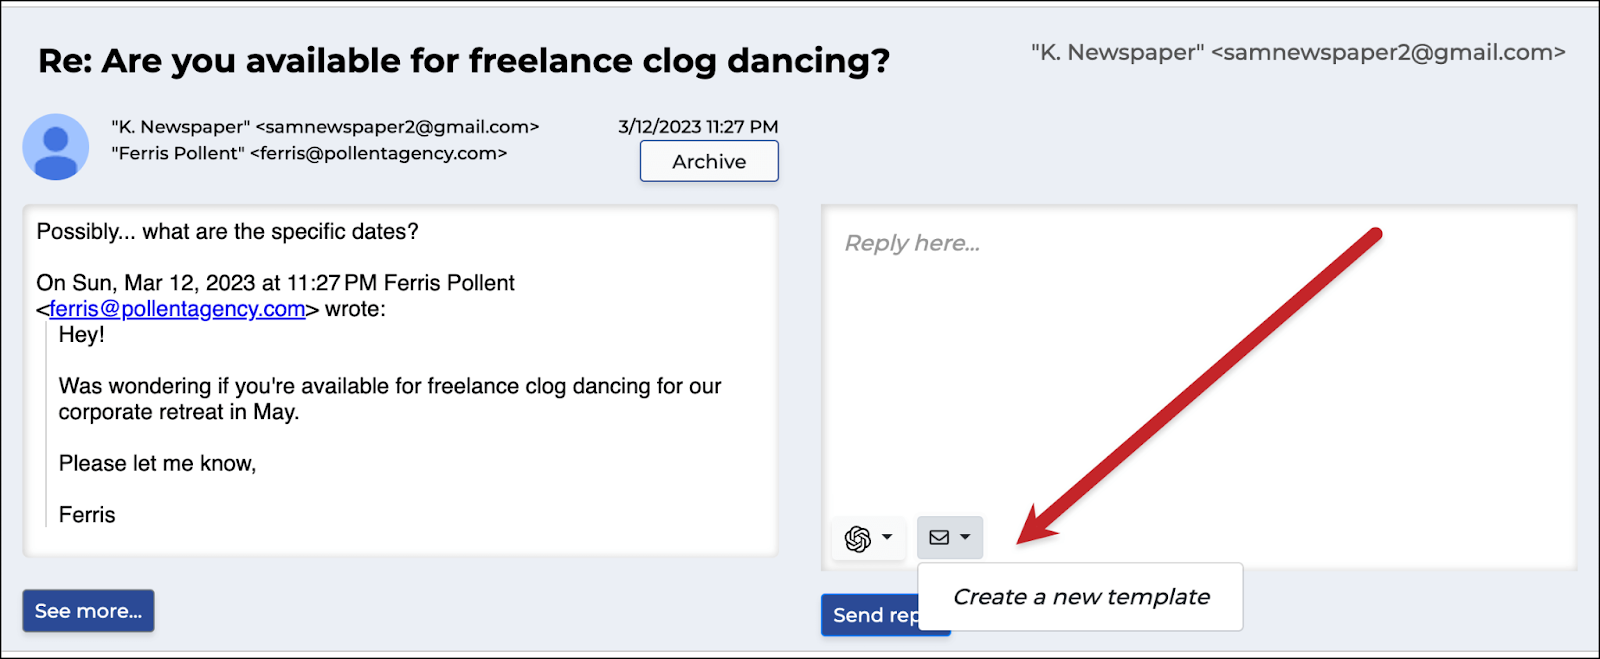
That will bring up a window where you give your template a name and then type it out.
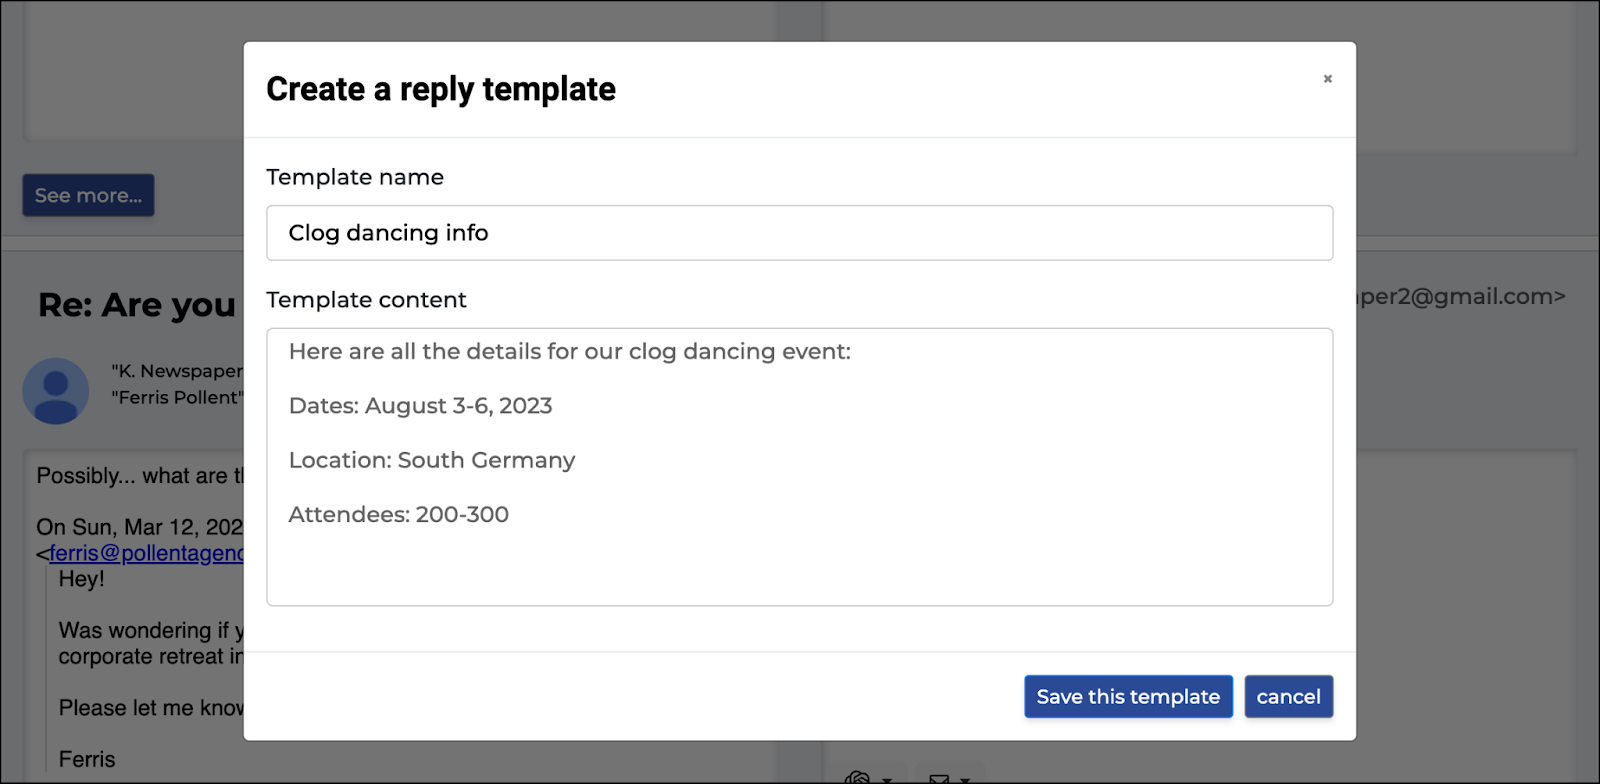
Once you’re done, click the Save this template button.
Using your templates
Once you have a template or templates available, click that same icon (or use Control/Command + M) in the reply box to see them in a list.
If you click on the name of the template, it will fill the box with your template. It will also replace anything that’s in the box (if you’ve typed anything before clicking the button).
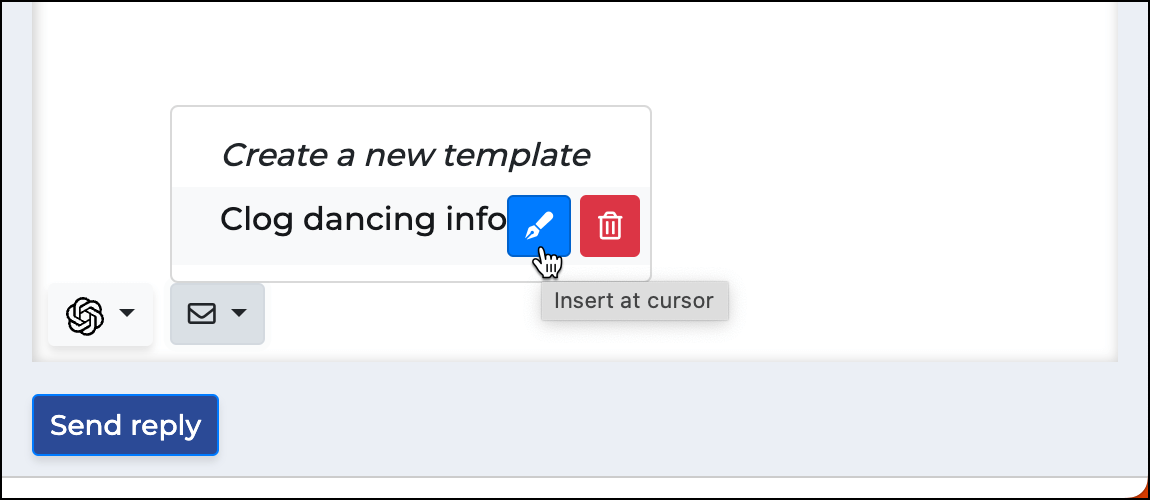
If you hover over the name of the template, you’ll see two icons. The pen icon is to insert the template at the cursor. When you do that, it will not overwrite anything in the box, it will just insert your template in the spot you’ve chosen. That could be useful for, say, creating a template that’s your Calendly link and being able to insert it into replies.
Deleting your templates
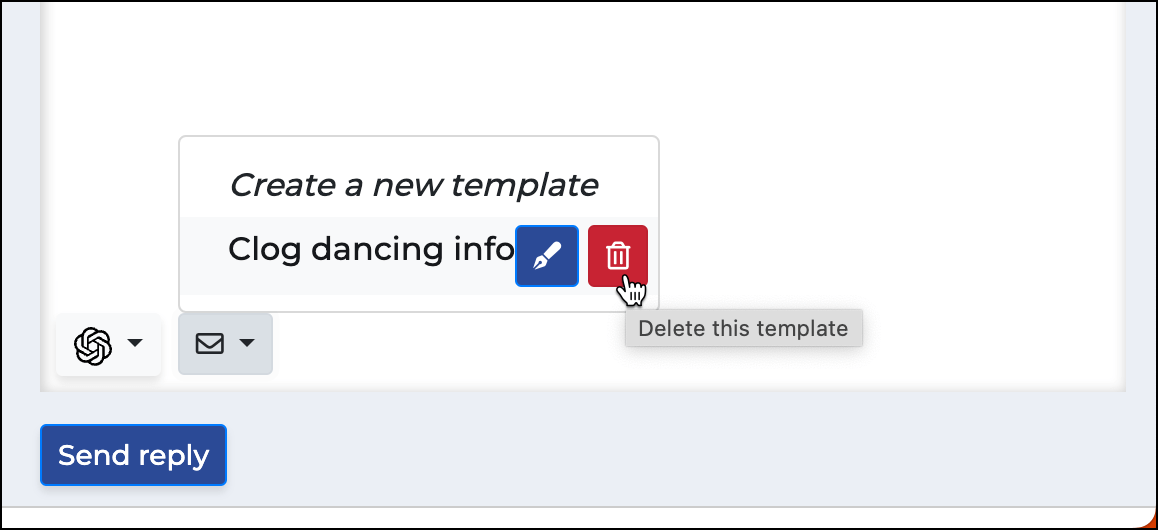
if you click on the trash can icon that appears when you hover on a template name, it will delete your reply template. You’ll no longer be able to access it on other emails in The Reply Project.
This is good for cleaning up your reply template list if it starts to get filled up with old templates that are no longer needed.
Keyboard shortcuts
Want to save even more clicks? When you’ve finished typing a draft (or used ChatGPT or a template to type it up for you), hit Ctrl+Enter on PC or Command+Return on Mac to send the message.
As mentioned earlier, you can use:
- Ctrl+Y / Command+Y to launch ChatGPT
- Ctrl+M / Command+M to launch your templates
And as we’re about to cover, you can use:
- Ctrl+A / Command+A to archive a message
- Ctrl+D / Command+D to delete a message
We’ll be adding even more keyboard shortcuts in the near future!
Inbox Zero in The Reply Project: Archiving and Deleting
The Reply Project is great for fast replies — but it’s also great for clearing out emails you don’t want to reply to as well.
Whether you’re aiming for “inbox zero” or just want to get rid of the clutter, The Reply Project has archiving and deleting functions built in. And when you archive/delete a message here, it’s archived or deleted (respectively) in your Gmail account.
Archiving a message in The Reply Project
To archive a message, click the Archive icon above that message. You can also press Control + A on Windows or Command + A on Mac.
You can also archive messages automatically after sending by checking the box underneath the search bar at the top of the page. We’ll cover that more in the next section on global options.
Deleting a message in The Reply Project
To delete a message, click the garbage can Delete icon above that message. You can also press Control + D on Windows or Command + D on Mac.
Searching and Global Options in The Reply Project
Using the search box in The Reply Project
While you’ll probably want to use The Reply Project to get through the messages in your inbox, there may be a case where you want to run a specific Gmail search and reply to just those messages.
The search box at the top of the screen on The Reply Project works with any Gmail search. So if you could run the search back in Gmail, you can run it here. (Here’s Google’s official guide to Gmail search operators.)
For instance, if you wanted to search for only messages that are responses from job applicants, you could search for that job title.
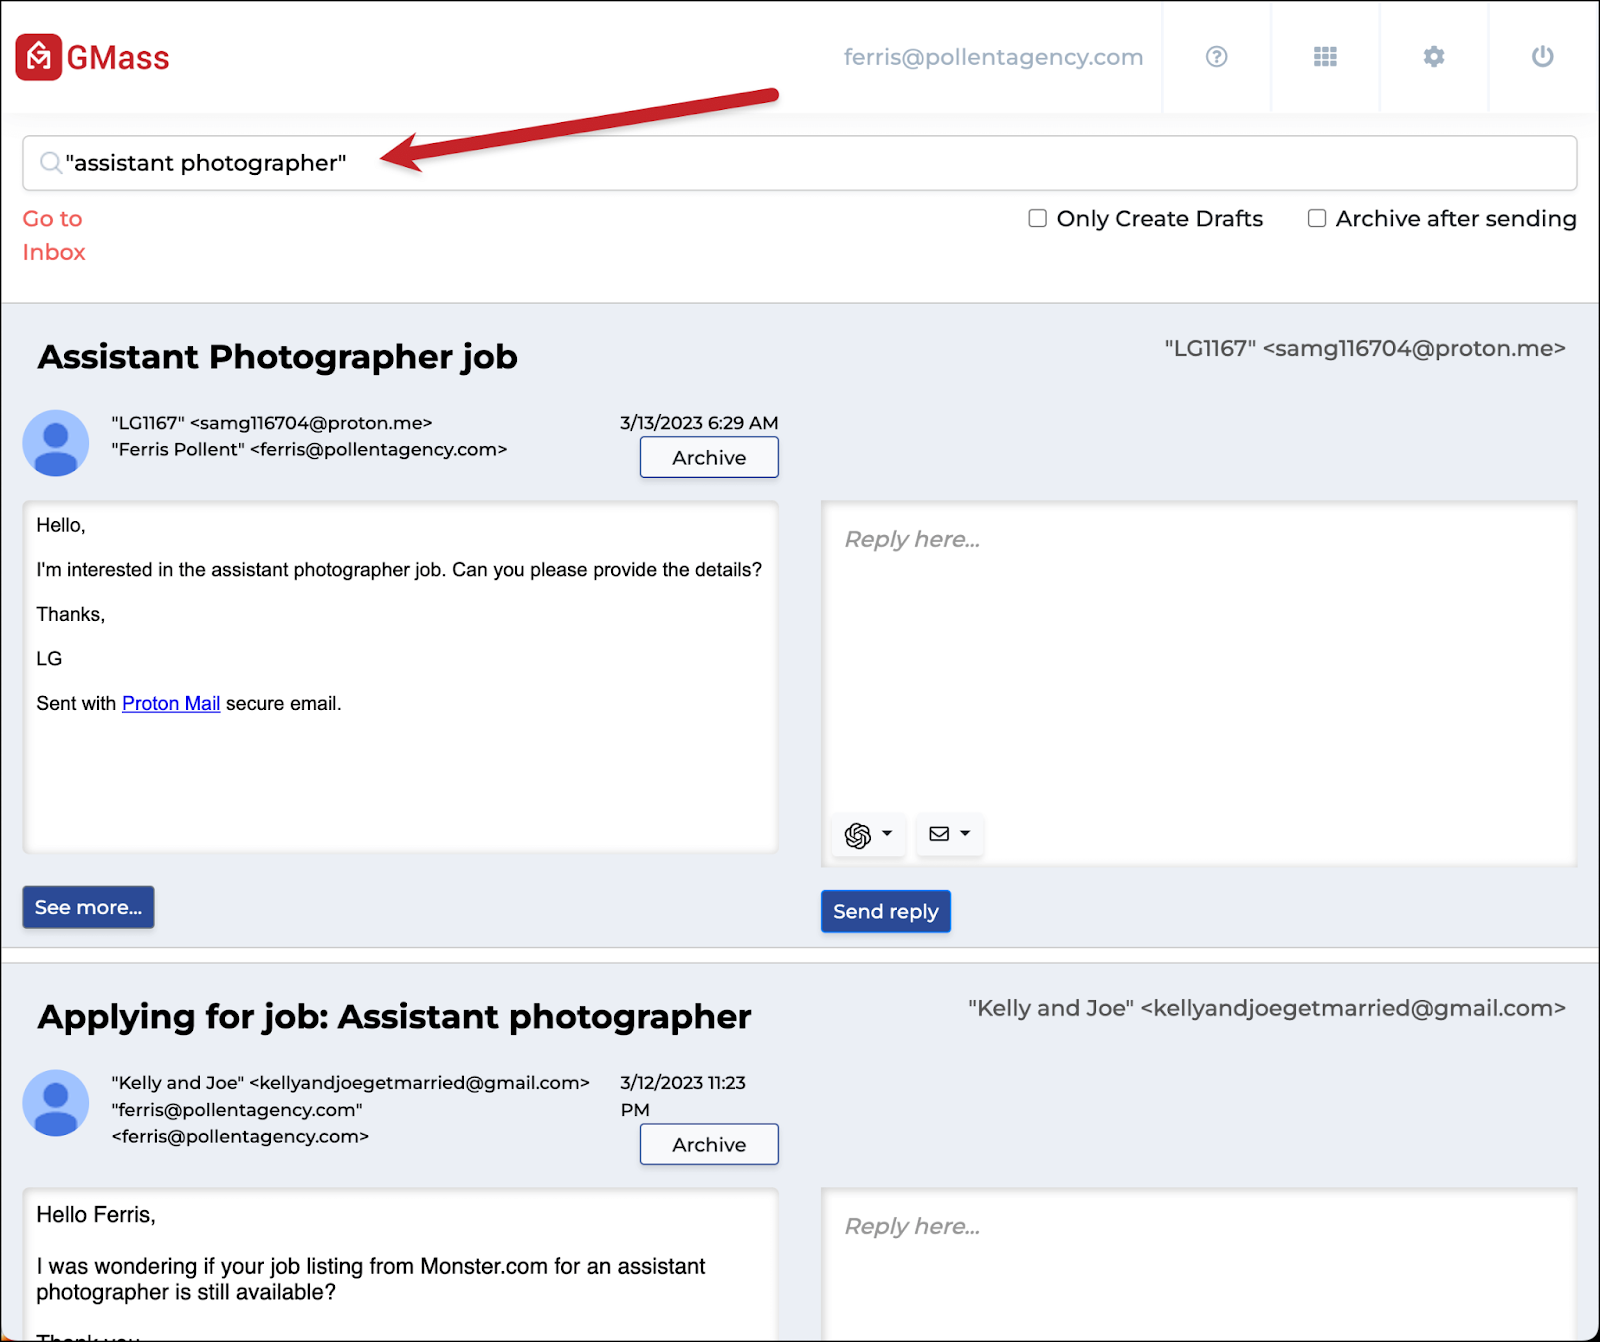
You can search with dates, by different Gmail labels, and more.
Archive after sending
The Archive after sending option is great if you’re really looking to clean up your inbox (maybe even get to the fabled land of Inbox Zero that people still sometimes whisper about).

When you check the Archive after sending checkbox, The Reply Project will send your reply, then archive the initial message/thread to remove it from your inbox view.
You’ll still be able to access it via a search in Gmail/The Reply Project or in Gmail’s All Mail folder — but it won’t be taking up space in your inbox anymore.
Using The Reply Project Inside of GMass
While The Reply Project is a standalone tool, we have baked it into GMass to help you handle responding to the replies to your campaigns. After all… a cold email or email marketing campaign doesn’t end when you send the initial email. There’s usually a back-and-forth after that.
After you send a campaign, click into the replies in either the GMass dashboard…

…or in the web-based campaign report.
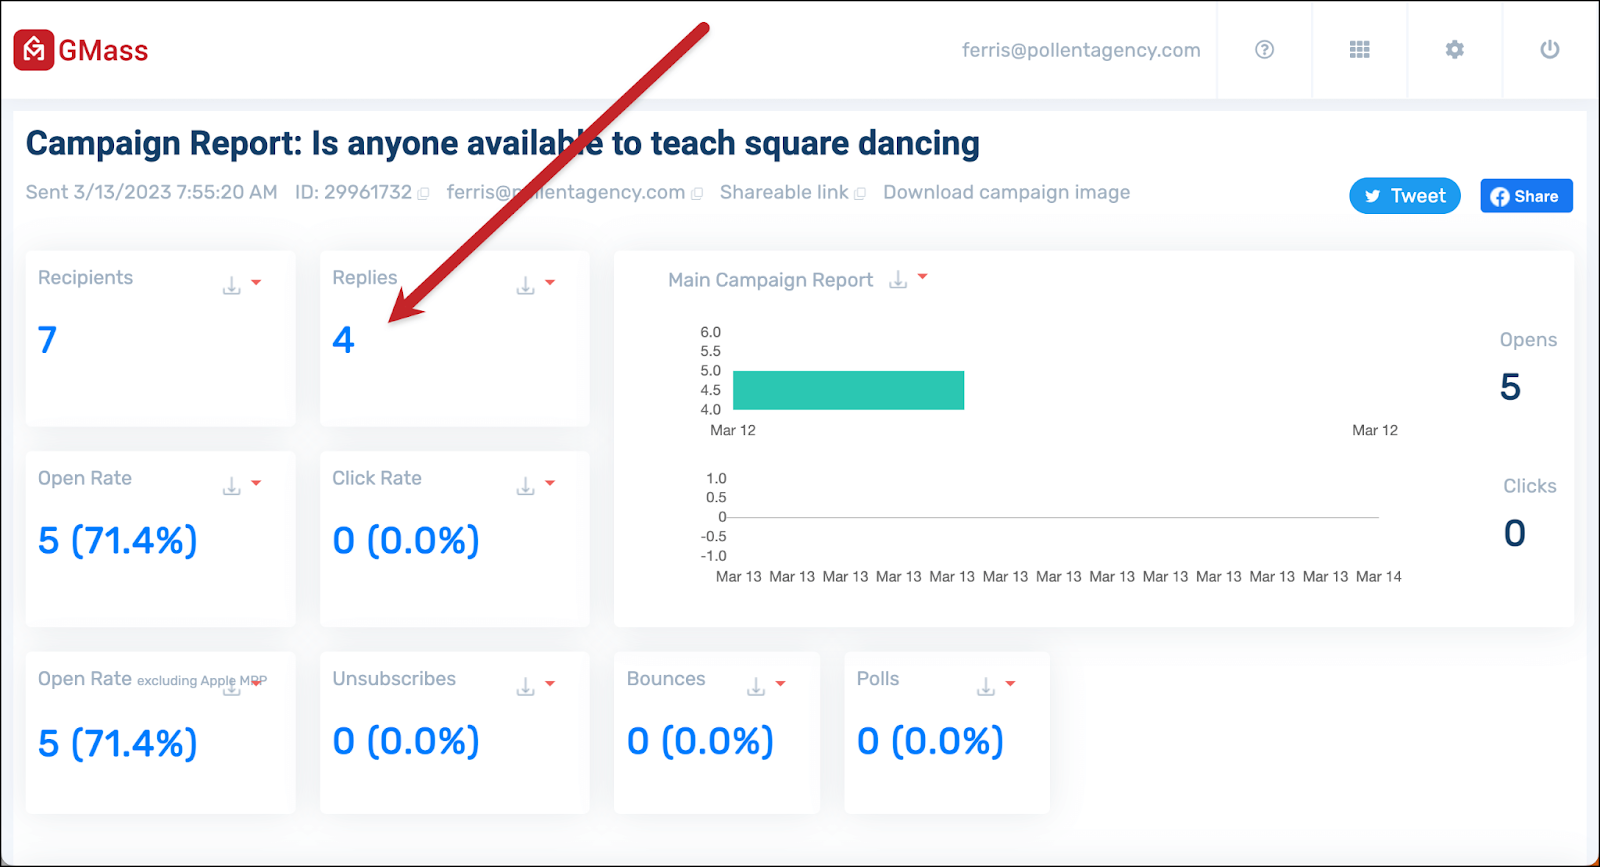
In either case, GMass will bring up a flyout panel on the right side of the screen showing you your replies. And there’s a link on top to Reply to these emails with The Reply Project.
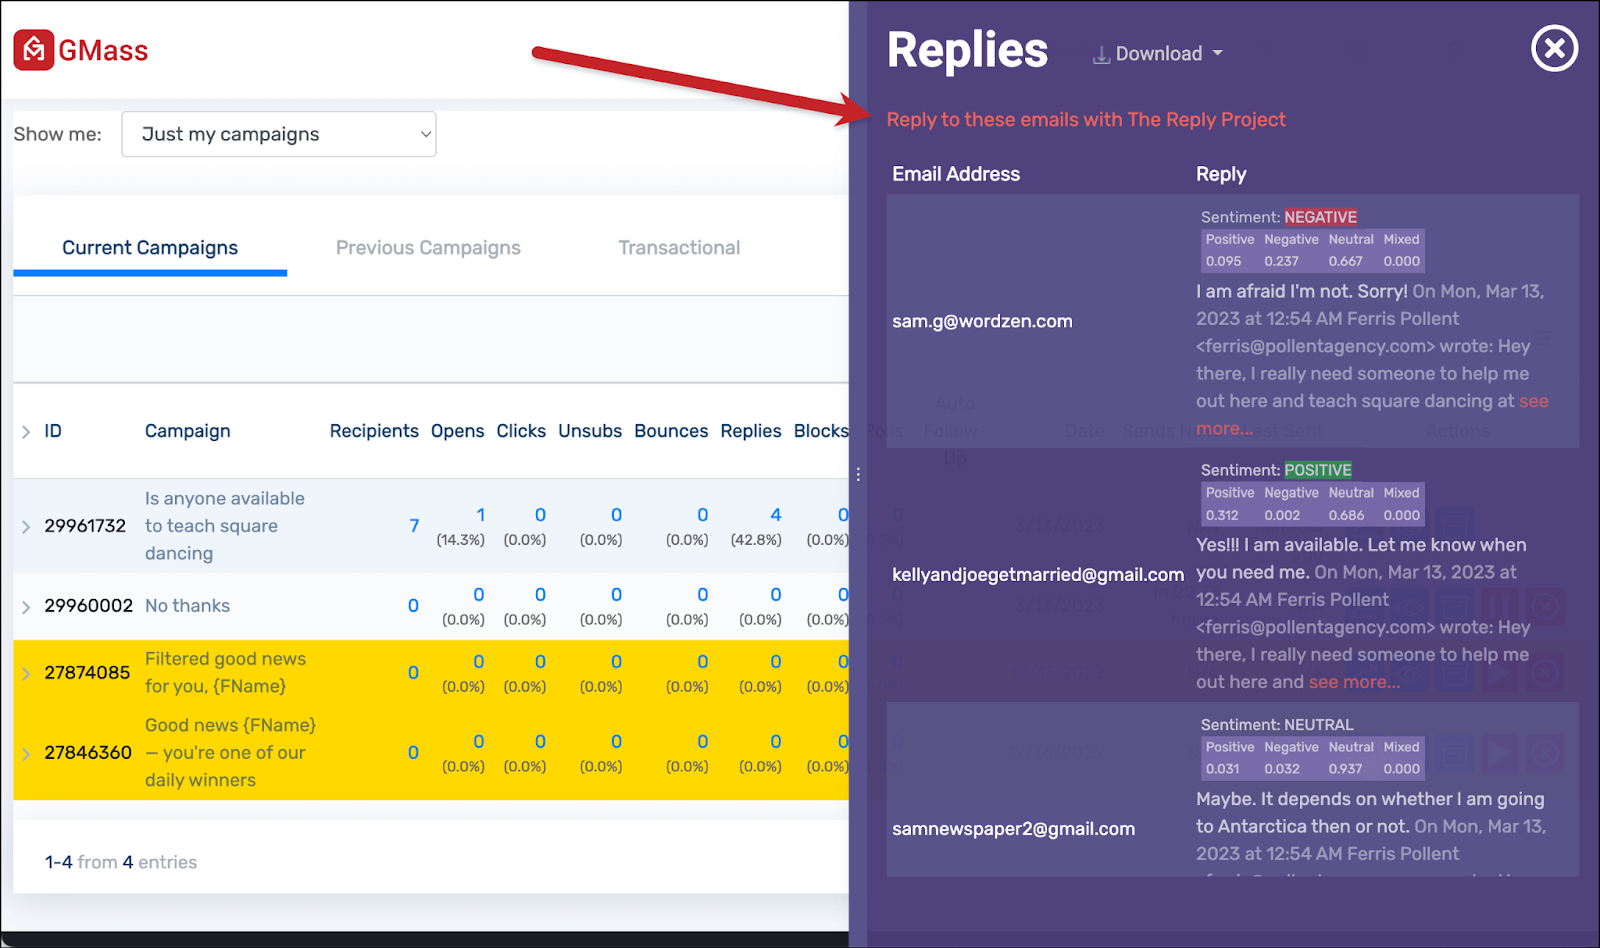
When you click on the link, The Reply Project will open, showing you only the emails from your campaign. You’ll notice there’s no search bar — this isn’t the main Reply Project screen, it’s just the place where you can knock out responses to people from that specific campaign.
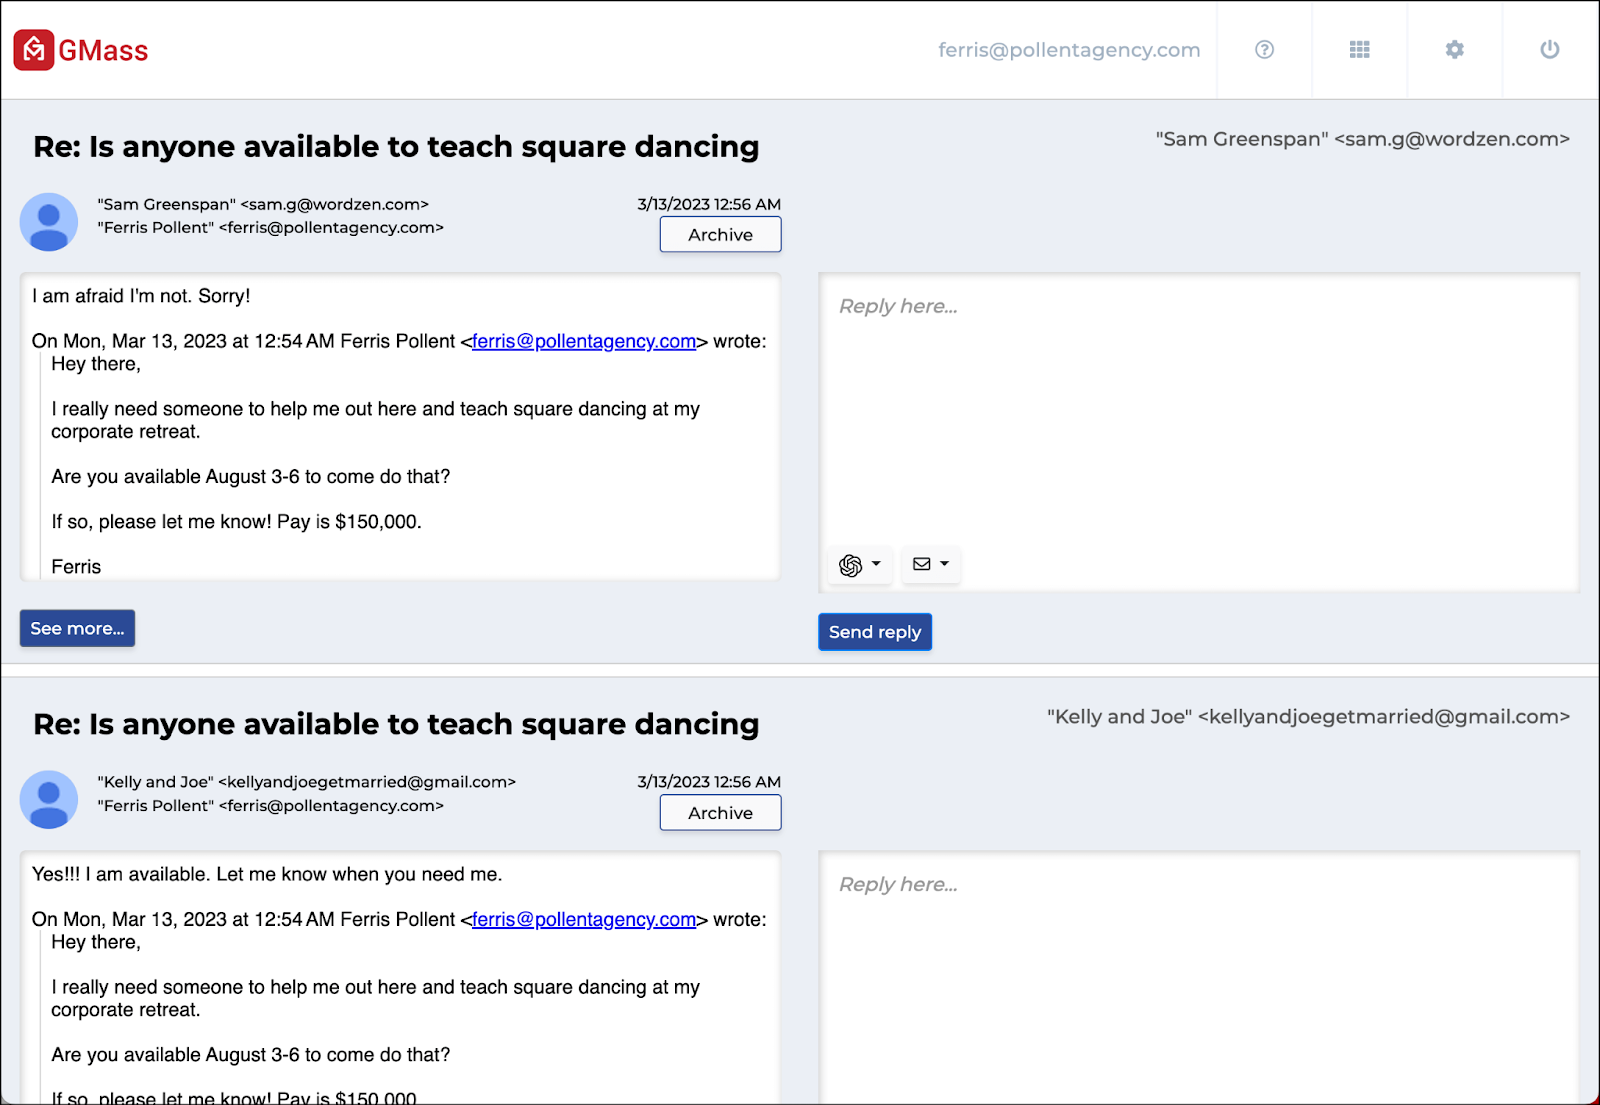
You can now write your responses, using ChatGPT or templates as needed.
The Reply Project: FAQ
How does this relate to GMass?
The Reply Project is a tool which we created here at GMass. However, it stands on its own. You do not need to be a GMass user (free or paid) to use The Reply Project.
The Reply Project is baked into GMass, however. It replaces the function called The Gate, which allowed you to use reply templates for fast replies. Since The Reply Project can do that and more, it now takes the place of The Gate.
Why is there a red outline around some subject lines?
That means the most recent email in that particular thread came from you, not someone else. But… you didn’t send that reply through The Reply Project. So the red outline is a visual indicator to you that you probably don’t need to reply.
What does this cost?
The Reply Project is currently FREE to use. There’s a chance that may change one day in the future, but we’ll give you plenty of warning if that’s ever happening.
Like GMass’s other free tools (SMTP tester, Inbox, Spam, or Promotions, Email tester, Email link checker), it’s important to us here at GMass to be major contributors to the email community and to continue to always figure out ways to make email work faster, smarter, and better for you.
Can I use this to compose new emails?
No, The Reply Project is built for sending fast replies en masse. It does not have a feature to compose new emails from scratch.
Can I use this for non-Gmail or non-Google Workspace email accounts?
No, much like GMass, The Reply Project is currently Gmail only.
Time to Send Your Blazing Fast Replies with The Reply Project
The Reply Project is designed to get you through the tedious process of replying to emails as fast as possible.
- With every email open on one screen, you don’t need to click into each individual email, then click reply each time.
- ChatGPT and email templates are here to handle the response writing process for you.
- You can read, send, and archive messages all in one spot.
Pull up The Reply Project in the morning instead of Gmail and you won’t have to block out an hour of your most productive hours to focus on email anymore.
Then use The Reply Project again in the afternoon to clear the messages you received through the day.
Emails just went from taking you hours to taking you minutes.
The Reply Project is free to use. To sign up, you won’t even need to fill out a form. Just head to The Reply Project page, click the button to sign in with your Gmail account, and start flying through your replies.
GMass is the only tool for marketing emails, cold emails, and mail merge — all inside Gmail. Tons of power but easy to learn and use.
TRY GMASS FOR FREE
Download Chrome extension - 30 second install!
No credit card required


HI
Gorgeous tool
Anyway to put a link in a Template?
Just put the URL in the template, and Gmail will automatically turn it into a link when the email is sent.
is there a feature to send follow up messages as well?
Sure, you can just reply to an email that you’ve already sent.
Or, if you want an automated way to do this, use the GMass extension.
is there a way to see only unread messages ?
Hi PF,
Could you clarify what you meant by only seeing unread messages? There’s an option directly in Gmail’s settings where you can set your mailbox to show unreads first if that was what you’re referring to.
Hi Ajay
I have learned this formidable GMass its really incredible and i am a first time user but managed to send 29 emals today. Thank you so much-needed.
From the Reply Project dashboard, users can reply to emails individually or in bulk. To reply to an individual email, users simply need to click on the email and then type their reply in the text box. To reply to multiple emails in bulk, users can select the emails they want to reply to and then click on the “Reply” button.
ut4qp9