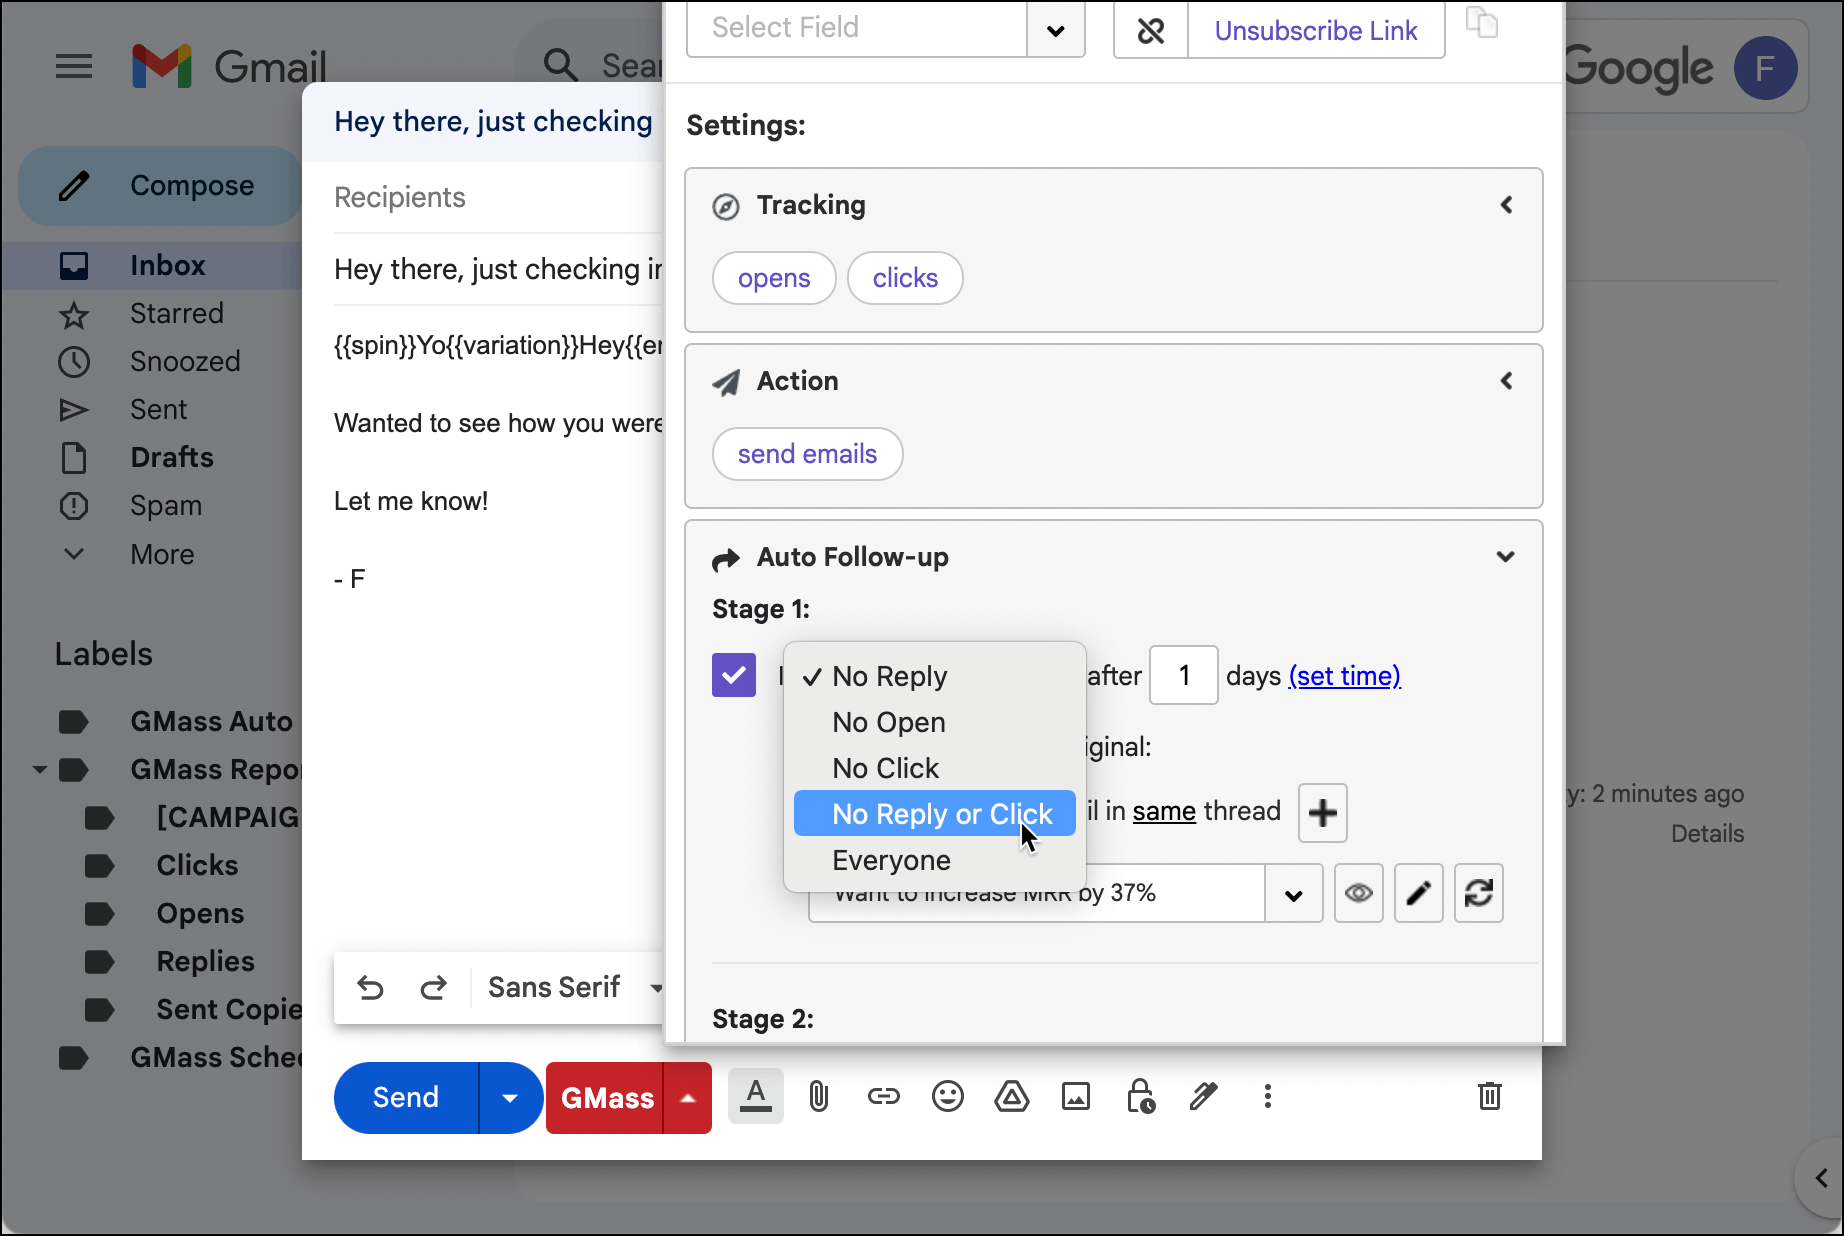
Great news! GMass now offers a native “stop on reply or click” option. So you won’t need to do the more complicated workaround detailed in the old version of this article.
A few pieces of advice:
- Make sure you have click tracking on for the campaign. That’s the only way to detect clicks and, therefore, to stop replies on click.
- Make sure you use anchor links (e.g., click here for more) and not URLs (e.g., https://www.google.com). That’s because only anchor links can be tracked. Here’s more info digging deeper into that nuance of click tracking.
- If you include links in auto follow-ups and want to make sure people stop getting your sequence when they click on those links too, those auto follow-ups should be rich text, not plain text. That’s because you need to use anchor links, not URLs, for click trackability. And plain text emails don’t use HTML, which means they can’t use anchor links.
And now, you can read about the old method for stopping a sequence on reply or click, in case you want to repurpose anything from this technique.
—
You can send automated follow-up sequences in GMass where the messages will only stop once a contact replies.
You can send automated follow-up sequences in GMass where the messages will only stop once a contact clicks.
But what if you want to stop the sequence if they reply OR click?
There’s no setting in the menu for that. (Well, there wasn’t before. There is now.)
But there is a way to pull it off.
Here’s how to set up a GMass campaign so your contacts will stop receiving follow-ups after they reply or click.
Stop on Reply OR Click: Table of Contents
Approximate setup time required: 20-30 minutes
Approximate GMass skill level: Intermediate
- Automatic vs. Manual Stop on Reply or Click
- Step 1: Setting Up Your Google Sheet and Campaign
- Step 2: Pausing Your Real Campaign to Set Up Your Dynamic Suppression Campaign
- Step 3: Adding the Faux Campaign As a Dynamic Suppression List to Your Real Campaign
- Step 4: Unpausing and Sending Your Real Campaign
- Stopping GMass Auto Follow-Ups on a Reply OR Click: Wrapping Up
Automatic vs. Manual Stop on Reply or Click
Over the past few weeks, I’ve been working with one GMass user named Howard on this topic. (Hint: if you reach out on GMass’s Facebook group to ask how to do something interesting with GMass, I love coming up with solutions. Sometimes I even write blog posts like this if the solution we come up with might help out other GMass users.)
And while there’s a manual approach to the reply/click problem (you can individually add responders/clickers to the suppression list for the campaign) — yes, there is an automated way.
It’s a bit of a workaround, but it will get the job done after some initial setup.
It takes advantage of a few of GMass’s more advanced features, including spreadsheet connection filters and dynamic suppression lists — but don’t worry if you’ve never dabbled with those before.
In this guide, I’ll walk you through the process step-by-step. And, as a bonus, through this process, you might even develop a better understanding of those sometimes-intimidating techniques.
Let’s dive in.
Step 1: Setting Up Your Google Sheet and Campaign
To begin, set up your Google Sheet of contacts for your cold email or email marketing campaign.
Set up the Google Sheet for your campaign
Set up the Google Sheet for your campaign like you normally would, using whatever columns you need for your mail merge.
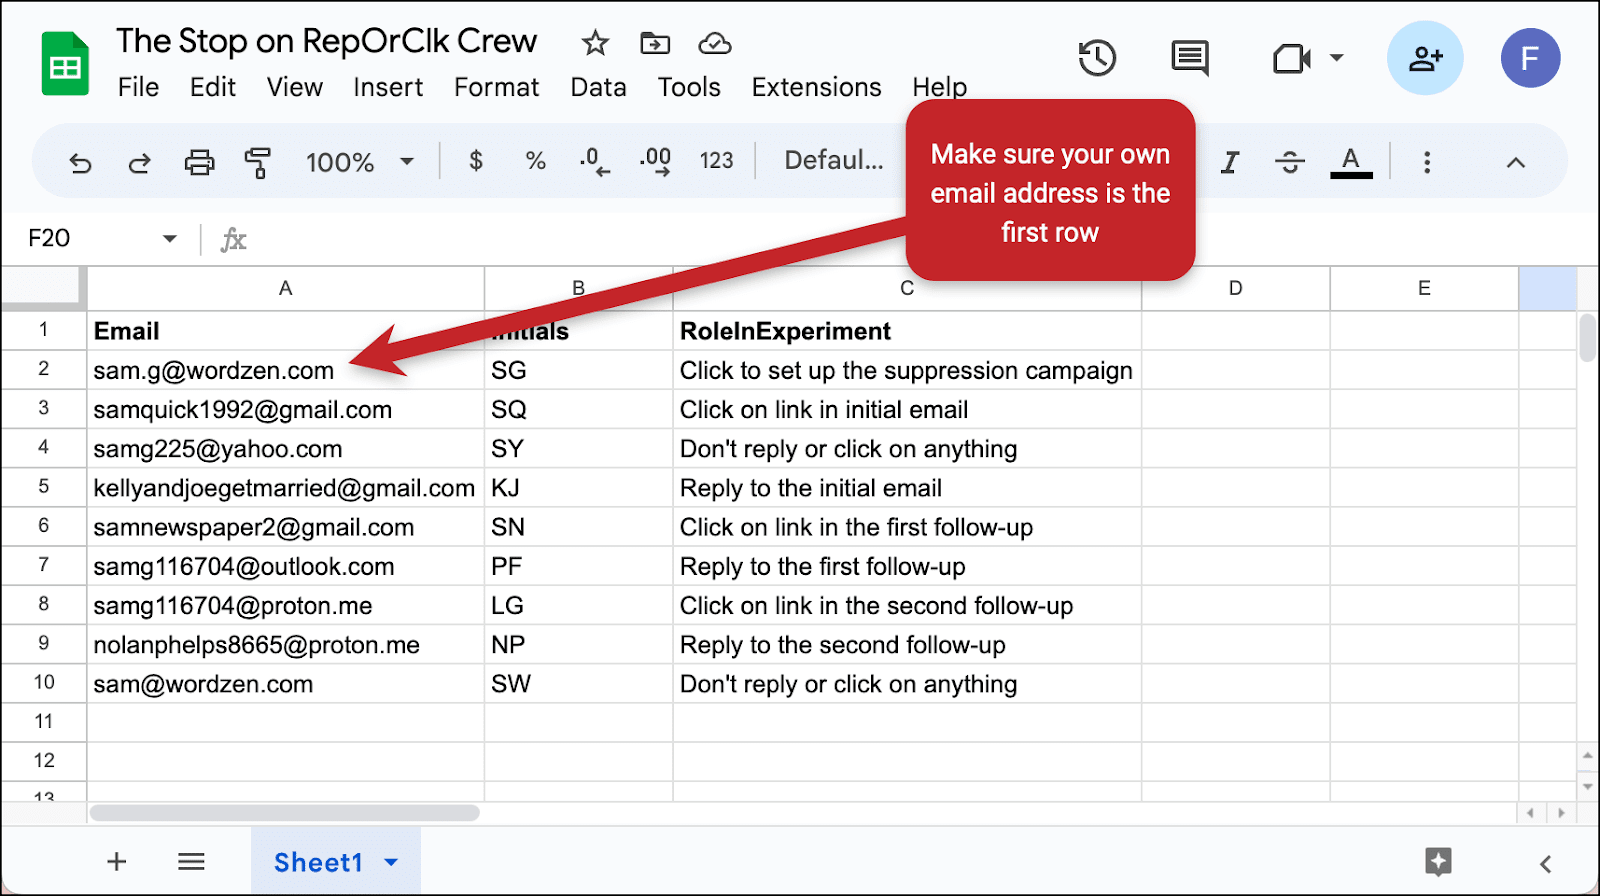
The only twist: Make one of your own email addresses the first row of the spreadsheet.
That’s because you need to be the first person to open and then click on the email. Why? So we can set up the dynamic suppression campaign with you in it.
Connect the Google Sheet to a new campaign
Go into Gmail and click the spreadsheet button next to the Gmail search bar.

Select your campaign spreadsheet.
Open the Optional Settings and make sure to check the box for Update Sheet with reporting data.
GMass must write data to your Google Sheet for this technique to work.
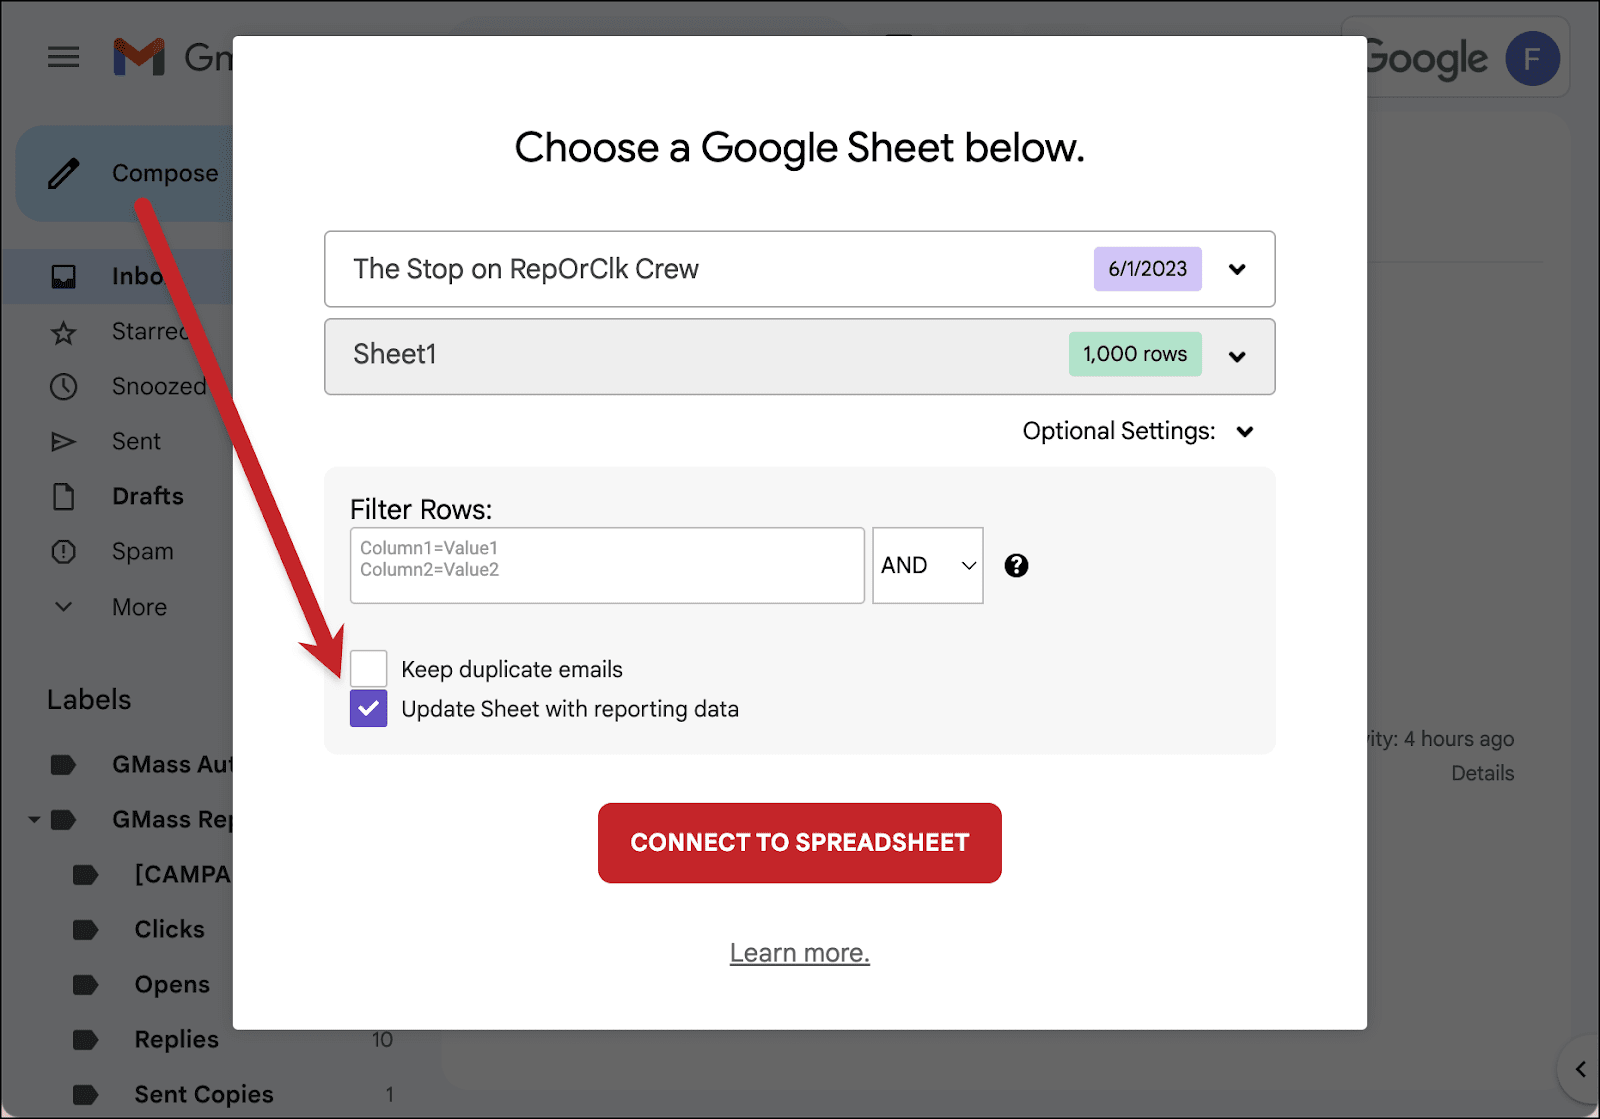
Now click the Connect to Spreadsheet button.
Create your initial campaign
Compose the first email in your campaign in the box.
Since we’re segmenting on a reply OR click, you’ll need a trackable link somewhere in this email.
A trackable link means hyperlinked text (e.g., click here) and not just URLs (e.g., https://www.google.com).
Why? GMass will not convert standalone URLs to trackable links. That can be a deliverability red flag; Gmail doesn’t like it when you display a URL but it first links somewhere else, even a tracking URL that ultimately redirects to the URL displayed.
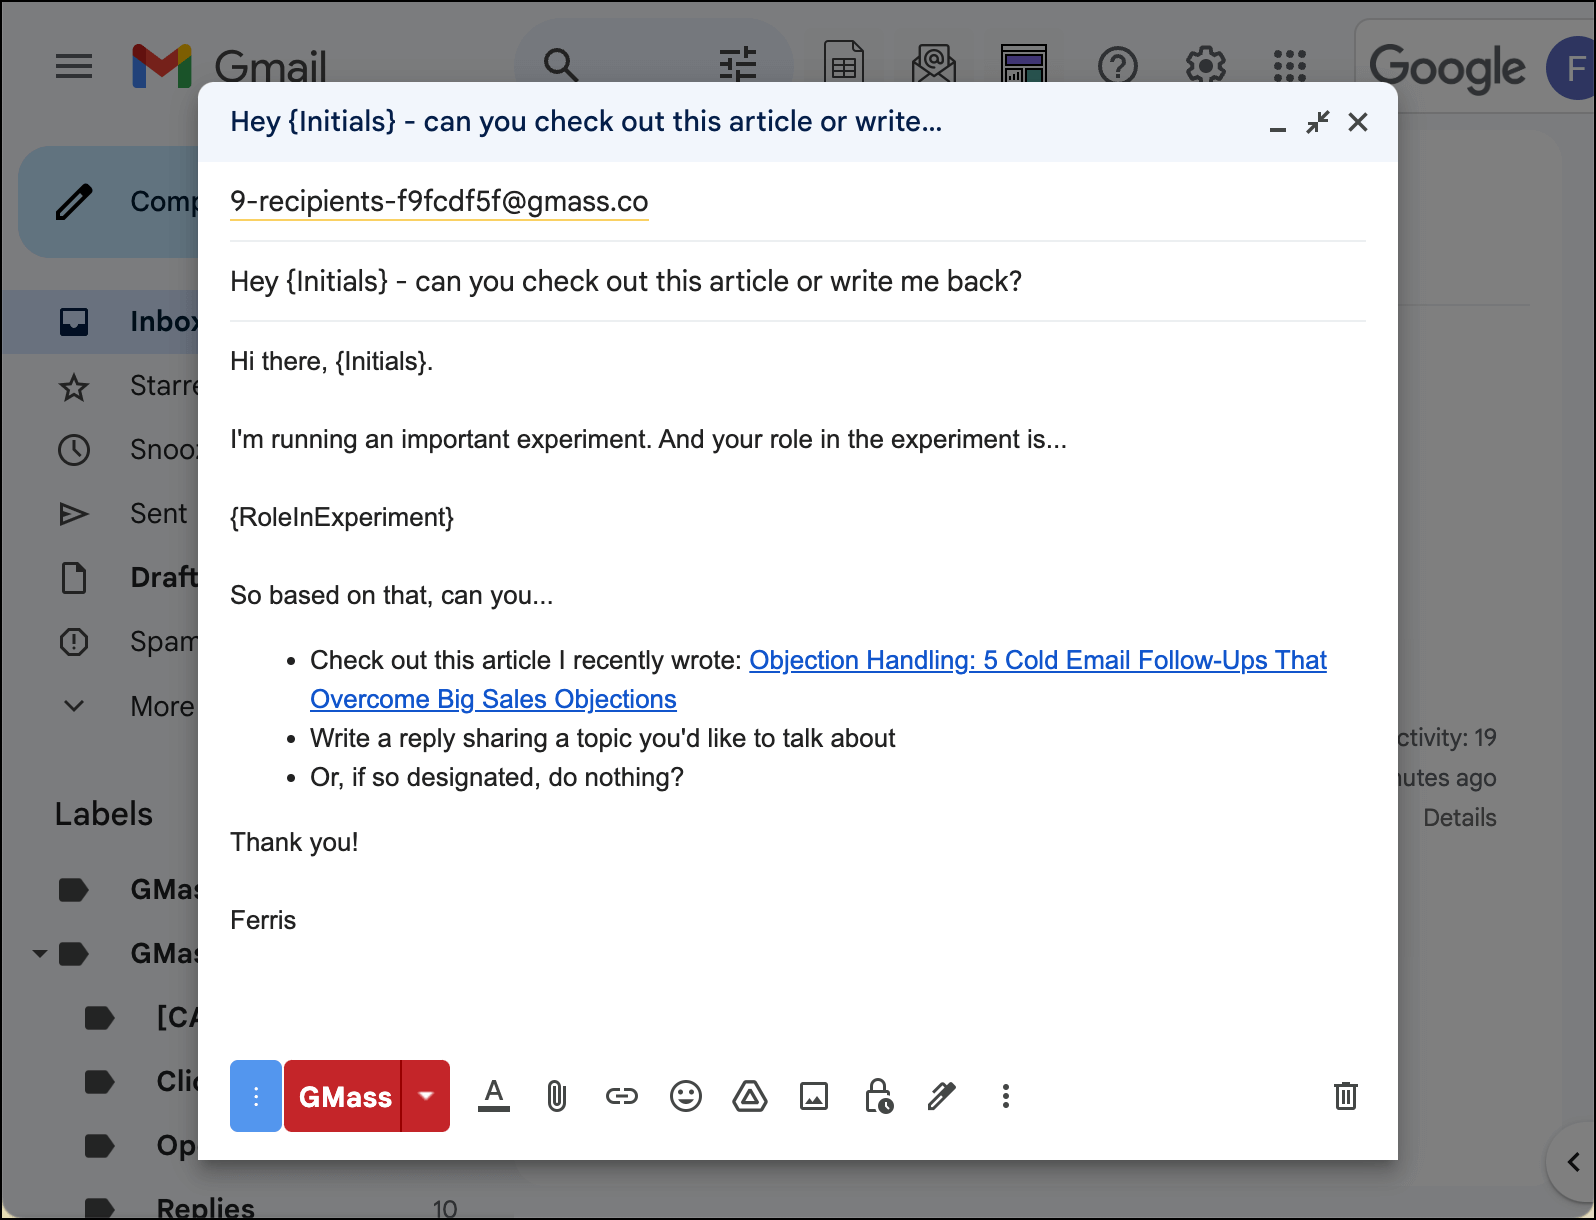
Now we need to make sure all the settings are correct for this campaign.
Open the GMass settings by clicking the arrow next to the GMass button.
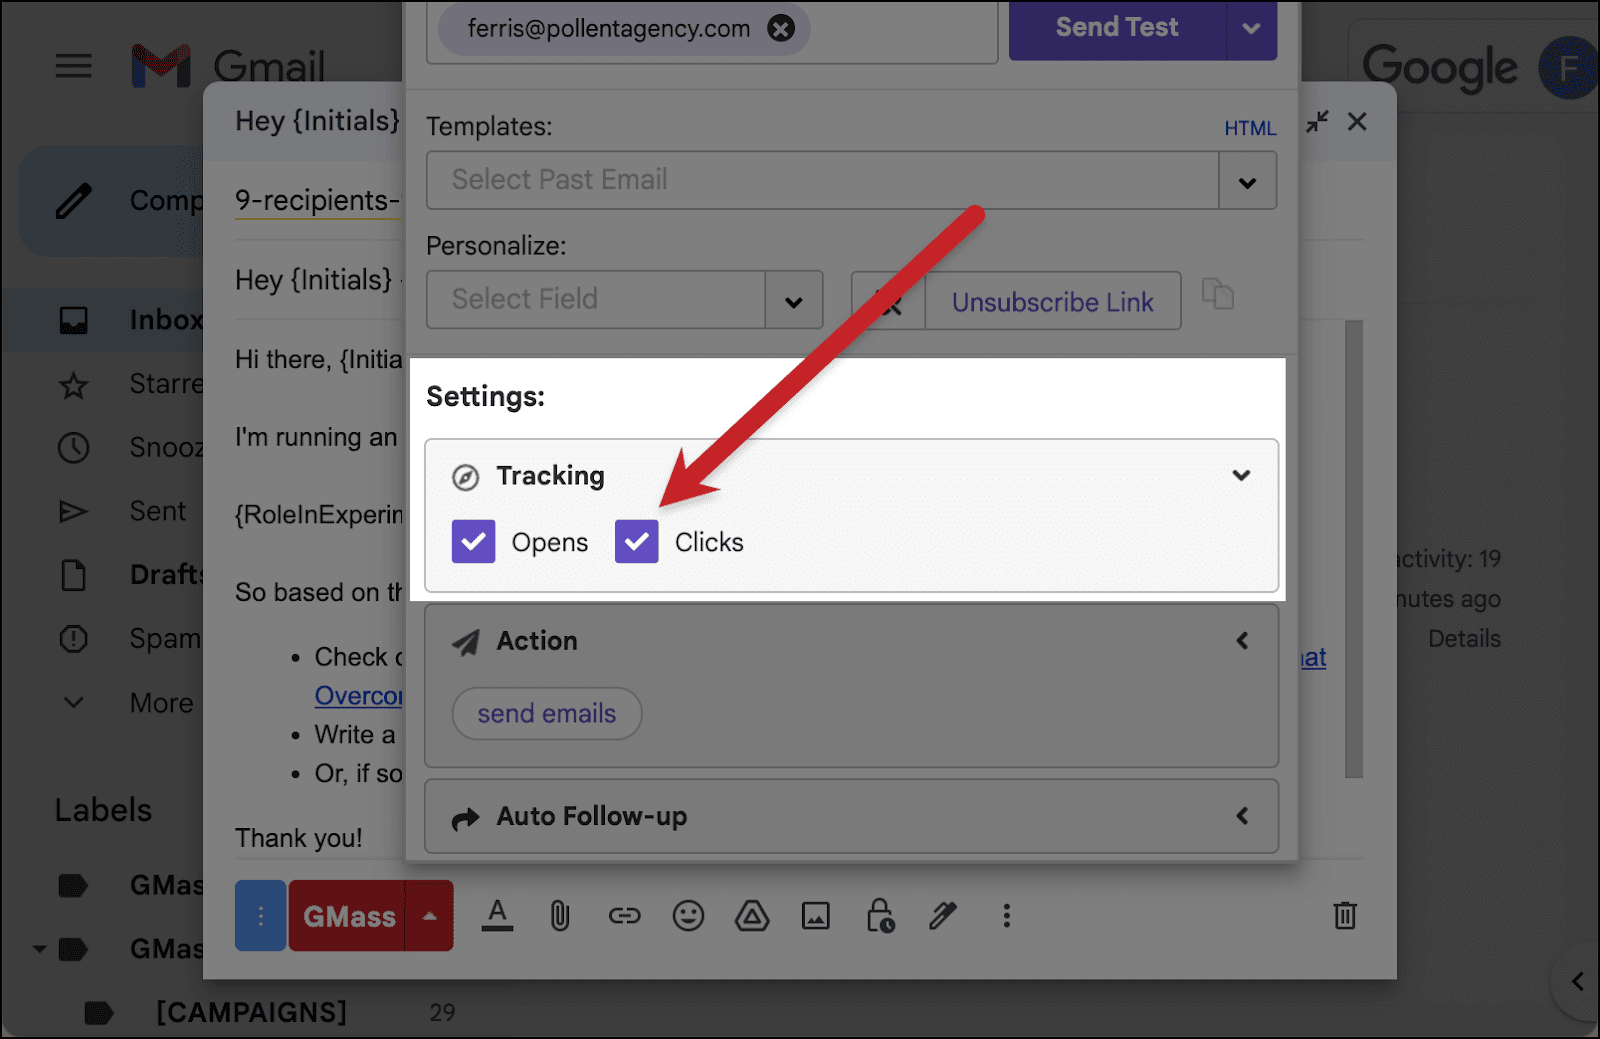
In the Tracking section, make sure click tracking is checked. Open tracking is optional here, but click tracking is required. (After all, since we’re ending the sequence on a reply or click… we have to track whether someone clicks.)
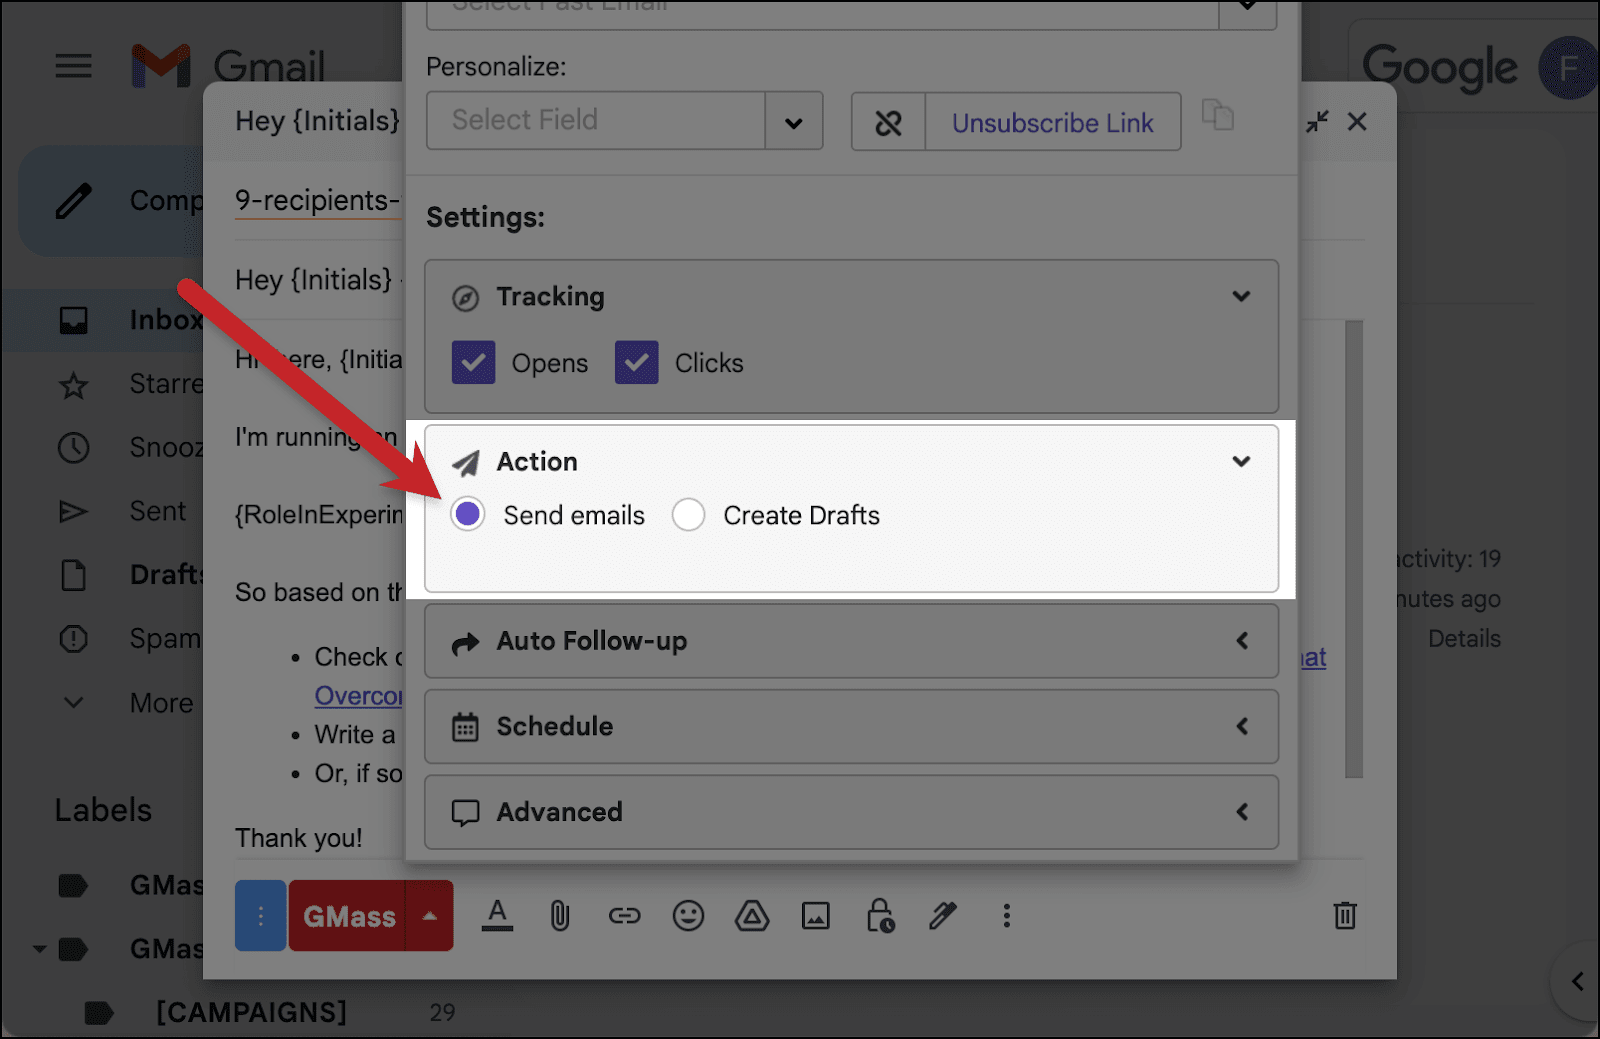
For Action, make sure you’ve set the campaign to Send emails and not Create Drafts.
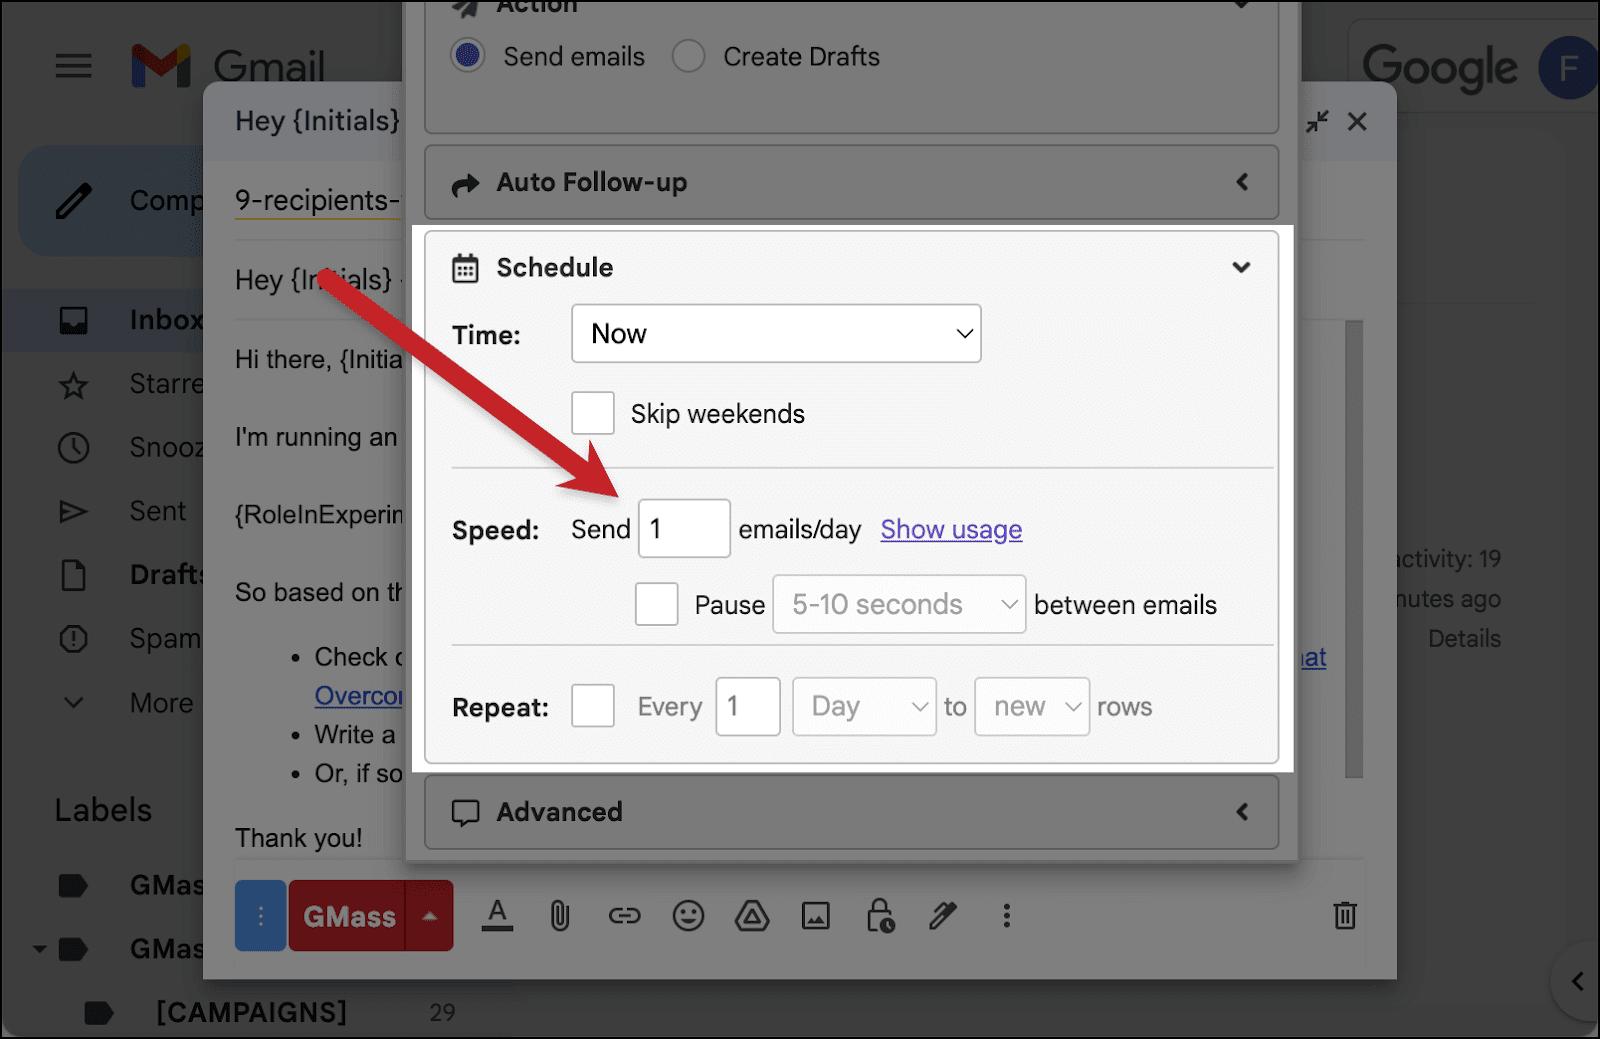
In the Schedule section, for this initial step, set the Speed to 1 email/day.
(We only want to send one email on our first send, that email to your own address. We’ll change this later. I promise this will all eventually make sense once you see my plan in action.)
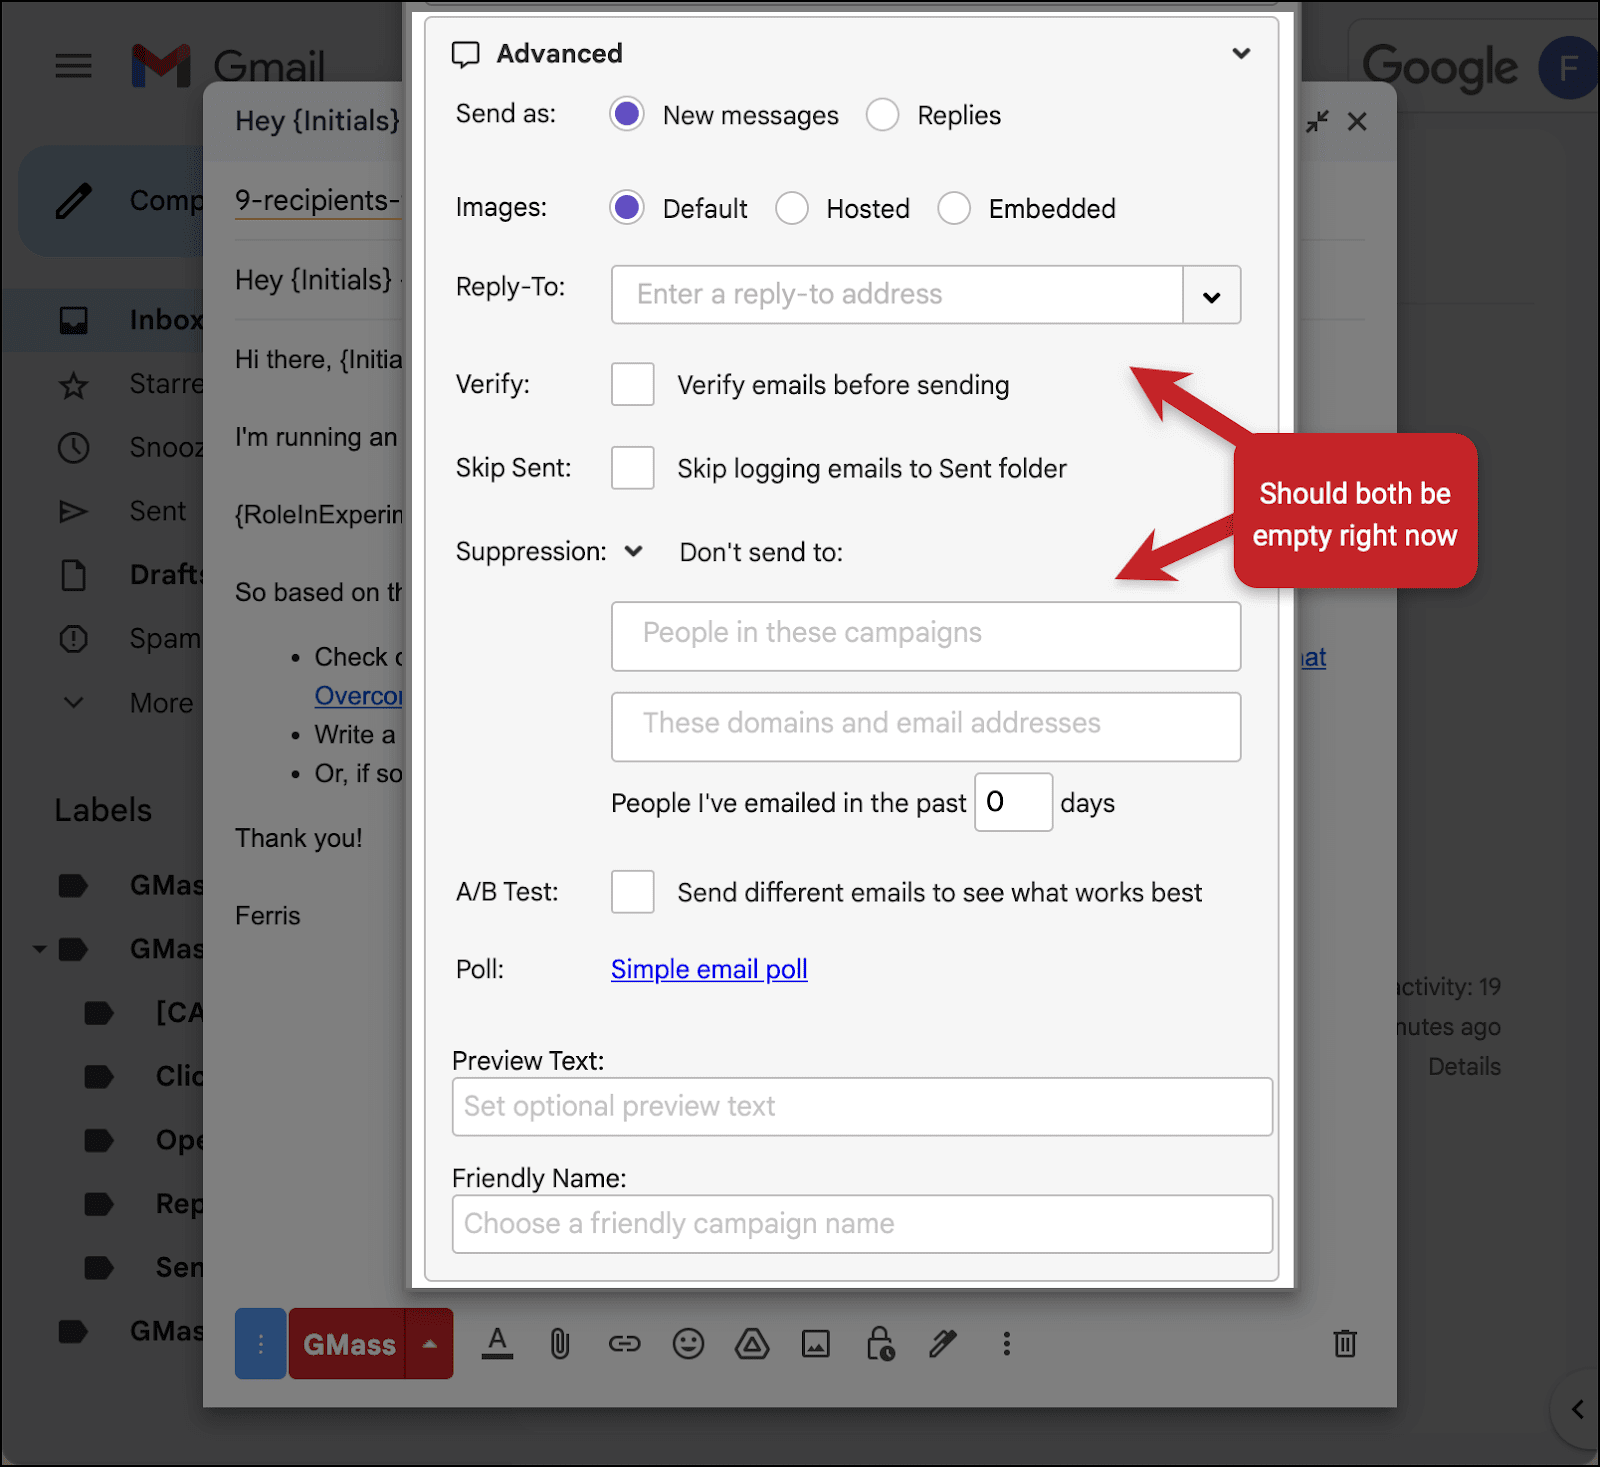
Finally, in the Advanced section, make sure not to set anything in the Reply-To field or in the Suppression section.
You’re welcome to A/B Test, set the preview text, or set a friendly name for your campaign — those won’t affect the reply/click technique one way or another.
As for email polls, you can use one — but do note that votes in your poll count as clicks. So if someone votes in the poll, with our reply-or-click technique, they’ll stop receiving your follow-ups.
Create your auto follow-ups
Now you can create the auto follow-ups for your campaign in the Auto Follow-up section of the GMass settings box.
You can set up as many stages of auto follow-ups as you want.
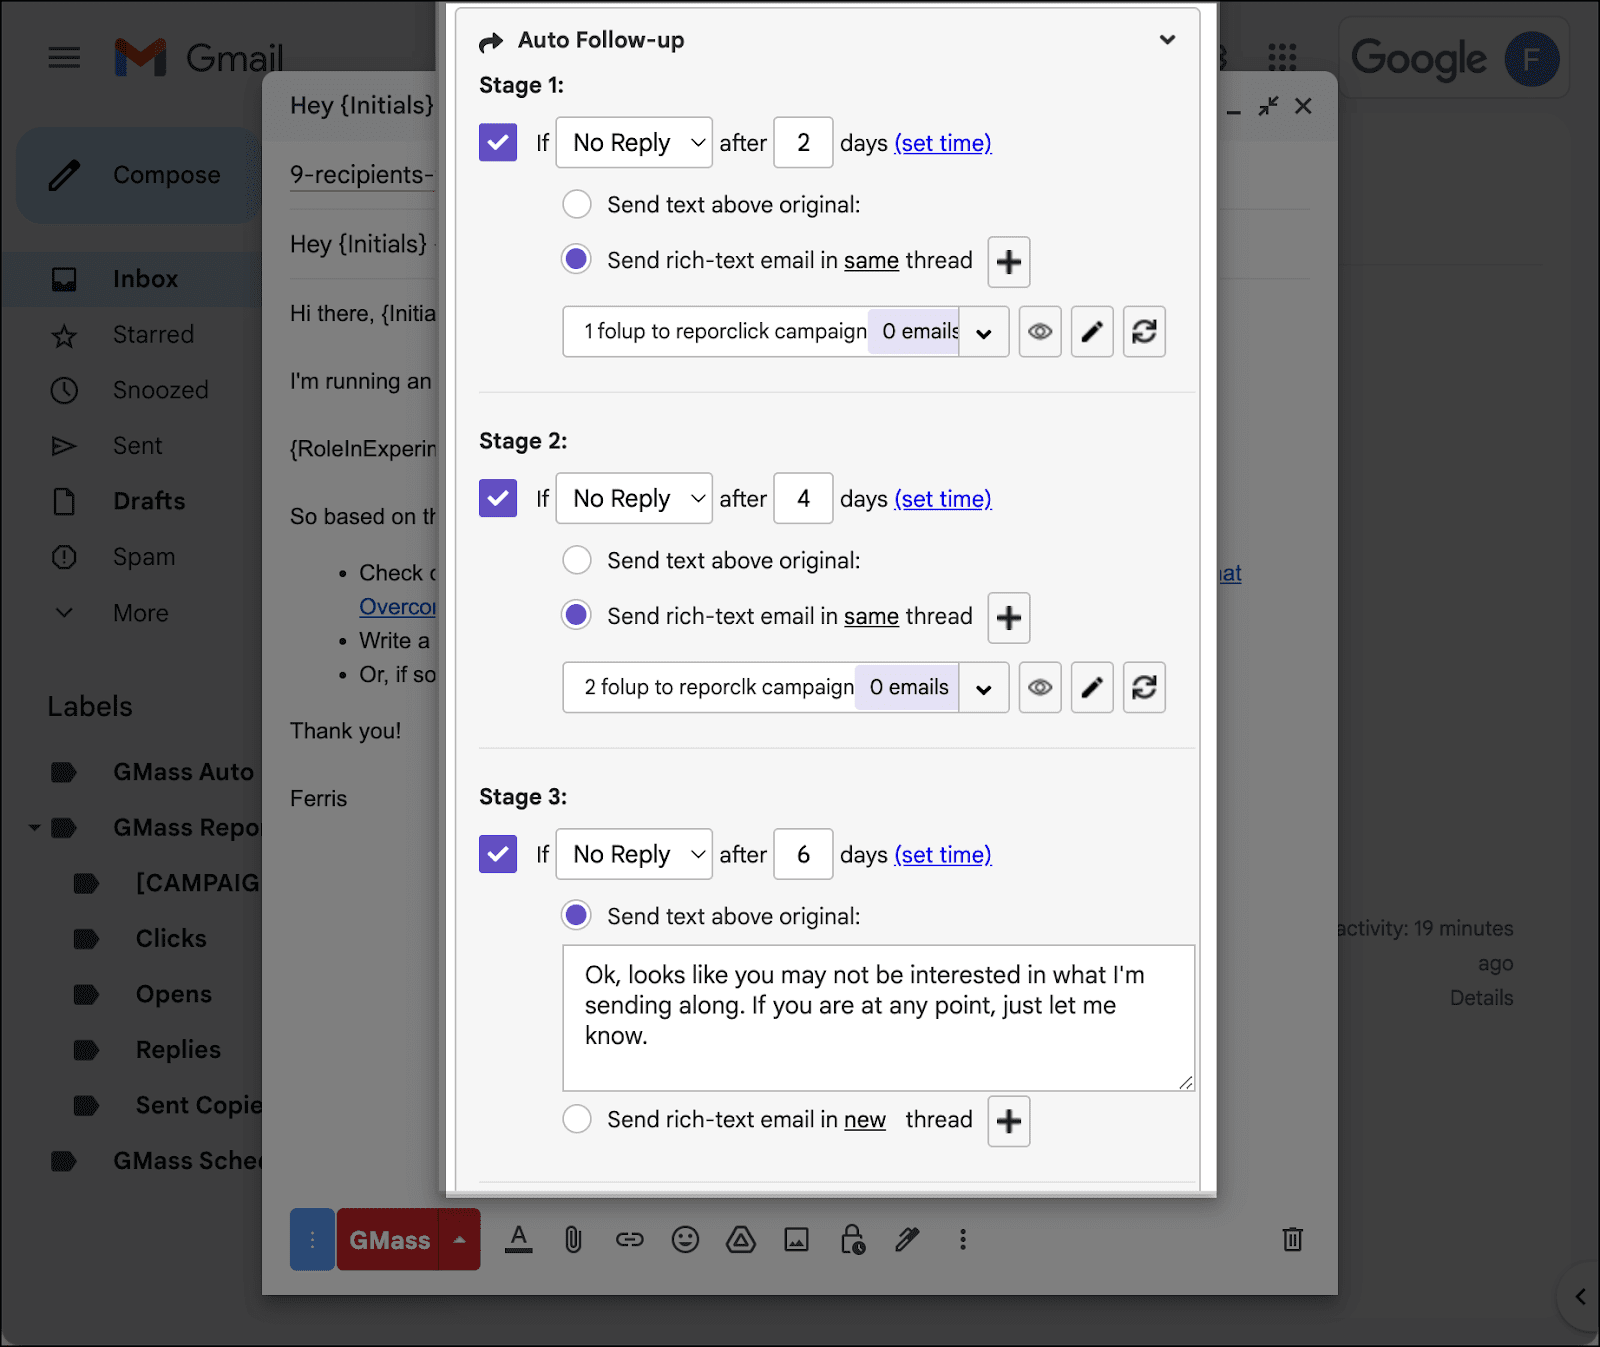
Important: Make sure your auto follow-ups are set to continue If No Reply. The suppression list we’re going to create in the next section is going to take care of removing people who click on the sequence. Your choice of No Reply here will take care of removing the people who respond.
Why did I choose this way? Why not have everyone pick No Click for the follow-ups and have the suppression list remove people who reply?
I made my choice because of how GMass processes clicks versus replies. GMass processes clicks instantly; it takes a bit longer for GMass to process replies because it needs to do some extra stuff (like verifying the replies are real and not auto responders, making sure domains match, and more). So it’s more efficient during the setup process here to dynamically suppress on clicks and let GMass “think” about replies. If I’d suppressed on replies, you’d have to take a pause during this setup process that might last several hours.
Also important: You should use rich-text follow-ups, not plain text. That way, the links can use HTML code, which allows for click tracking. We need click tracking to be able to remove people who clicked from the rest of the follow-up sequence.
Just make sure that, again, you’re using hyperlinked text (e.g., Google) and not hyperlinks (e.g., https://www.google.com).
For this sequence, my first two automated follow-ups are both rich-text follow-ups that contain a hyperlink.
That way, if someone clicks on a link in either one OR replies to either one, they’ll be removed from the rest of the sequence.
The final message in the sequence is plain text. I did that because in my case, I didn’t include a link and it didn’t matter if it had click tracking. Someone will only receive it if they haven’t clicked on nor replied to any message to that point.
Here’s what my auto follow-up settings look like when I’m all done.
Send the first email of the campaign to yourself
Once your messages and all your settings look good, you can initiate sending the campaign.
Remember, since you capped the send at one email per day, you’ll only send to the first row on the spreadsheet: yourself.
So double check all the settings, then hit the red GMass button to begin the campaign and send the first message to yourself.
Step 2: Pausing Your Real Campaign to Set Up Your Dynamic Suppression Campaign
Now that the first email has gone to you, it’s time to set up your dynamic suppression campaign.
Pause your campaign
We’re going to pause your campaign while we set up the suppression campaign (and then make some key changes to the campaign settings).
After GMass sends the first email from the campaign to your address, open the campaign in the Gmail Drafts folder. Open the settings for the campaign, then click on the yellow Pause Campaign button.
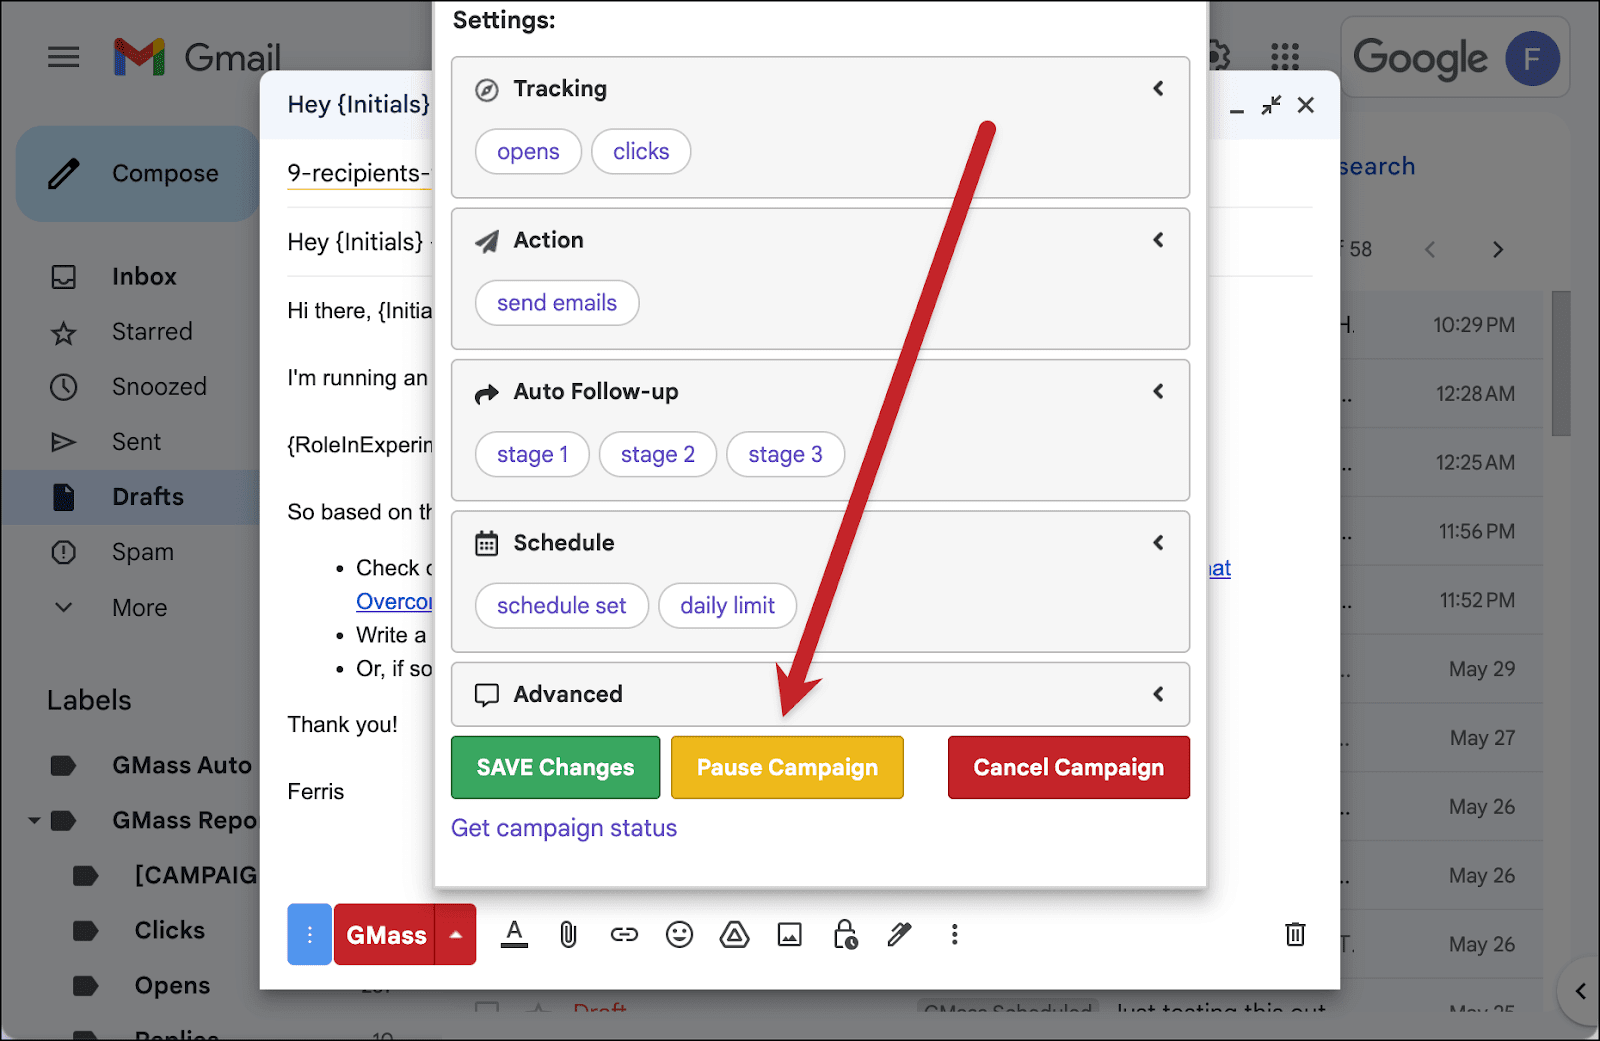
Select Pause campaign and pause auto follow-ups.
Open and click on the campaign
Head over to your inbox (wherever you sent the first email from the campaign).
If you’re using GMass’s Tracker Blocker extension to prevent yourself from triggering open pixels, make sure it’s turned Off. Today, we want to trigger our own pixels.

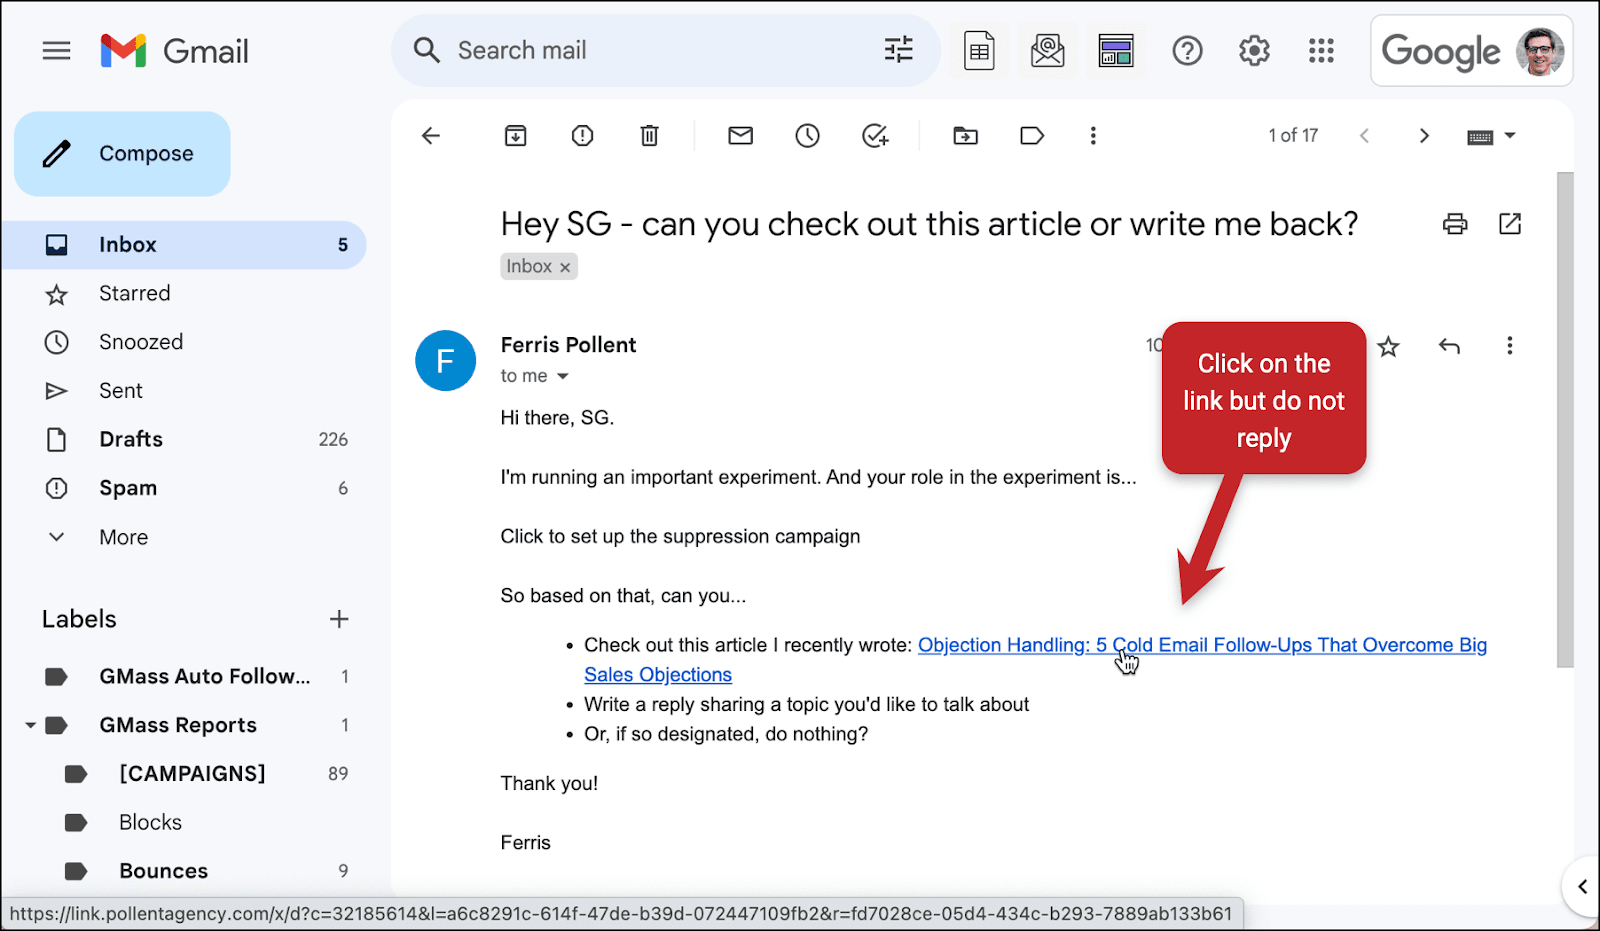
Now you can open the email you sent yourself. Click on the link in the email but do not reply. (Not to distract from the mission at hand, but… notice I’m using my own custom tracking domain. It’s a great way to help your deliverability — make sure to set one up if you haven’t already.)
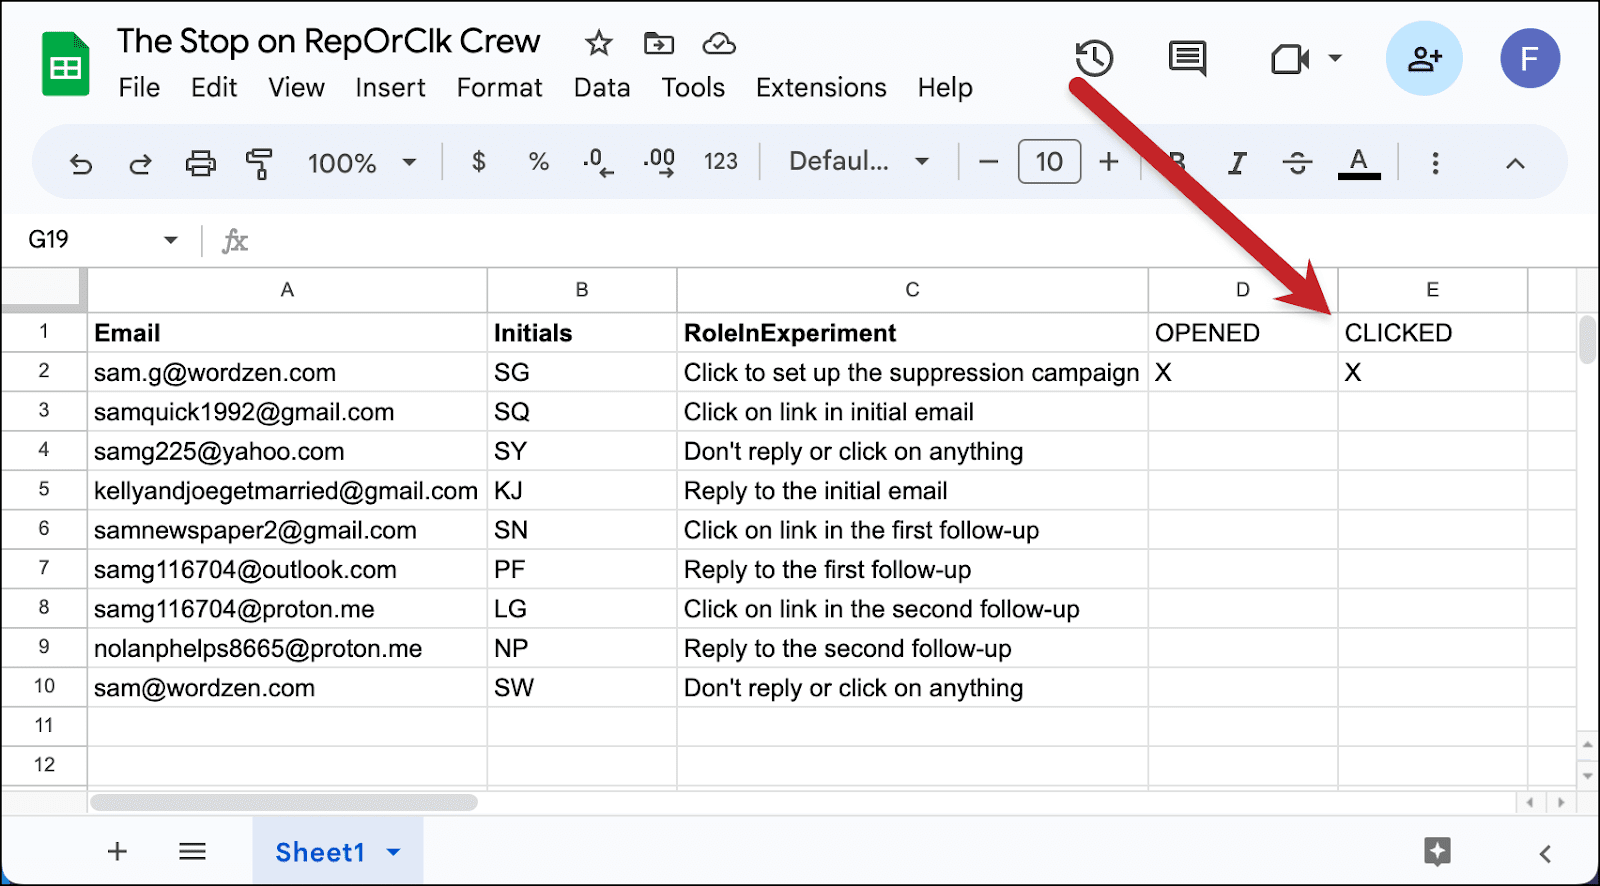
Go into the Google Sheet for your campaign. You’ll see that GMass has added two new columns to your sheet, one called OPENED and one called CLICKED. And the row with your email address has an X in both of those columns.
As I said at the beginning of this article, the way to manually stop people from receiving follow-up messages to a campaign is by adding them to the suppression list for that campaign.
And one of your suppression list options is suppressing emails to everyone who’s in another campaign.
So what we’re going to do is enter everyone who clicks into a faux campaign, and use that as the suppression list.
It’s a faux campaign because we’re not actually going to send them anything, we’re just going to create drafts. But that’s good enough to enter them into the campaign and, therefore, make them “eligible” for the suppression.
I told you, this is a workaround. But a cool one. You know, cool being a relative term.
Create the faux campaign
Head into your Gmail account and click the spreadsheet icon to connect to a Google Sheet.

We’re going to connect to the same Google Sheet as our real campaign — but with a few crucial changes.
We’re going to use GMass’s filtering feature here. If you’re not familiar, filtering allows you to only select certain rows of a Google Sheet when you connect, not all of them.
And we only want GMass to choose rows where someone has clicked.
So in the Filter Rows box, we’ll enter: CLICKED=X
That tells GMass to only select rows where the CLICKED column contains an X.
You also need to uncheck the Update Sheet with reporting data box. It will cause issues if this faux campaign is also trying to update the data.
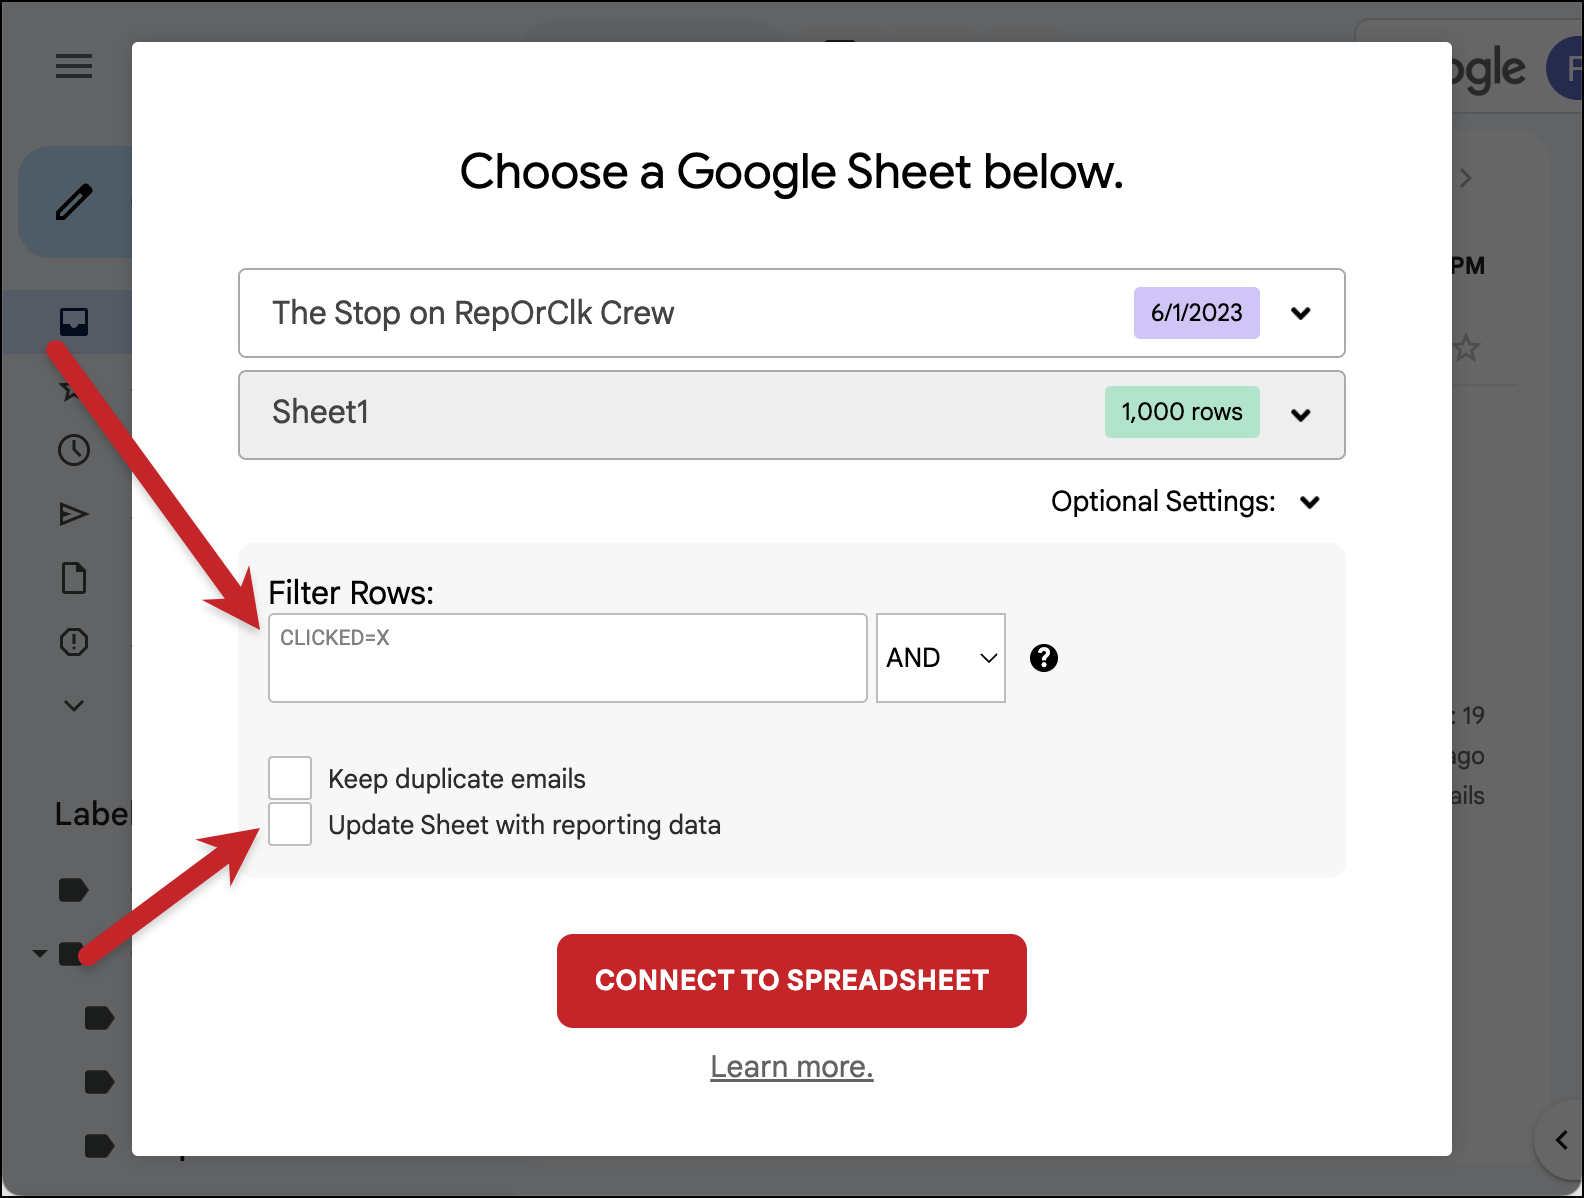
Now click the Connect to Spreadsheet button.
When the compose window opens, GMass should find only one matching row based on the filtering criteria — your own email, as it’s the only row with an X in the CLICKED column.
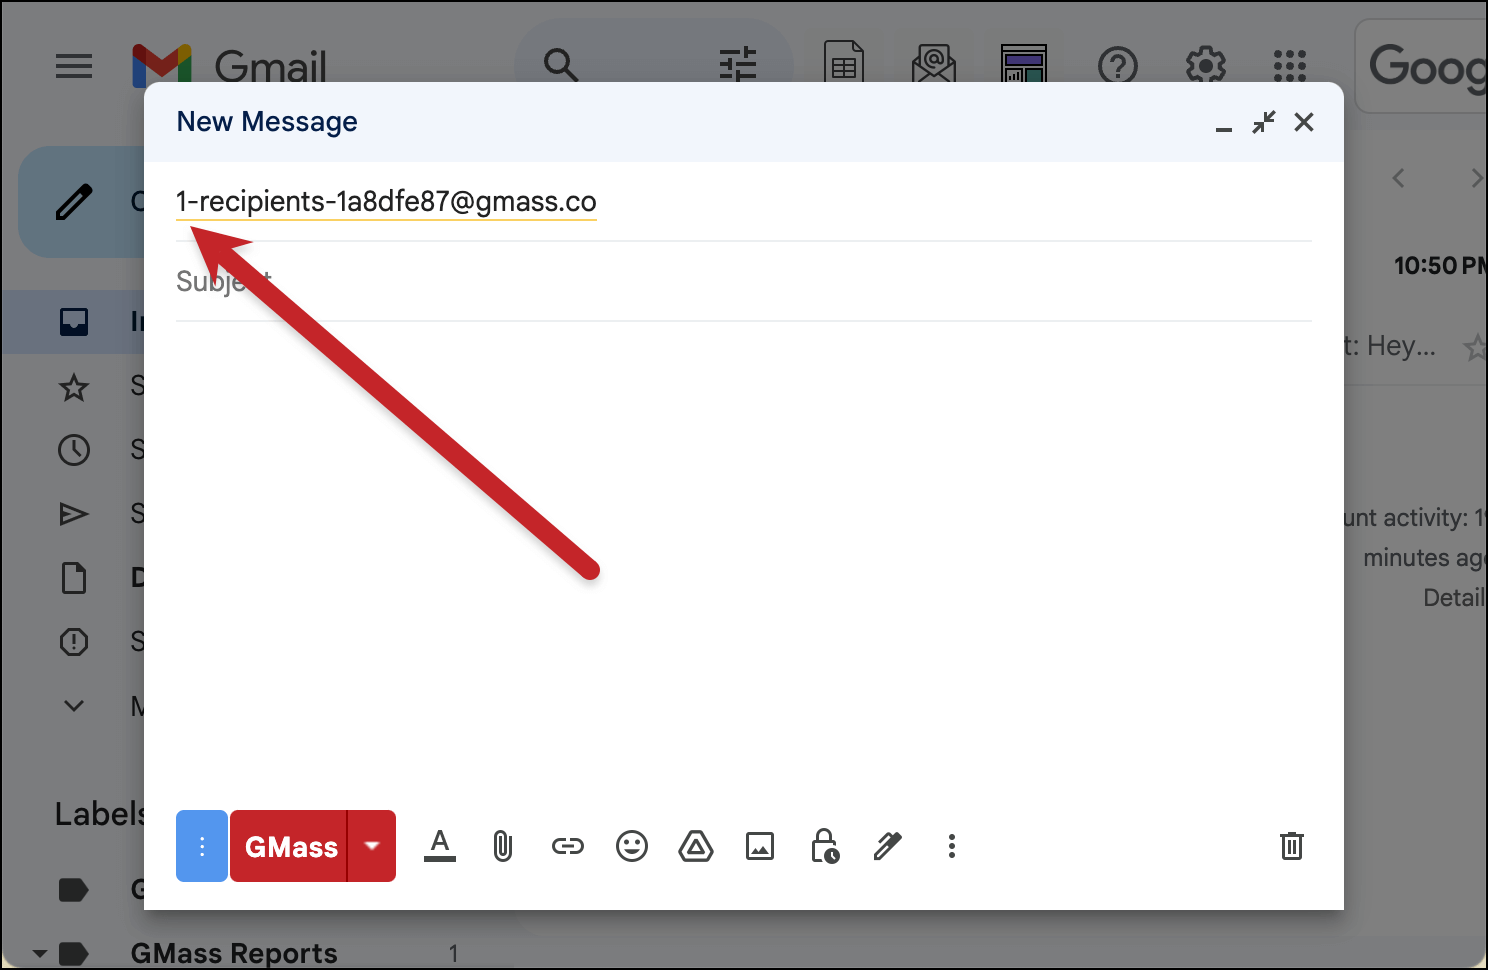
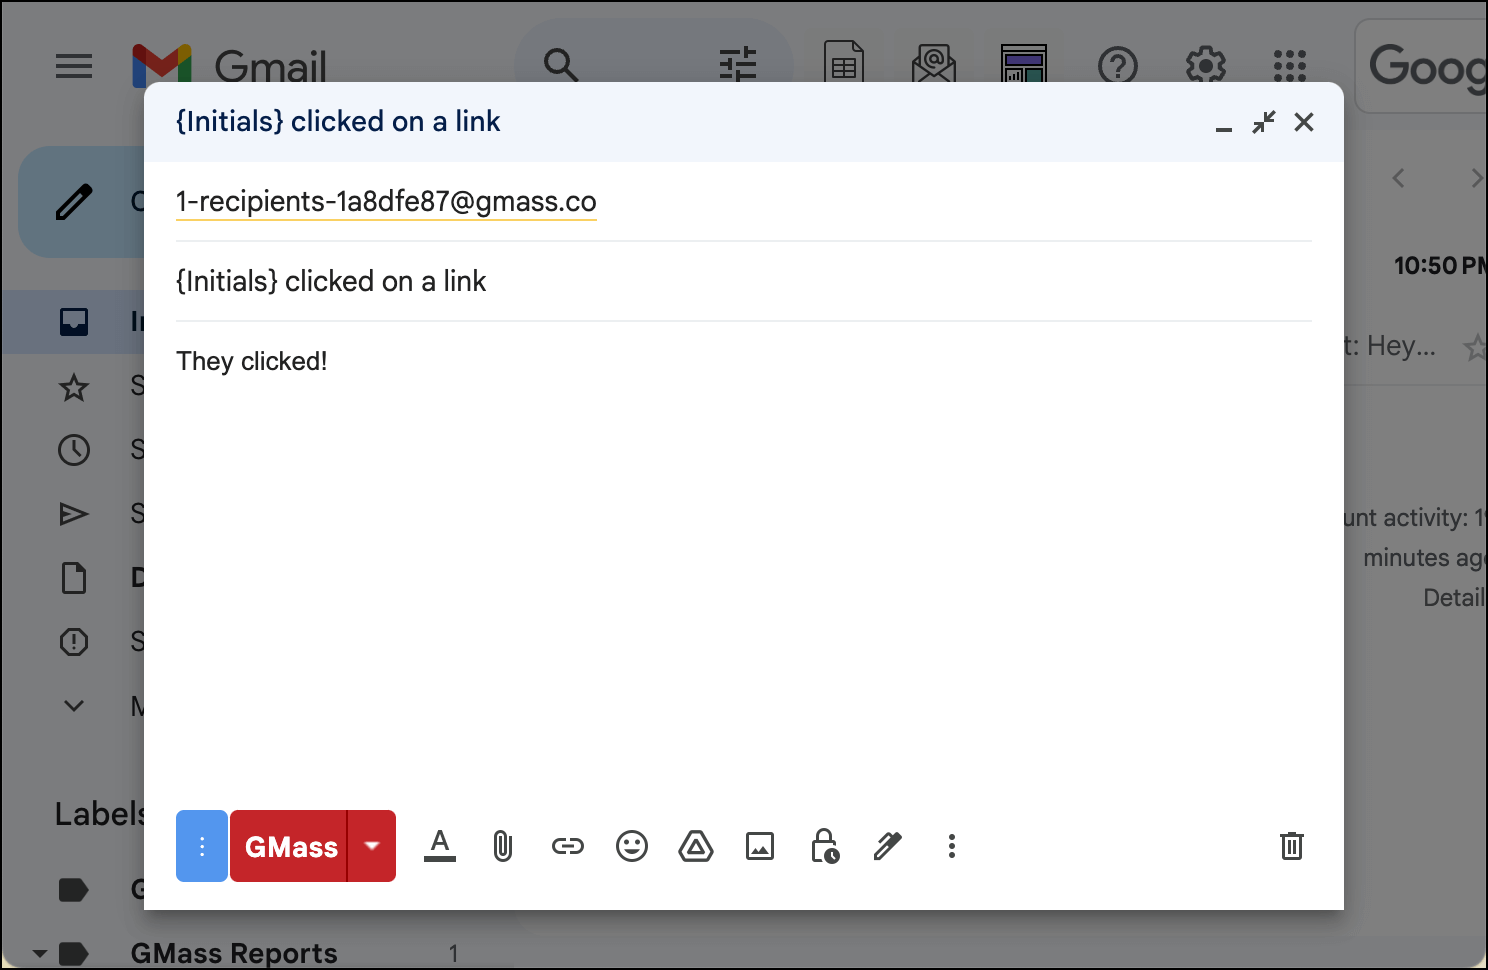
Now compose an email. Don’t worry, none of your contacts will ever see it, only you will. So I’m just going to throw something informative in here for my own internal use.
Set the faux campaign draft, schedule, and recurrence settings
Open the GMass settings for the faux campaign.
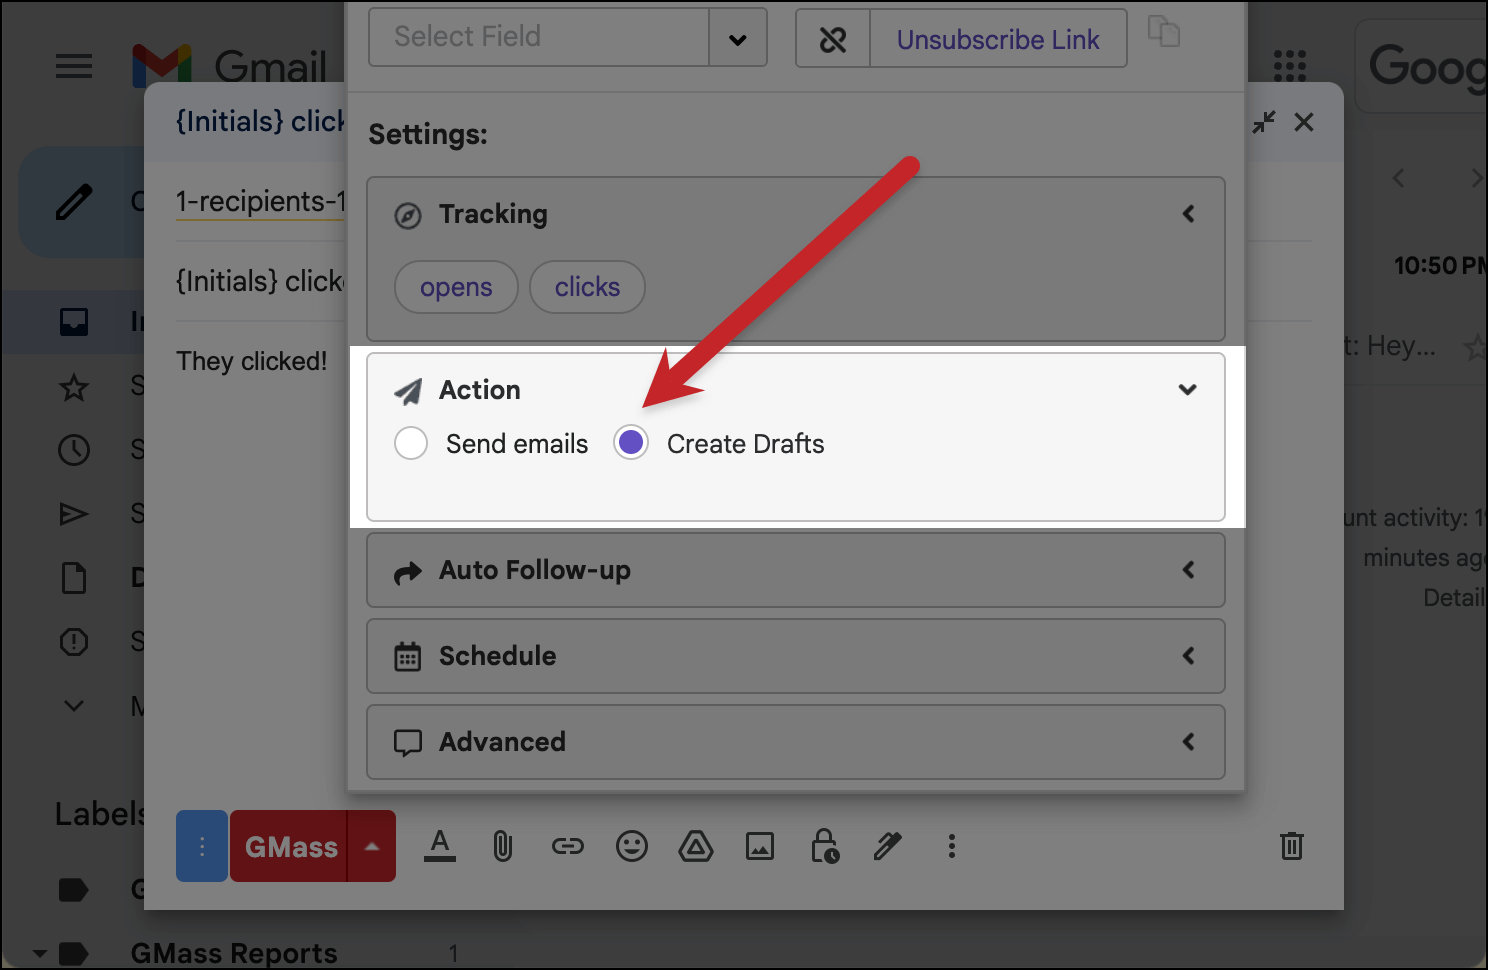
Crucial: Action must be set to Create Drafts. We never want these emails to go out. We want to get the email addresses into the campaign by creating drafts, but don’t want the emails to actually go to them.
Now we need to set the recurrence.
We’re going to use GMass’s recurring campaign feature here to regularly check the Google Sheet for new Xs in the CLICKED column — and when it finds a new one, it will create a new draft to the email of the person in that row, which enters them into the faux campaign. That will then suppress the follow-ups from the real campaign.
It’s up to you how frequently you want this campaign to recur. GMass can run it as frequently as hourly. You may want to go with that frequency to eliminate as much risk as possible of someone clicking on a link but not being removed from the auto follow-up sequence. It’s your call!
However, if your auto follow-ups are several days apart, the odds of someone finally clicking the link right before the next follow-up are pretty slim. So you might want to space out how frequently GMass reruns this campaign — giving your notifications a break, if nothing else.
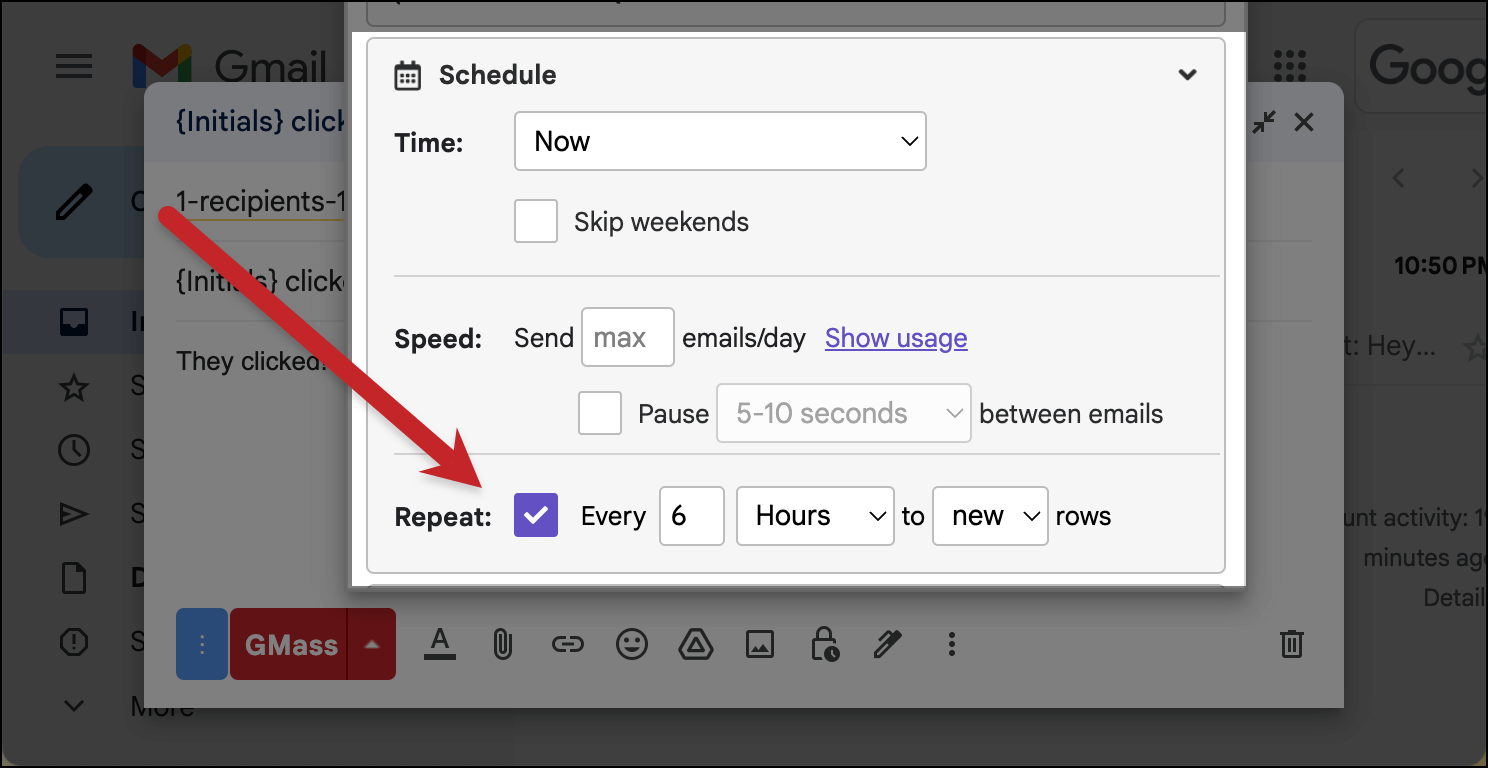
To set the recurrence, go to the Schedule section. Now check the box next to Repeat.
Choose your frequency. (I went with 6 hours for my test, but again, pick whatever works for you.)
Choose New rows from the dropdown menu. Because we used the filter, GMass will treat rows that get an X as “new” rows and add them to the campaign.
Set the faux campaign live
The faux campaign is ready to go “live.”
Click the GMass button on the campaign to get it going (and creating drafts).
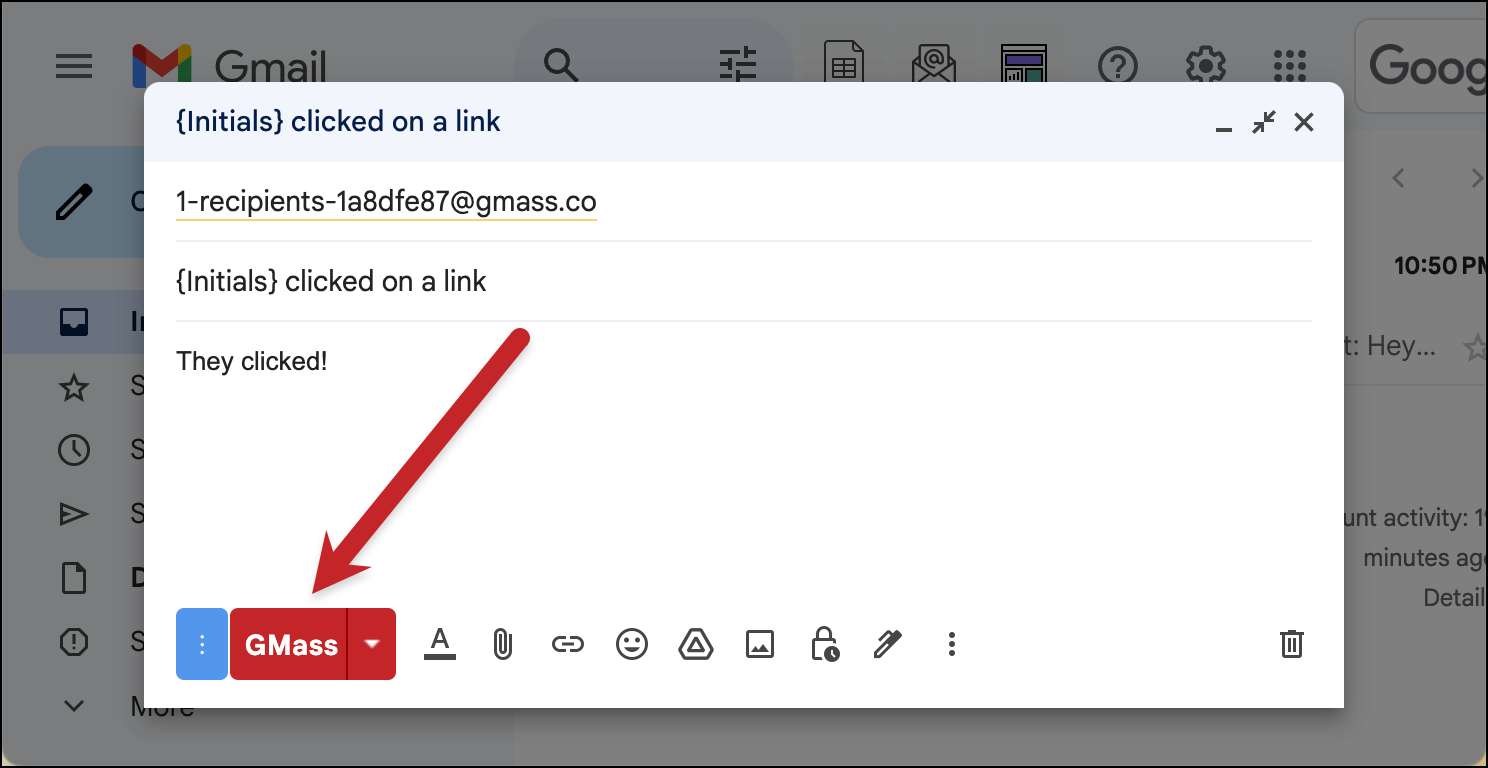
The campaign will run for the first time, creating a draft in your Gmail Drafts folder of an email to your own email address.

You’ll receive an email from GMass telling you “GMass Drafts have been created – – take action” — you should ignore (and archive) that email. You don’t want to send the drafts and you don’t want to delete the drafts. You just want the drafts to sit in the Drafts folder peacefully.
Step 3: Adding the Faux Campaign As a Dynamic Suppression List to Your Real Campaign
Now we get to the big moment. We’ve created a recurring faux campaign that will automatically include everyone who clicks on your real campaign.
Time to make that into a suppression list.
In the Gmail Drafts folder, open the draft of your real campaign. (The one we paused earlier.)
Now open the GMass settings for the campaign and go to the Advanced section. There, open up the Suppression area.
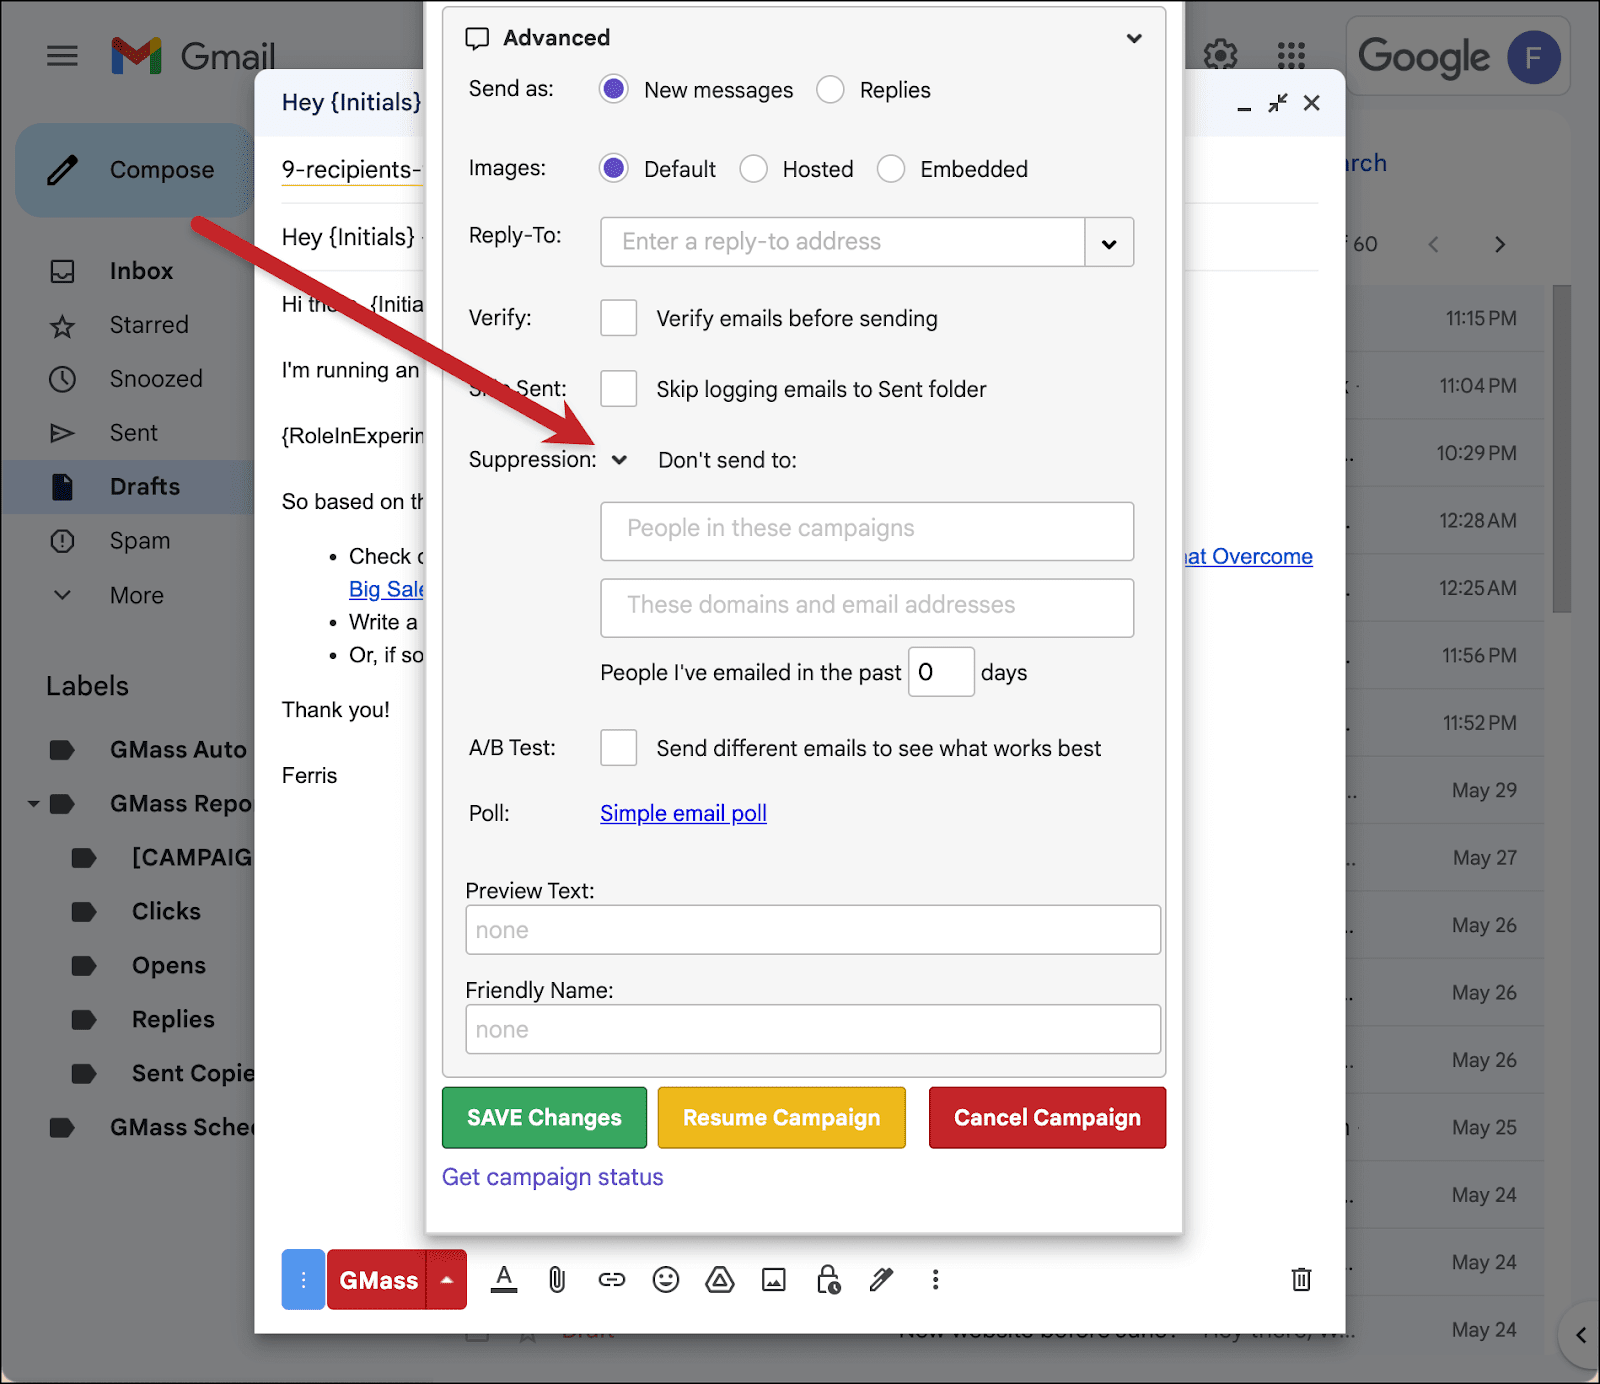
Click into the People in these campaigns field. A dropdown menu will appear showing a list of your GMass campaigns, ordered from most recent to least.
Choose your faux campaign from that list.
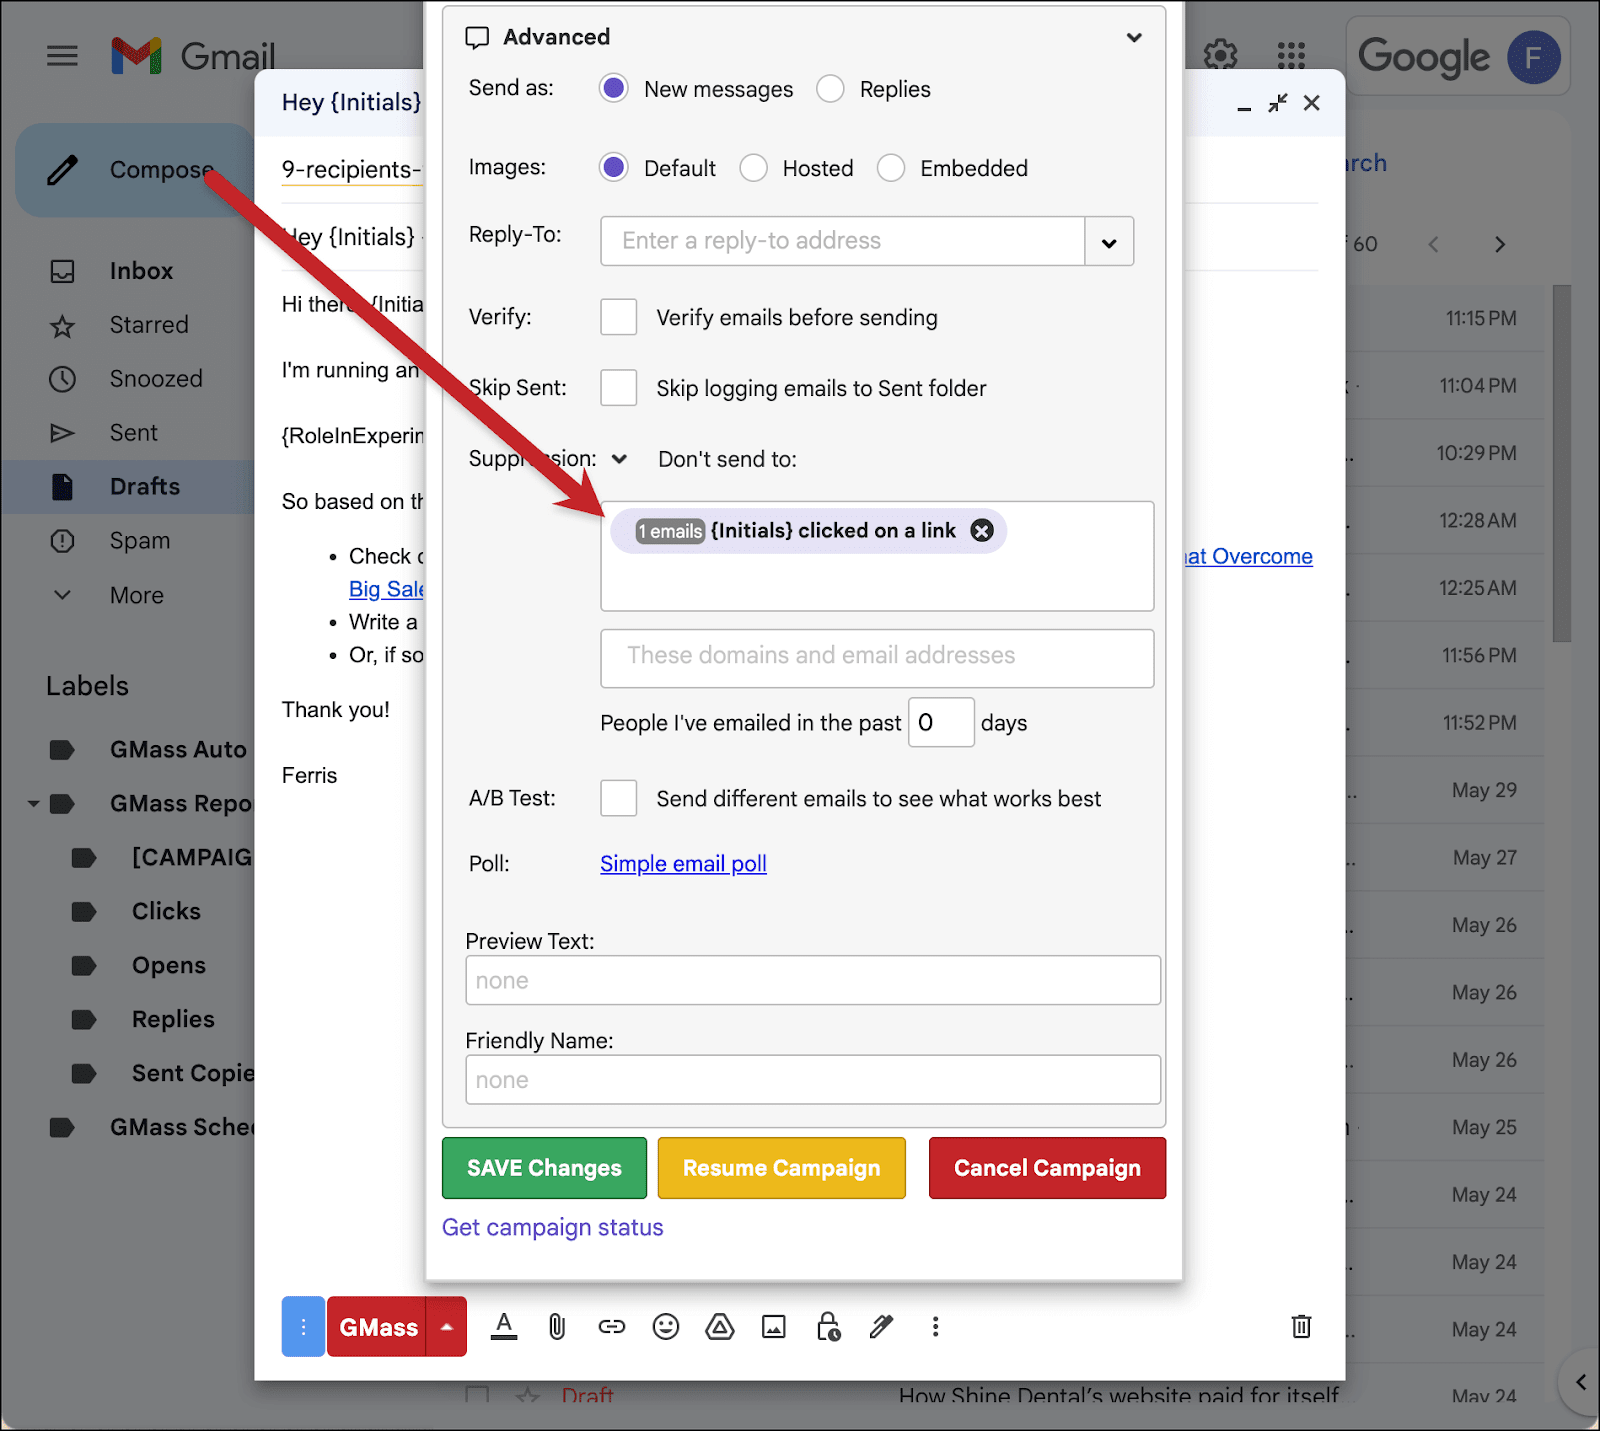
This means: Everyone in the faux campaign will automatically be suppressed in your real campaign.
And since the only way for them to be entered into the faux campaign is by clicking a link in an email in your real campaign, now after they click, they’ll stop receiving your follow-ups.
So… clickers have officially been removed. And the auto follow-up No reply trigger is removing people who reply.
In other words: Mission accomplished.
Step 4: Unpausing and Sending Your Real Campaign
There are just a few things left to take care of before we can unpause the real campaign and finish sending it out.
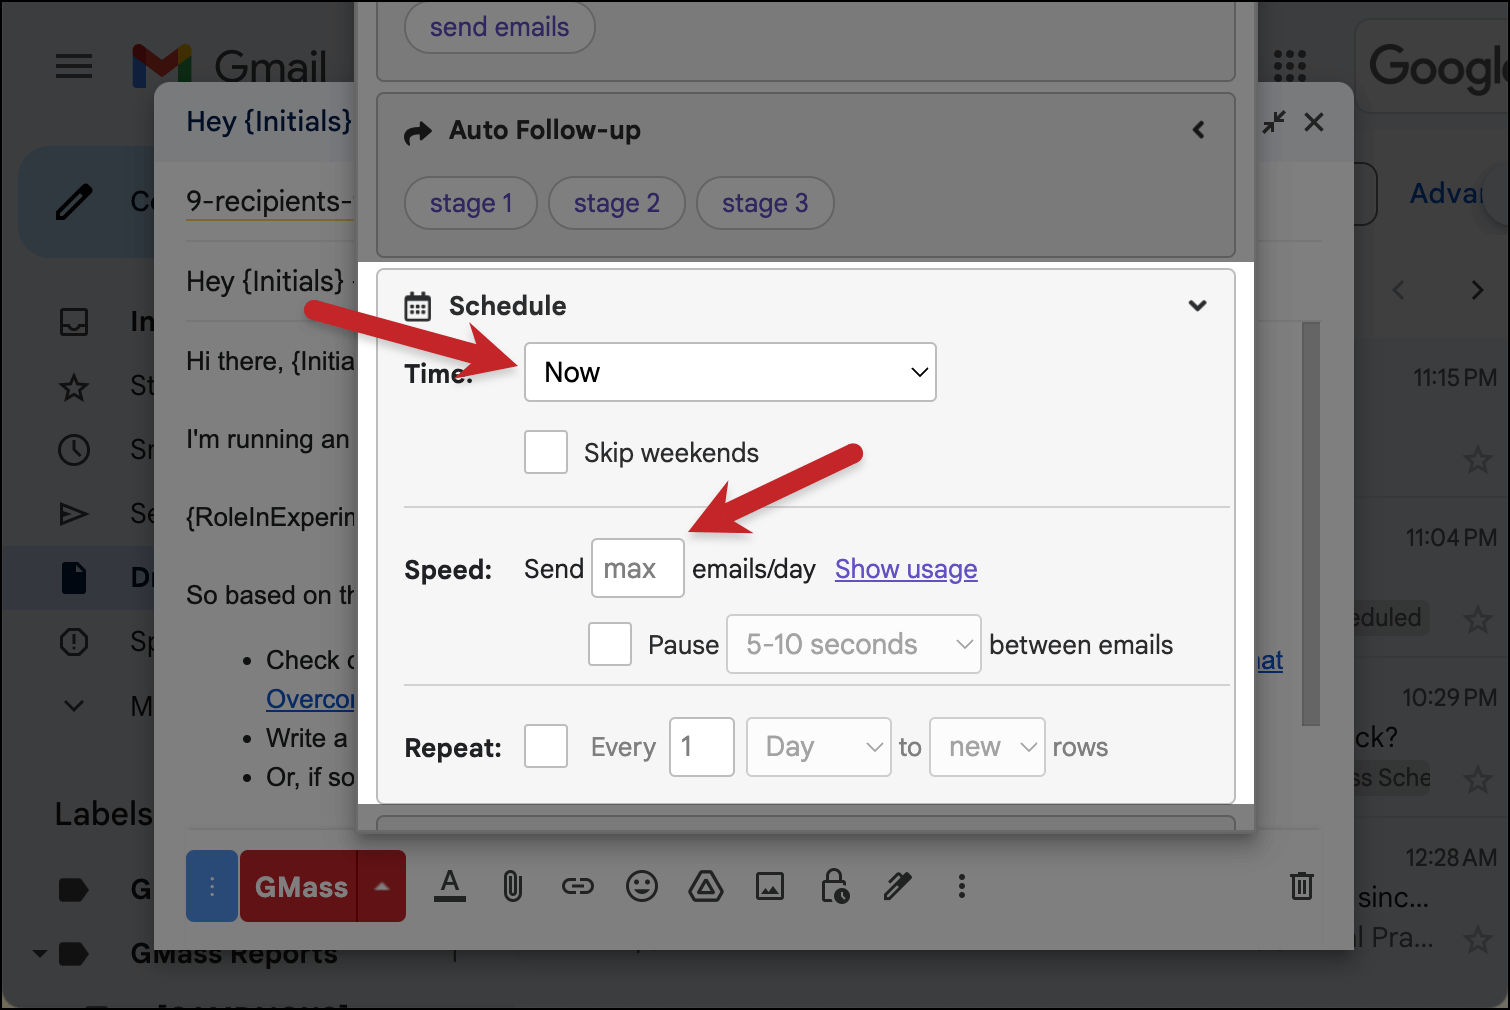
Go up to the Schedule section.
Set the Time to Now.
And delete the “1” from Speed so it becomes “Max” — meaning your campaign will go out to everyone.
Now scroll to the bottom of the settings box and click the green button to SAVE Changes.
Then re-open the draft of the campaign and click the yellow button to Resume Campaign.
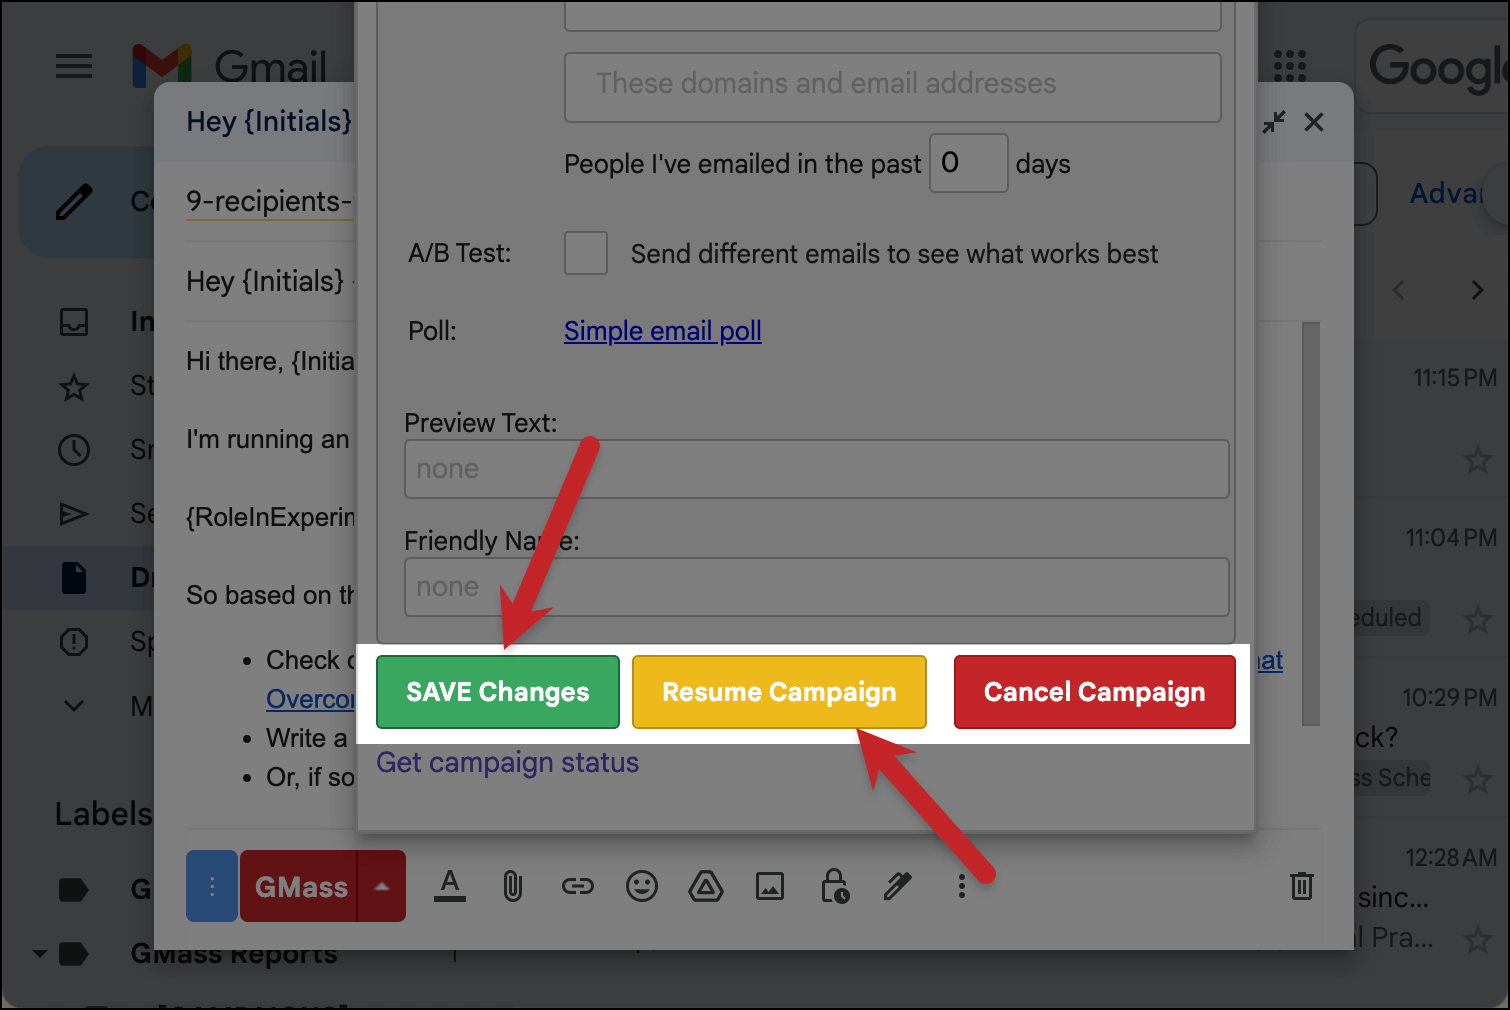
And once you do, the campaign will begin sending to everyone else on your Google Sheet.
They’ll also receive the auto follow-ups on schedule… at least until they reply OR click.
How my experiment went
As you could see from the screenshots through this article, I field tested this technique to make sure everything worked as I was describing it.
After I finished all the screenshots, I continued to let the auto follow-ups run over the course of an entire week. I clicked/replied as I’d planned and monitored whether or not I received the follow-ups I was supposed to receive.
And I’m happy to report everything worked perfectly for me.
Here’s my delightfully analog chart where I monitored my progress along the way, keeping careful track as I replied and clicked on specific emails and follow-ups..
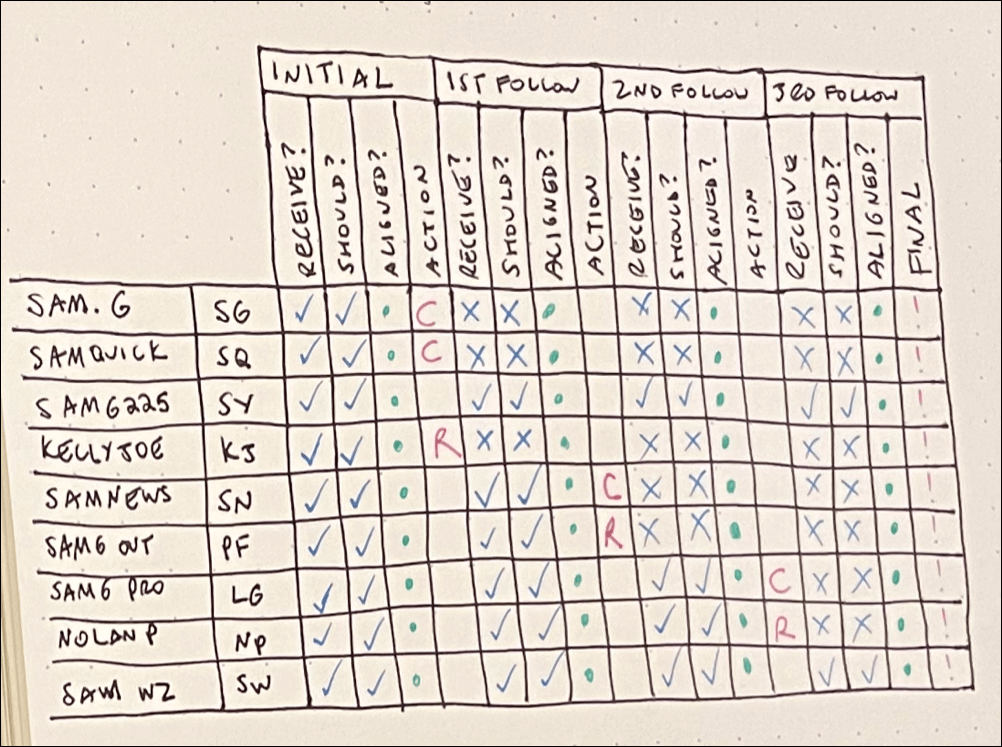
Make sure to follow all the steps in this article to the letter and you should see the same success.
(Note: Once all the auto follow-ups have gone out, you can pause or cancel the faux campaign so it will stop creating drafts every few hours.)
Stopping GMass Auto Follow-Ups on a Reply OR Click: Wrapping Up
So… as you can see, the process of stopping auto follow-ups on reply or click has quite a few moving parts.
While I tried to make sure nothing here is overly complicated, it may require you to use a few GMass techniques you’re not using regularly.
However, I do hope you’ll find this workaround incredibly valuable for your future campaigns.
And if you’re interested in GMass — I promise, doing pretty much anything else is easier than this. Only a few of us lunatics ever get this deep into customization. Most of the time, you’ll be sending out incredible Gmail mail merge campaigns faster than you’ve ever done before.
Plus it only takes a few minutes to get started. You don’t even need to put in a credit card to start your free trial. You just download the GMass Chrome extension and you’ll be sending your first campaign in record time.
GMass is the only tool for marketing emails, cold emails, and mail merge — all inside Gmail. Tons of power but easy to learn and use.
TRY GMASS FOR FREE
Download Chrome extension - 30 second install!
No credit card required

