Conditional Mail Merge in MS Word
Microsoft Word provides basic personalization options for mail merges using merge fields. What if you want to apply more advanced personalization in a Word mail merge (beyond the basic first name/last name changes) or include conditionally formatted content in the merge fields? You can accomplish that with conditional mail merge rules in Microsoft Word.
Unlike Excel, there is no conditional formatting button in Microsoft Word. In addition, when sending out emails, MS Word does not preserve the formatting of MS Excel data files. However, you may employ an IF…THEN…ELSE rule to modify formatting and replace text/paragraphs depending on the conditions you define. Conditional mail merge allows you to change the content of your emails based on specific criteria or variable data in your excel data file, such as gender, client sector, purchase date, and so on.
Conditional mail merge capabilities in Microsoft Word are limited and need strong software expertise to set up. In addition, if you make a small error, you’ll run into a slew of formatting issues.
In this article, we’ll show you how to set up a conditional mail merge in MS Word correctly, as well as the most common mistakes to avoid. We’ll also go through a simple method for hyper-personalizing your emails using GMass.
How to Insert Conditional Content (If…Then…Else) in Word Mail Merge Fields
In Microsoft Word, the IF function is enclosed in curly braces. It begins with a condition and then contains the action to perform if true, as well as the action to take if false, as shown below:
{ IF Condition “Truetext” “Falsetext”}
Examples:
{ IF { MERGEFIELD Gender } = “Male” “Mr.” “Ms. }
{ IF { MERGEFIELD Industry } = “Recruiting” “hope the recruiting business is going well, and you’re placing lots of candidates!” “hope things are going well for you.”}
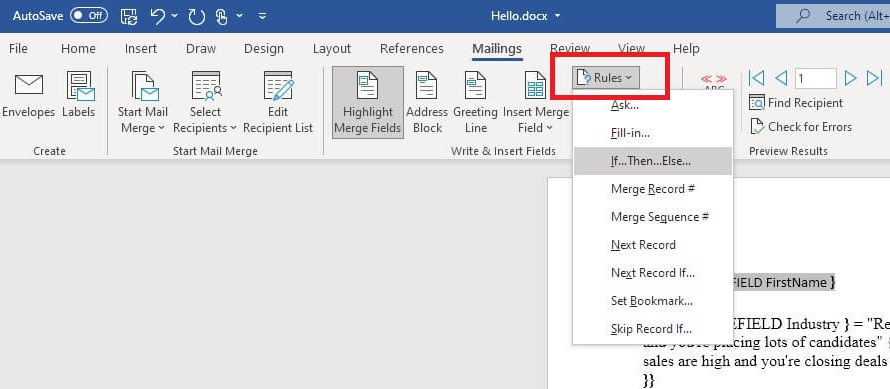
Note: In Microsoft Word, these curly braces must be placed using an If…then…else rule as shown below. Alternatively, you may use the Ctrl+F9 key combination to add them. The conditional formatting will not work if the curly braces are entered manually.
Here’s how to implement conditional mail merge in MS Word:
1. Open MS Word > Go to Mailings tab
2. Click Start mail merge and choose Letters
3. Select the Insert Merge Field option from the dropdown menu to insert merge fields.
4. Select where you want the conditional text to be placed.
5. Press Alt + F9 so you can see the field codes
6. To apply conditional formatting, Go to Mailings > Rules > If…Then…Else and a pop-up box will open

7. In the Field name dropdown select the desired field from the data source (MS Excel File) you want to use for conditional text

8. In the Comparison box, choose a method for comparing the data value.
9. In the Compare to box, type in the comparison value
10. In the Insert this text box, enter the content that appears in the document when the comparison criteria is met.
11. In the Otherwise insert this text box, type in the words that would be included in the document when the comparison criteria is not met
12. Select OK.
13. If you want to apply conditional formatting manually, you need to use Ctrl+F9 to add the curly braces and the field codes.
Note: Don’t use spaces in your field names.
Formatting the Conditional Text in Word Mail Merge
When you perform a merge mail in Microsoft Word, the formatting of an MS Excel data file is lost. You must edit the field code if you want to change the color of the conditional text. For example, if you want to change the color of “Truetext” to blue, modify the field code as follows:
{ IF { MERGEFIELD Industry } = “Recruiting” “hope the recruiting business is going well and you’re placing lots of candidates!” “hope things are going well for you.”}
Nesting Conditional Statements / Multiple If- Else Conditions in Word Mail Merge
If you want to use multiple IF statements, simply add more IF functions in the field code, as shown below:
{ IF Condition1 “Truetext” { IF Condition2 “Truetext” “Falsetext” }}
{ IF { MERGEFIELD Industry } = “Recruiting” “hope the recruiting business is going well and you’re placing lots of candidates!” { IF { MERGEFIELD Industry } = “Sales” hope your sales are high and you’re closing deals left and right! “hope things are going well for you.”}}
Problems with Conditional Formatting in Word Mail Merge
- If you have more than one condition or wish to perform more complex mail merge personalization, the procedure gets considerably more difficult.
- You can not simply type the curly braces {}; MS Word must add these. You can only create a blank field by pressing Ctrl+F9. If you type the curly braces manually, the conditional formatting won’t work.
- The text you use for your TrueText or FalseText should not include any special characters, such as slashes (/), Inverted Commas, Quotation Marks, brackets ([]), or braces ({). This is because MS Word will not output them during the mail merge.
- If any of the “IF” fields are blank during mail merge, MS word won’t be able to suppress them. As a result, you will see additional blank lines or inconsistent output in your mail merge letters. To eliminate them, you need to add a “\b” after the merge field.
- If you have any hyperlinks in the conditional text, those will not be outputted by the simple If…Then…Else… rule.
Conditional Text Automation with GMass and Gmail
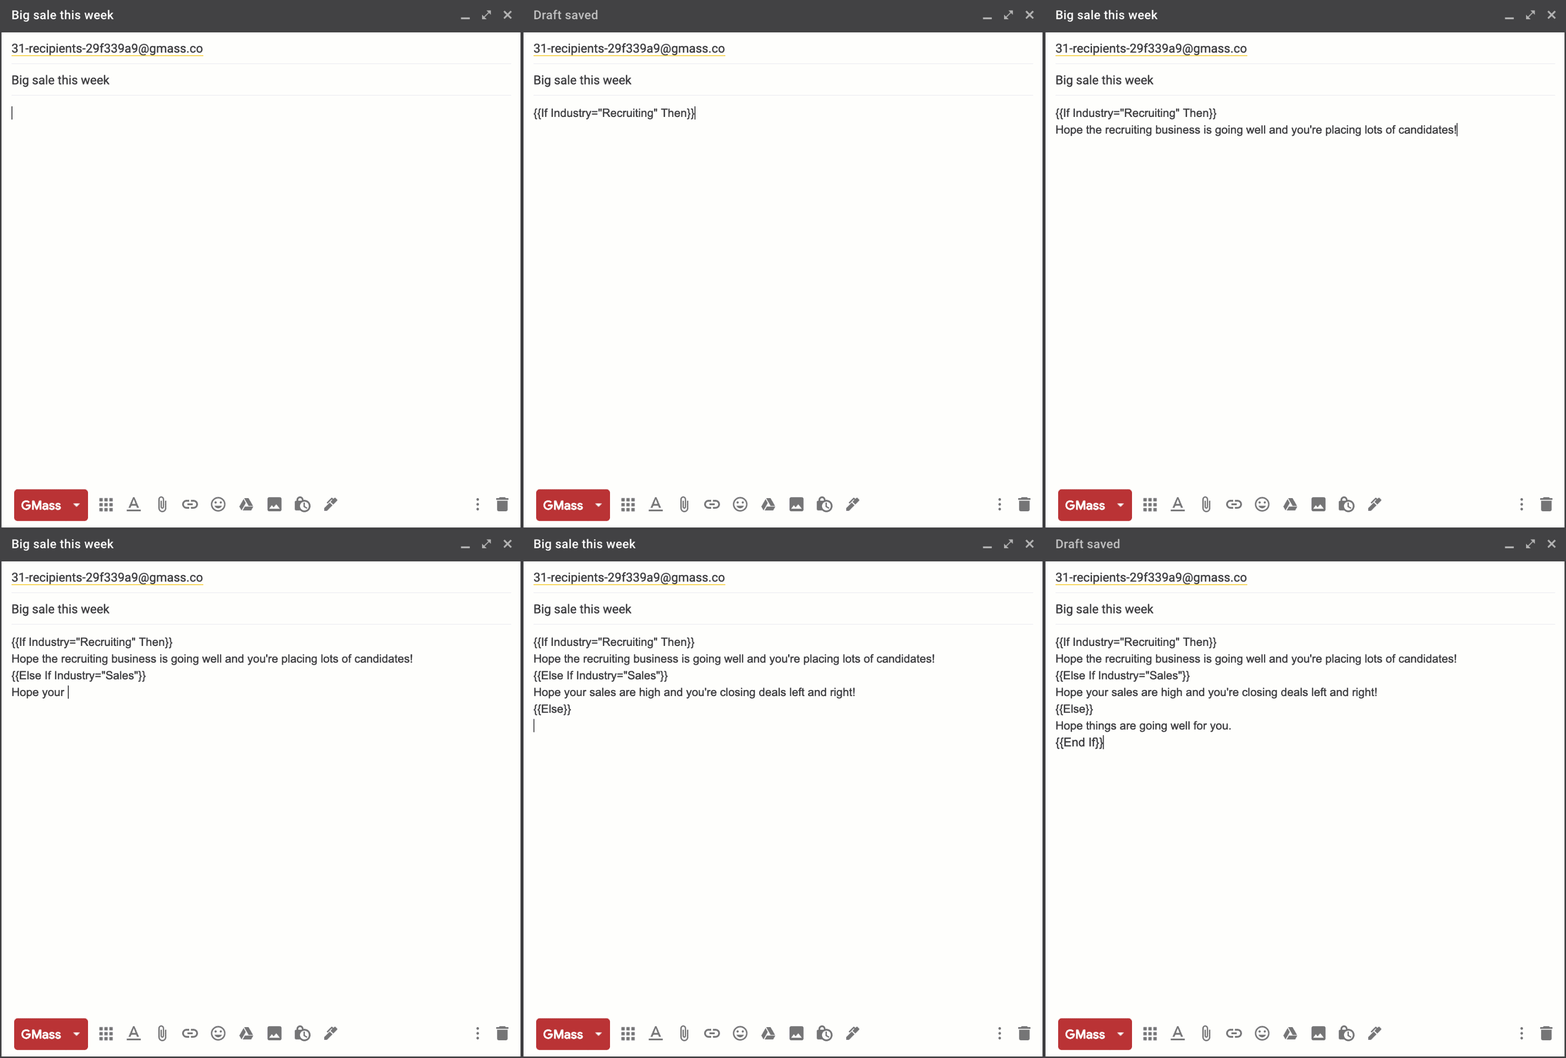
GMass has created a simple solution to send personalized mail merges using Gmail that eliminates the typical conditional formatting and other mail merge issues associated with MS Word. With GMass, you can use If/Then and other statements in your Subject and Message to hyper-personalize content based on any criteria you have associated with each email address. Read our full guide on conditional content for personalized emails.
Along with this, you can also:
Personalize links and URLs for each recipient, including anchor links without link breakage that can otherwise occur in the Compose window.
Personalize attachments by sending individual images, invoices, or documents to each recipient in a mass email.
Personalize images for each recipient to include a different team logo, pet breed, or astrological sign, etc.
Personalize large blocks of text according to the needs of each recipient, such as a different promotional offer for different levels of customers, or for customers in different zip codes.
Send your campaign to a personalized CC or BCC address for each recipient to keep the associated salesperson or distributor in the loop according to their respective territories or accounts.
Personalize the To header of each individual email so that your contact’s First and Last name appear as part of the To line instead of just their email address.
For our full set of personalization documentation see the personalization category page on this blog.
We’ve tried to make GMass as simple to use as possible. It is simple to double-check your personalization before sending your email to all of your recipients. You may use the Send Test button with the Create Drafts option to see instantly what personalization to everyone on your list will look like. Simply select the “Send Test” option and check your Gmail DRAFTS folder. When you’re ready to send your campaign with the red GMass button, don’t forget to switch the Action back to “Send email.”
Conclusion
The Microsoft Word mail merge tool is powerful, but it has certain limits. For example, it isn’t well-equipped to handle complex mail merges or conditional content, resulting in errors and formatting issues that are difficult to troubleshoot. You can use GMass to create hyper-personalized bulk email campaigns using Gmail. With in-depth analytics and automation, you’ll have all you need to easily send, manage, and follow up on your emails. Why not download the GMass Chrome extension today and try it yourself?
Email marketing, cold email, and mail merge all in one tool — that works inside Gmail
TRY GMASS FOR FREE
Download Chrome extension - 30 second install!
No credit card required


how to open mail merge with criteria if …. then…else from cba excel. thank a lot
Hi,
The conditional formatting is done directly through your Gmail compose window (https://www.gmass.co/blog/conditional-content/)
Hi,
I’m trying this in the subject box {{If var(“Wellbeing Last Name”)=” ” Then}} {Head Last Name} but it returns an error message. Is it not possible to set up a condition that returns a different field rather than a set piece of text?
And if so, is ” ” possible? i.e. if the field is blank return content of a different field?
Thanks!
(I’m not very techie, but I’m trying hard!
I’ve sorted the above thanks. But now I have realised another issue:
My google sheet has 2 columns of names.
I want GMass to return all the names in column 1 and where it finds an “X” I want it to return the name in the field in the same row from column 2. So far so good, I am able to do this.
But for all the fields that have something other than an “X” in column 1, GMass returns nothing. I want whatever is in the field (different first names) in column 1 to be returned (unless it is an “X”)
Can GMass do this?
Thanks for your help!
Hi Joanna,
Please get a hold of our support team (gmass.co/g/support – there’s a link up top to submit a ticket) to see if we can come up with a workaround for this for you.