We all know the basic Gmail settings. Today I’m going to dive into some that they’ve been keeping from you.
(I’m not sure who exactly has been keeping them from you, but someone has.)
These tweaks will…
- Make your email easier to read and respond to.
- Keep your inbox more organized and help you clear it to get to inbox zero faster.
- And help make sure you stop missing important messages.
And we’ll do it all without adding any extensions or add-ons. Everything here is a native Gmail/Google Workspace feature.
(Though at the end, I am going to share a Gmail extension that will change your life. Your email-based life, that is. And what a life it will be.)
Now, let’s tweak.
Hidden Gmail Settings: Table of Contents
- The 5 Secret Gmail Settings to Improve Your Email Life
- Squeezing Even More Hidden Power Out of Gmail
The 5 Secret Gmail Settings to Improve Your Email Life
Here are the five tweaks you can make to Gmail that should improve things immediately.
1. Enabling the Updates tab
By default, when you start a new account, Gmail sets up three category tabs: Primary, Promotions, and Social.

And then… most of us go straight to the settings to disable those tabs.
Various studies over the years have reliably found that about half of Gmail users disable the tabs. And, in particular, only about one in five has the Promotions tab enabled.
(Email marketers have been in a panic about the Promotions tab ever since it arrived in 2013, even though these numbers show that panic is overblown. Still, if you’re worried, I highly recommend checking out Spam Solver — which actually tests a campaign to see if it’s going to go to the inbox, spam folder, or Promotions tab and then recommends fixes.)
Like most Gmail power users, I am one of those people who turn off Gmail’s default tabs immediately.
However, after experimenting, I’ve started using one category tab — and it’s been keeping my inbox much cleaner ever since.
The hidden setting
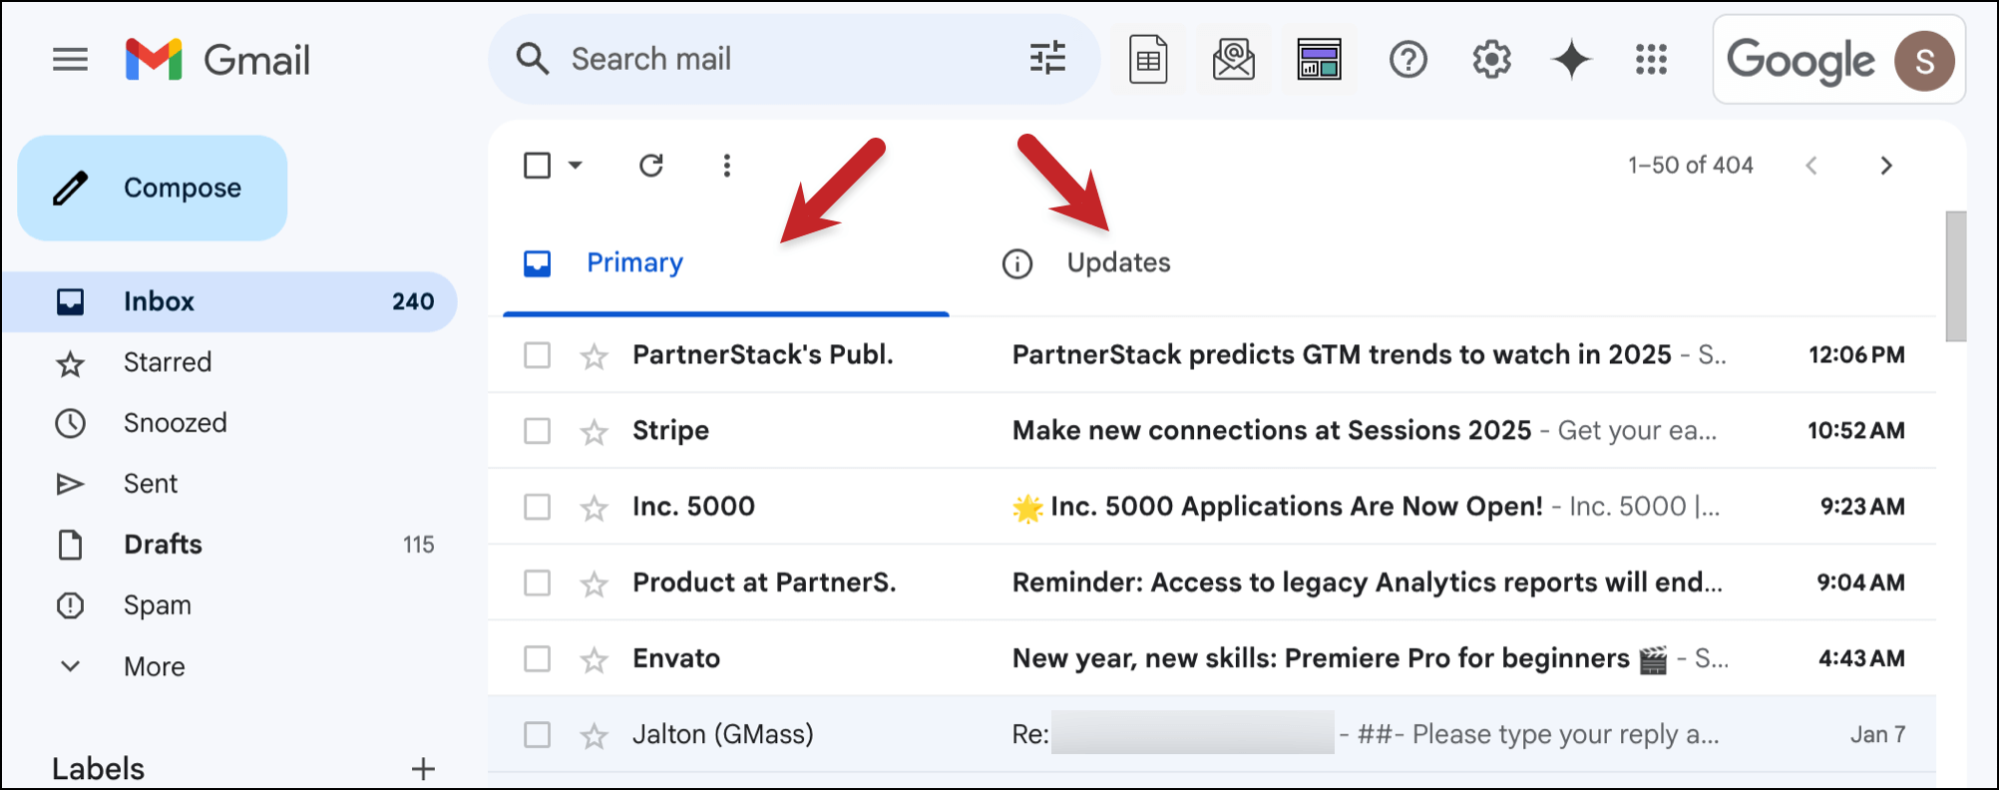
I enable the Updates category tab.
Why Updates? I’ve found Google does the best job at categorizing emails into that tab that I don’t need to see in my main inbox.
I don’t want to miss every single marketing email. (If there’s a company whose emails I do want to miss, I unsubscribe).
I do want to skip a lot of social media updates — but rather than having multiple Gmail tabs and also enabling the Social one, I know Google will just move those to Updates with a little training.
I also really like not having my inbox cluttered with automated notifications, which is where the Updates tab shines. Things like Google news alerts, order status updates, shared Google Docs edits, sign-in alerts, political campaign everything — all automatically out of the way, for me to look at in bulk when I’m ready.
How to enable the Updates tab
Click the Settings icon in Gmail, which will open the Quick settings sidebar panel.
Scroll down to Inbox type and click on Customize underneath Default.
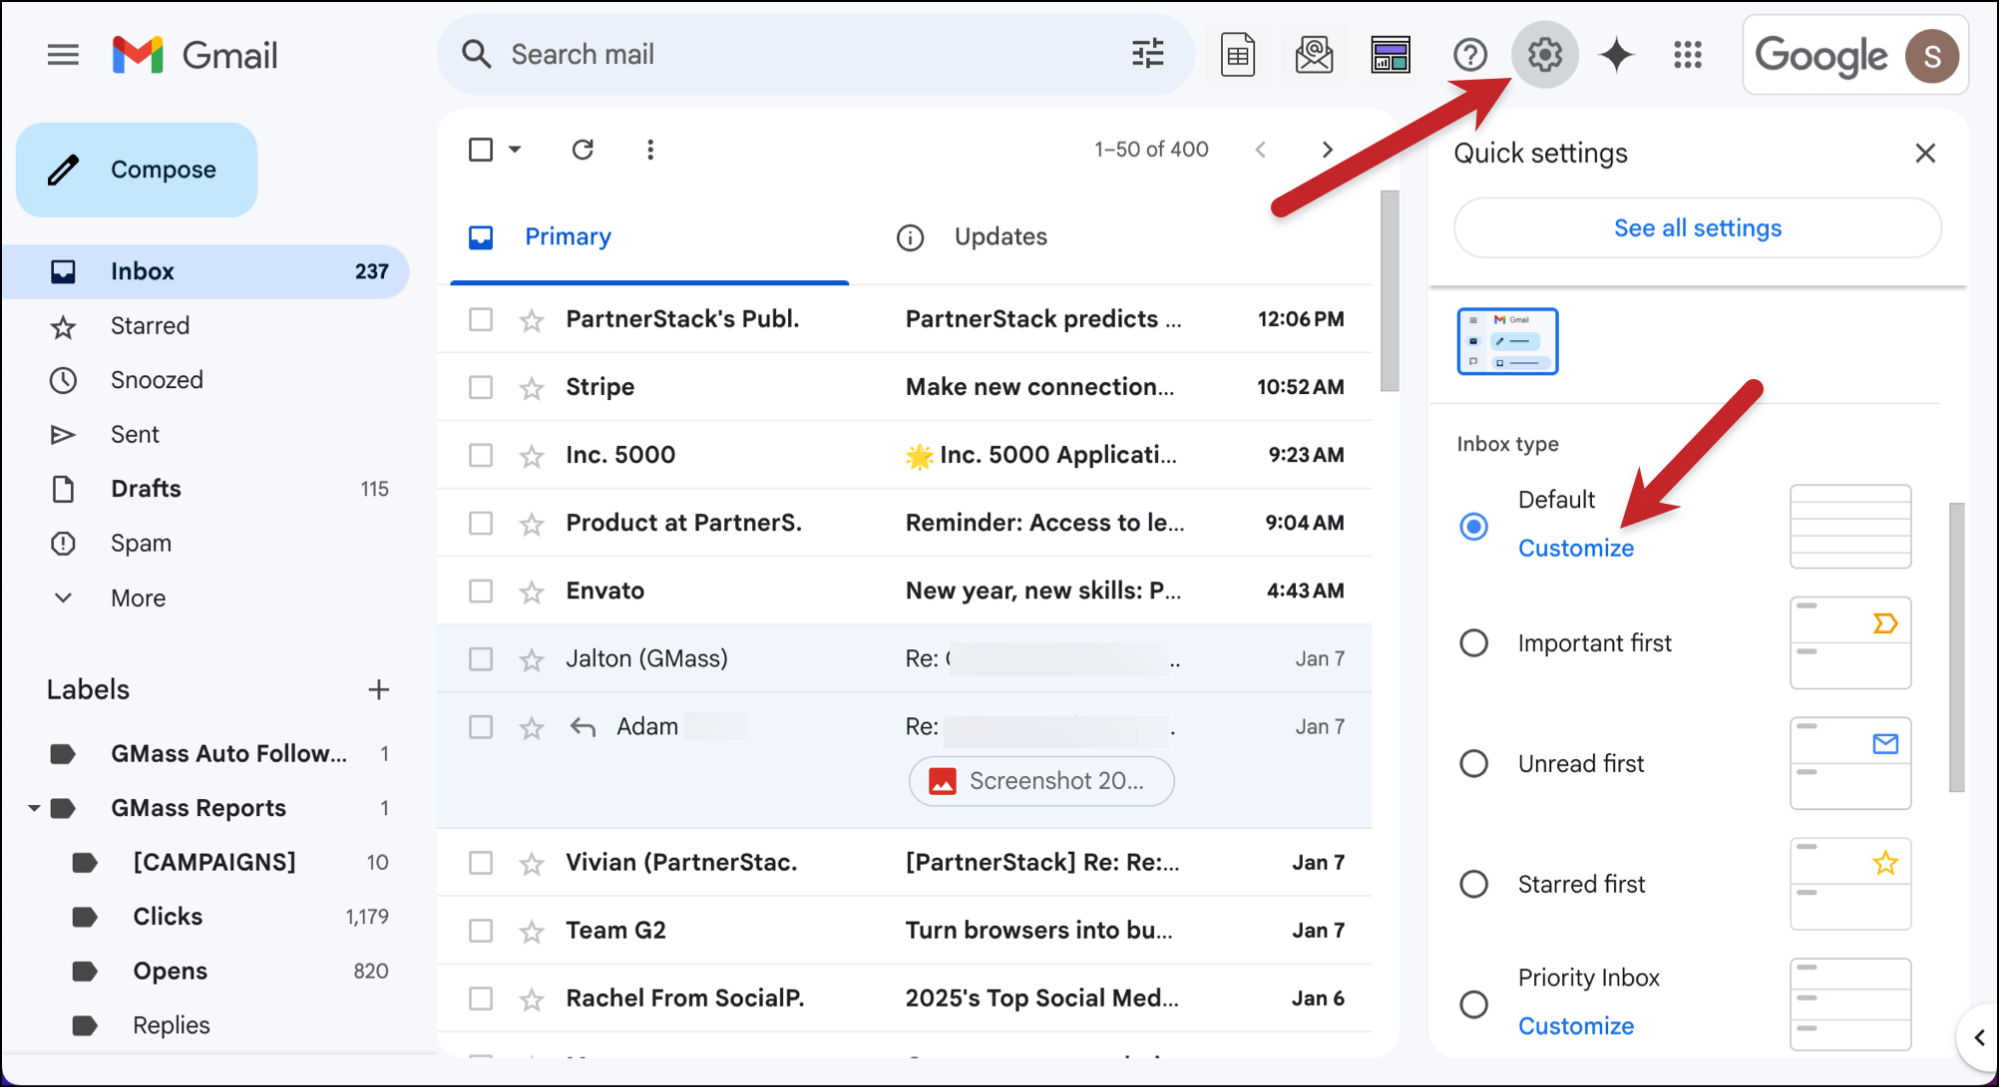
That will bring up the tab settings pop-up.
Make sure only Primary and Updates are checked. (It’s optional about including Starred messages in Primary; that’s a matter of preference.) Then click Save.
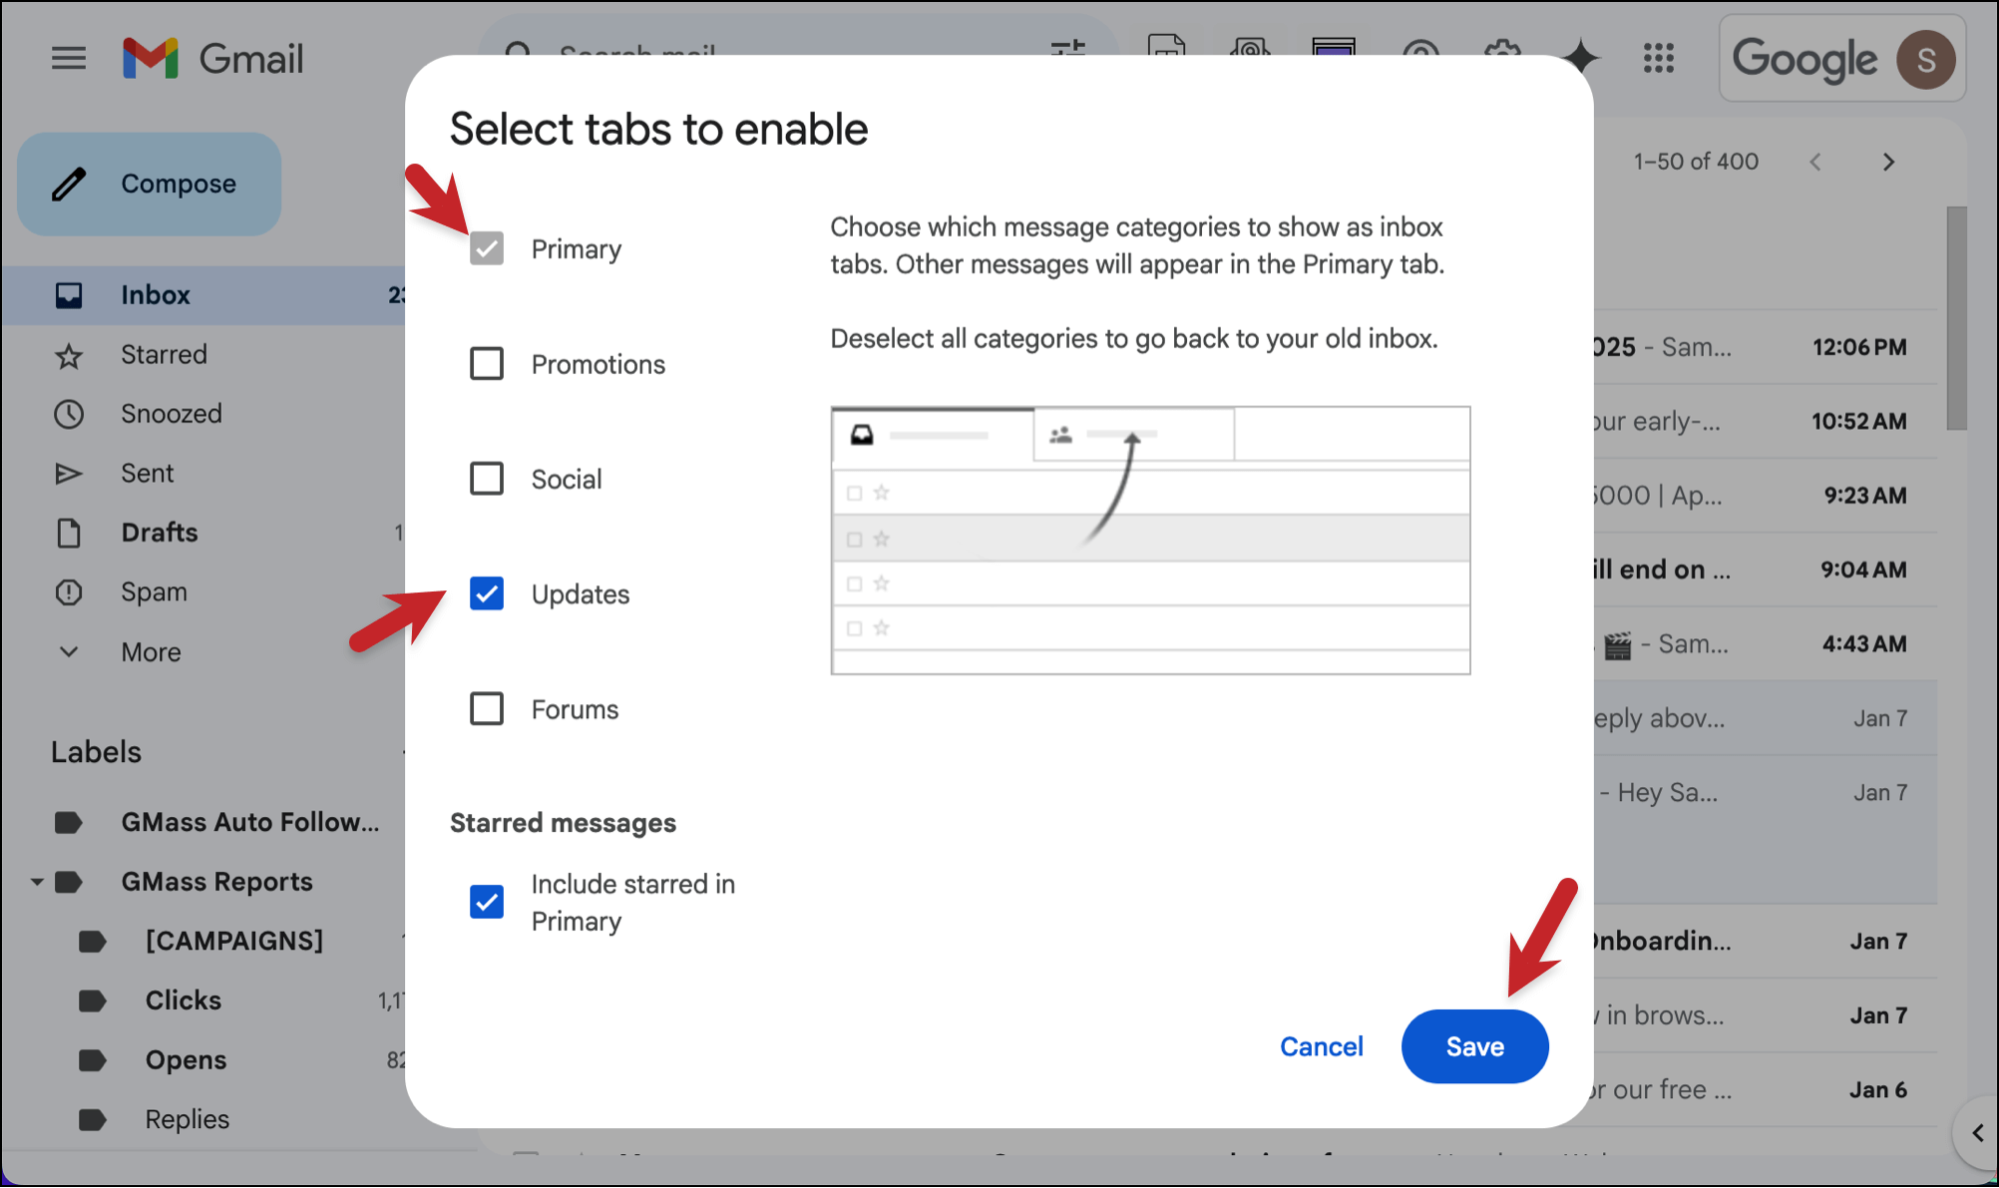
Now that you have the Updates tab enabled, it’s time to train it.
One way is to drag items from the Updates folder to the Primary folder (or vice versa).
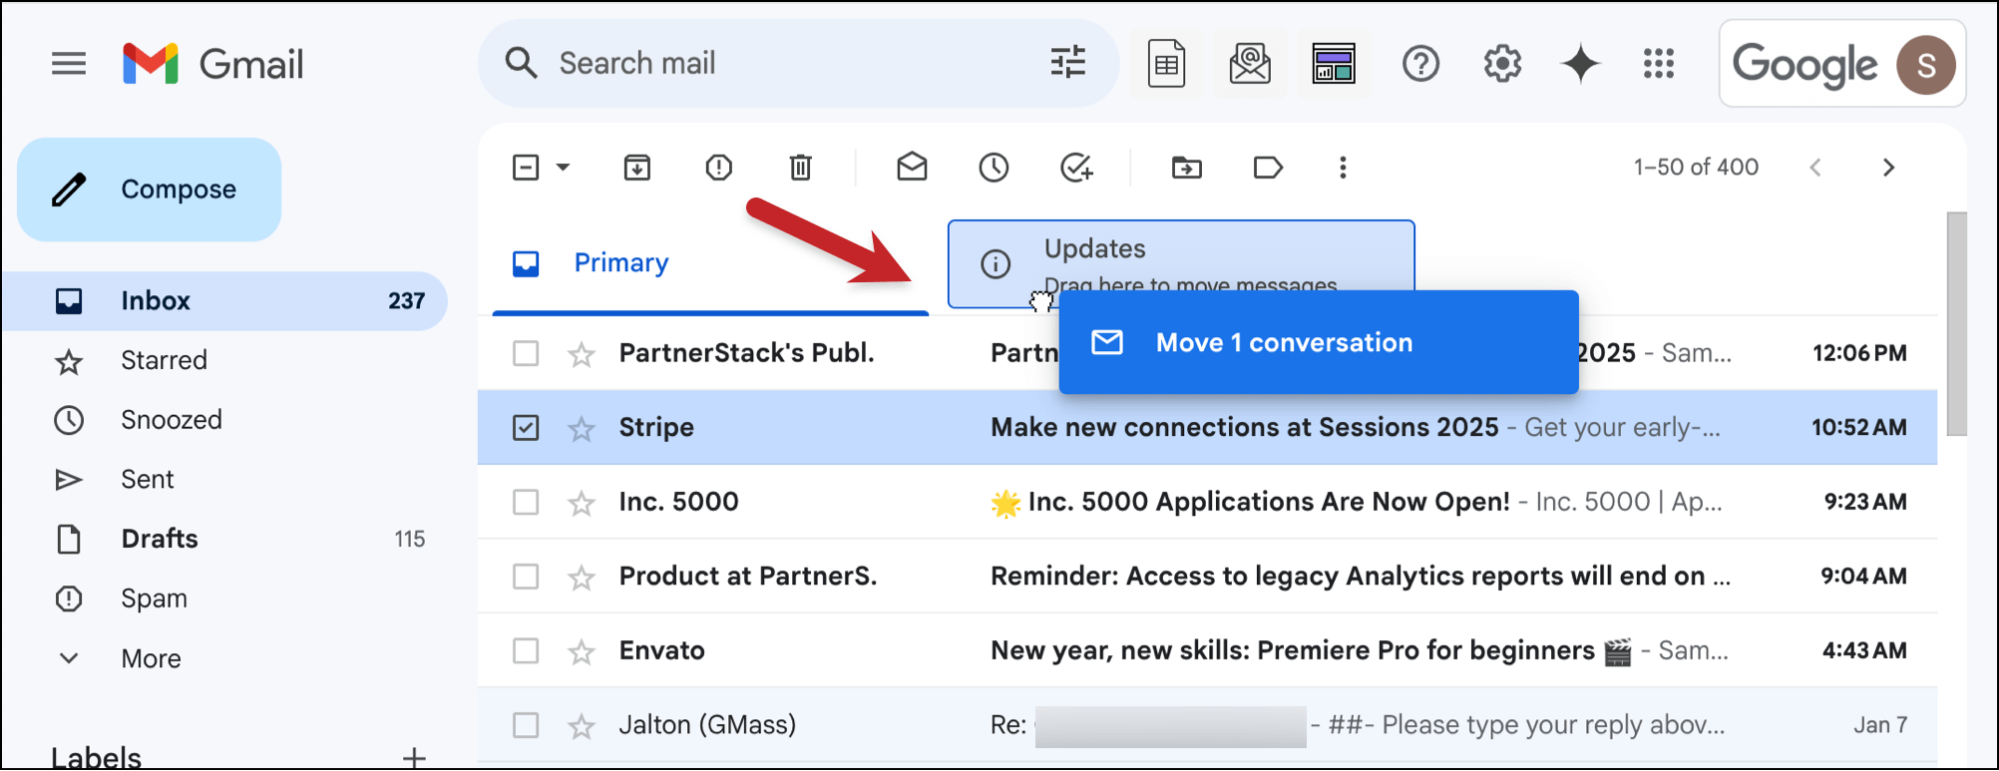
But there’s an even more effective way too…
2. Using Quick Filters
It would be disingenuous for me to call Gmail’s filters a “hidden Gmail setting.” Filters aren’t hidden and aren’t unknown.
But quick filters are.
In case you aren’t 100% solid on filters, in Gmail you can set up rules to automatically take action on messages from certain senders, with certain words, or a whole host of other triggers as well. For example: You could set up a filter to automatically send every message from your Uncle Donald into the trash.
You do that in the settings, in the Filters and Blocked Addresses section. Which, again, is why I won’t call filters a secret or hidden Gmail feature — they have their own entire section.

However, I’ve found a lot of people (including myself) don’t use filters all that much because they can be cumbersome to set up.
Though they’re in the settings, it takes several clicks to get to them. Then once you get to the filter box, you have to remember (or paste) what address or terms you want to filter — then experiment until you create a filter that does what you want it to do.
The hidden setting
It turns out you don’t need to go through all that to create a filter.
With quick filters, you can set up a filter from right inside your inbox — and without having to manually enter the filter parameters.
How to use quick filters
Select an email or multiple emails in the inbox.
Then, in Gmail’s strip of buttons underneath the search box, click the three vertical dots. In that menu, select Filter messages like these.
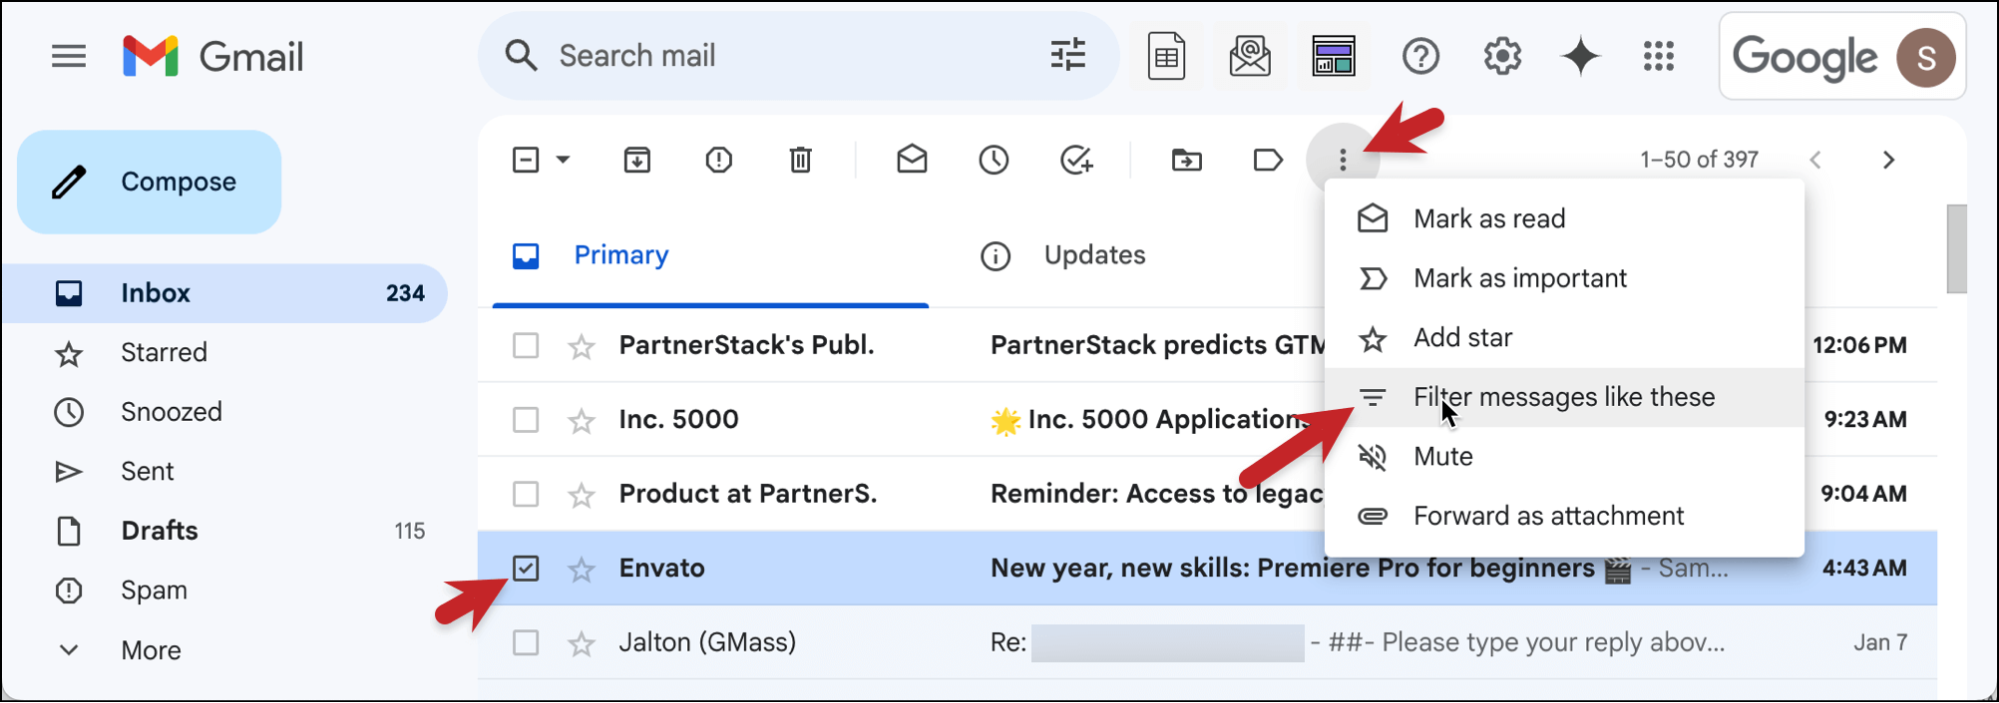
Gmail will filter by that email’s sending address.
The filter box pops up, already pre-populated with that sending address.
You can filter all messages from that sender, or edit the filter further (like, perhaps, filtering based on a keyword in the subject line or the email address). Then click the Create filter option.
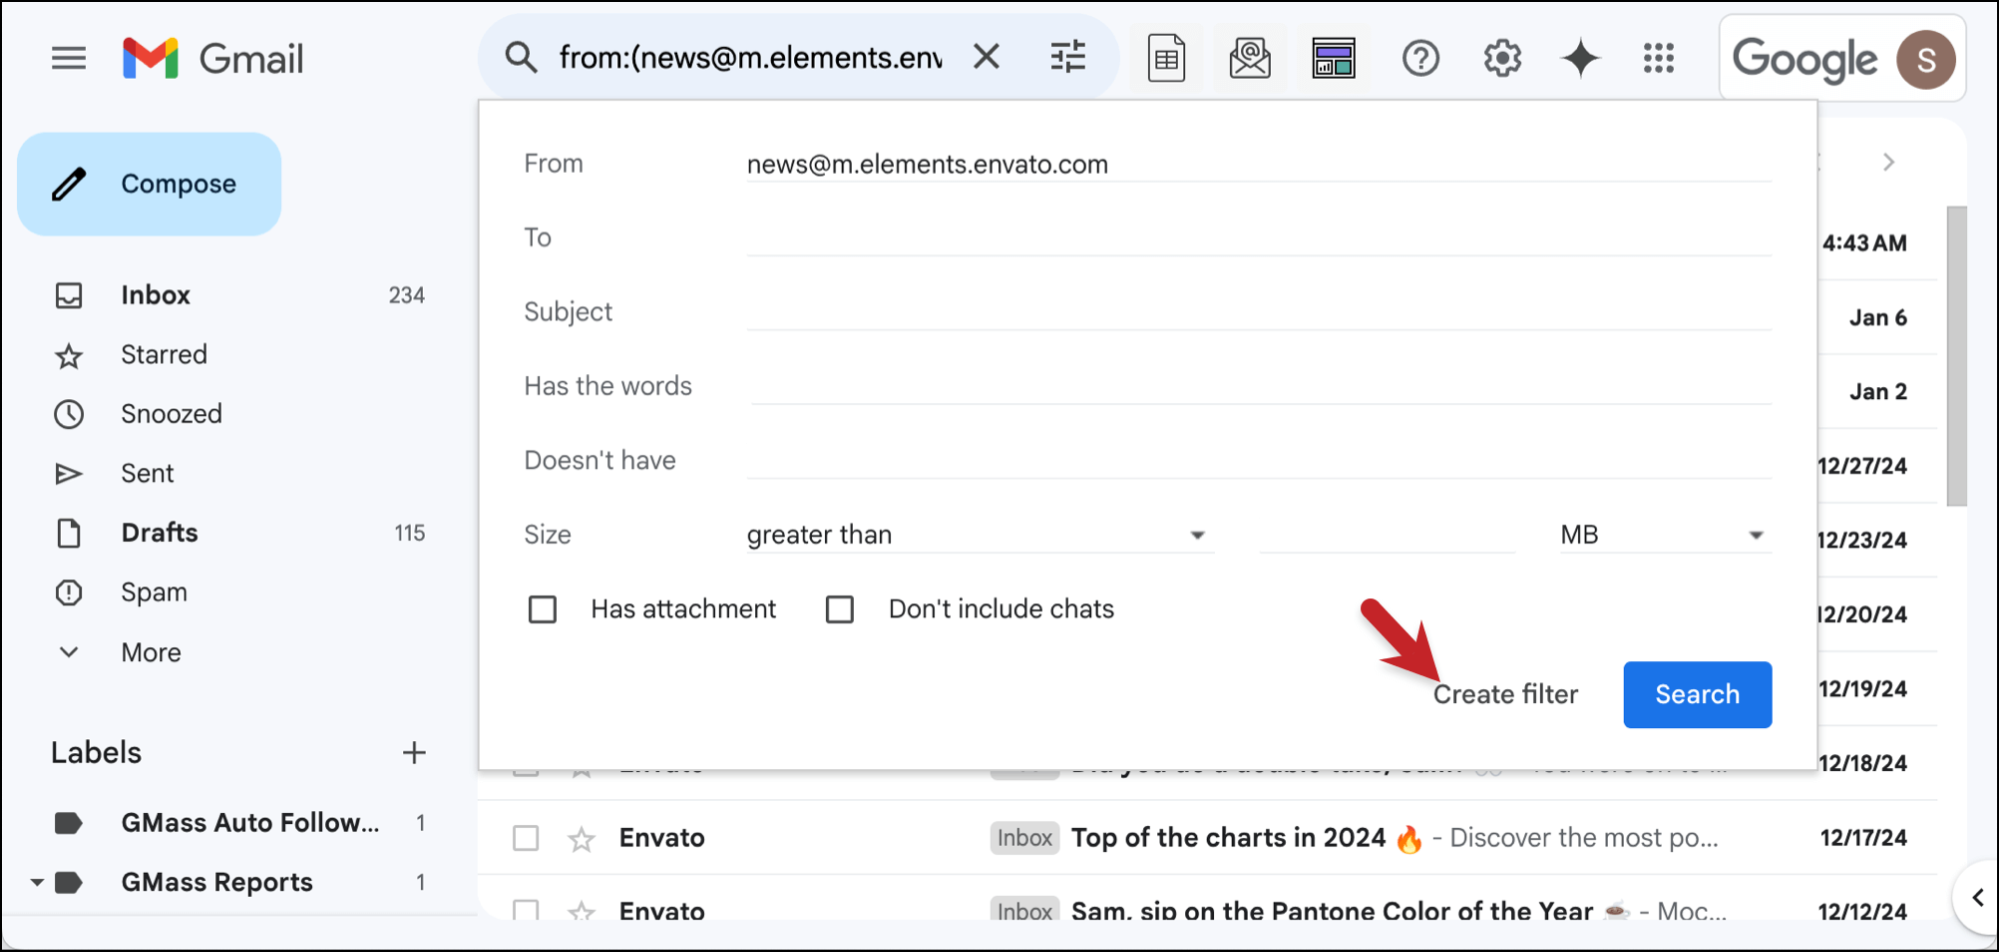
You can now choose what action Gmail should automatically take when messages match that criteria.
If you want to send those emails to the Updates tab, that’s in the Categorize options. Once you’ve picked the action, click the Create filter button.
Also, though I haven’t done it in the screenshot below, if you want to move every email currently in the inbox that matches the filter, check the box for Also apply filter to n matching messages.
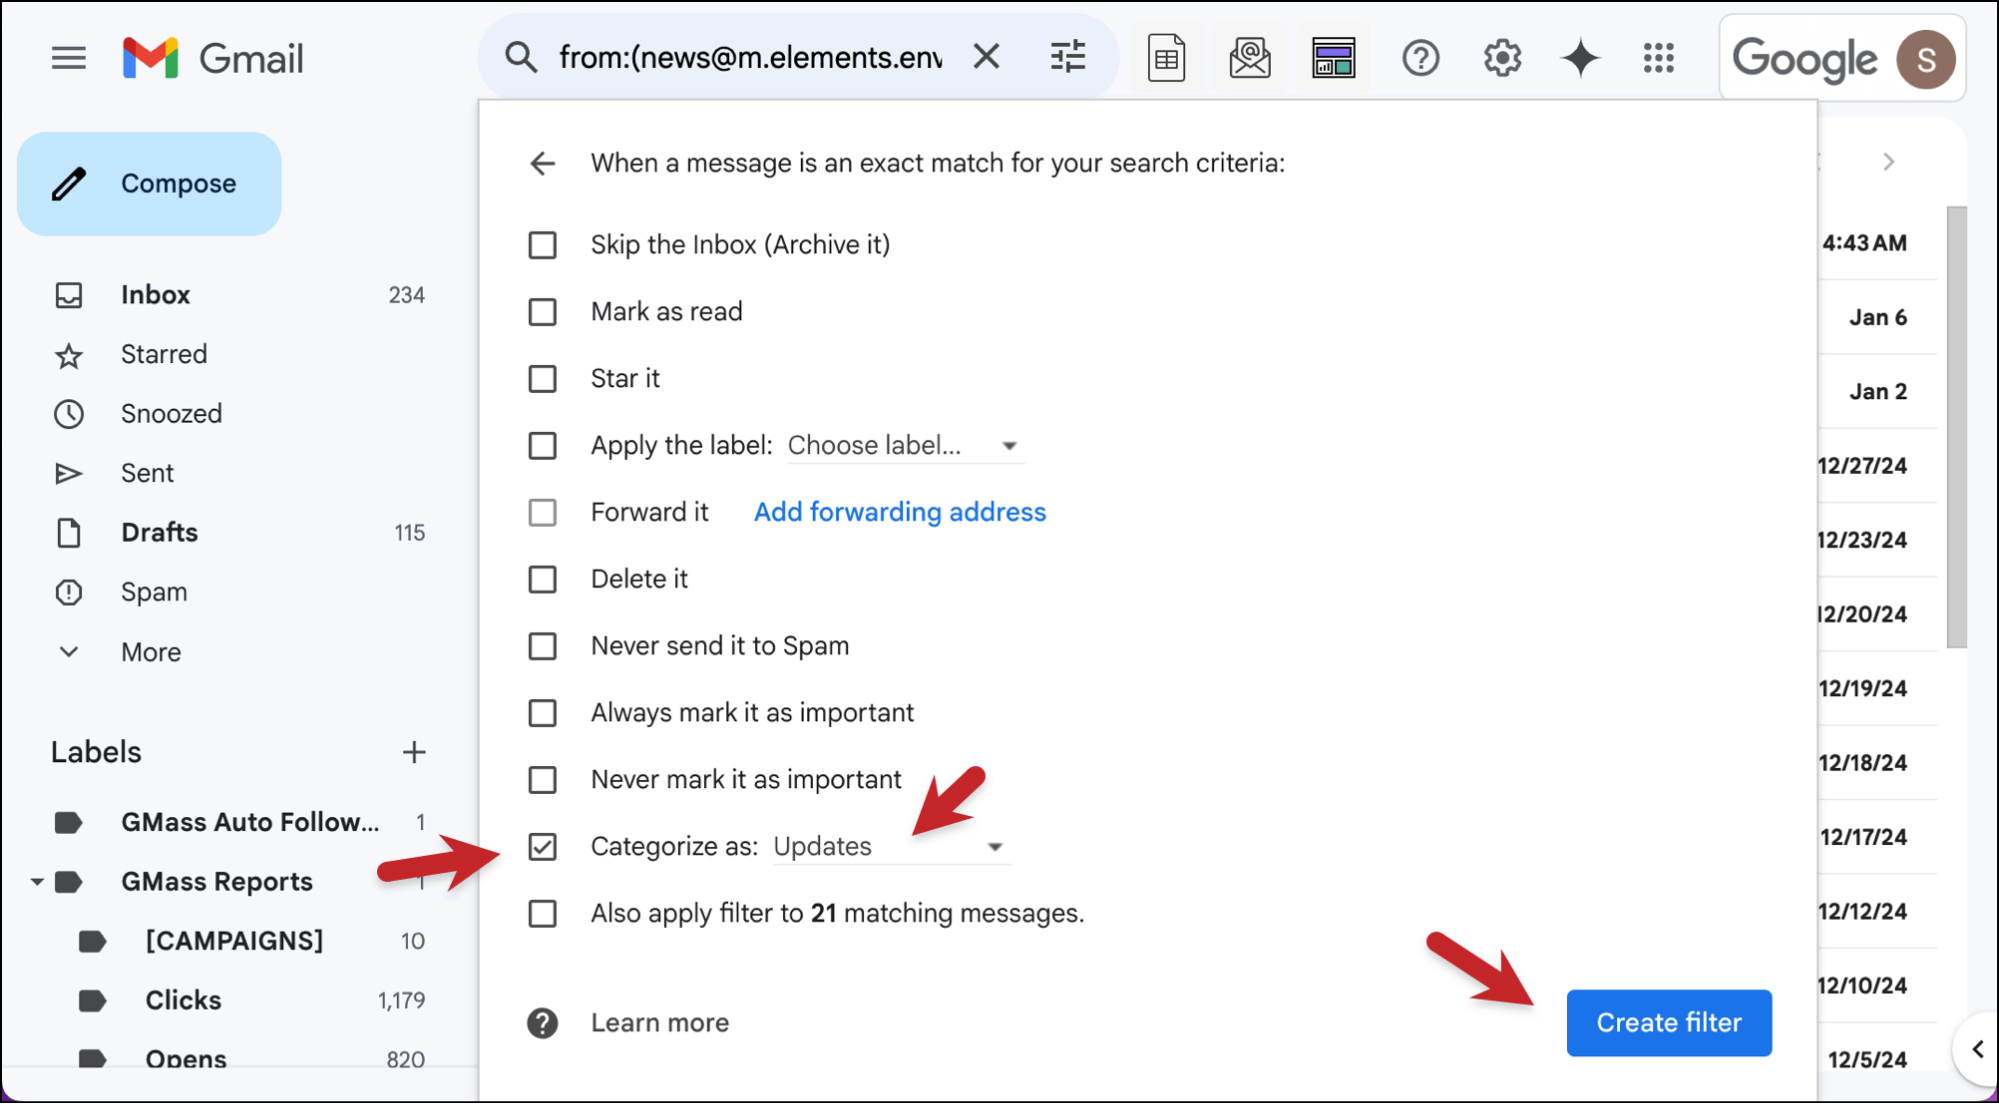
This is a faster and more efficient way to create filters, to put emails into categories and beyond.
3. Turning off Conversation View
Now that we’ve made the inbox tidier… let’s fill it up again. But for the purposes of good, I swear.
Conversation view is how Gmail groups email replies into one thread.
The theory behind conversation view is logical. In theory, it declutters the inbox by consolidating conversations down to a single line. Plus, when you open any email in the conversation, you can see the messages before and after it.
But in practice — I find conversation view leads to missing many important emails. Emails get buried in threads, often making you see them late — or miss them altogether.
I prefer every reply on its own line, separated out from the rest of the thread.
The hidden setting
By default, conversation view is on in Gmail.
I turn it off.
As I covered in a previous article where I dug deep into Gmail conversation view, there were six main reasons why I strongly advocate for getting rid of it:
- Conversation view off is better for previewing individual thread messages.
- I avoid losing or missing emails.
- It makes inbox organization simpler.
- It’s easier to run a visual scan of your inbox.
- I don’t get overwhelmed by long threads.
- I have better control over replies and archiving.
How to turn off conversation view
Conversation view is available in the quick settings in Gmail.
Click the Settings icon, then scroll down to the very bottom of the quick settings sidebar. Uncheck the box for Conversation view.
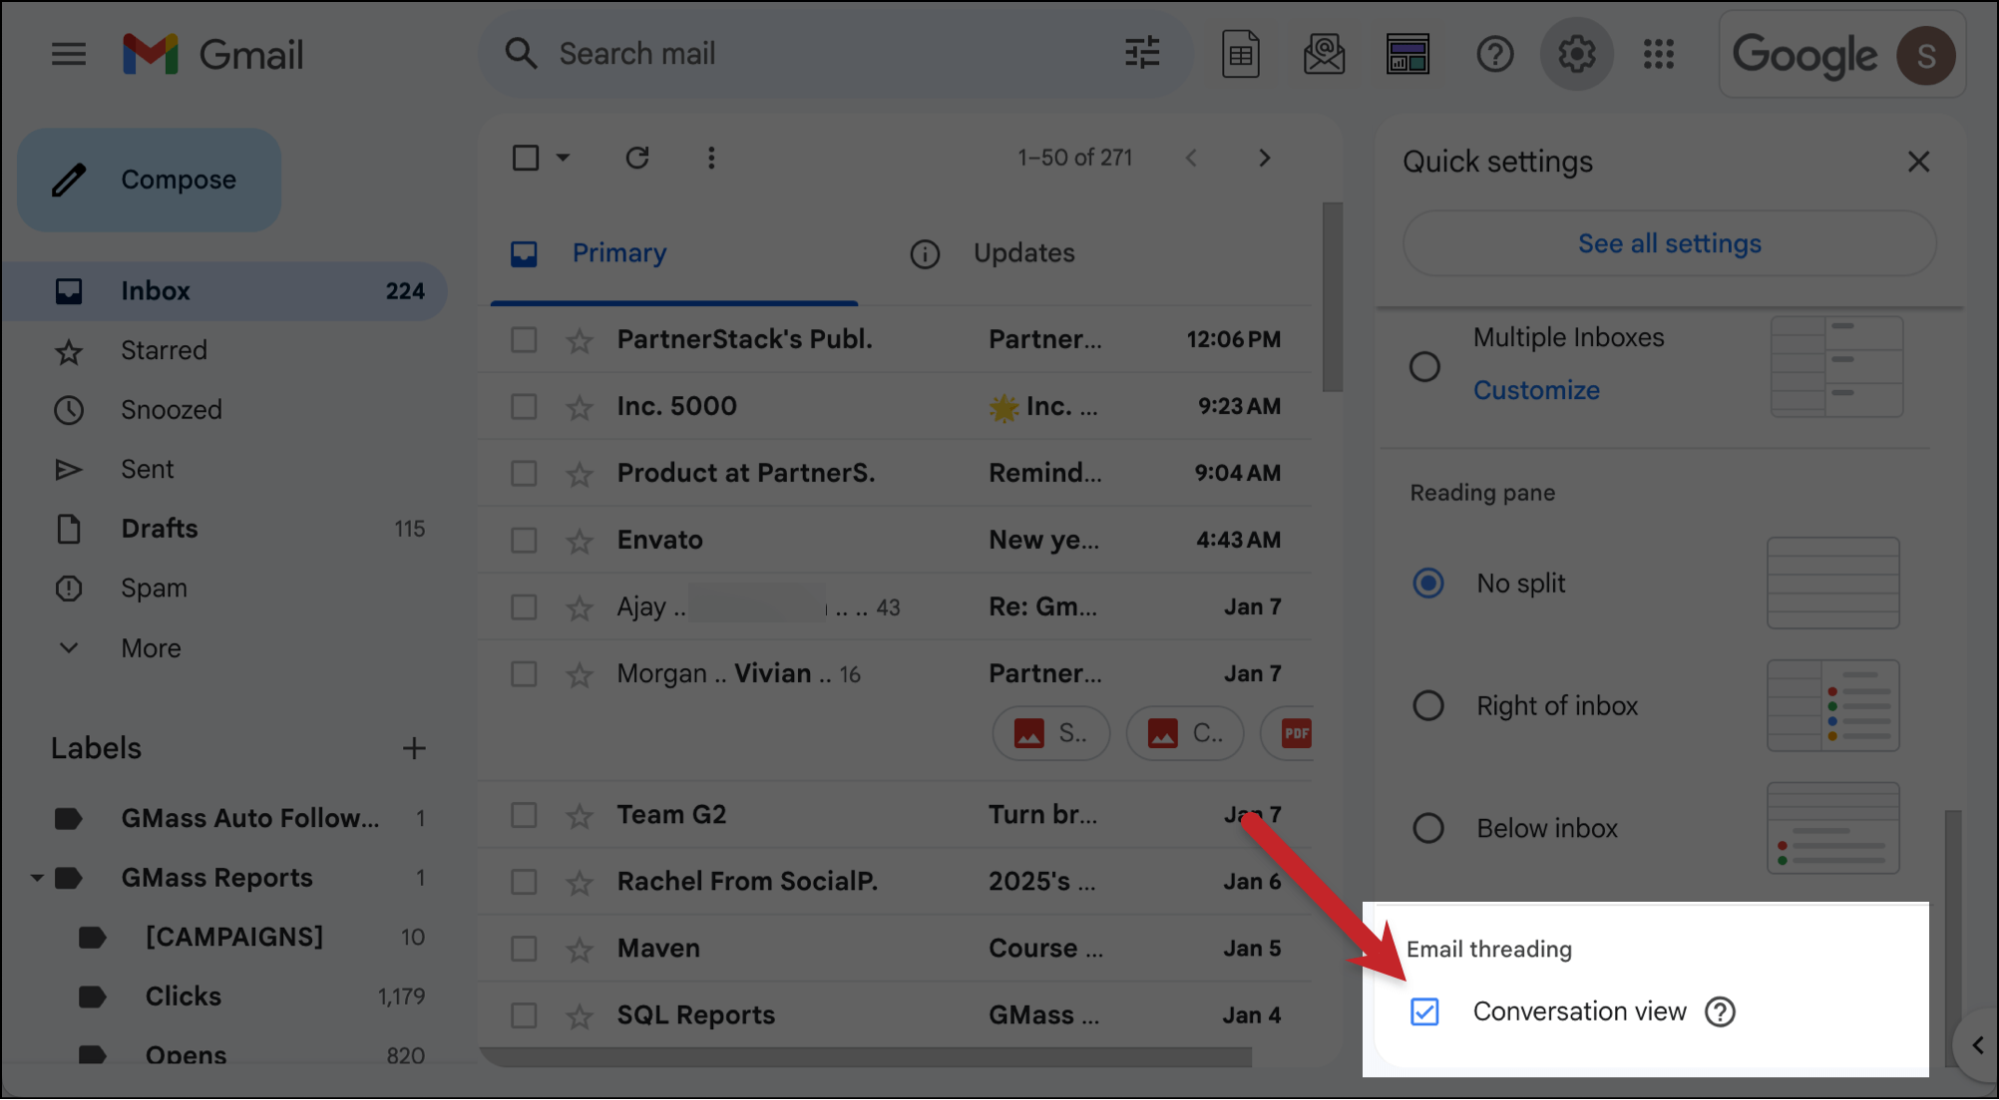
Gmail will tell you you need to reload.
Your threaded messages will now each get their own line — making you much less likely to overlook them.
4. Moving up the Spam folder, then hiding it if it’s empty
Gmail tries to keep its left sidebar clean, only showing you (by default) your Inbox, Starred, Snoozed, Sent, and Drafts folders. The rest of the system folders — like Spam, Trash, All Mail, and Categories — are available by clicking the More to unveil the list.
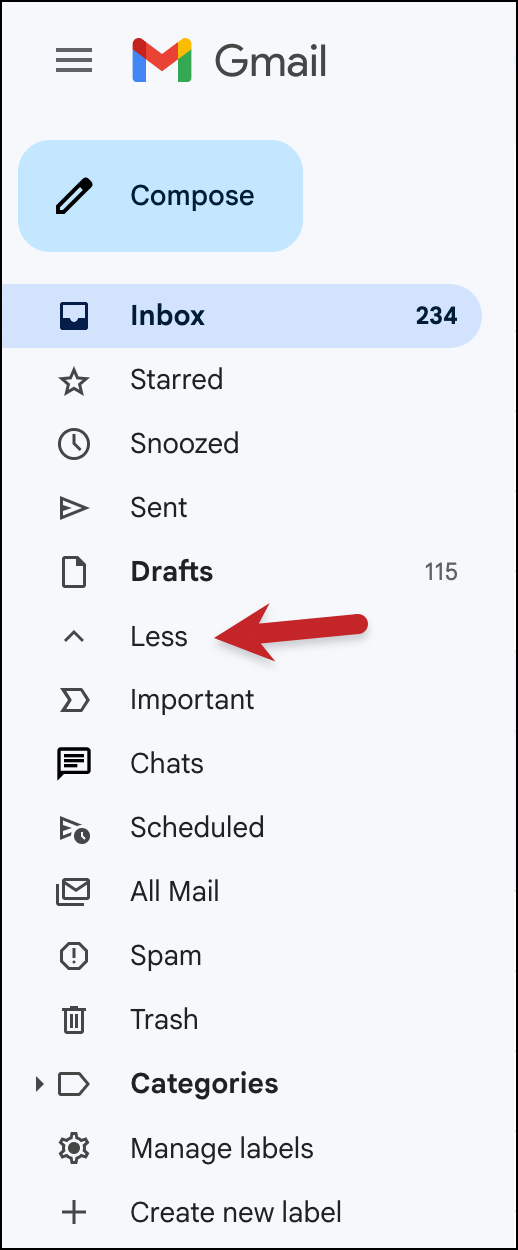
In most cases, I’m fine with not seeing those other folders at a glance.
The one case where it’s not okay is the Spam folder.
I simply have too many real emails go to spam — my dentist and my kids’ school and daycare are the biggest culprits. Also my penpal who sells fake Viagra.
I like to check my spam folder at least once a day to make sure I haven’t missed something important.
So I recommend moving it up.
The hidden setting
You can drag folders above and below the “More” toggle depending on whether you want them to show up by default or not.
And then — you can also auto-hide some folders (like the Spam folder) if they’re empty.
How to move then auto-hide the Spam folder
I recommend dragging the Spam folder up to the set of folders displayed without clicking “More.” (Just click on it and drag it above the “Less” line.)
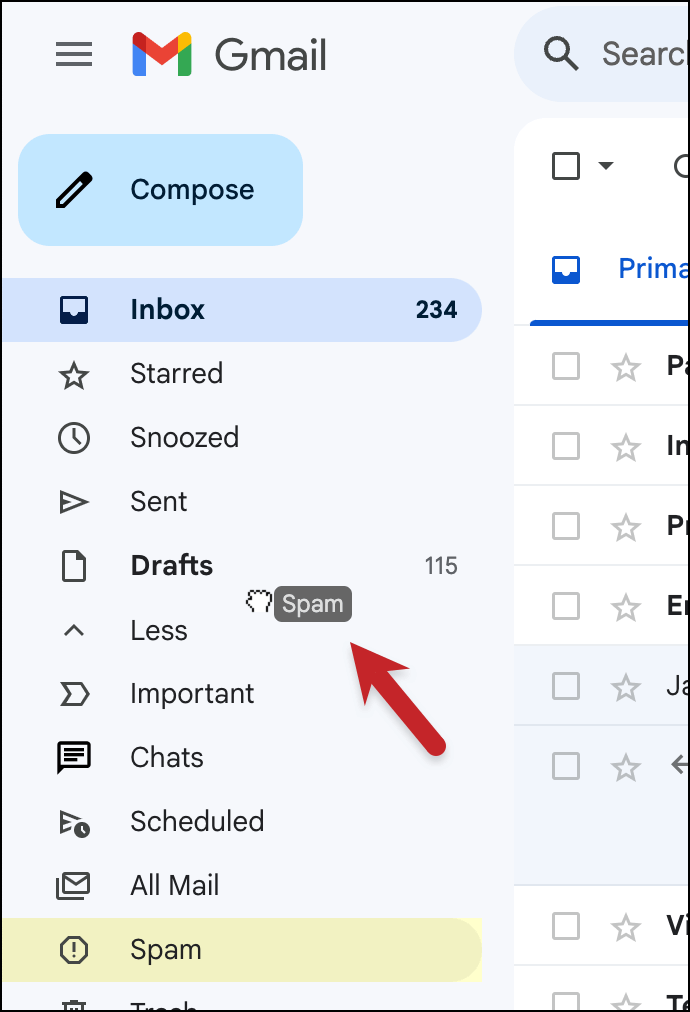
Now that the Spam folder is there, though, there’s no reason for us to look at it when it’s empty.
Click the Settings icon, then the See all settings button. Now go to the Labels tab. And next to Spam, click on show if unread.
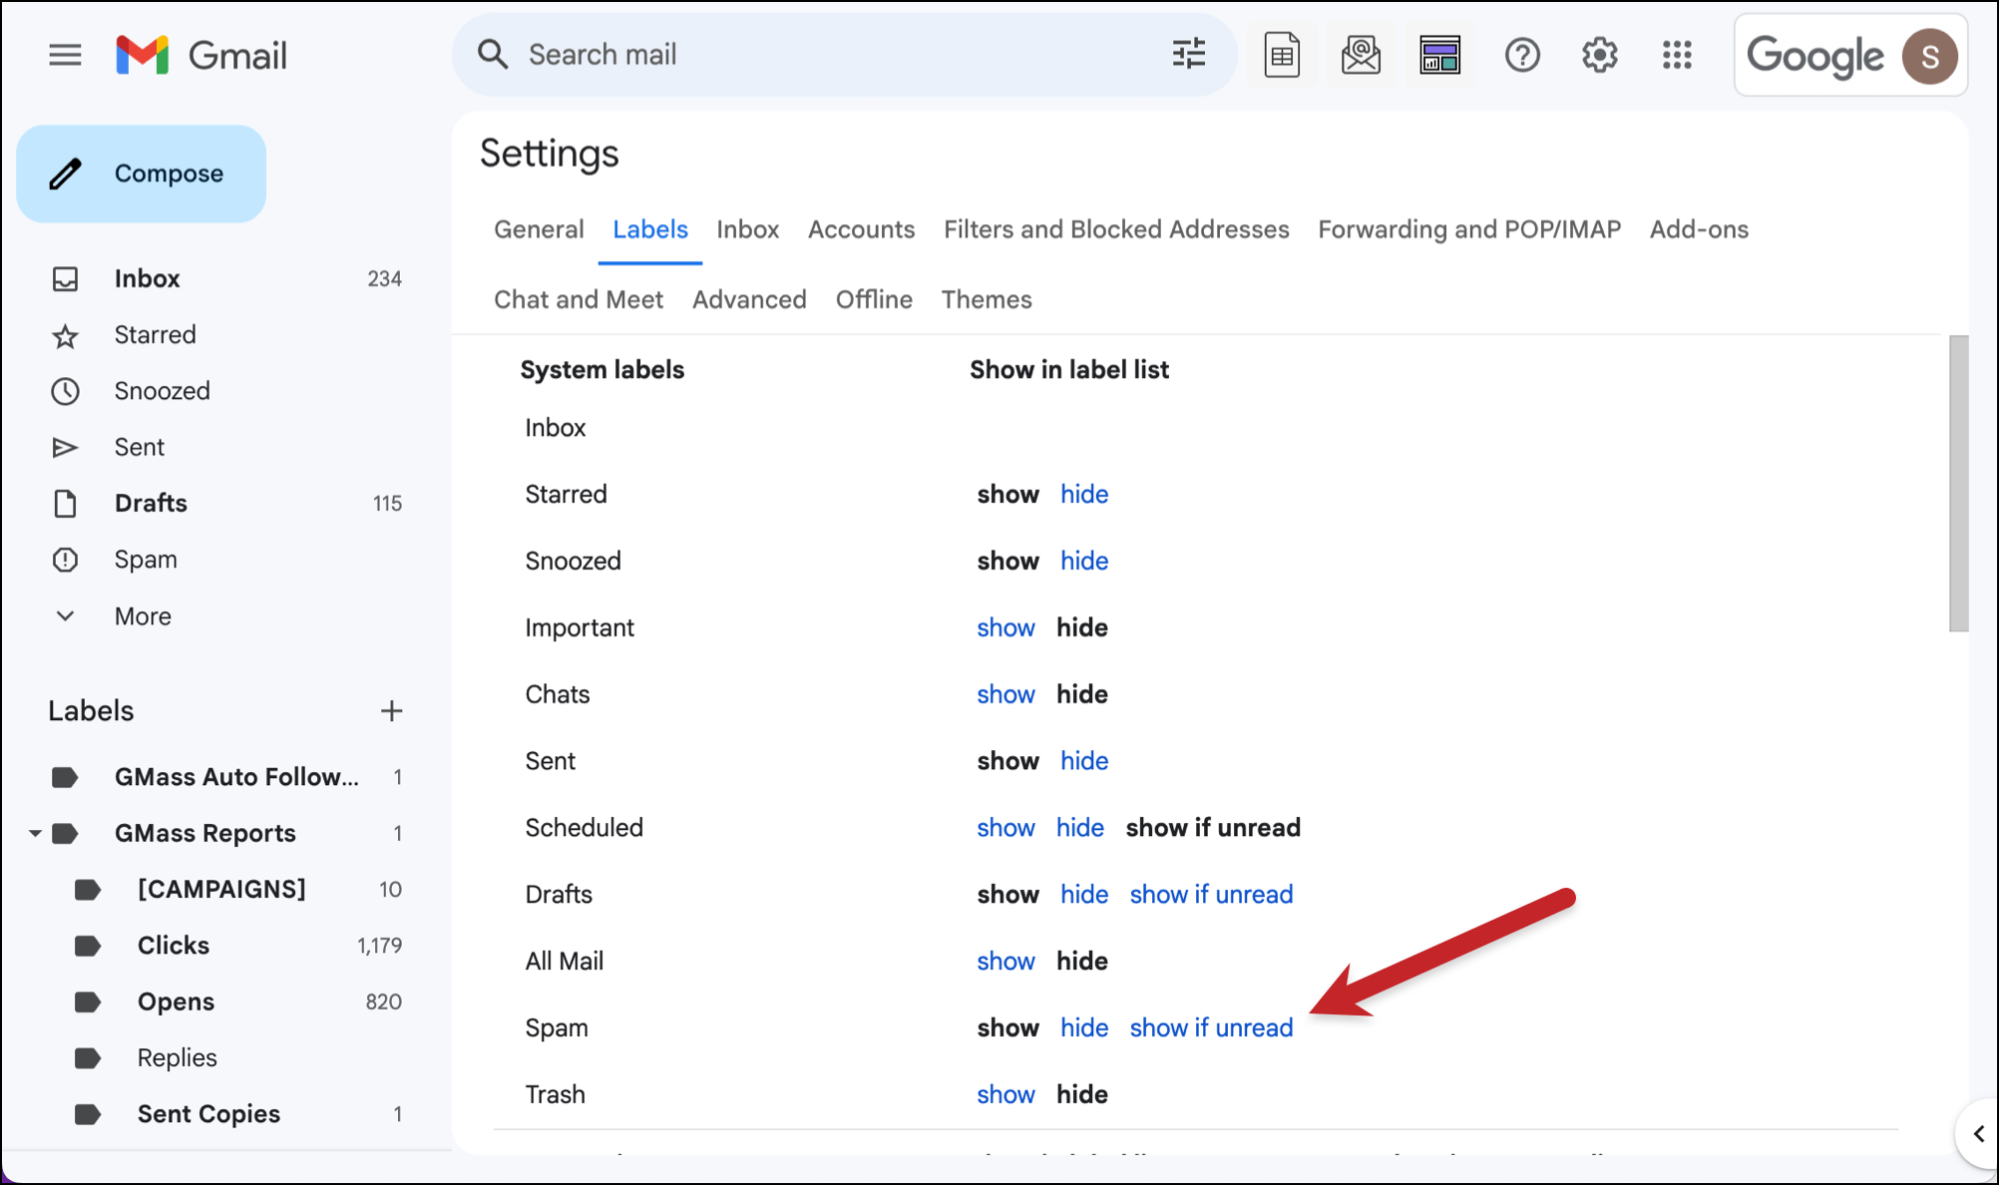
Now Gmail will only show you the Spam folder above the More toggle if it contains an unread message.
5. Using multiple types of stars
I’ve been “starring” emails in Gmail since the beginning. I’m not alone.
Starring emails is a popular Gmail feature — more popular than, say, creating labels and adding those to different emails.
After all, adding a star is ultra convenient. You don’t have to create anything or add inbox noise like some labels do. You just click, add a star, and then go to the Starred folder to see your collection.
The problem: The single star isn’t versatile.
For instance, I’ve found myself starring emails for quite a few reasons:
- An important email I wanted to save.
- An email that, due to the nature of my job, had something interesting I could use as an example in a future blog or social post.
- Emails that needed a follow-up from me that I wanted to find after I went to inbox zero.
- Emails where I was waiting on a follow-up from someone else.
All of those different emails got a star — which then made my Starred folder and Gmail searches (is:starred) a jumbled mix. Suddenly, starring emails had become less helpful.
The hidden setting
You aren’t limited to just the yellow star.
Gmail gives you the option to have several different types of stars (six different colors) as well as six other icons.

I recommend going with around four of these — not the whole list, as tempting as that is — because, after you’ve enabled them, you cycle through them by clicking or tapping the star multiple times.
If all 12 are enabled, that’s a lot of clicking to use them — and runs contrary to the convenience of using the stars.
How to enable multiple stars (and then search for them)
You can access the Stars menu by clicking the Settings icon, clicking See all settings, then scrolling to the Stars section in General.
Choose the stars/icons you want to use by dragging them from the “Not in use” row to the “In use” row.
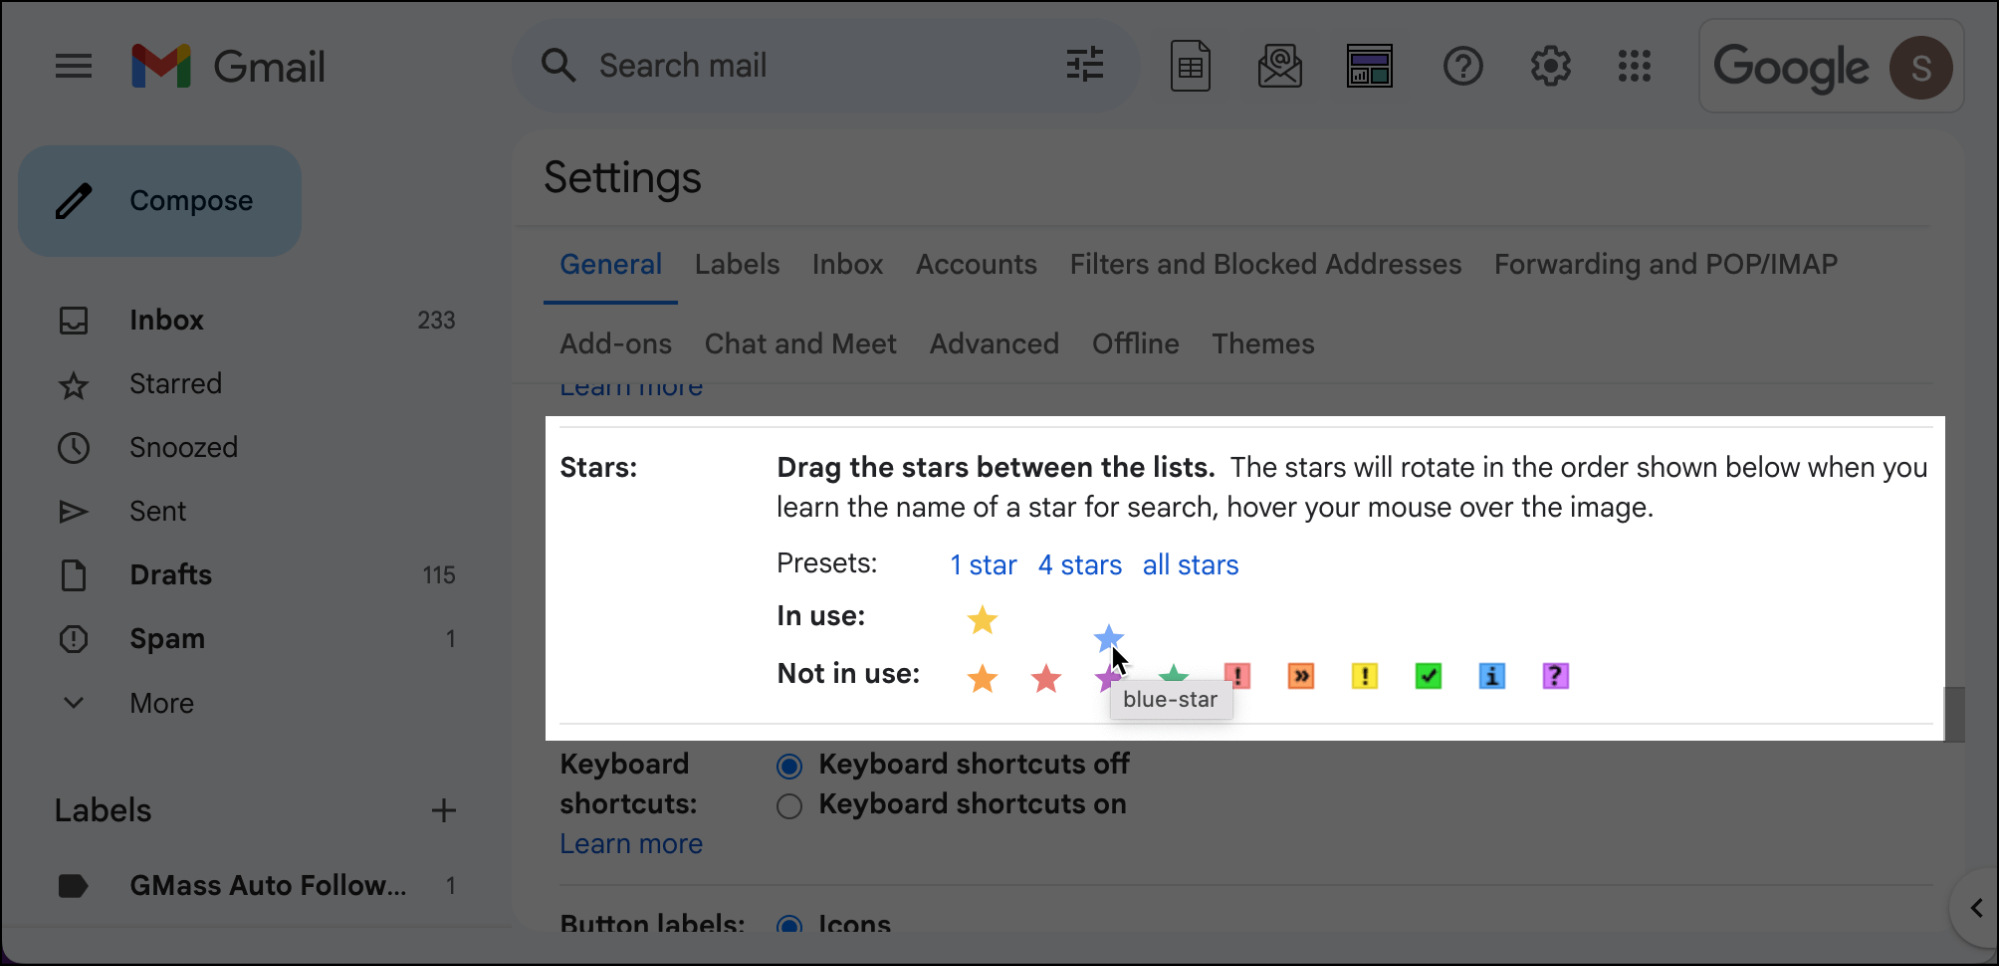
When you’re done, scroll to the bottom of the settings page and click the Save Changes button.
Now you can use your stars by clicking the star icon next to any email. Each time you click, Gmail will rotate through your selected star options.
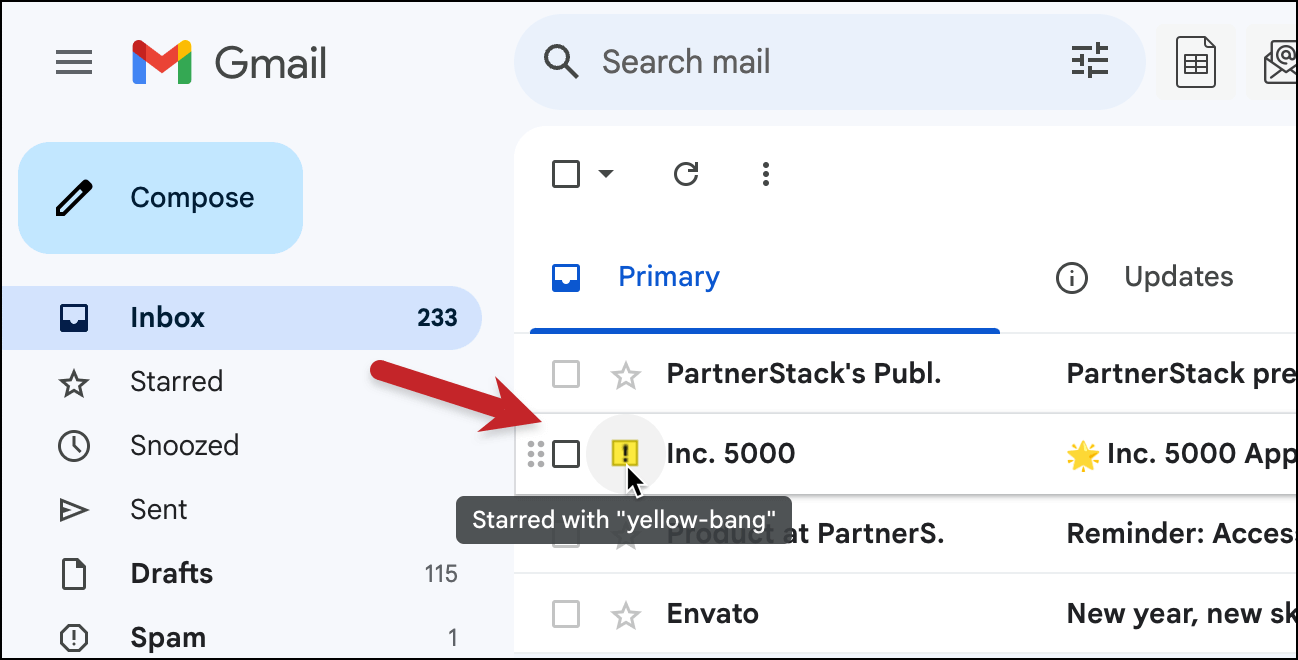
Once you’ve started using your stars, you can search for emails that have each star variety as well.
Use has: followed by the name of the star. (You can find the star’s name by mousing over it.) For instance, has:blue-star or has:yellow-bang.

But even without searching, the different star types give you a quick visual reference when you’re scanning through your inbox.
Squeezing Even More Hidden Power Out of Gmail
These hidden settings are a good step toward getting more out of Gmail.
But I want to introduce you to a way to give Gmail absolute superpowers.
GMass is a Chrome extension that transforms Gmail into an email marketing, mail merge, cold outreach, and email tracking platform.
You can quickly and easily send any and all email campaigns — right from inside Gmail, where they slide right into your workflow.
There are ~400,000 people who use GMass to send every type of email campaign imaginable. And they’ve rated GMass an average of 4.8 out of 5 stars across 10,000+ reviews.
Why? Here are some of the highlights (and things GMass does different and better than anyone else)…
- Unlimited emails, contacts, and campaigns.
- Special deliverability tools to help you get to the inbox, like Spam Solver.
- A native integration with Google Sheets for easy mail merges.
- Quick auto follow-ups.
- And dozens more, from A/B testing to simple email polls to AI campaign creation.
The best part? You can try GMass for free with no credit card required.
Just download the Chrome extension, connect your Gmail account, and you’ll be sending your first campaign in a matter of minutes.
Send incredible emails & automations and avoid the spam folder — all in one powerful but easy-to-learn tool
TRY GMASS FOR FREE
Download Chrome extension - 30 second install!
No credit card required

