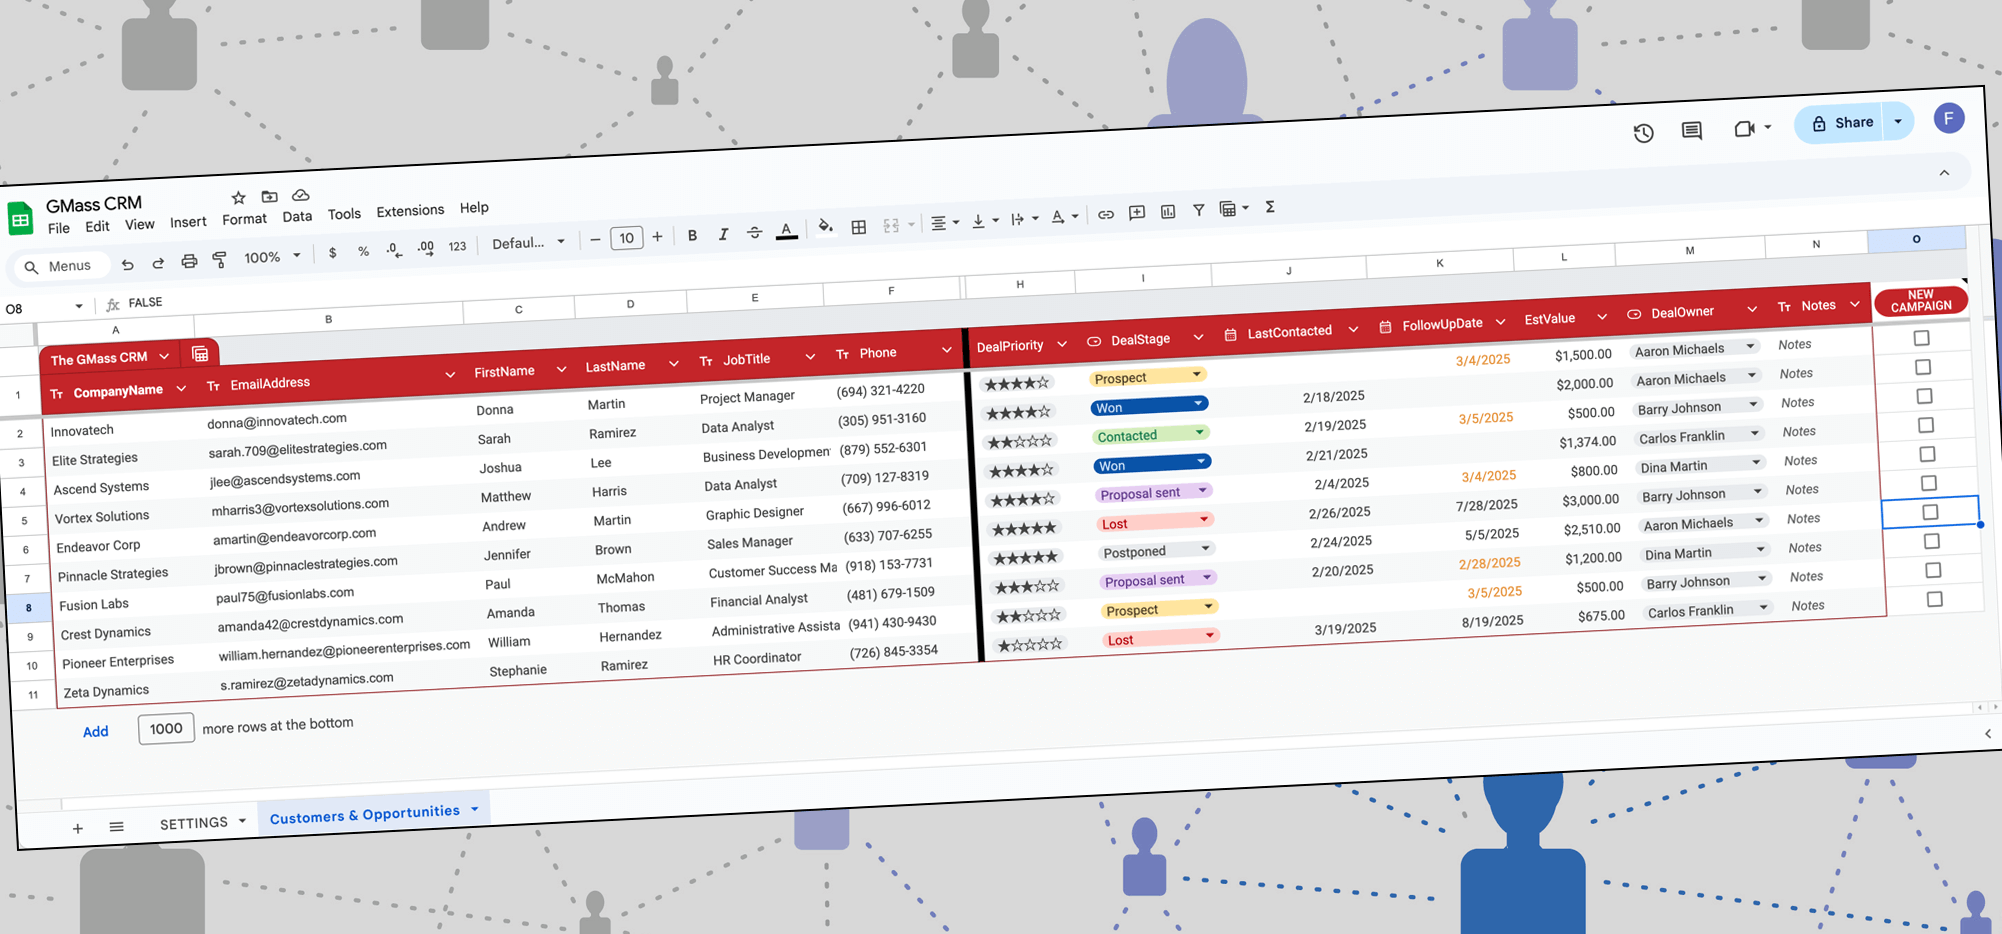
Google Sheets is great as a CRM when you’re growing — and it’s especially great for GMass users.
After all, most GMass campaigns use Google Sheets as their data source for mail merge — so if your CRM is inside of Google Sheets, that saves several steps.
Rather than leaving you on your own to create your own CRM in Google Sheets, we built a free one for you. And we even added some features to make it perfect for GMass campaigns.

Of course, it’s not a complete, fully-functional CRM that would cost hundreds or thousands of dollars a month. I didn’t just build a replica of Hubspot in Google Sheets.
In fact, we intentionally tried to keep it as simple as possible, with just the most necessary features, to make it more user-friendly and easy to get started.
You may, one day, outgrow a Google Sheets CRM.
But until you reach that point, this should be a really handy way to manage your customers and prospects with zero learning curve — and the smoothest possible option to get your customers from your CRM into your GMass campaigns.
Google Sheets CRM Template: Table of Contents
- How to Set Up the GMass Google Sheets CRM
- How to Use the CRM on an Ongoing Basis
- How to Create a New GMass Campaign Worksheet
- Installing Updates to the Google Sheets CRM
- Google Sheets CRM Template: Next Steps
How to Set Up the GMass Google Sheets CRM
Here’s how to set up this CRM and start customizing it to make it your own.
Make a copy of the Google Sheet in your account
The first step is to make a copy of the Google Sheets CRM template in your own account.
That’s easy to do: Just click this link and it will make a copy of the Google Sheet in your account. (You won’t be able to edit the sheet until you make your copy. So don’t request edit permissions on my account.)
Current version: GMass CRM v1.1
Important: Do not change the names of the SETTINGS or Customers & Opportunities worksheets. You can change the names of any future worksheets you add in this file. You can change any column names. Just don’t change the names of those two worksheets.
Add your own data
Go into the Customers & Opportunities worksheet of the Google Sheet. You’ll see 10 rows of filler data in there.
Feel free to delete all that data and replace it with your own. You can add as many rows as you need to the Google Sheet to contain all of your prospects and customers.
You don’t need to fill in every field for every customer.
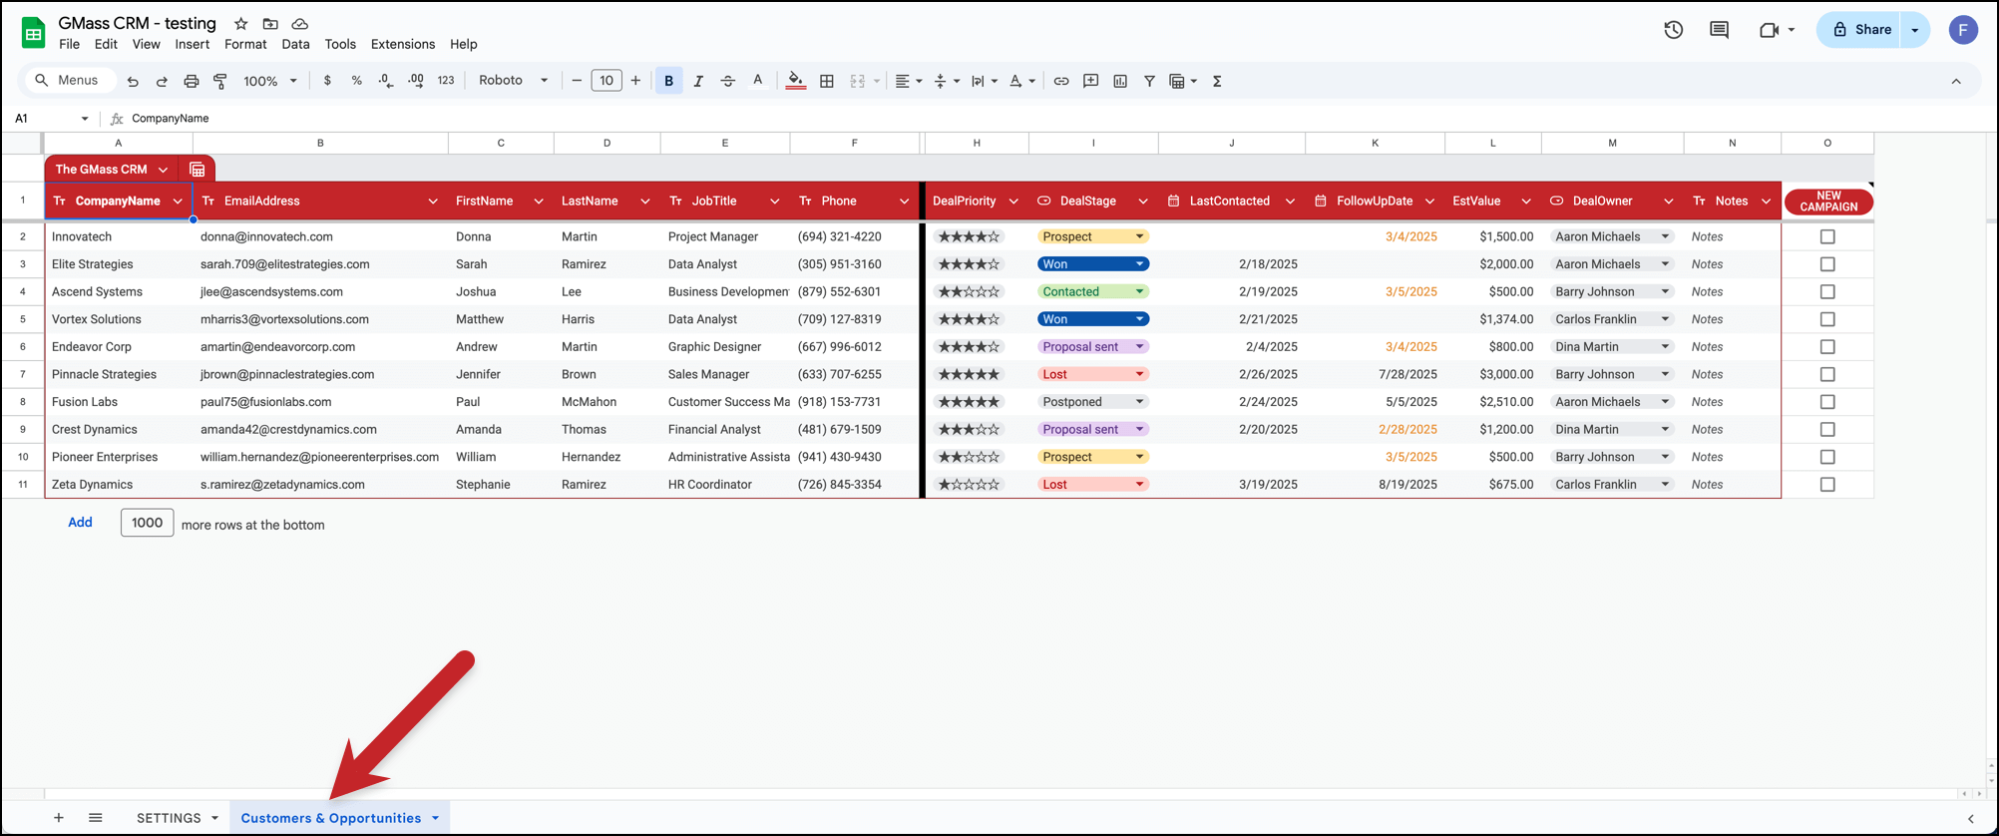
(For the sake of this demo, note I’m going to stick with the filler data.)
Editing the dropdown menus
The first thing you’ll want to change are the two columns with dropdown menus. Those are the columns called DealStage and DealOwner.
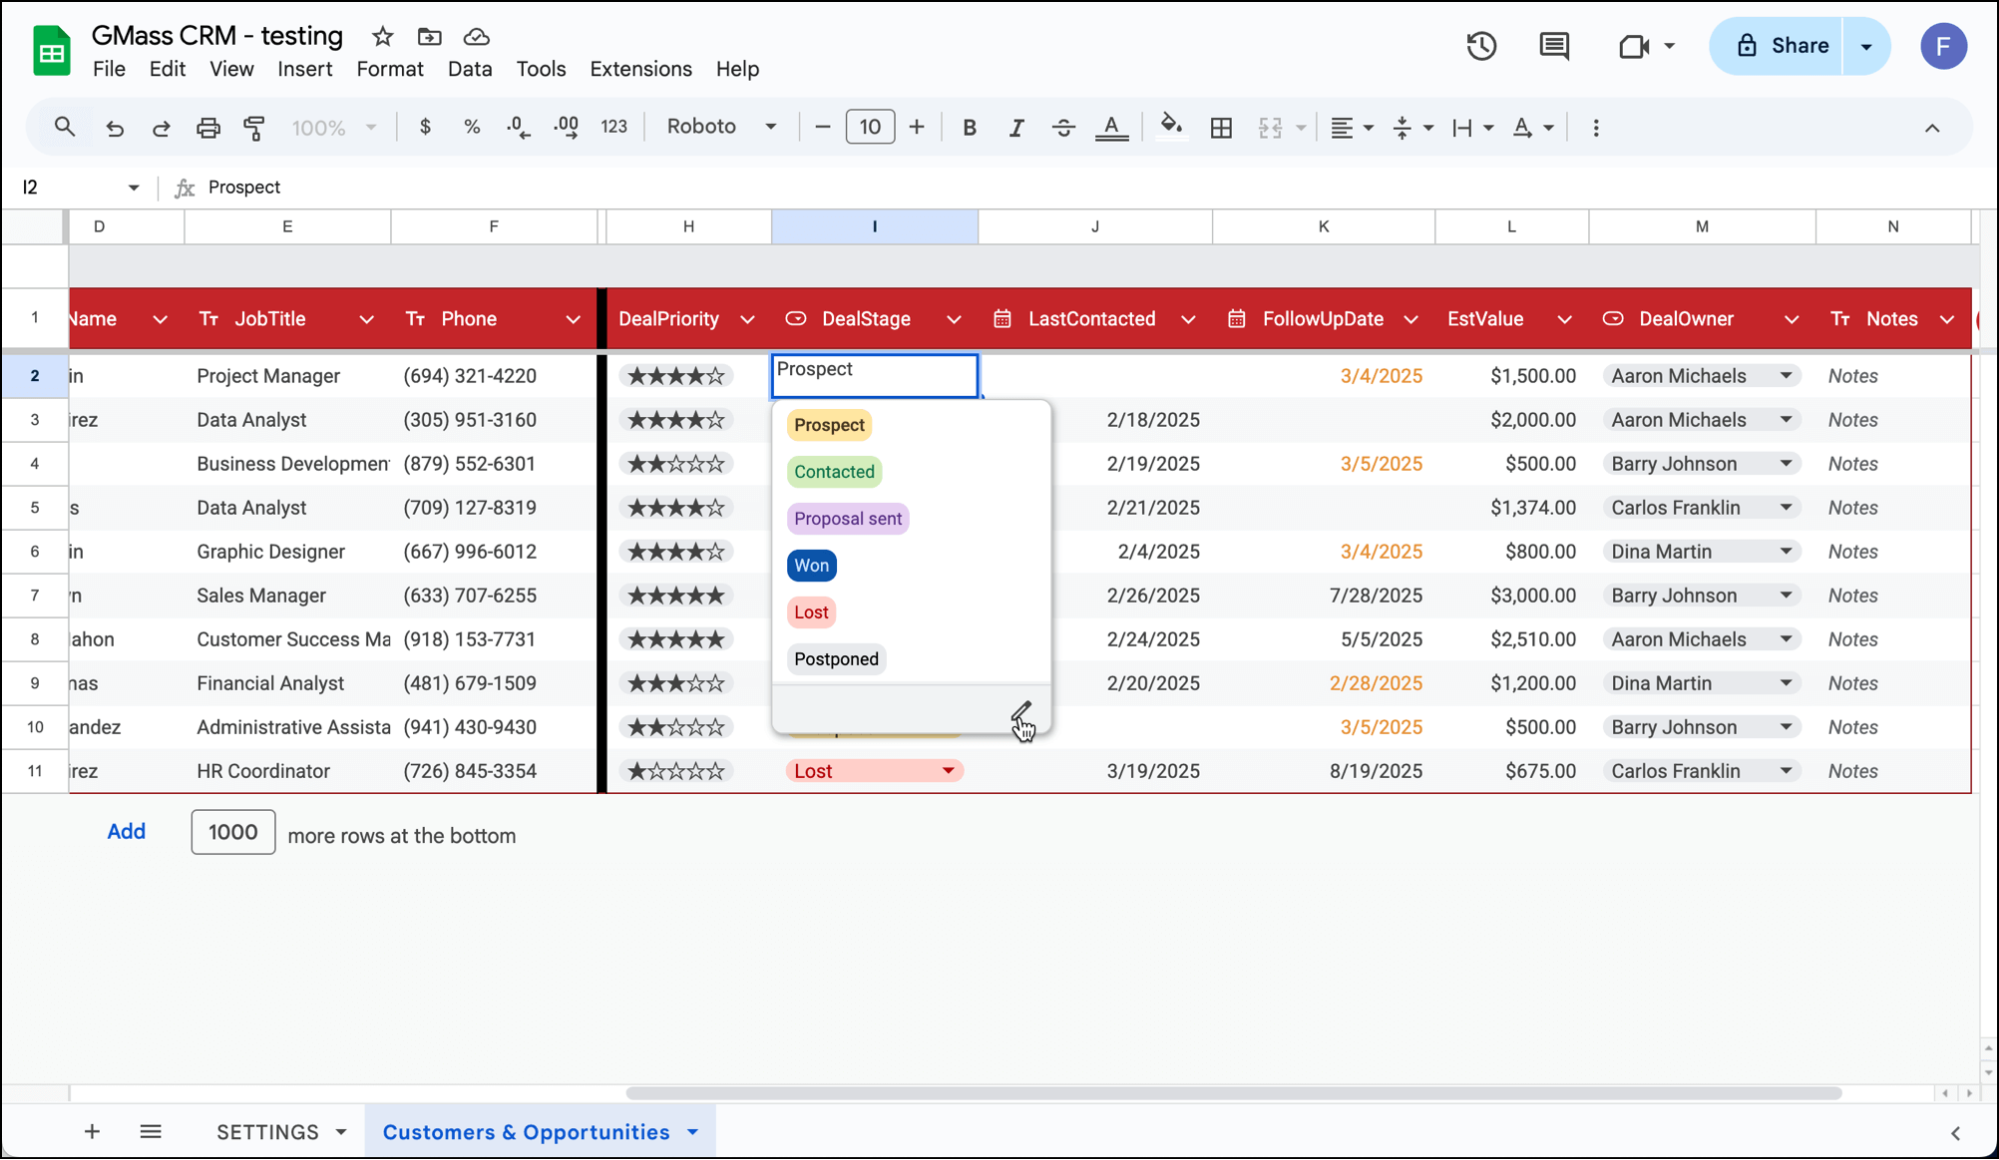
We’ve pre-filled some common options for the deal stage: Prospect, Contacted, Proposal Sent, Won, Lost, and Postponed.
You can change these, add new options, even add emojis and change the colors. To do any type of editing, click into any of the menus, then click on the pen at the bottom.
That will bring up the editing menu on the right side of the screen, where you can change, add, or otherwise edit the options.
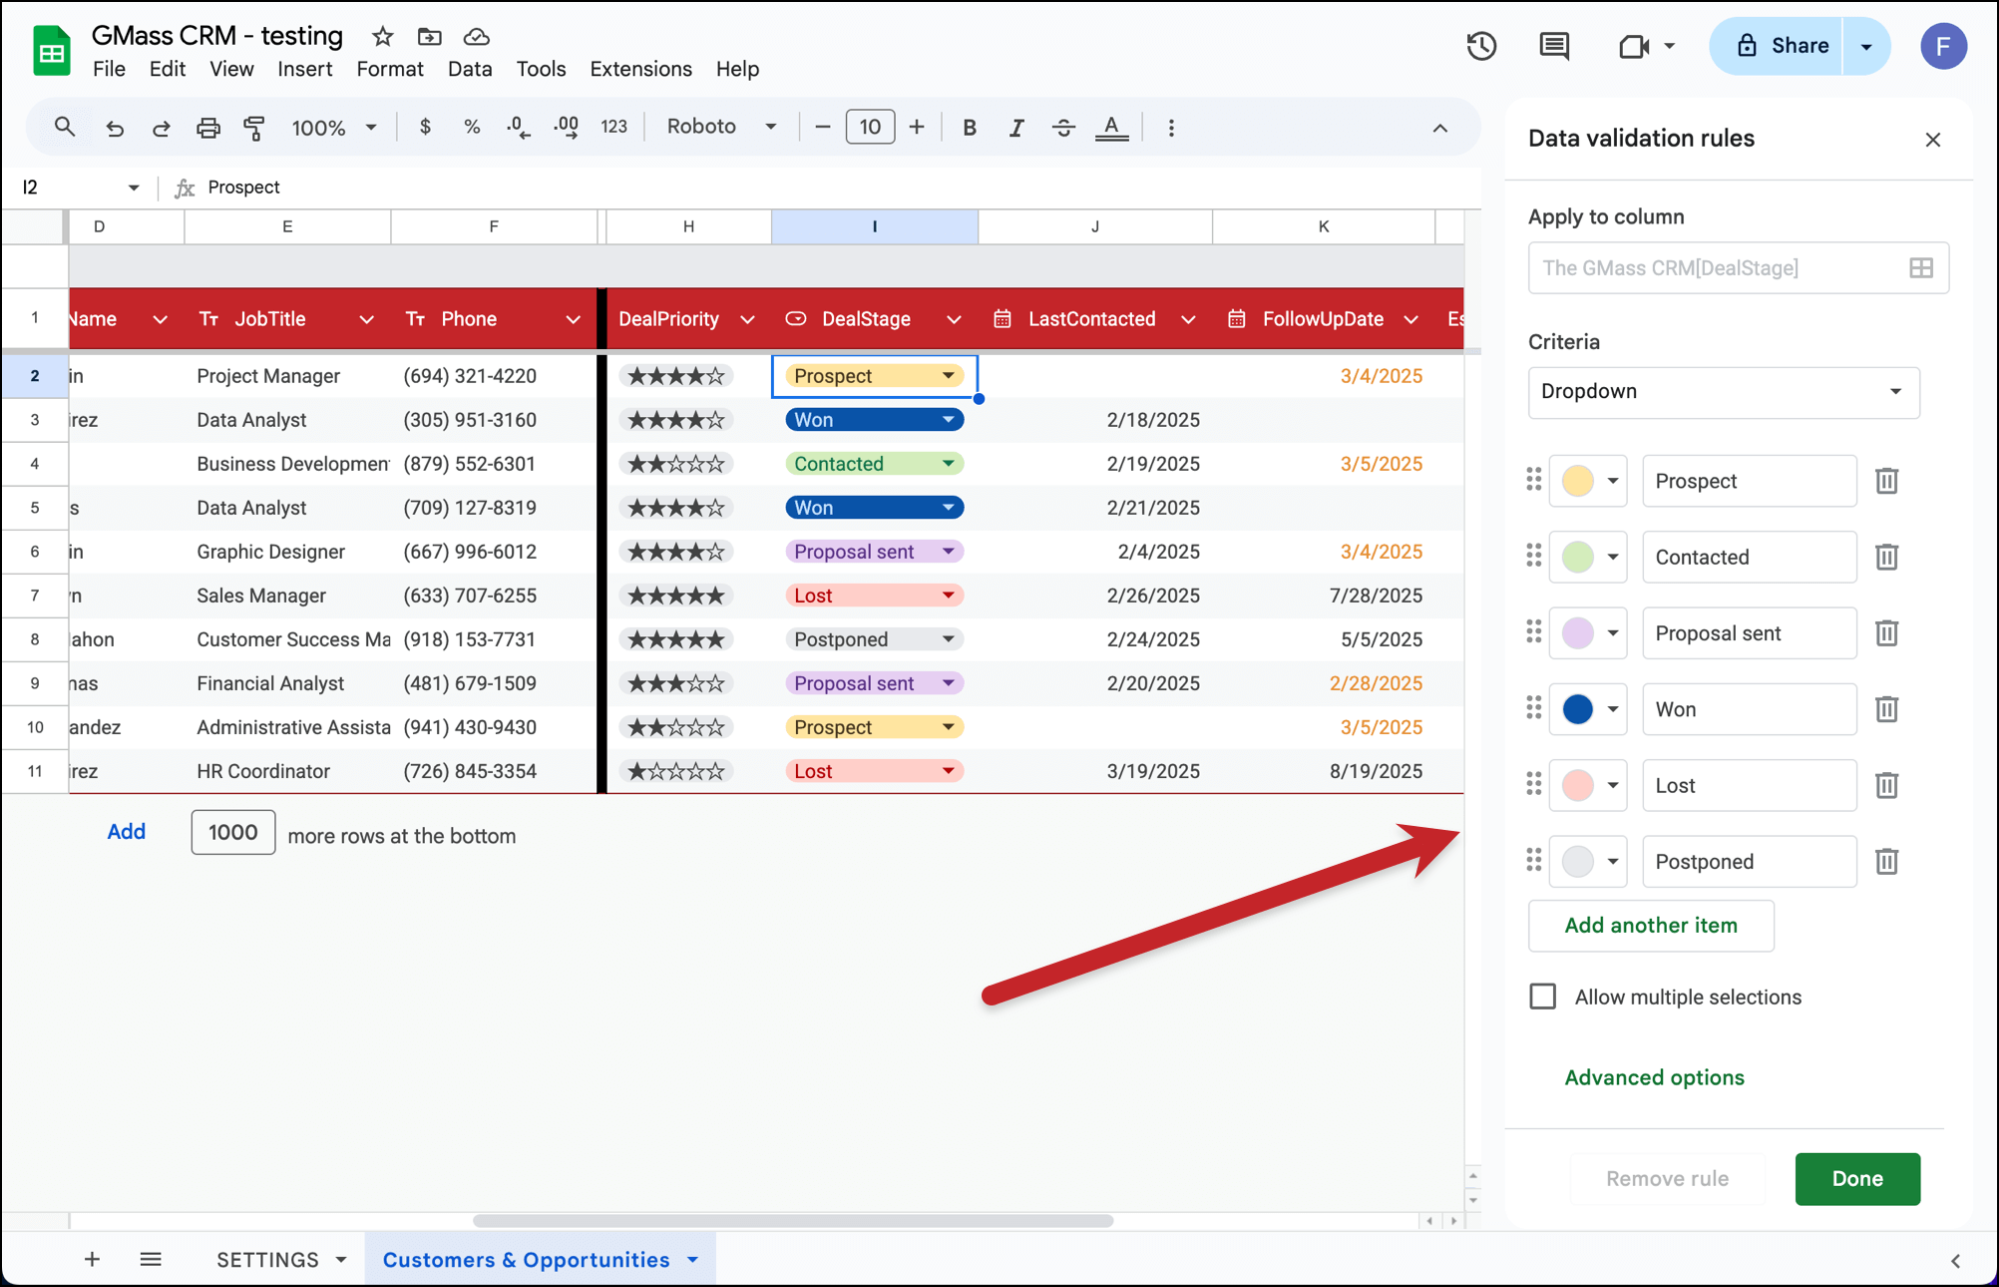
You can use the same process for editing the names of your team for the DealOwner column.
If you’re a solo enterprise, you could also just delete the DealOwner column completely.
Adding columns of prospect info
On the left or “Customers” side of the Google Sheet, we have columns for some traditional CRM info for each prospect: company name, email address, first name, last name, job title, and phone number.
You can add as many columns as you need to store prospect info here. For instance, maybe you want to add a column for their location, or their LinkedIn profile, or company website, and so on.
Just make sure you add your prospect info columns somewhere to the left of the column that’s a black line.
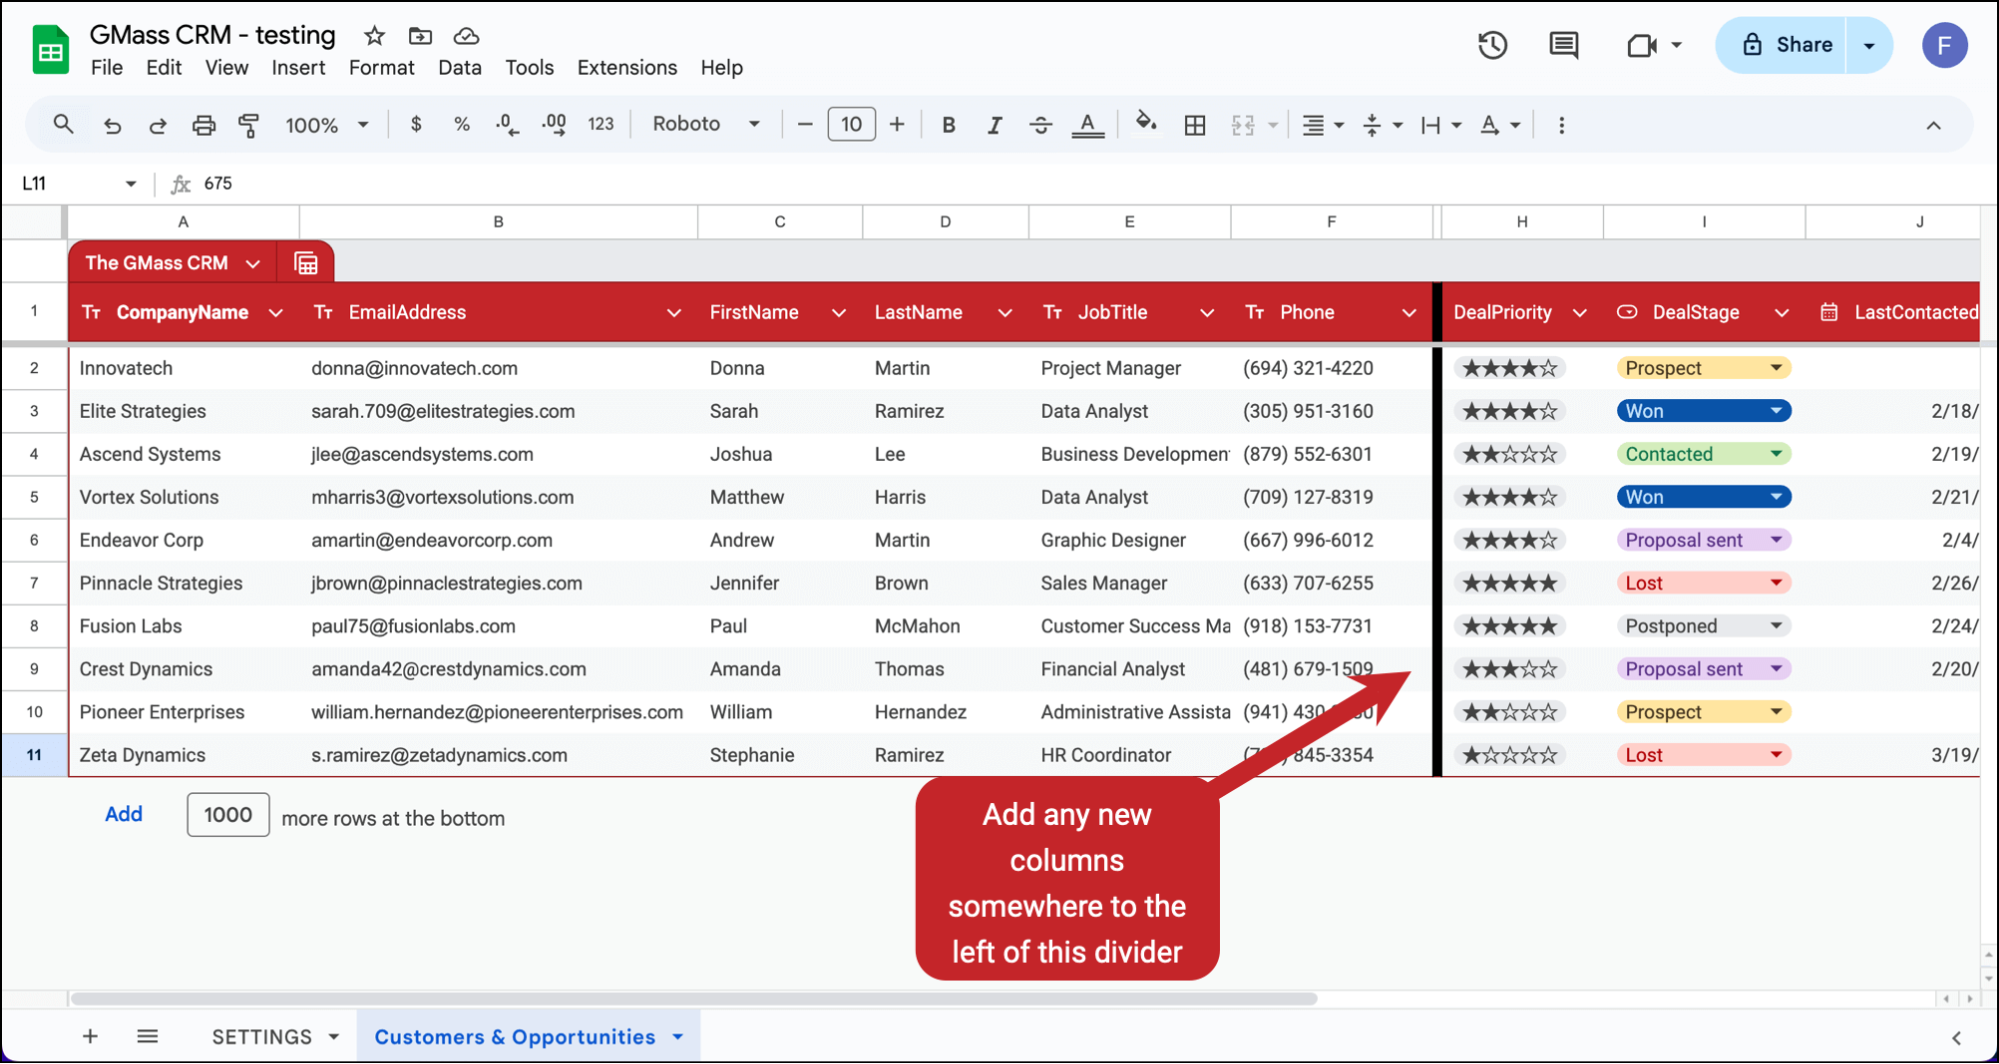
You can also delete any columns (except EmailAddress, as you can’t send campaigns without email addresses).
Adding columns for deal management
You can also add any new columns you need on the right side, or “Opportunities” side, of the Google Sheet, where you keep track of deals.
Make sure to add all of these columns somewhere to the right of the dividing line.
How to Use the CRM on an Ongoing Basis
With all your prospect data in the Customers & Opportunities worksheet, you can now use this system for day-to-day management of your customers.
Sorting, filtering, and grouping
We have the data in a Google Sheets table here for easy sorting, filtering, and grouping.
To start the process of sorting/filtering/grouping, click on the sheet icon in the top left corner.
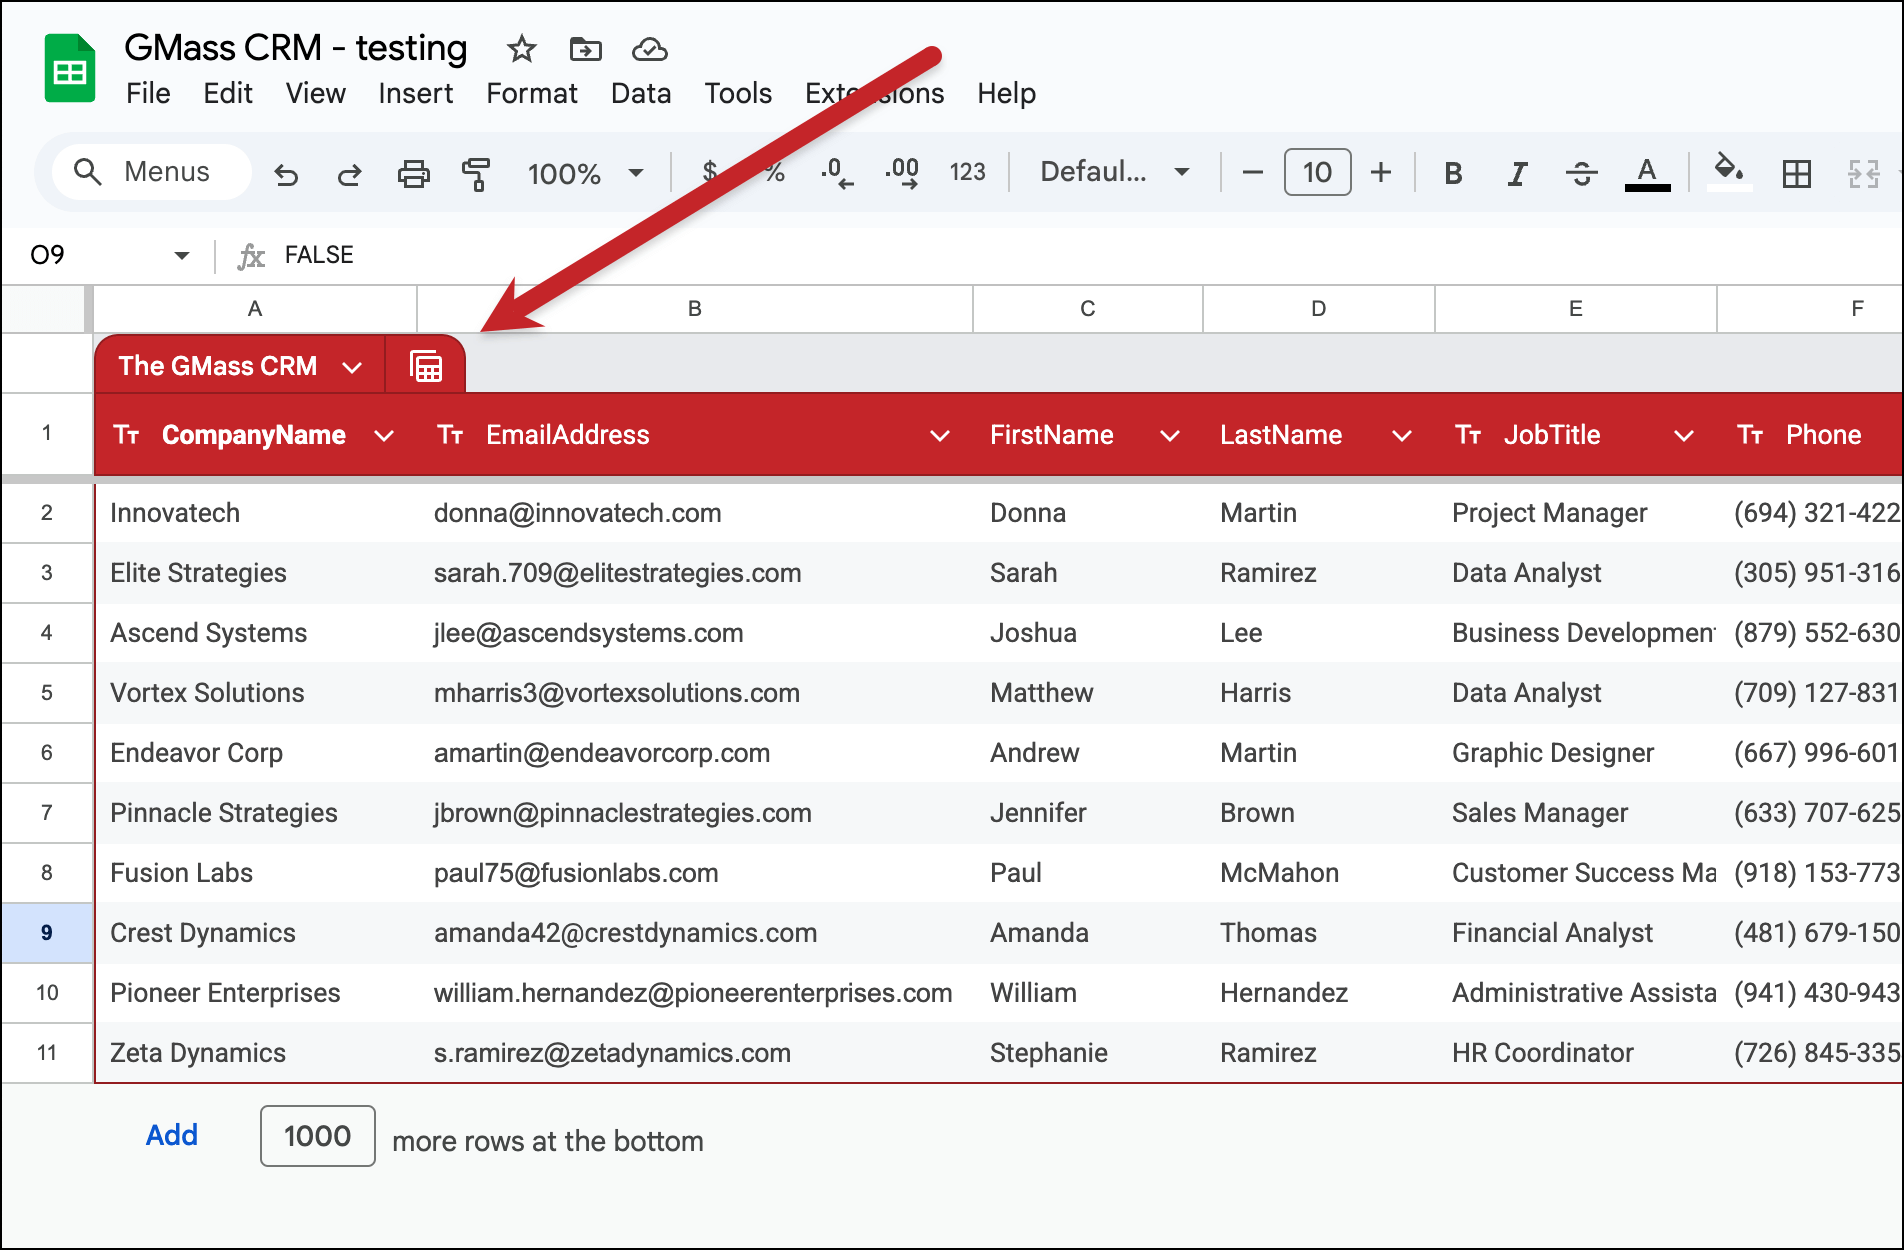
You can group your data with the grouping option. For instance, you could group all prospects by stages.
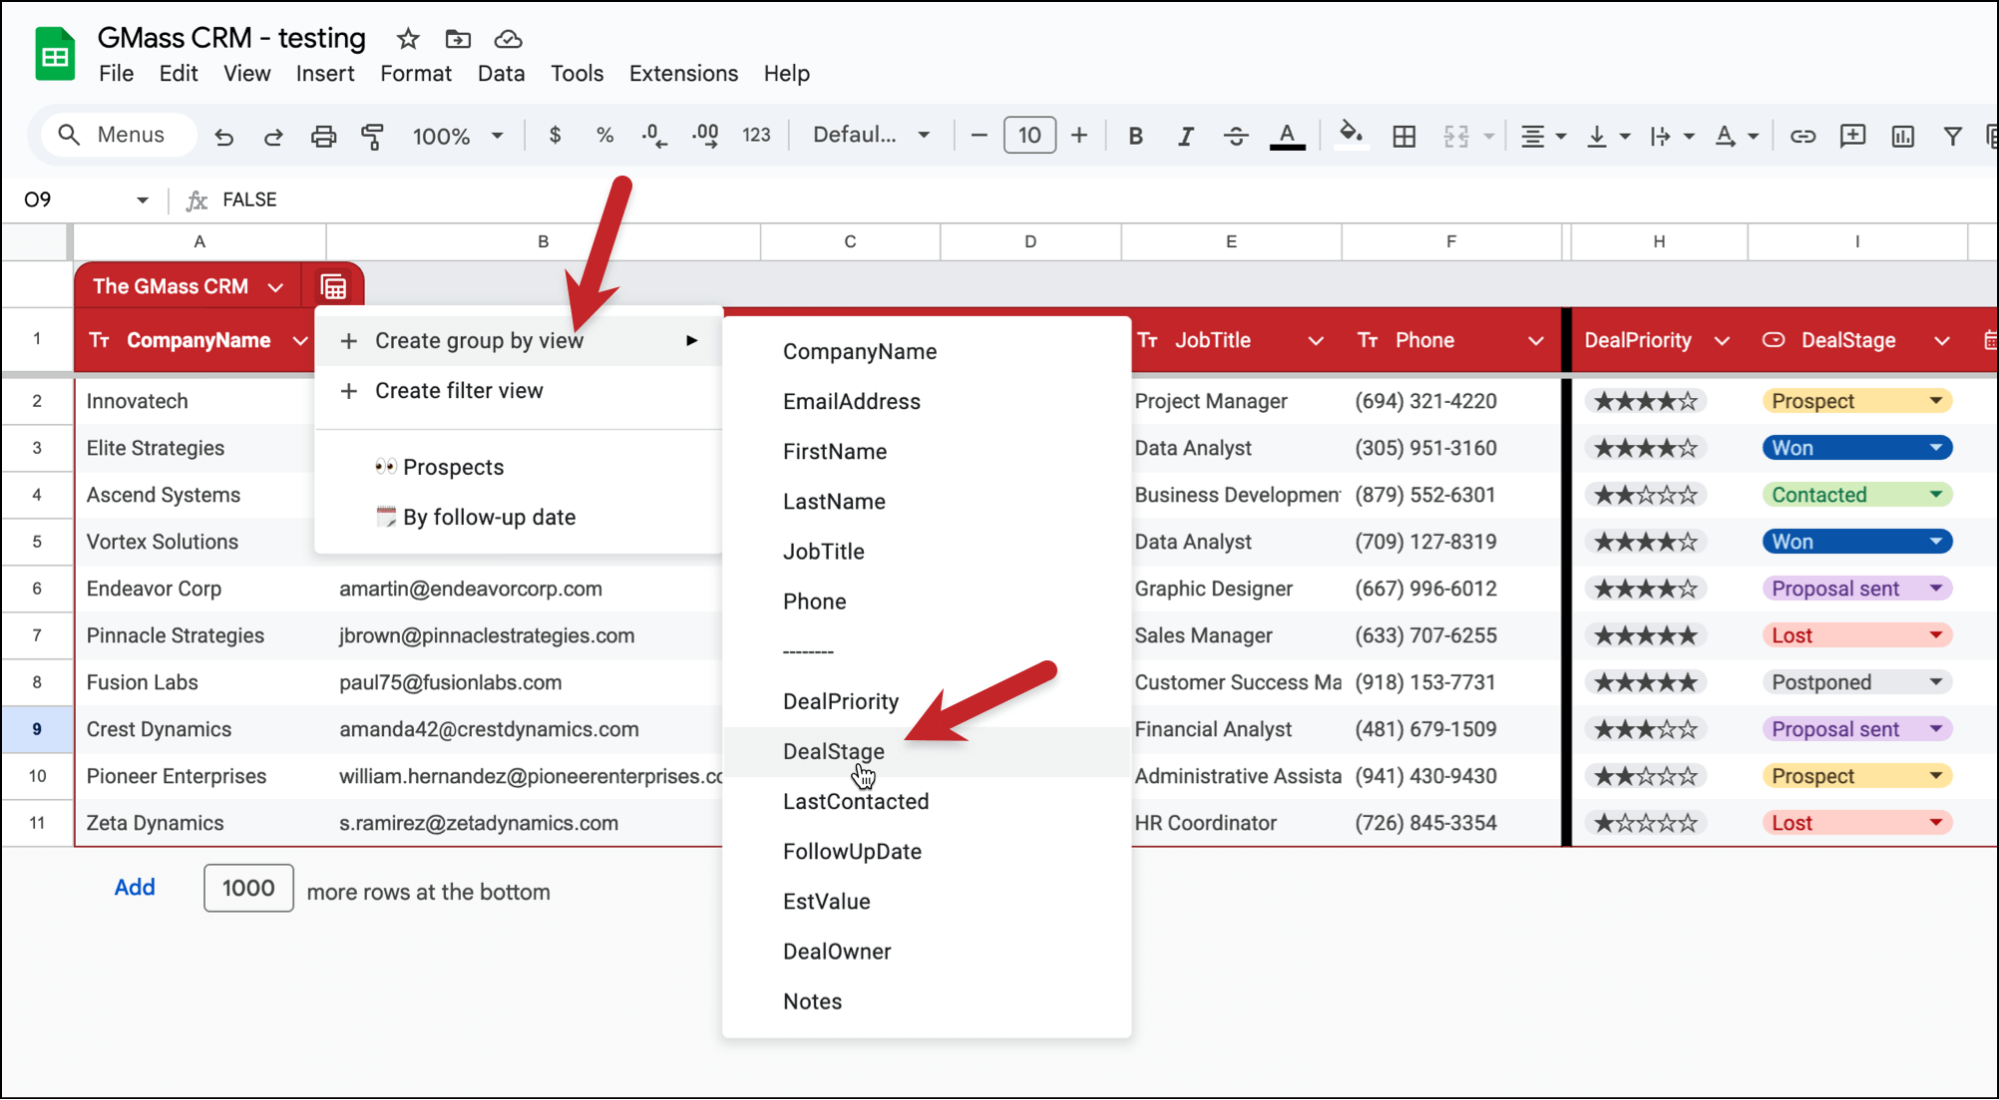
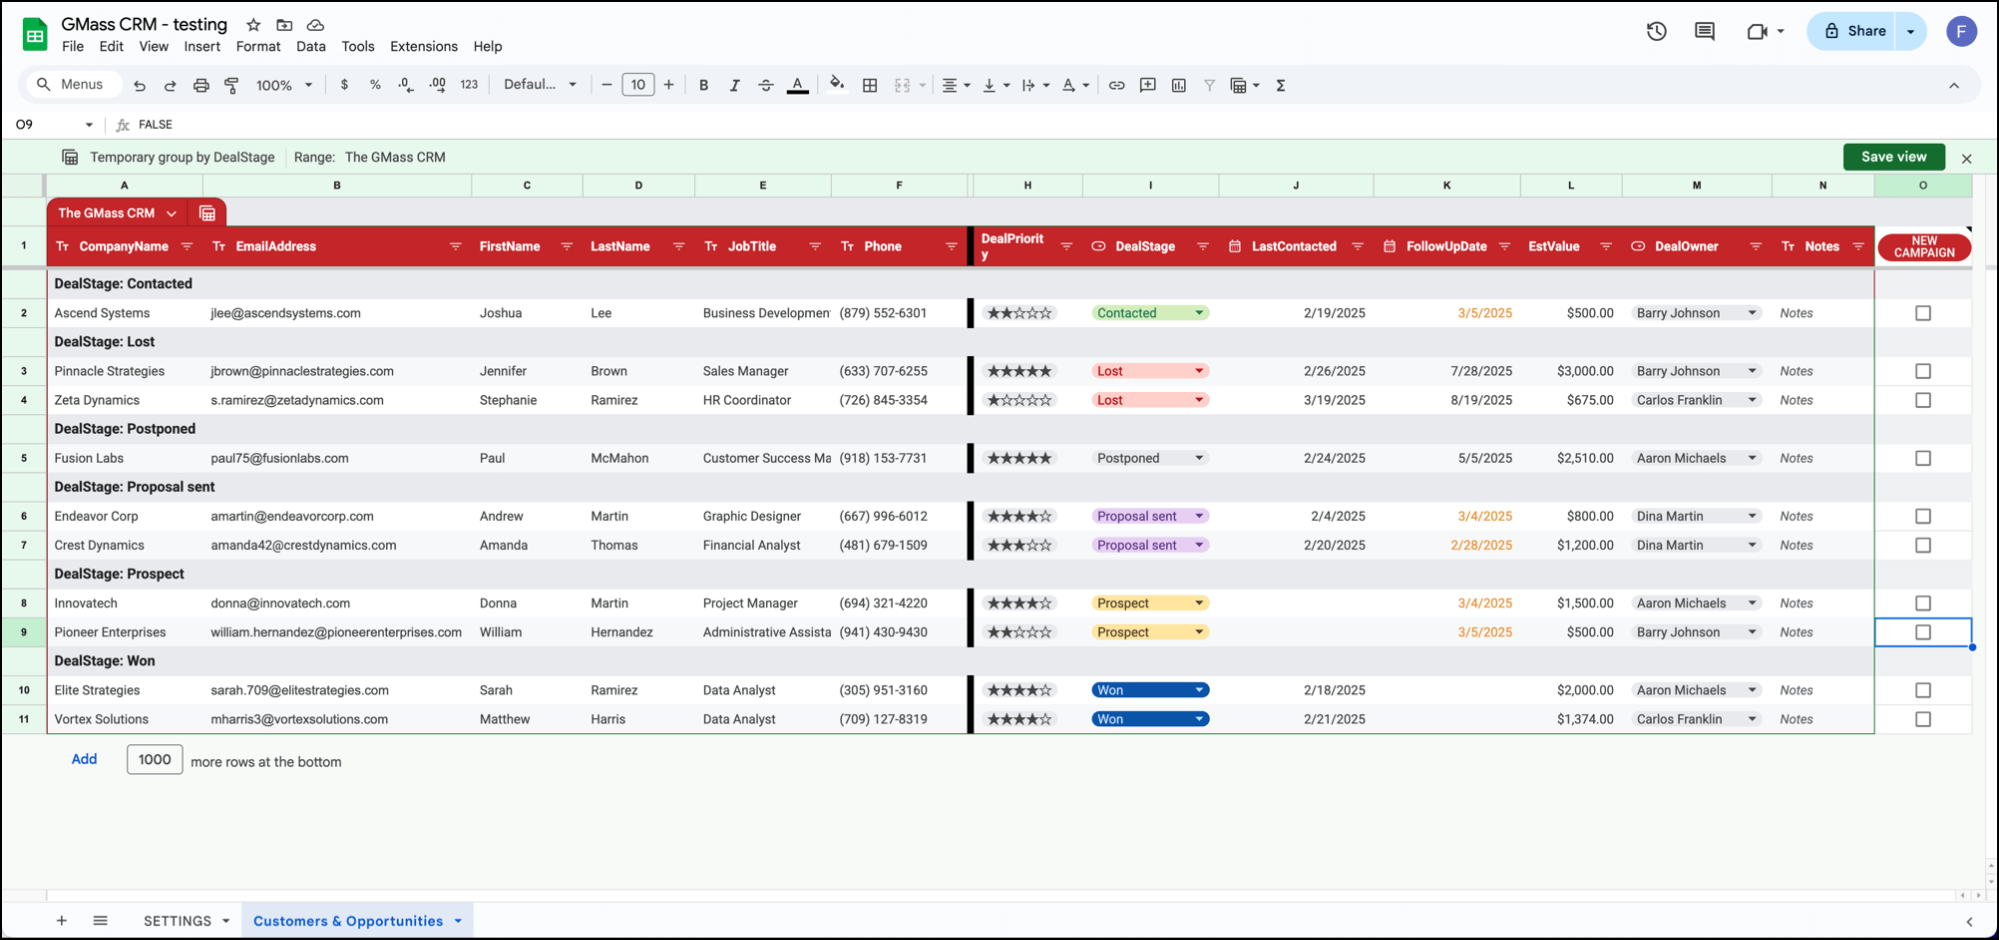
And here’s what the result looks like.
You can also create a Filter view. For example, I could filter by deal owner just to see one person’s customers. Start by choosing Create filter view.
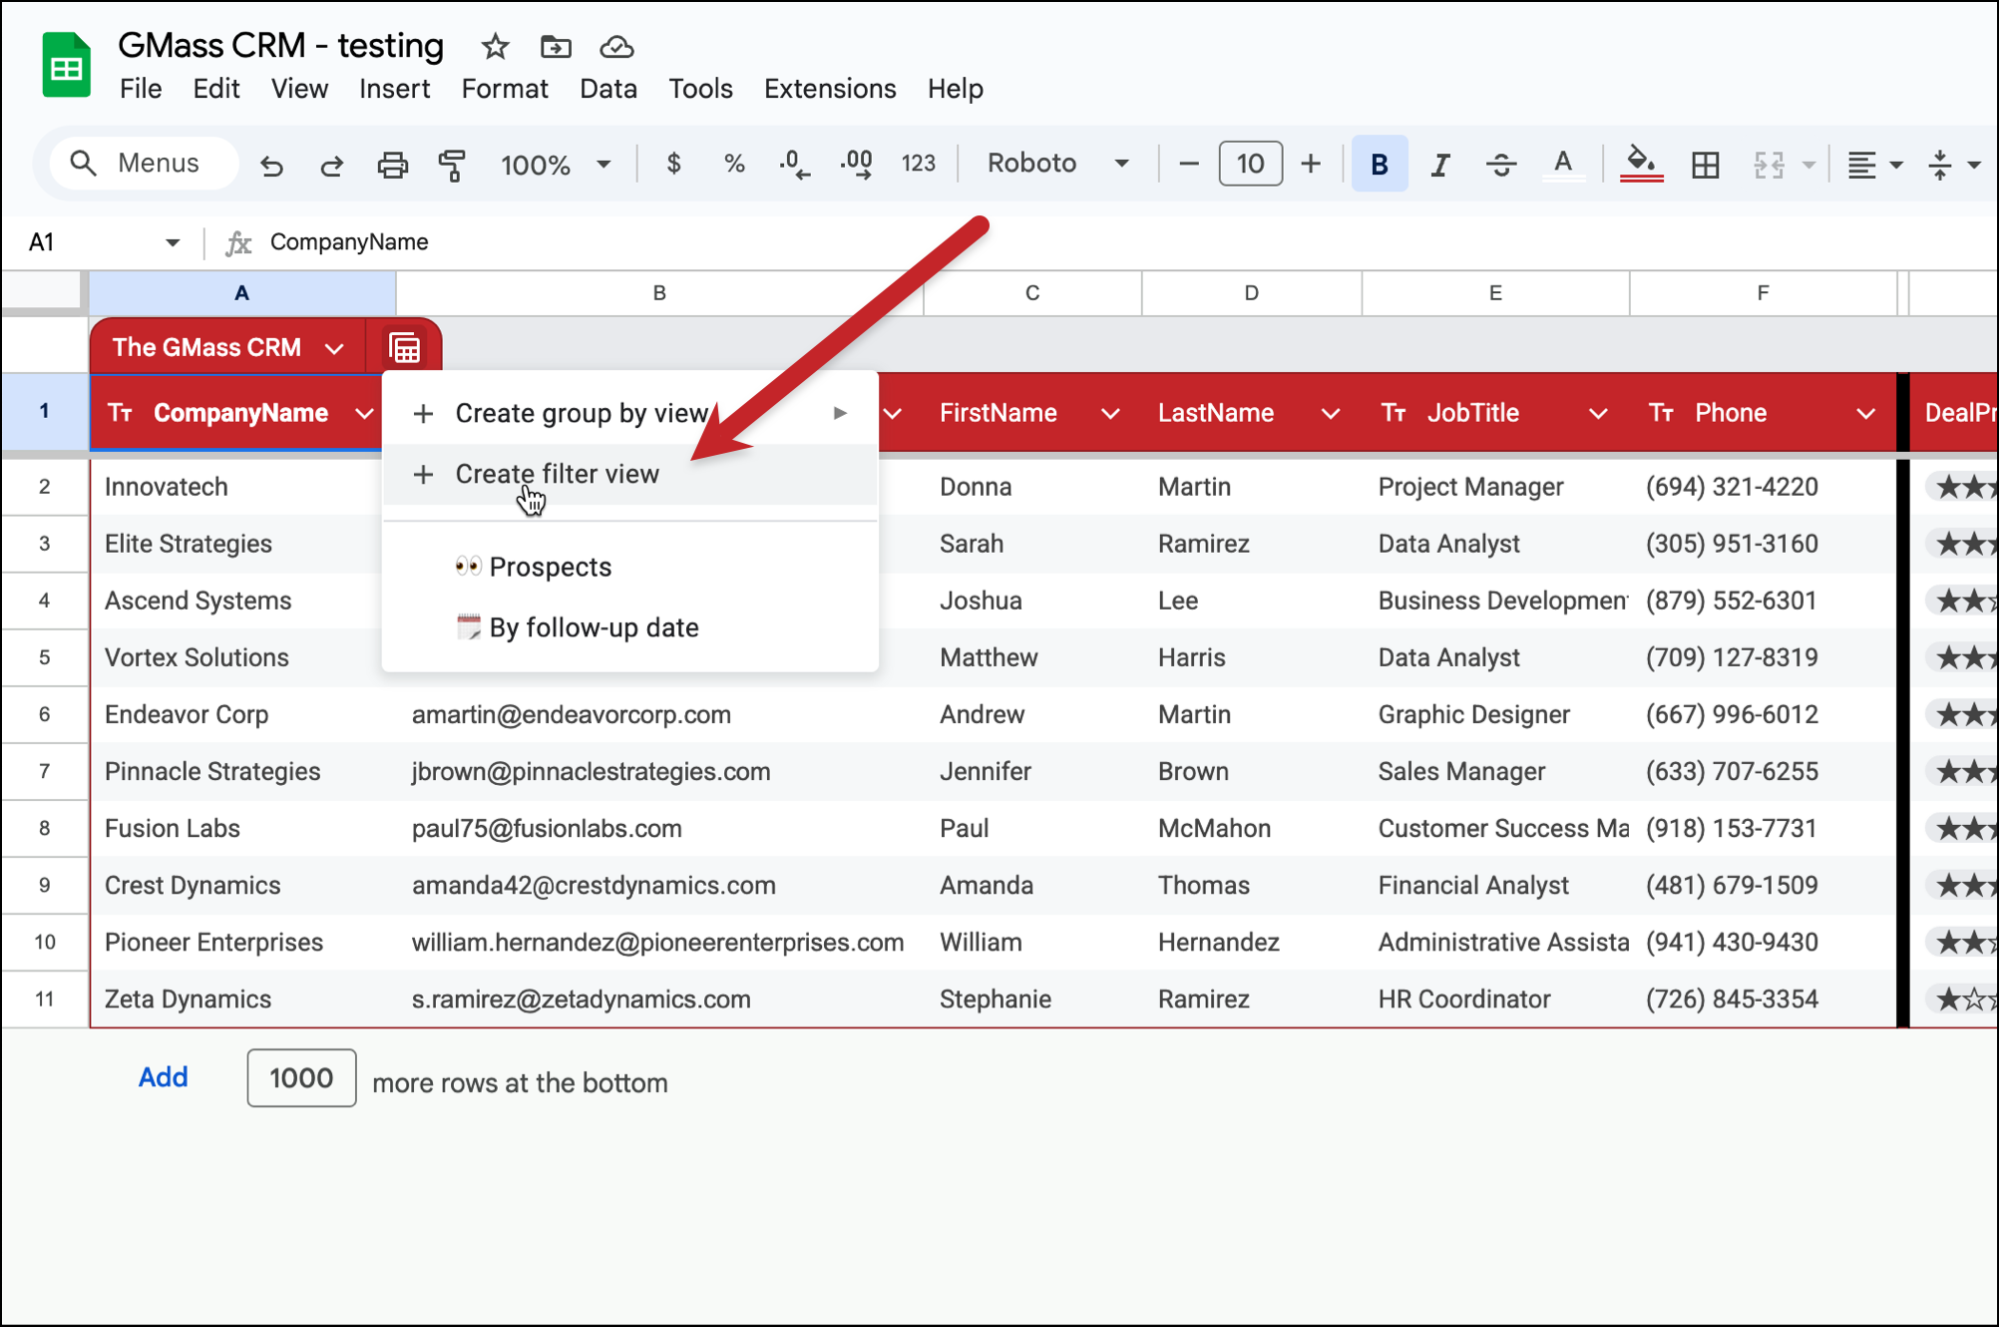
Then click the filtering icon in your desired column, and set your filter.
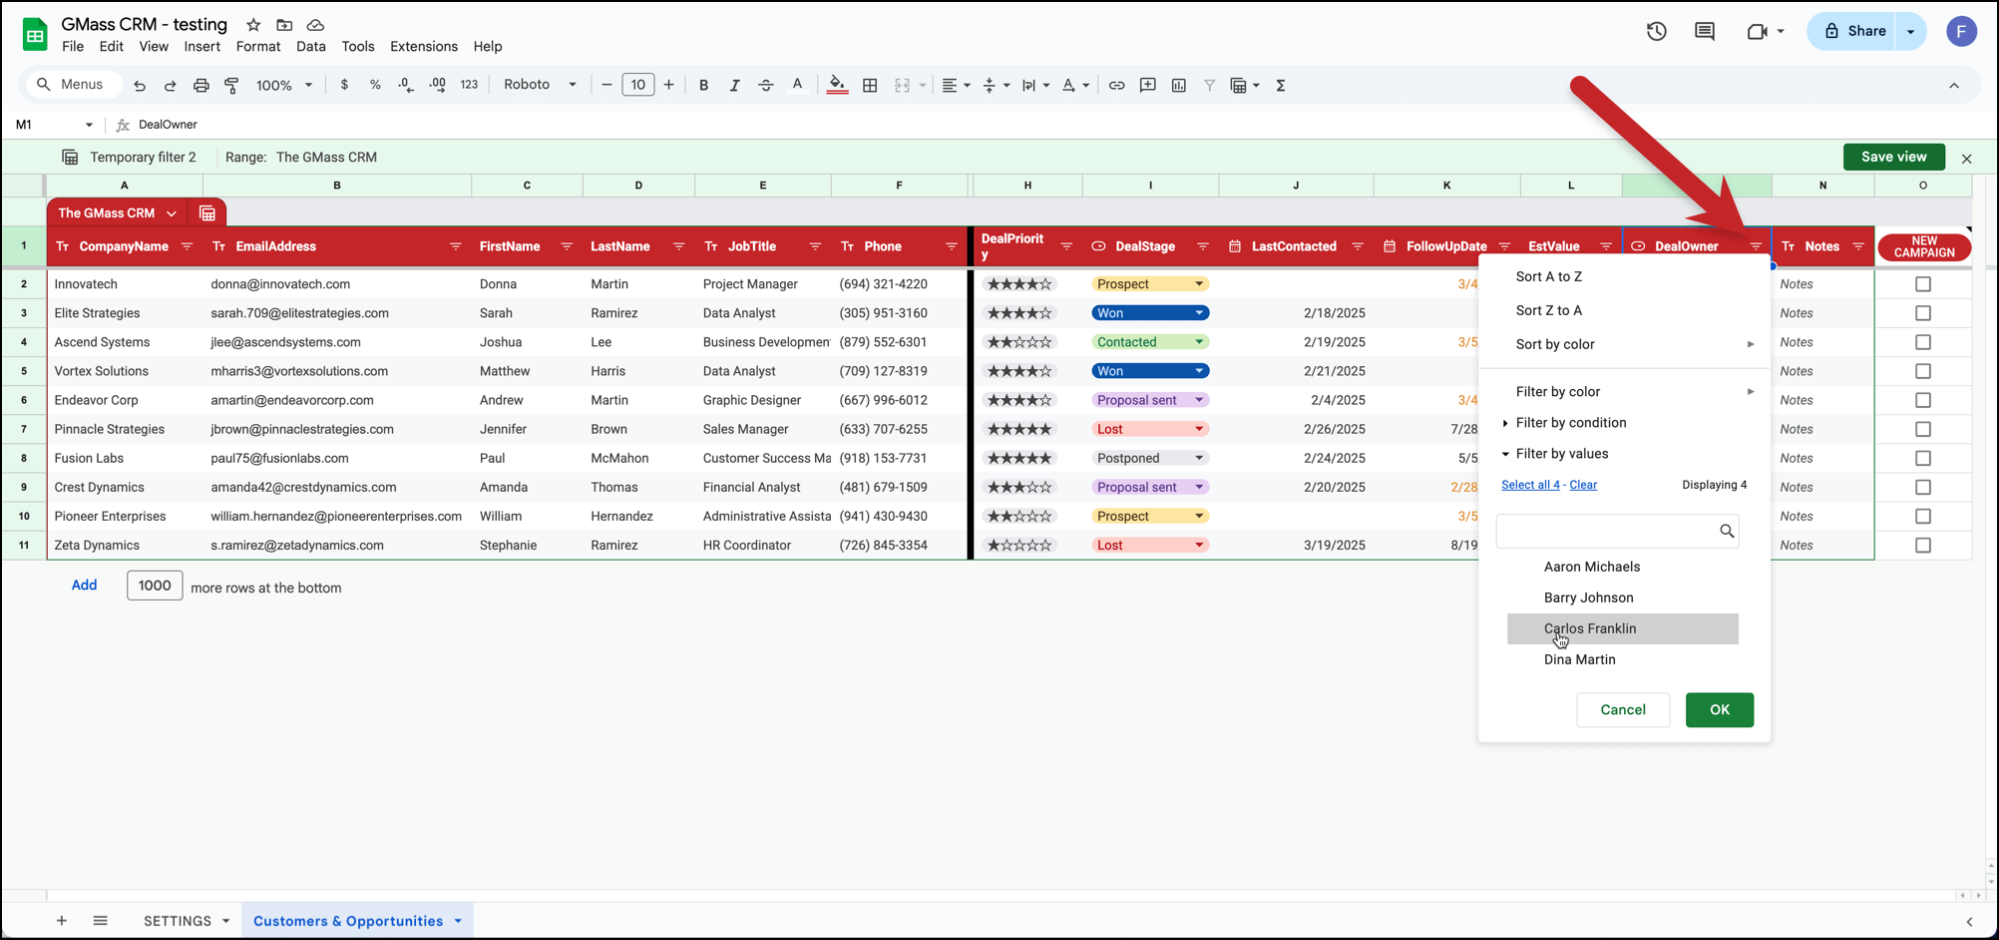
Here’s the result.
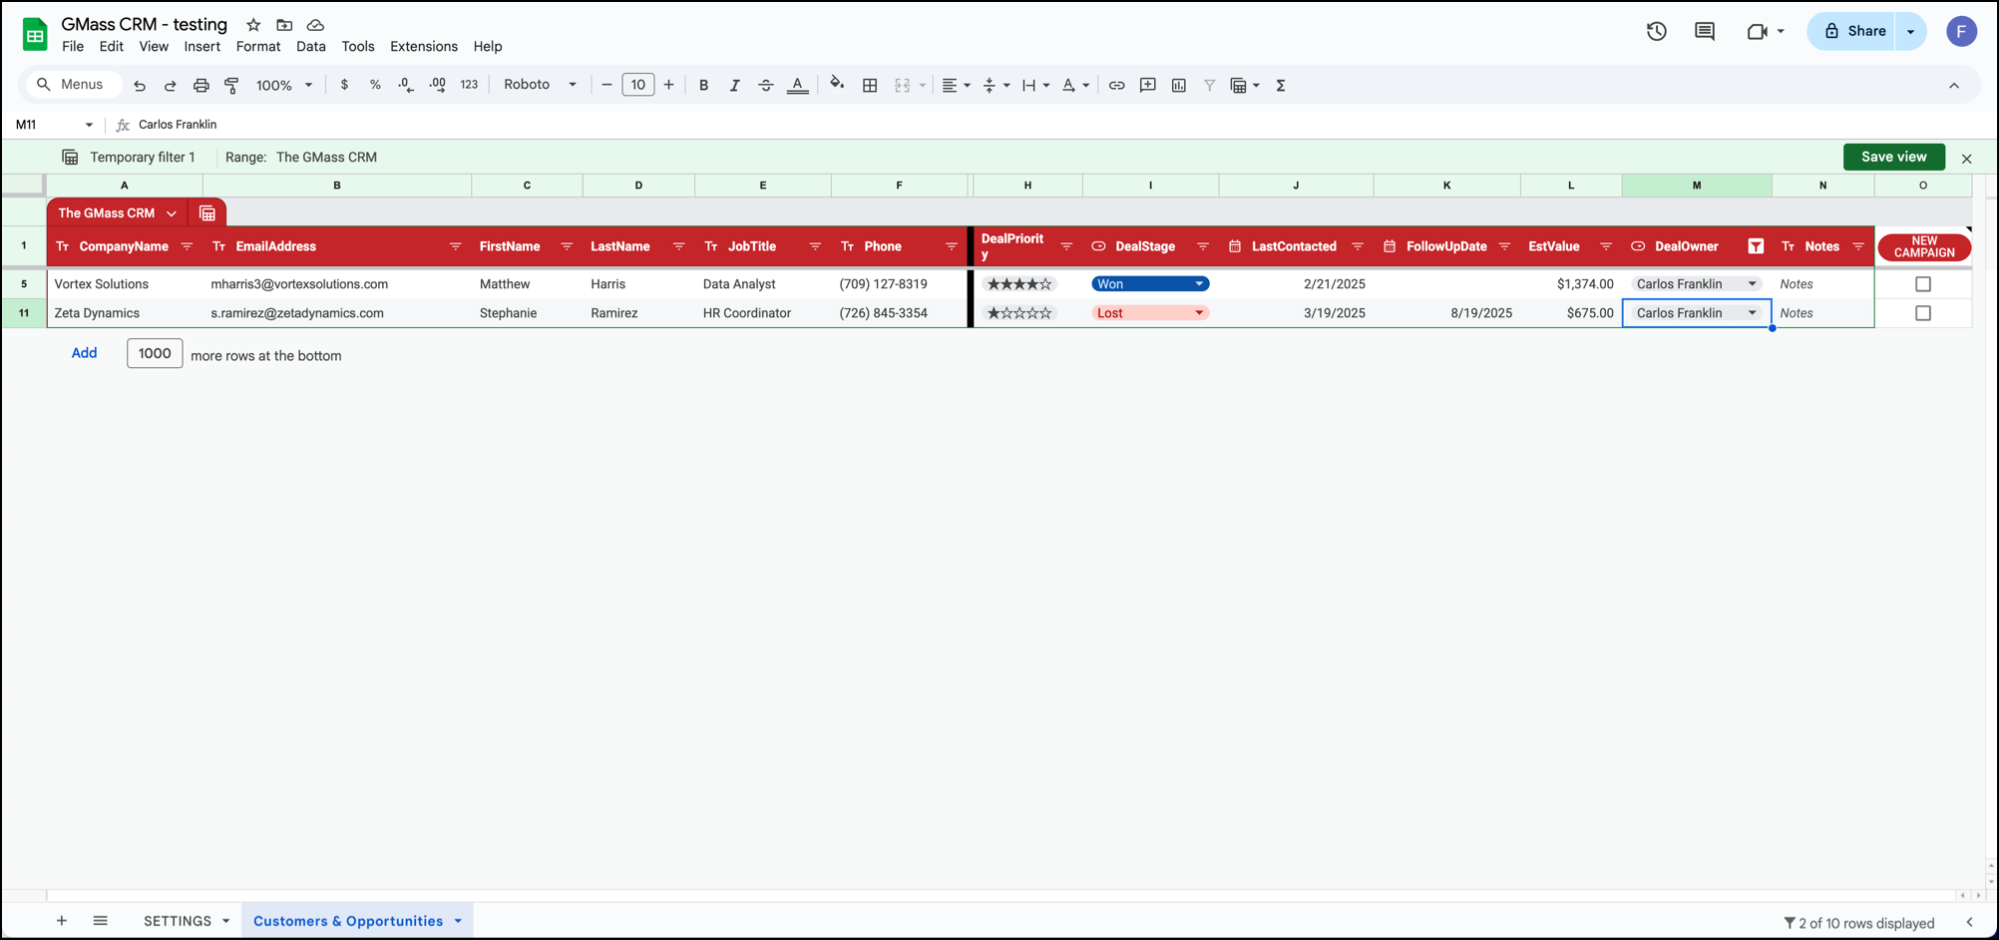
And finally, you could sort your sheet by a column. For instance, follow-up date.
To do so, click on the little down carat at the right of the column, then choose Sort column.
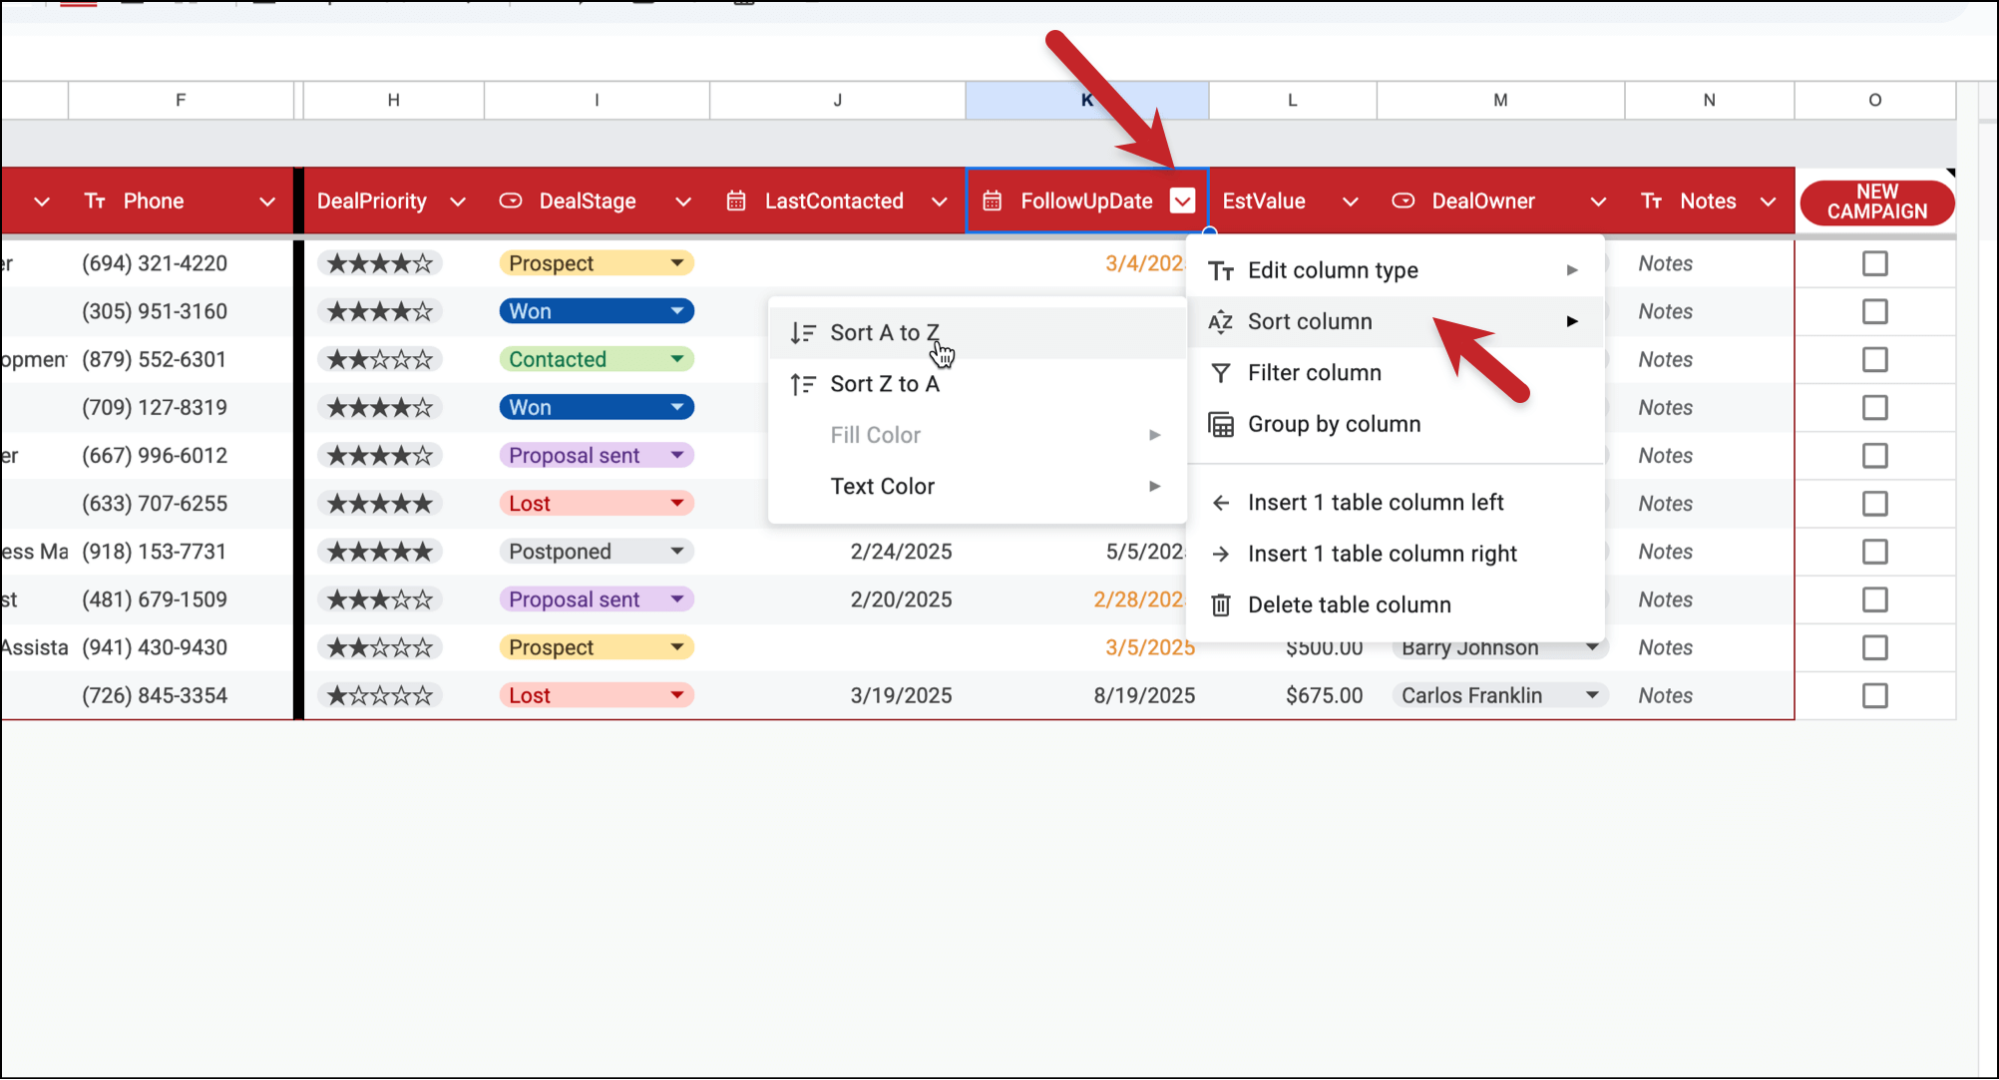
And here’s that result.
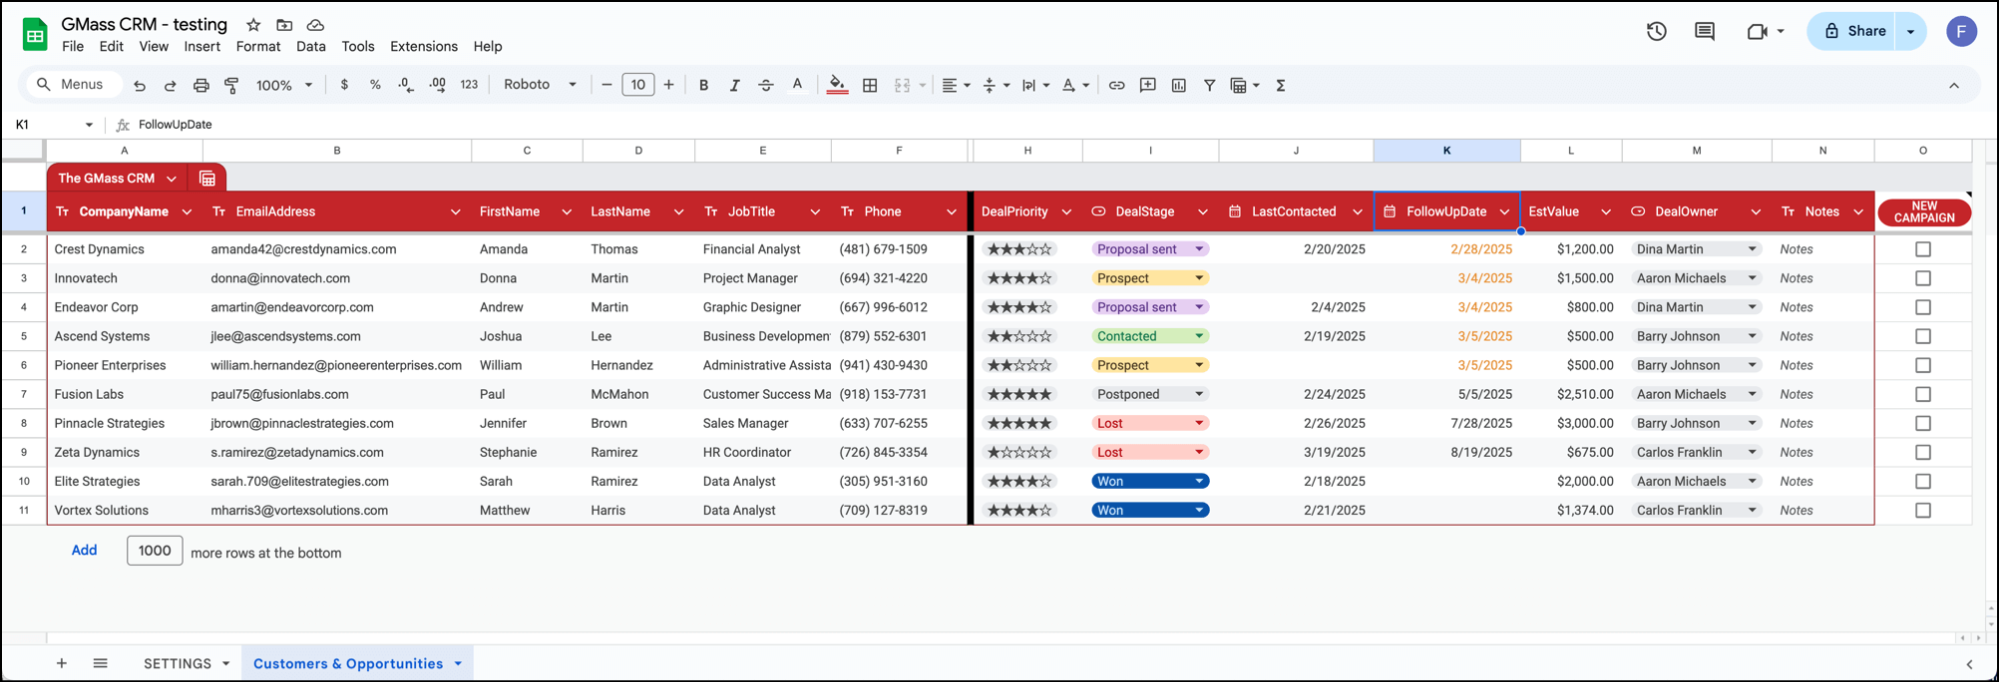
You can also mix and match grouping, filtering, and sorting to create whatever custom views you need.
Saving views
Whenever you’ve created a grouped or filtered view you plan to re-use in the future, you can save it.
When you click the menu, you’ll see we put a few pre-created views in there, called Prospects and By Follow-Up Date.
You can save your own views by clicking the Save View button that appears in the green bar.
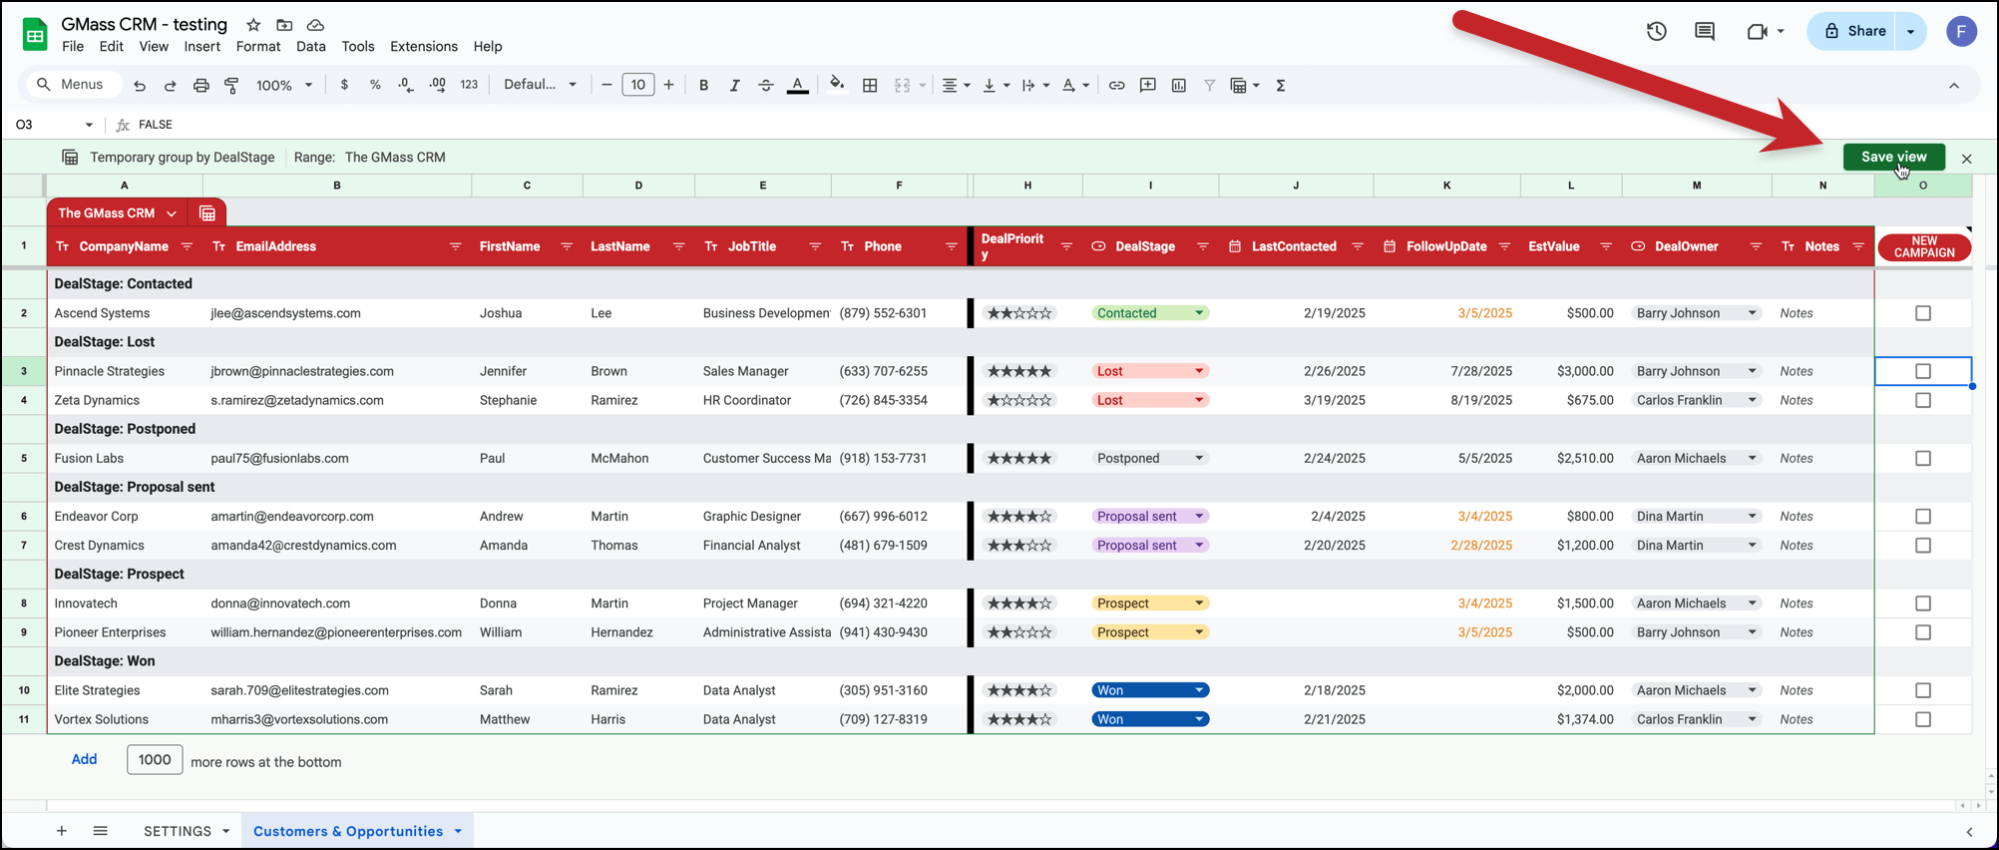
You can then rename these saved views in the pop-up to make them easier to remember in the future.
How to Create a New GMass Campaign Worksheet
Now that you have your Google Sheet CRM rolling, let’s pull some customers out for a new email campaign in GMass.
We can do anything here — from cold outreach to prospects to follow-up campaigns to warm leads to re-engagement campaigns to customers we’ve postponed or lost.
Let’s say you wanted to send a cold outreach campaign to everyone who’s a prospect (meaning you’ve never contacted them).
One option would be connecting this Google Sheet to a GMass campaign and using a filter where you only pull rows that contain the word Prospect in the DealStage column.
You can absolutely do that.
However, if you do it that way, you probably wouldn’t want to have GMass write campaign data back to this sheet. Why? It would be great for the first campaign. But after that, for the next campaign, GMass will add in more columns called OPENED, CLICKED, and so on — and you won’t know which columns correspond to which campaigns. (Especially after a ton of campaigns, where this will get unwieldy.)
Plus, as I speak with GMass subscribers, I know a lot of folks love using a “clean” worksheet for each unique campaign.
So this CRM has a feature built in to help you quickly pull customers’ info into a new worksheet you can use for a campaign.
Creating the new campaign
To begin, click the NEW CAMPAIGN button in the furthest right column of the sheet.
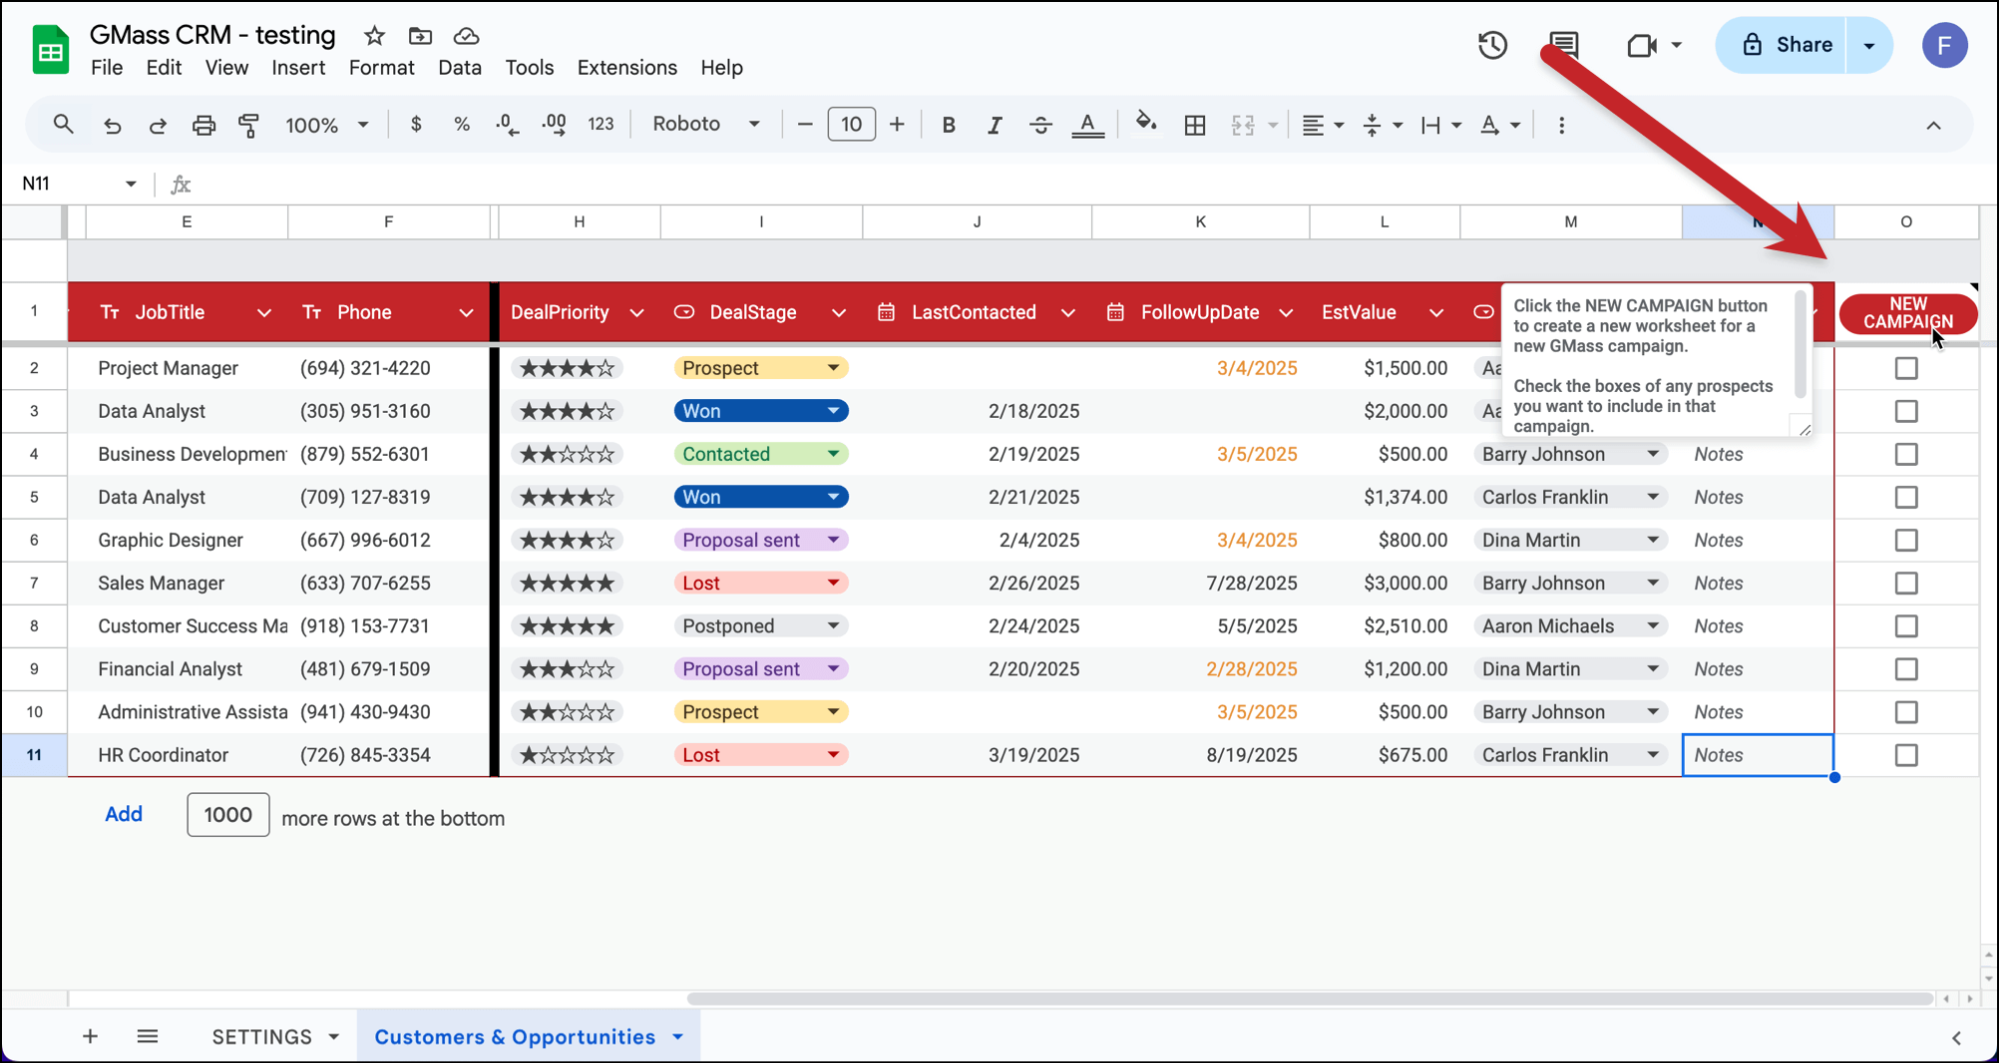
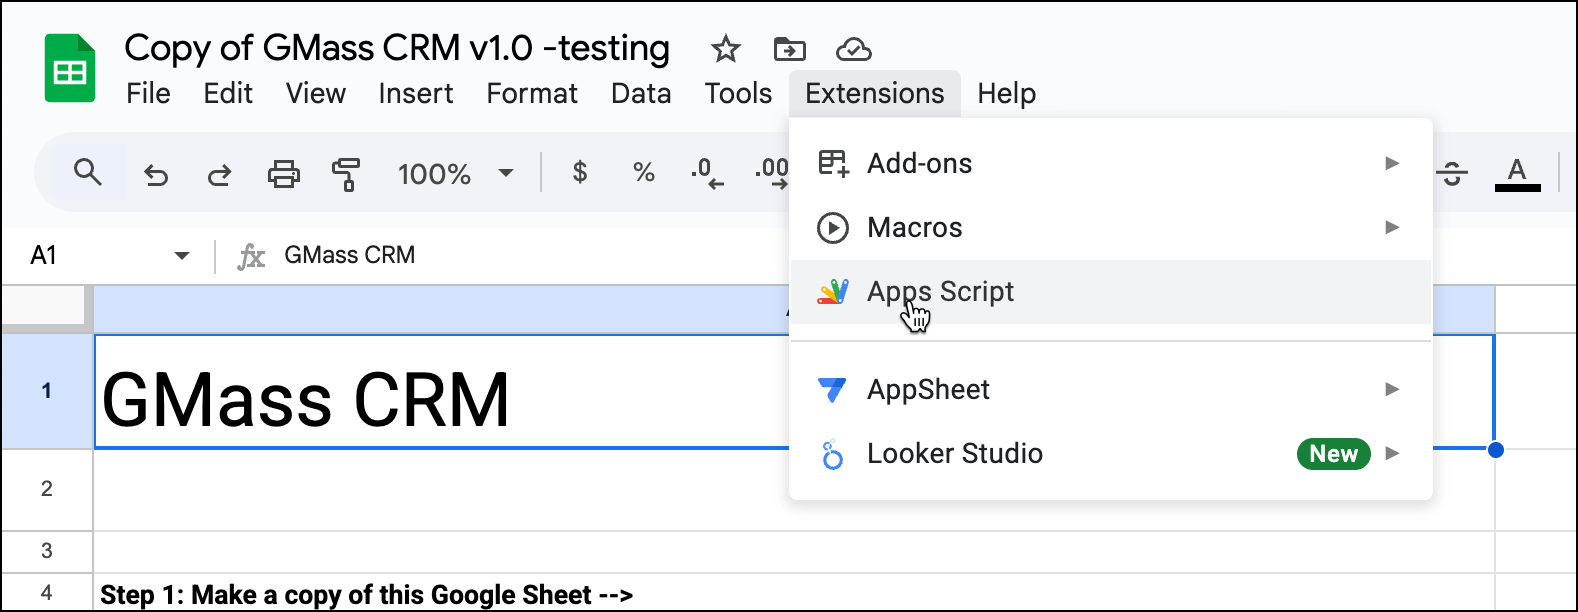
You will have to give Google Apps Script permissions to run. (Despite Google’s scary warnings, these scripts are just to add functionality to the CRM. If you’re curious about exactly what they do, you can look at the Apps Scripts yourself in the Extensions > Apps Script menu.)
Then you’ll see the script will create a new worksheet, called NewCampaign followed by today’s date. (You can change that name to anything you want.)
It will also pull all the header names from the left/”Customers” side of the Customers & Opportunities worksheet.
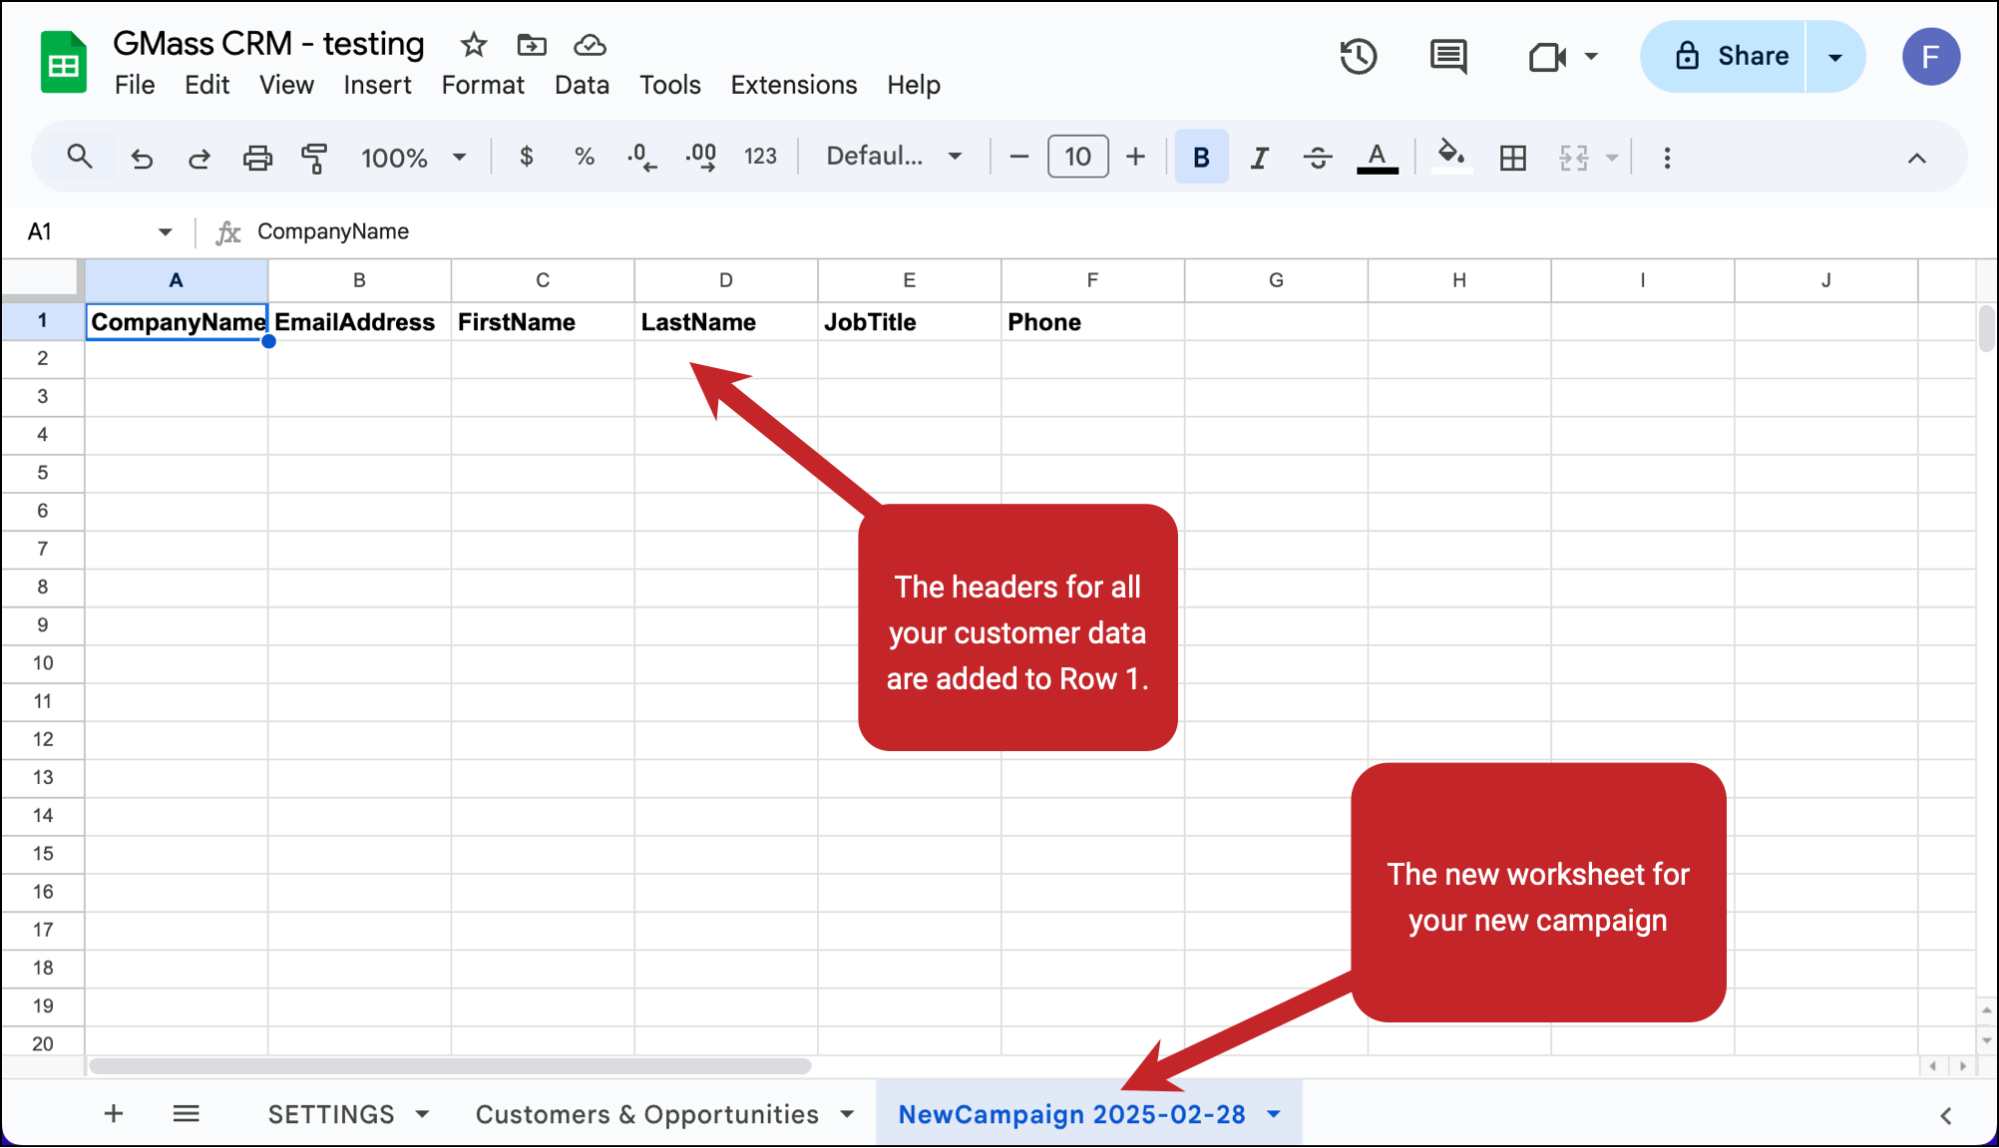
Now go back to the Customers & Opportunities sheet, where we’ll find the customers to add to the campaign.
Adding customer to the campaign
As of version 1.1, you can now select all to add to a campaign.
Click the checkbox next to anyone you want to add to this particular campaign. For this example, I’ll check everyone who’s in the Prospect stage.
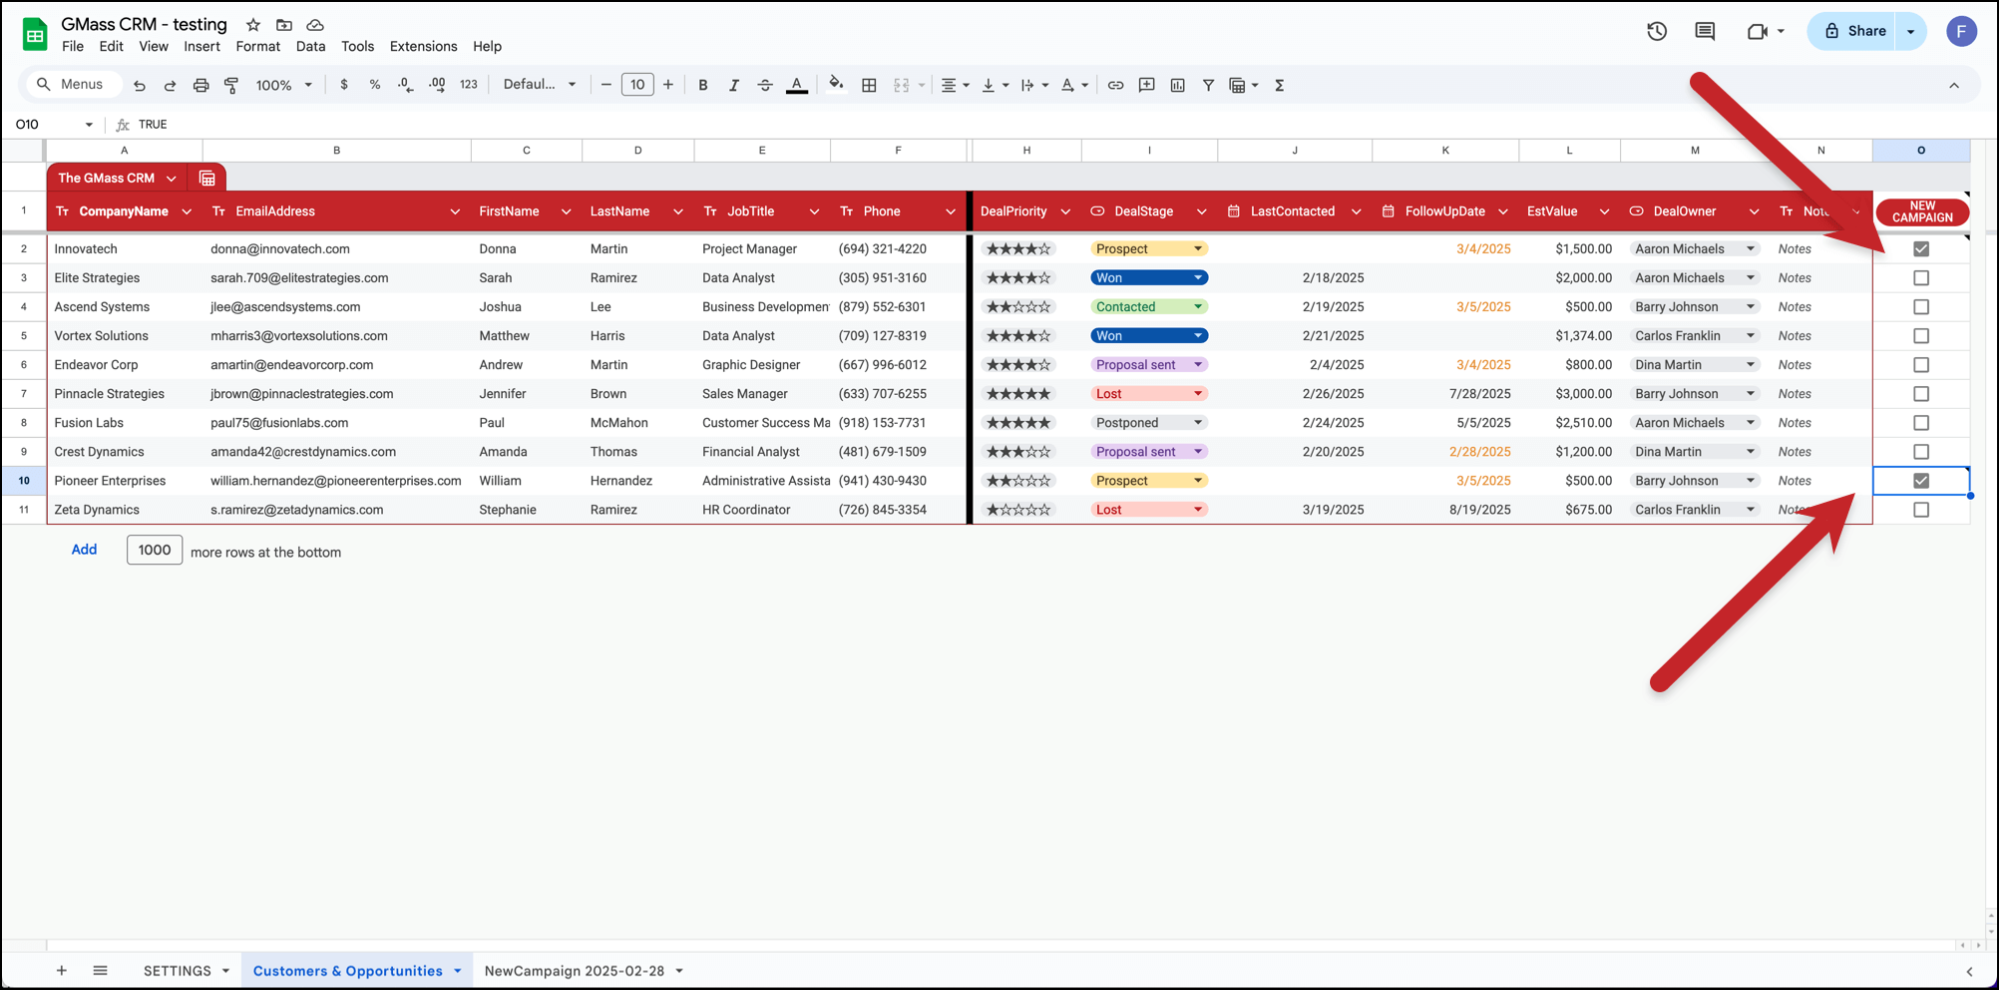
After a moment, you’ll see a new note appear in each of those checkbox cells, confirming that prospect has been added to the campaign.
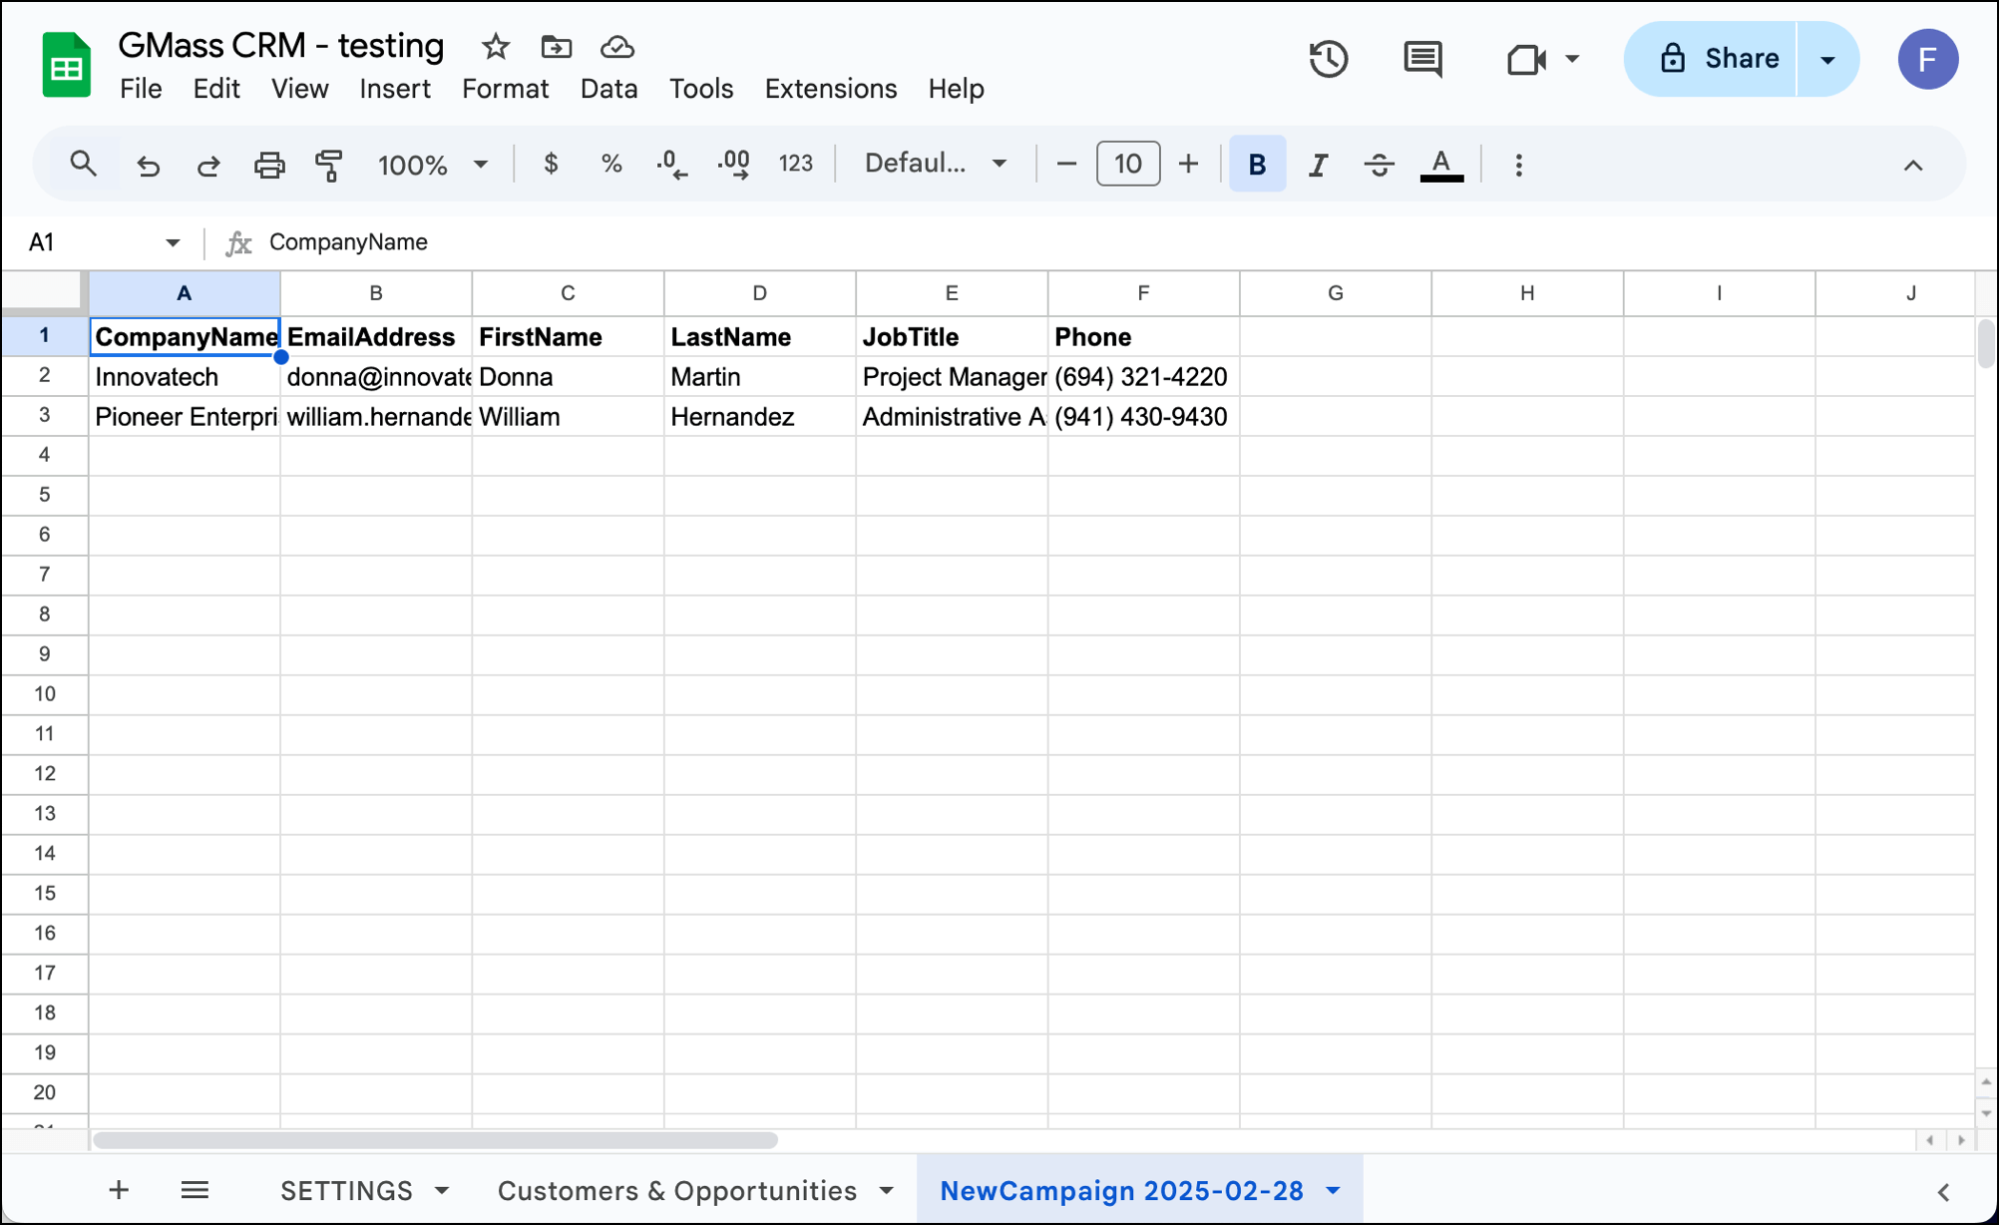
And when you flip back over to the new campaign worksheet, you’ll see they’ve been added.
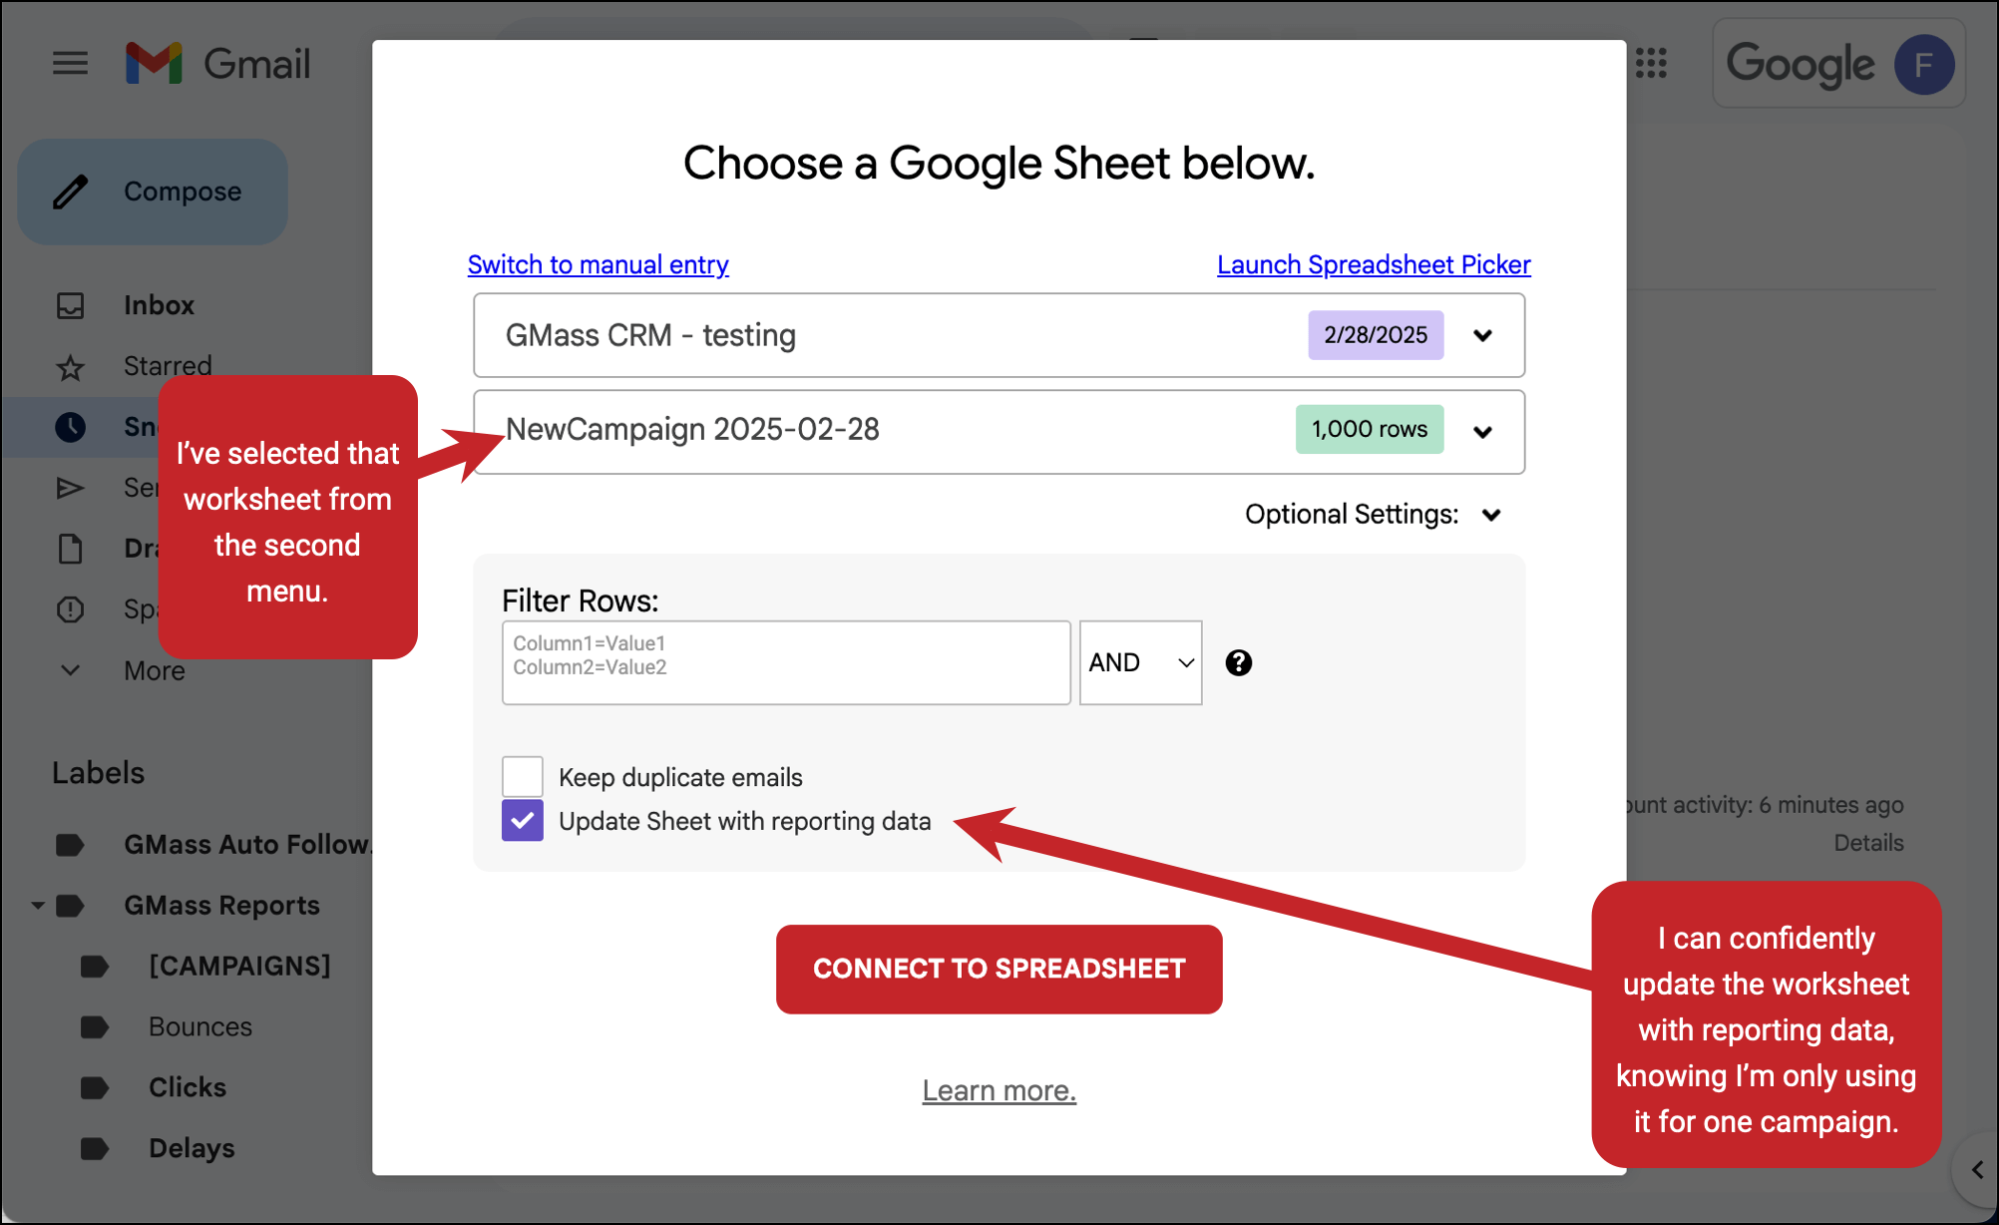
Now you can connect this worksheet to a new GMass campaign.
Clearing the CRM checkboxes for a new campaign
Until you click the NEW CAMPAIGN button again, every time you click a checkbox on a row in the Google Sheet, it will insert that person’s data into your most recently created campaign worksheet.
But once you click the NEW CAMPAIGN button, it will create a new worksheet and reset all the checkboxes on the worksheet to unchecked — so you can add anyone you want, fresh.
Archiving old campaign worksheets
While it’s great to use a different worksheet for every campaign, eventually it can make your Google Sheet unwieldy. Too many worksheet tabs can even slow down the Google Sheet.
So we’ve built a tool for archiving your data from all your campaign worksheets here into one sheet, enabling you to confidently clean up (by that I mean, delete) your old campaign worksheets.
Go to the SETTINGS worksheet and scroll down to the ARCHIVE section. It’s hard to miss the big button. Click that button.
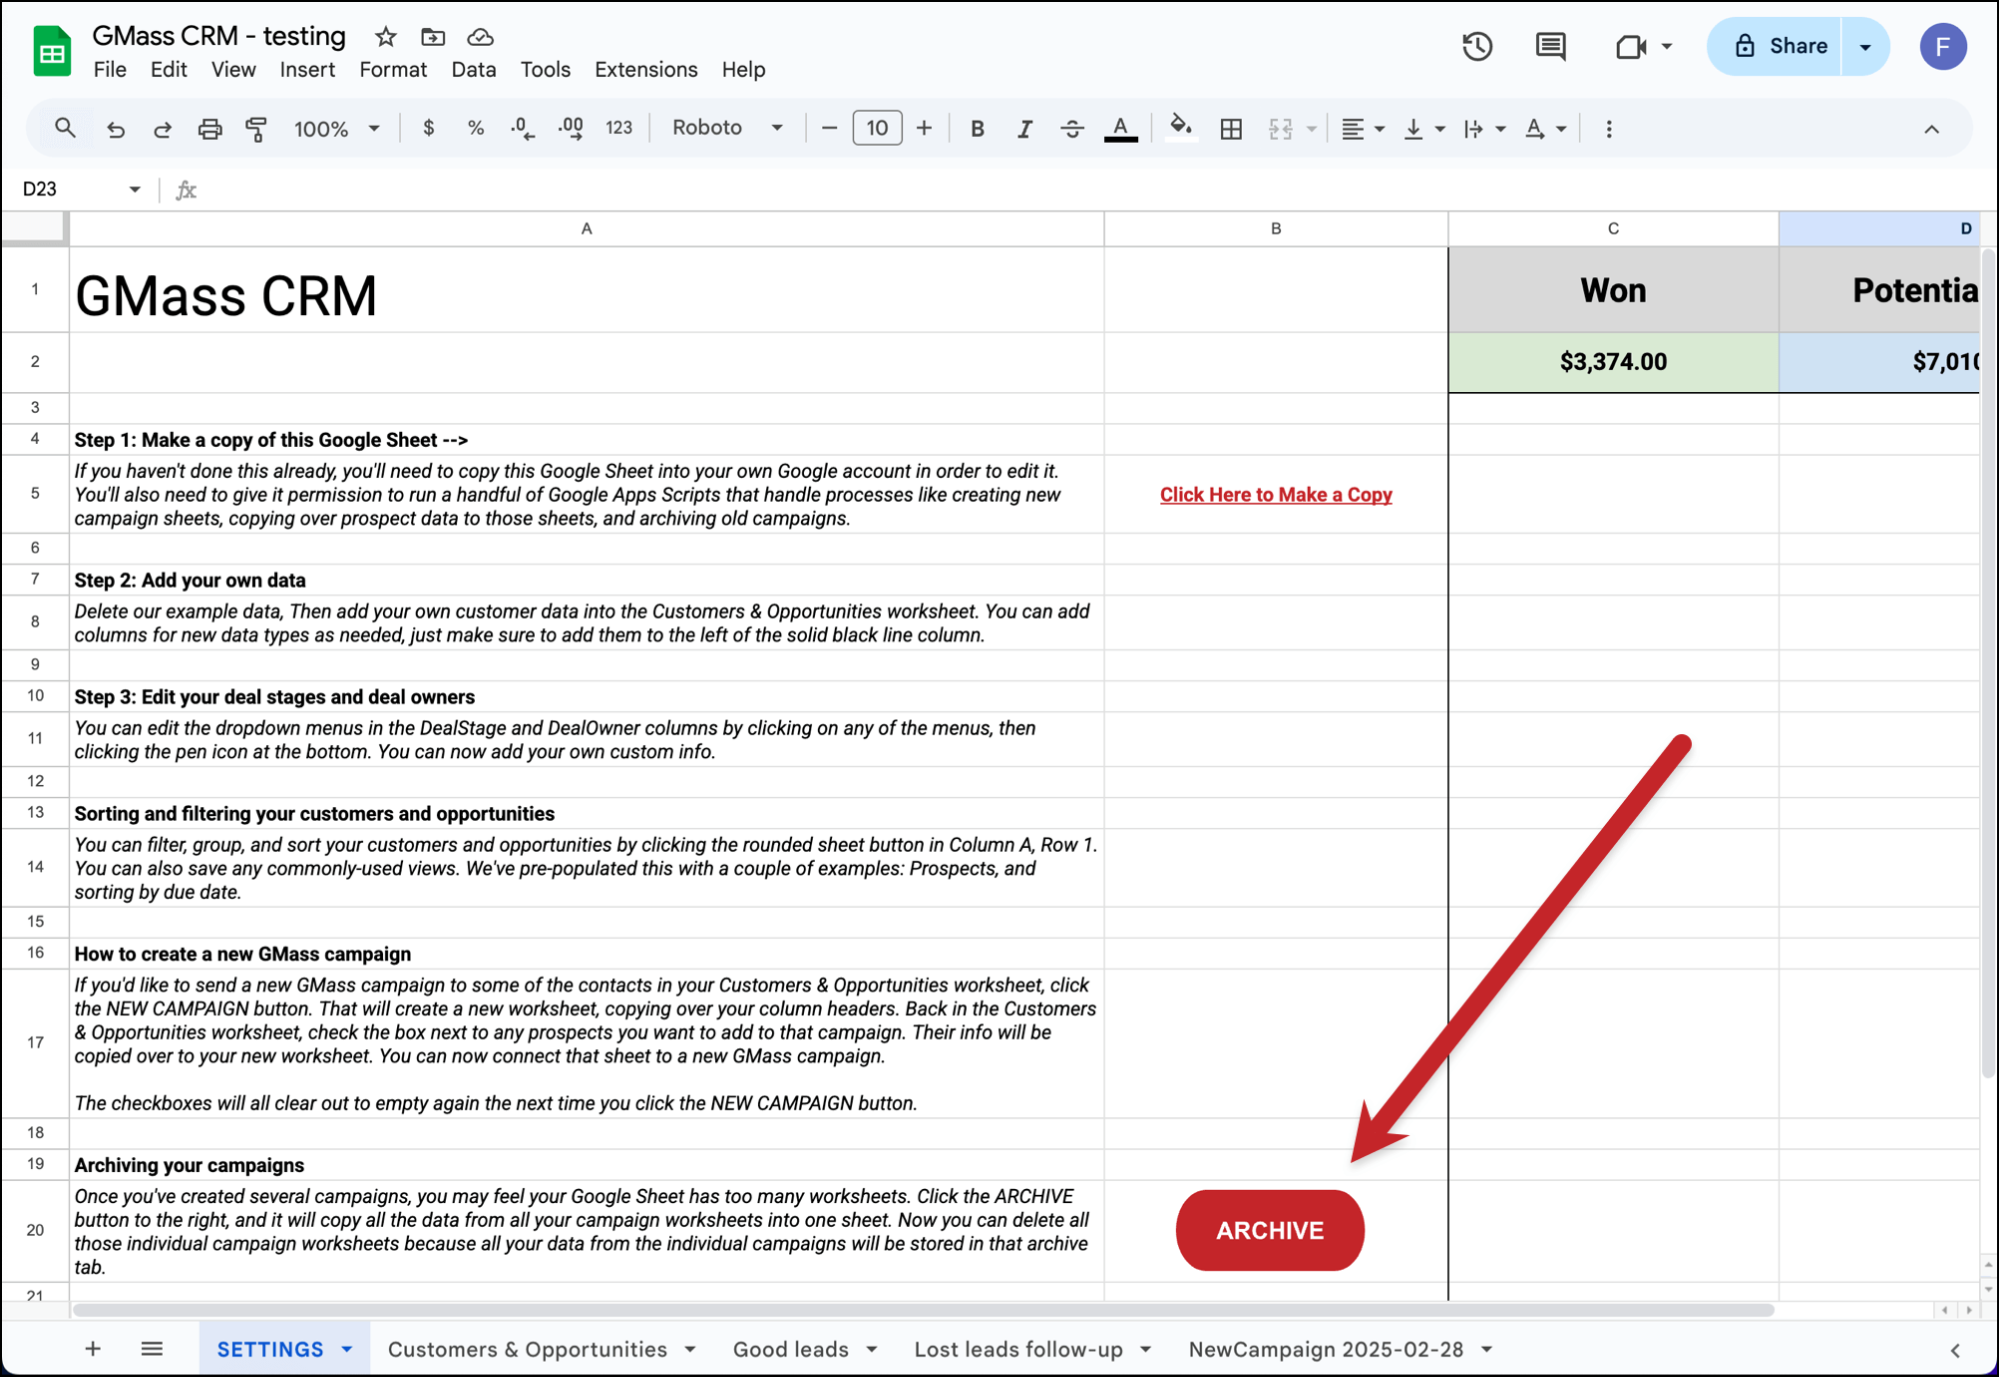
A new worksheet will appear called Archive with today’s date. And the script will copy over all the data from all the campaign worksheets in your file.
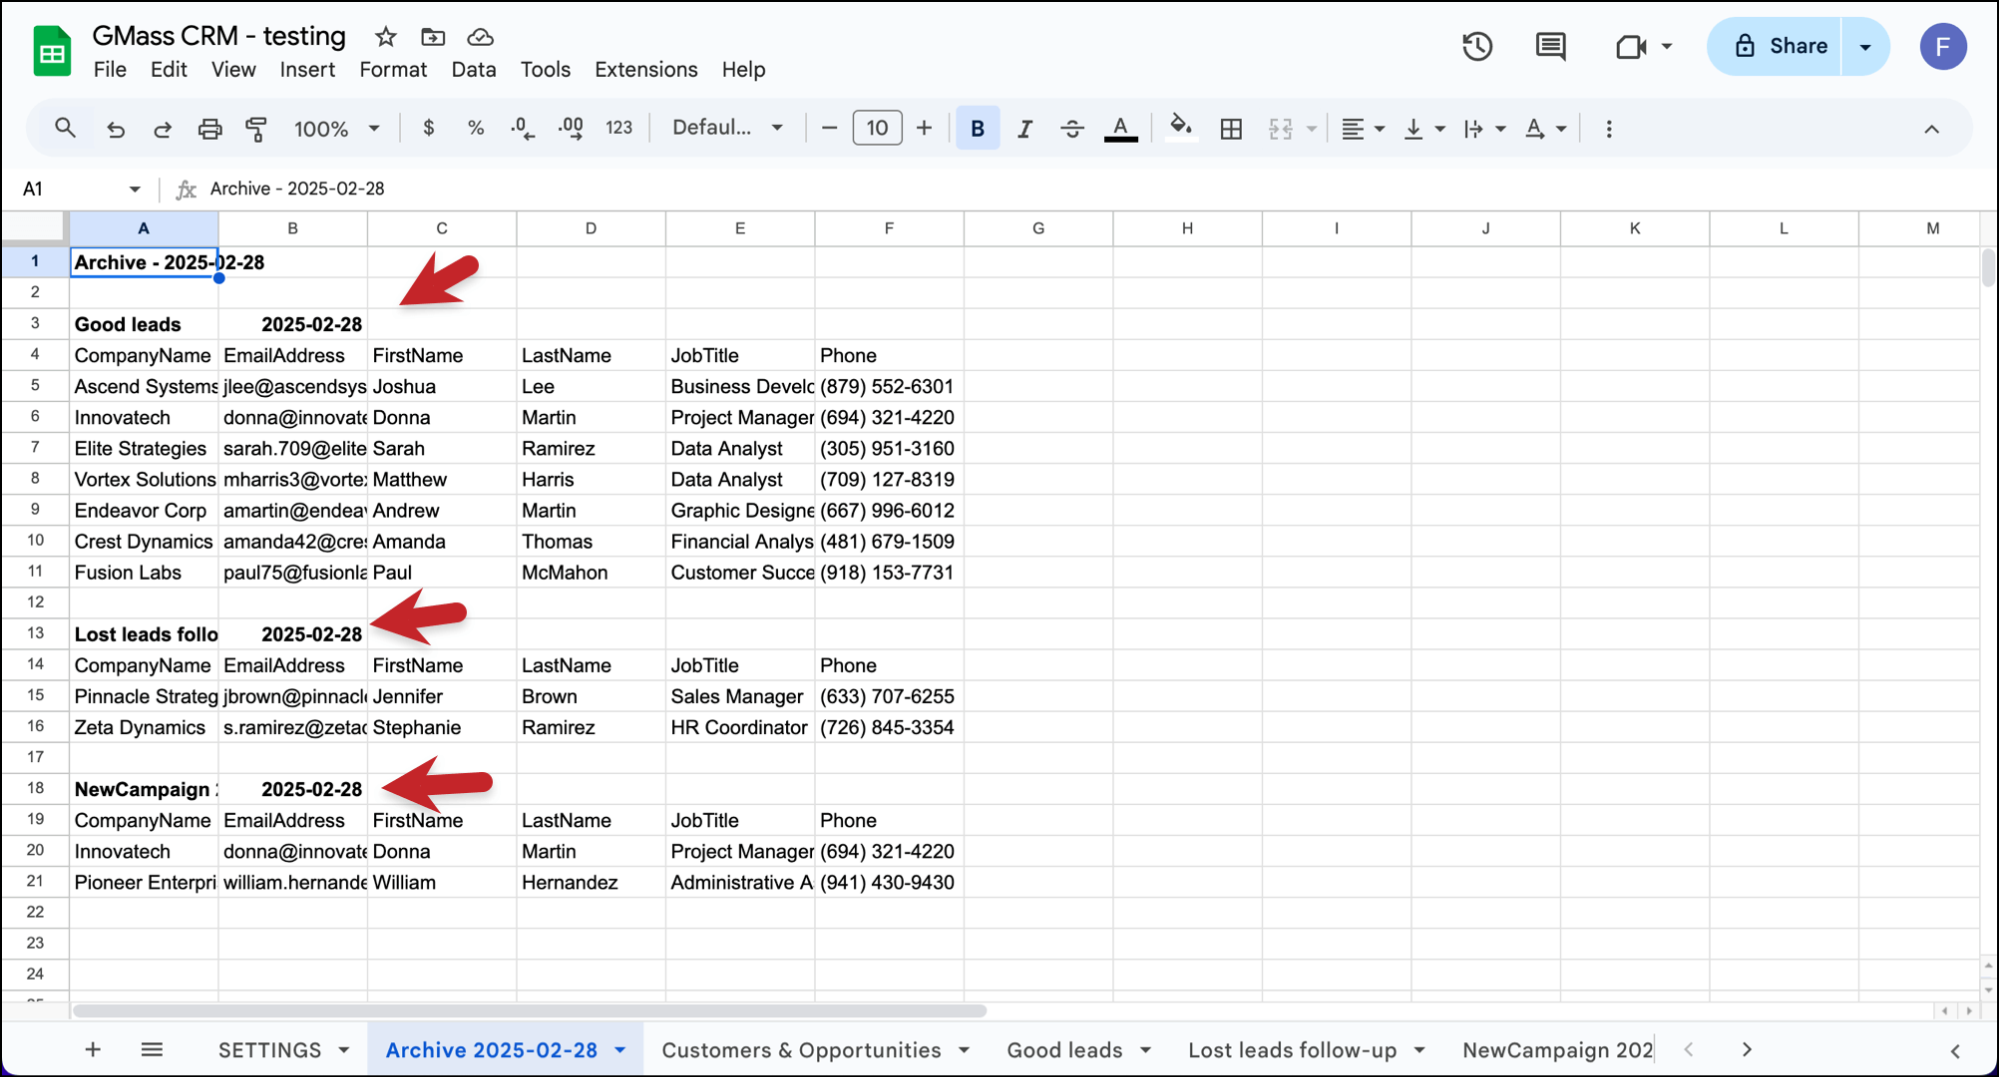
With all your campaign data backed up, you can now safely delete those worksheets to keep your CRM’s tabs more manageable.
Installing Updates to the Google Sheets CRM
Because you copy the Google Sheets CRM to your own account to use it, you won’t automatically receive any updates we make to it.
So you’ll need to manually make those updates yourself. (Or re-download the CRM from the link in this file, then copy over your data.)
Updating to v1.1 (March 28, 2025)
The first update to the CRM includes:
- Adding a top menu to the Google Sheet with the key actions.
- Ability to add all contacts to a new campaign (i.e., “Select all”).
- Cleaning up the file a bit for general performance.
Updating to this version requires:
- Adding two new Apps Scripts to the file.
To install the update:
Open your copy of the GMass CRM. Go to Extensions > Apps Script.
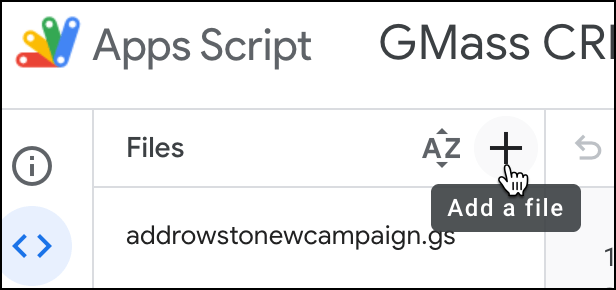
The list of files will appear. Click the 
Choose Script. Name it selectalloption and hit enter. Then delete everything in that file, which is function myFunction() { }.
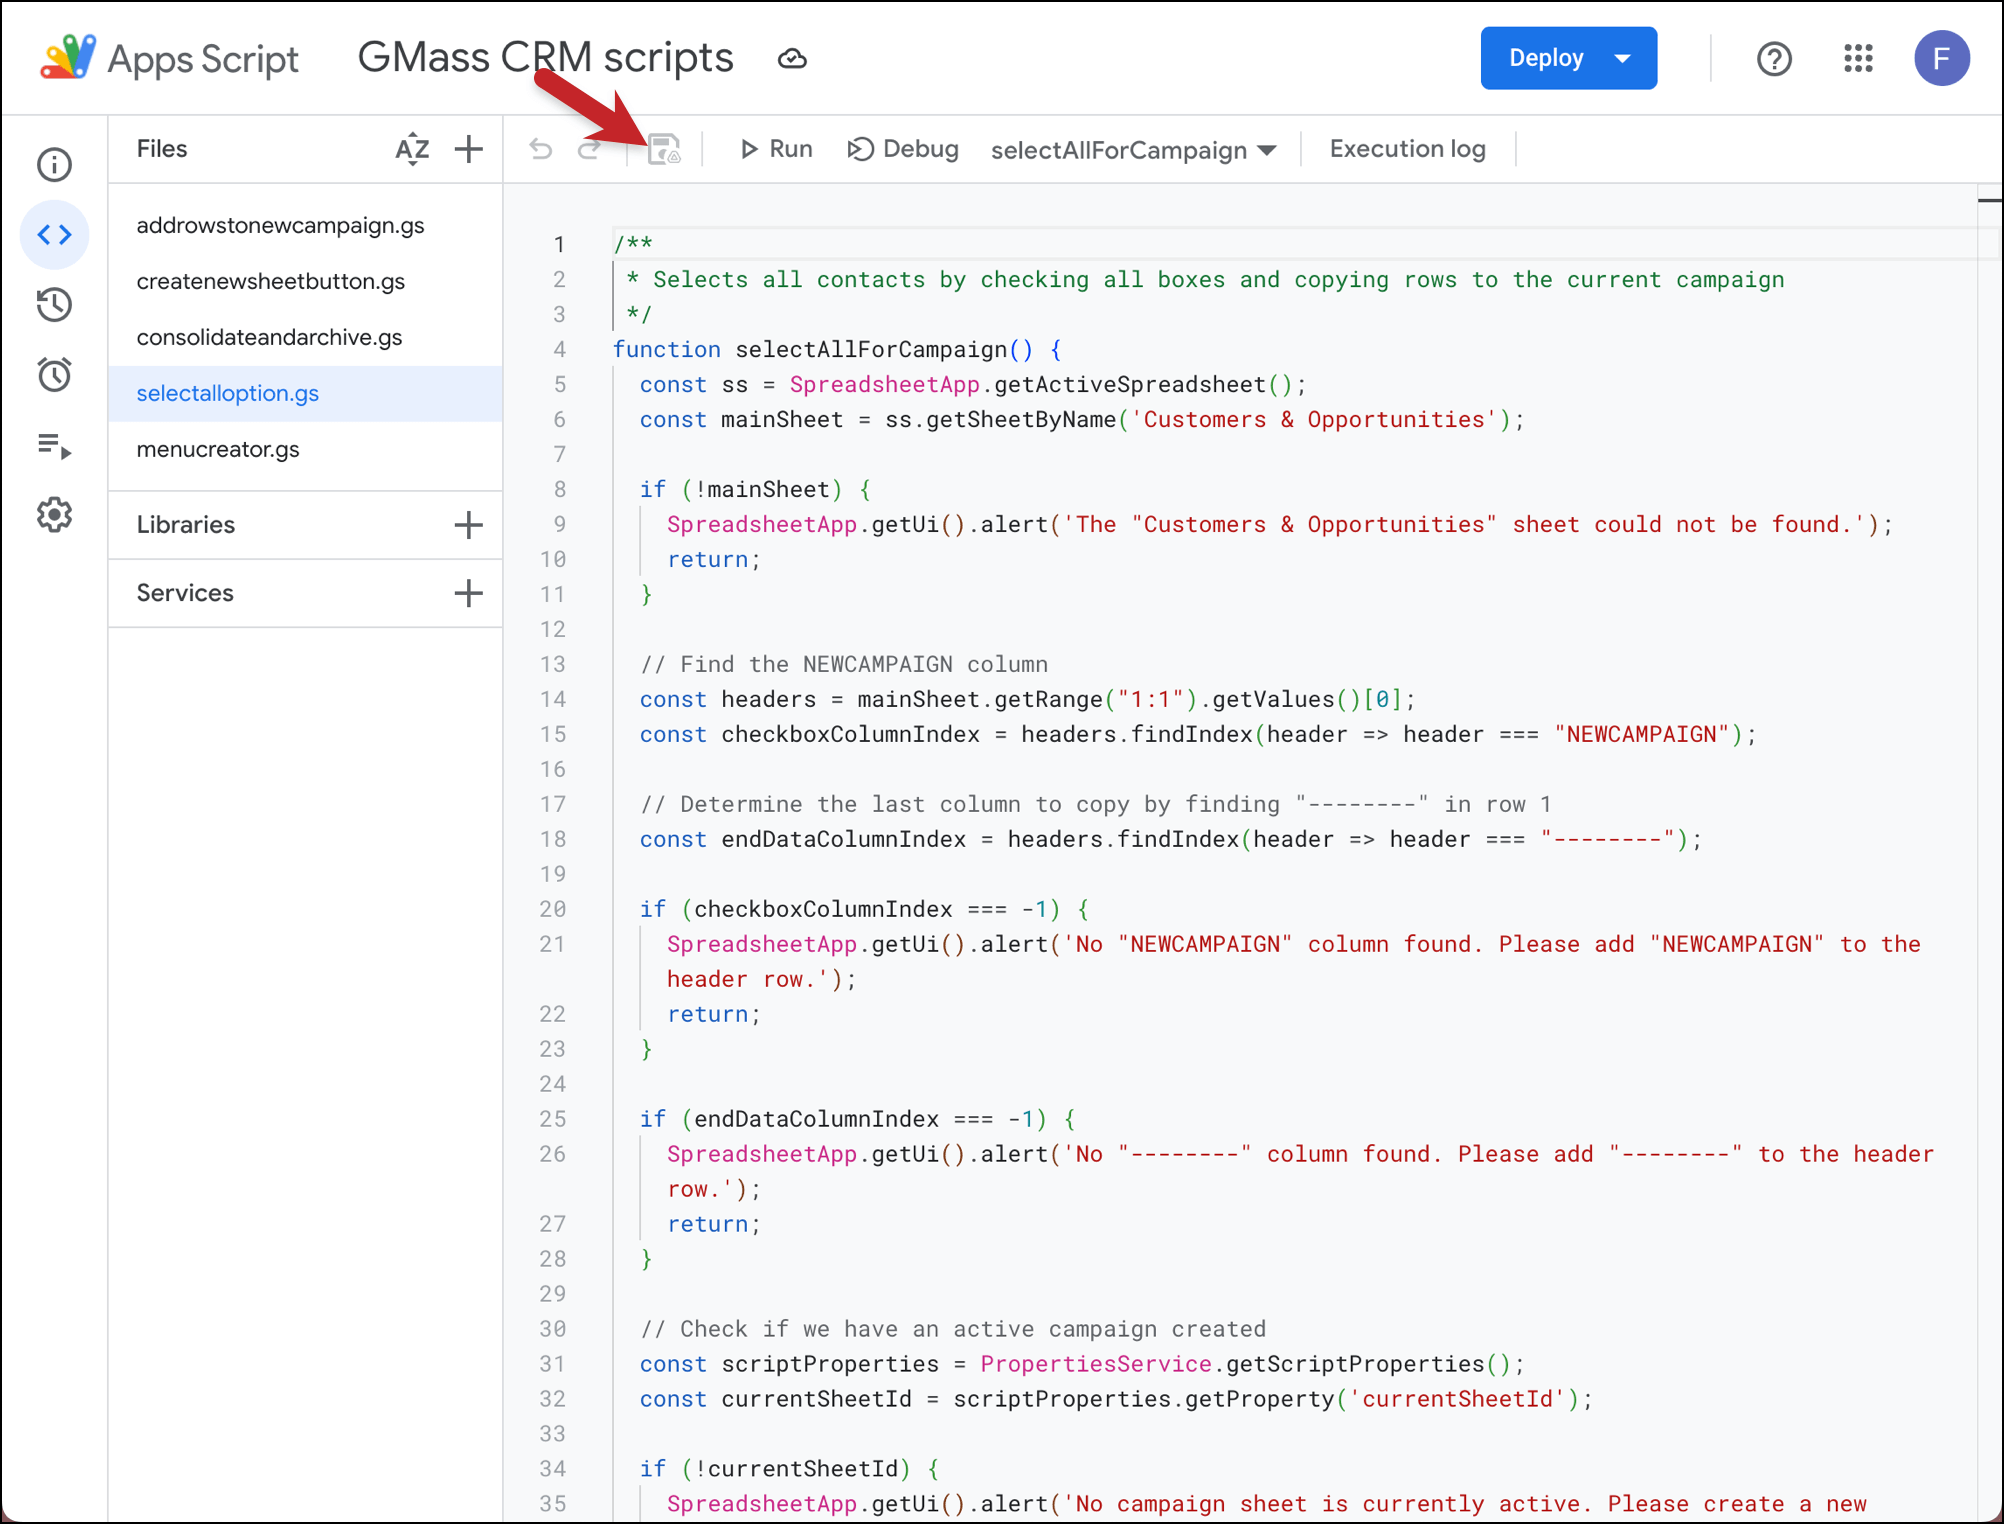
Now paste in the following code.
Your screen should look like the image below. Click the disk icon to save.
Now click the 
Select Script again, and this time name the file menucreator — then, once again, delete the function myFunction() { } code.
Now paste this script into that file.
Once again, hit the disk drive to save this file.
Now close the Google Apps Scripts tab and reload your GMass CRM sheet.
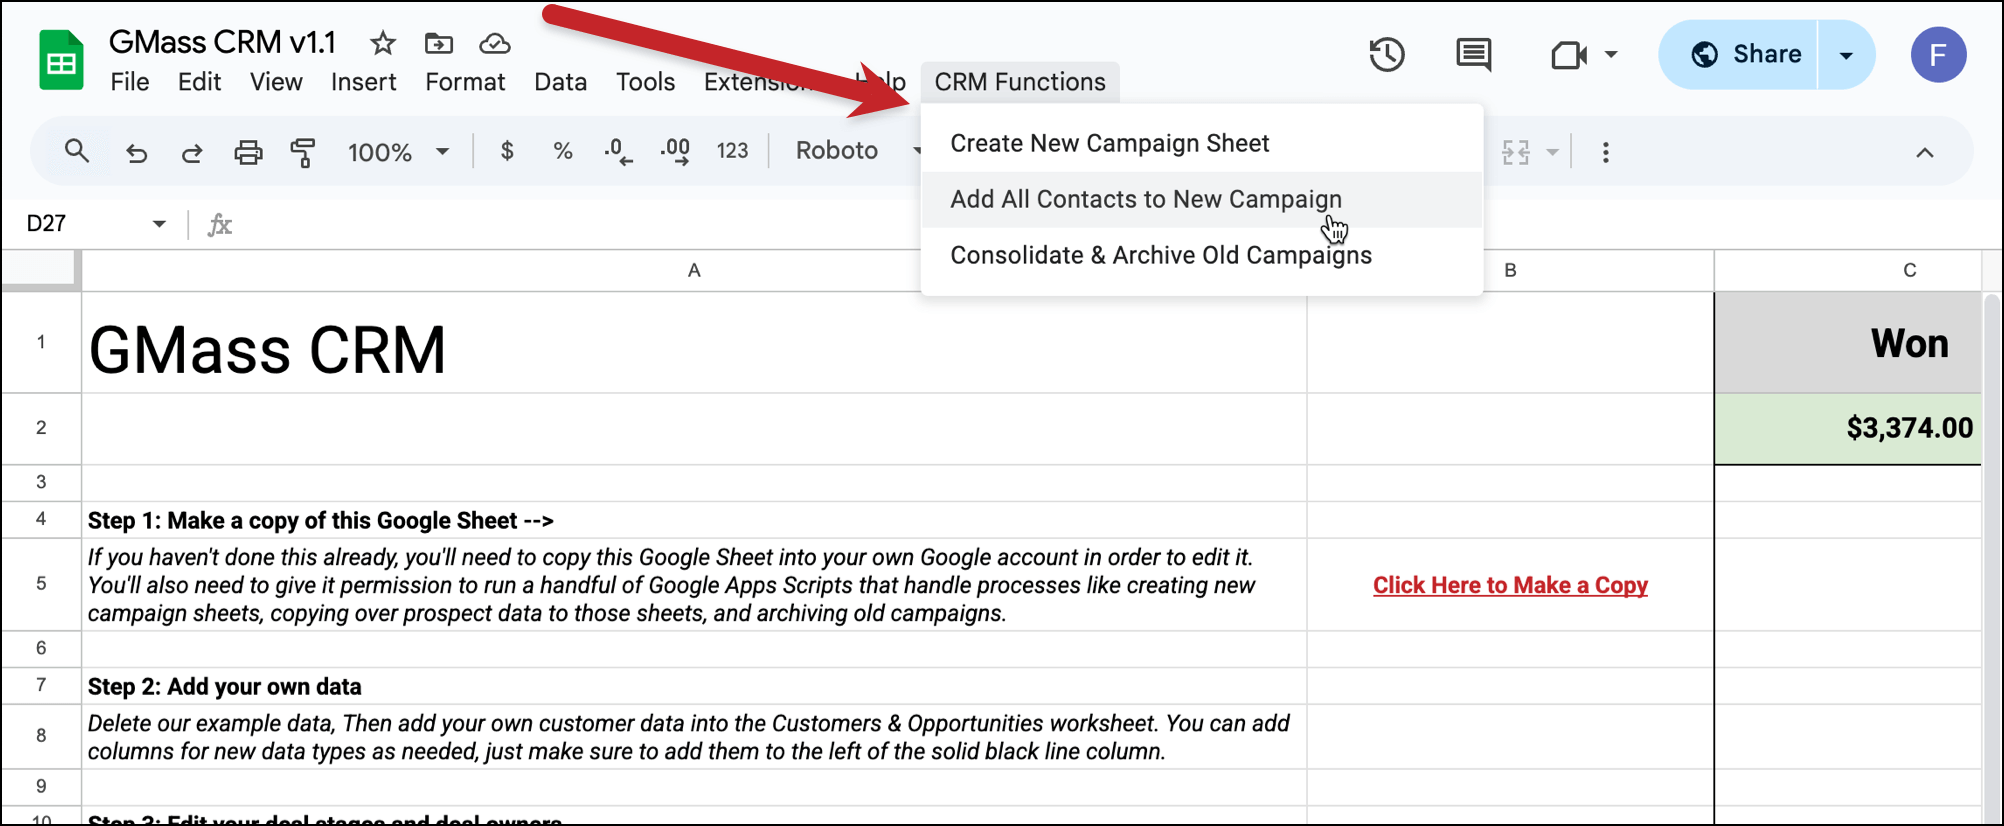
You should now see a new menu available, which gives you access to some functions (including the ability to select all contacts to add to a campaign).
Keep an eye out here for more updates in the future.
Google Sheets CRM Template: Next Steps
That’s everything you can (currently) do with the GMass Google Sheets CRM template.
If there’s popular demand, we could always build more. For instance, we could build a new tool in this CRM that lets you examine any individual prospect and get your whole history with them.
But for now, we wanted to keep it focused on the most important things: An easy place for you and your team to store customer data and deal data, and to initiate email campaigns using that data.
And while this free Google Sheets CRM template will work without GMass, you’ll be missing out on that functionality.
So if you’re not using GMass as your email platform — you might just want to give it a try.
GMass transforms Gmail into an email sending platform for everything from cold outreach to mail merge campaigns. GMass works seamlessly with Google Sheets for mail merges.
And because it’s inside Gmail, there’s almost no learning curve and it slots right into your workflow.
Come see why nearly 400,000 users love GMass — and have given us an average of 4.8 out of 5 stars across 10,000+ reviews.
GMass is free to try — no credit card required. Just install the Chrome extension and you’ll be up and running in a matter of minutes.
And now, you’ll be doing it armed with this free, easy-to-use, Google Sheets CRM.
Send incredible emails & automations and avoid the spam folder — all in one powerful but easy-to-learn tool
TRY GMASS FOR FREE
Download Chrome extension - 30 second install!
No credit card required

