<img height="1" width="1" style="display:none" src="https://www.facebook.com/tr?id=1822615684631785&amp;ev=PageView&amp;noscript=1"/>

Today, I have an example from GMass that’s an interesting way to stay in a critically important context–your email–while getting the work of job recruiting done effectively, courteously, thoroughly and searchably. Best of all, it’s very easy to implement and stay organized while doing it.

Overview

  1. Set up Gmail Labels to file the email response from your job ads under these Labels, immediately clearing them from your Inbox. Labels can be nested multiple levels, so you can have a very organized structure. 
  2. Set up Gmail filters to send the candidates’ emails to the Labels–and remove them from your Inbox!
  3. Build the interview and rejection lists using GMass and the Gmail Labels.
  4. Send a personalized mass email to everyone, whether that’s for an invitation to interview or a courteous rejection, and sent such that the email goes out as a reply to each person’s original email to you.

First, Post Your Job Ad!

Before we begin, we will need a job advertisement that candidates could apply to. The nice thing about this approach in GMass is it is not dependent on which job placement site you use. Whether it’s Indeed.com, CareerBuilder, Glassdoor, Monster, Craigslist, or others, this approach will work. So, we’ll assume you’ve got your ad posted.

Create Gmail Filters and Labels to filter Job Posting Responses

Part of efficient recruiting management is keeping everything organized and not just overflowing your Gmail Inbox. To do that, we’re going to make use of Gmail Filters to keep the applicants’ emails out of your Inbox and where they belong: filed under the Label for the job they applied for.

  1. Start by setting up some Gmail Labels. It’s up to you how you structure them, but this tutorial will give you one possible format and you can adapt it to your needs. Mine, for the fictional “Ted’s Tadpole Tanks” business, looks like this:
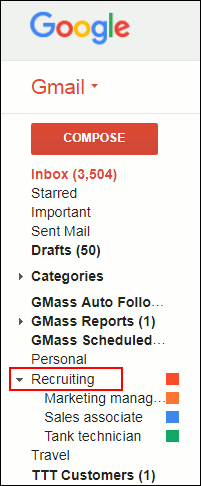
    The Recruiting Label highlighted, and showing sub-labels.

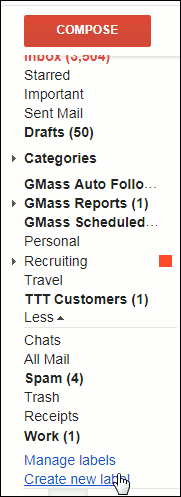
    To create those Labels, scroll down to the bottom of the Gmail left sidebar (you may have to hover or drag to reveal the bottom section), and click on “Create new Label”.

    About to create a new Gmail label
    About to create a new Gmail Label
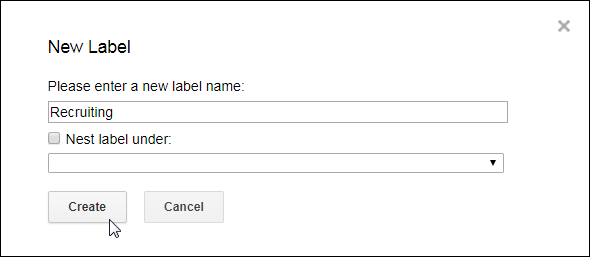
  2. Then just give the Label a name in the popup window. In this case, I chose “Recruiting”.
    Note: For now at least, Gmail’s Labels are organized alphabetically, so if you want your Label to appear higher on the screen–and avoid being hidden under the “fold”, giving it a name with a letter early in the alphabet will achieve that (Such as “Advertised jobs”). In this case for our tutorial, I don’t have enough other labels to have that matter.
    I am also not going to nest this first Label, so that it will always be visible from my Gmail sidebar. Then click “Create”.

    Have filled out name of label and about to click "Create" to create this label.
    About to create this Label.
  3. Now make one or more sub-Labels. These are just Labels that are “nested” under the main “Recruiting” label. To add one, first click on the small down arrow to the right of the “Recruiting” Label.

    About to click arrow to the right of the Recruiting label.
    Click here to open options for this Label.
  4. That brings up a new window.
    Popup menu showing options for this label.
    Popup menu showing options for this Label.

    In this window, click on “Add sublabel”. That will bring up the same screen as shown above in Step 2. Make your new sublabel. Provide an informative name for this job title, one that matches to what was advertised in the job ad you posted. Make sure the “Nest label under:” checkbox is checked, and that “Recruiting” (or your equivalent) is shown in the choice dropdown below it.

    About to click Create on the add a label dialogue. Here the option to nest it under "recruiting" is checked.
    Adding a sublabel to our “Recruiting” Label.

    Then click “Create”.
    Note: It’s important to mention that you can repeat this process of adding sublabels under “Recruiting” as much as you want. In fact, you can re-organize and edit your Labels at any time. If you want to do that, click “Manage labels” found near the bottom of your Gmail sidebar.

    The "Manage labels" option of Gmail sidebar.
    The “Manage labels” option of Gmail sidebar.

    From there you can scroll down in the window and choose which Labels and their nesting you want to edit.
    Tip: I later went back and clicked on the little arrow to the right of the Labels and chose “label color” just to bright these up and make them easy to find.

  5. Now that you have your Labels ready to “catch” your job applicant emails, you can now create your email filter for a job. Creating email filters in Gmail is possible in two ways: 1) if you have a message selected, the choice “Filter messages like these” is available under the “More” button’s dropdown menu or 2) you can do it from Settings. To keep things clearer, let’s do it from Settings. Start by clicking on the Settings “gear” icon on the right of your Gmail screen.

    Gmail Settings button.
    Gmail Settings button.
  6. Select “Settings” from that dropdown list.

    Gmail Settings menu.
    Gmail Settings menu.
  7. Click on “Filters and Blocked Addresses”.

    Settings window showing filters options.
    Filters options
  8. Click on “Create a New Filter”.

    Clicking on "Create a new filter" in Gmail.
    Click here to create a new Gmail filter.
  9. The filter you create is really up to your specific needs, but it is probably a good idea to create one that will filter emails that a) mention your advertised position and b) originate from an email from a job site.
    To do that is to use, for example, the following filter, which will capture any job ad responses for your advertized “Tank technician” job coming in from Indeed.com or CareerBuilder.com:

    Creating a filter for job ad responses.
    Creating a filter for job ad responses.

    Note: if you don’t get your filter absolutely perfect, don’t worry: anything the filter doesn’t catch will just go to your Inbox as usual, and from there you can manually label it for the job. The point is, no emails can ever be lost if you don’t get the filter exactly right.

  10. The filter itself will now be created–in other words, what to do with emails that match your search specifications. In the window that pops up, click the checkbox for “Skip the Inbox (Archive it)” and “Apply the label”.

    Getting ready to apply the label for this filter.
    Getting ready to apply the label for this filter.
  11. Then click on the “Choose Label” option, and in the list that drops down, click on “Recruiting/[your-advertised-job]”, or whatever the appropriate Label is. In my case, it is “Recruiting/Tank technician”.
    Dropdown showing all labels with user clicking on label for this advertised job.
    Choosing the Label for this advertised job.

    …And you will have created your filter.Once you have your filter, you can now await emailed job ad responses from applicants. When they come in, Gmail will automatically filter them to your Labels. Remember, if it happens to miss any, you can always manually Label the email and archive it, and get the same effect as the filter.

  12. At this point, you can consider making additional sublabels for the process of sorting candidates. For example, you could have a set of sublabels of , “Interview”, “Maybe”,  “Offer”, and “Rejected” for each job posting sublabel.
    Showing a job role as a label, with hiring process sublabels.
    Showing a job role as a label, with hiring process sublabels.


    Tip: 
    The “(1)” shown next to the “Tank technician” Label does not refer to how many emails are labeled this way, but how many emails with this Label are unread.

    With the Labels organized this way, any time you wanted to look at candidates in a category, just click on that label to reveal all the emails. If you want to move a candidate’s email to another category, click the checkbox to the left of the email, then click the label’s icon. A dropdown will allow you to uncheck one checkbox and check a new one, which will relabel that email.

    Relabeling a candidate's email to "Maybe" within the Tank Technican job.
    Relabeling a candidate’s email to “Maybe” within the Tank Technician job.
  13. Now, to review your candidates, just click on the Label corresponding to this job (in my case, “Tank technician”) . That will bring you to a screen similar to the Inbox view, showing the candidates’ emails as a list.

    The job applicants' emails, selected via the label.
    The job applicants’ emails, selected via the label.
  14. As you decide on the suitability of a candidate, you can relabel their email to “Interview” and other Label categories you set up. To do so, just click on the Label icon when reading an email. Be sure to check the Label for the category you assigned the person to, such as “Rejected”. Do not uncheck the job title Label–we are going to use later. And do not forget to click “Apply”. 
    Note: Gmail will separate the nested sublabels with slash marks, like this: “Recruiting/Tank technician/Rejected”.

    Shows Gmail labels interface, relabeling a candidate to "Rejected".
    Relabeling this inappropriate candidate to “Rejected”.

Use GMass to respond to groups of candidates simultaneously

When you are ready to offer the best applicants an interview, you can easily mass mail them now through GMass. Let’s assume you want to start by contacting those you’ve selected for an interview.
Note: The following assumes you have followed the labels structure I have used; if not, just adapt to your own structure.

  1. Click the Interview Label. This will bring all the emails from candidates you intend to interview. 
  2. Click the GMass Build Email List button (magnifying glass button), and GMass will build a recipient list all of the email addresses labeled “Interview”.

    About to build a list for a mass email.About to build a list for a mass email.
    About to build a list for a mass email.
  3. Then write your email to those selected for interviews. Here’s our sample:
    Email sent to potential interviewees.
    Email sent to potential interviewees.

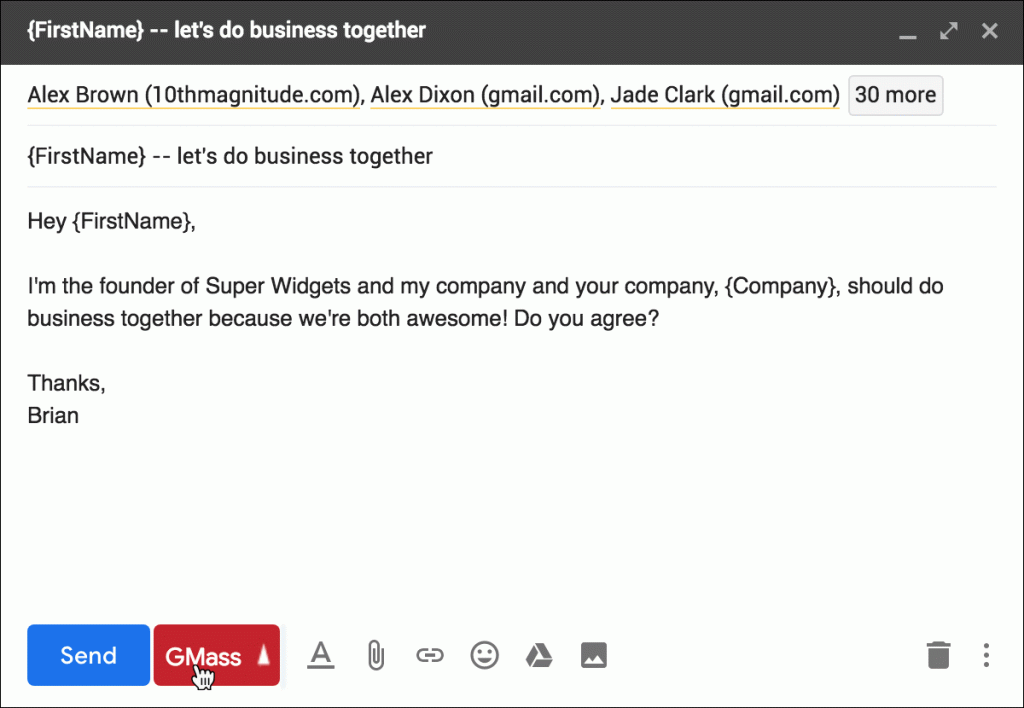
    Tip: Notice I’ve personalized the email, too. That’s a nice touch in interview invites, and trivial to do in GMass.

  4. Let’s suppose I prefer the email inviting the applicant to an interview will arrive as a reply to their application email. To set that up, click the GMass settings button.

    Showing the GMass settings button.
    The GMass Settings button.
  5. Then, In the settings dialogue, click the “Send as replies” radio button.

    The "send as replies" option in the GMass Settings window.
    The “send as replies” option in the GMass Settings window.
  6. Finally, click the GMass button to send out the mail. In our case, we just have four recipients, but for many jobs, there may be more recipients for the interviews and potentially hundreds for the “rejected category”. That many emails is fine–that’s just what GMass does best!

    Cursor shown poised over the GMass button, ready to click.
    Ready to send out, just need to click GMass…
  7. OK, let’s say you’ve hired someone. Now how do you inform everyone else they didn’t get the job? For those, you can do a time-saving trick with GMass. Just click on the job title Label (in my case, “Tank technician” and then the GMass Build Email List button (magnifying glass button). This will make a list of everyone who applied for this job. But don’t send it yet!

    The email rejected candidates receive. Don't send it just yet!
    The email rejected candidates receive. Don’t send it just yet!
  8. Now, click the Settings button (the up arrow) in Gmass, and in the Settings window, use the Suppression feature. Click in the field to the right of “Suppress” and a dropdown list will pop up. From there, select the emails that went out to the candidates offered interviews.
    Note: in order to later find the interview offer email, it is a good idea to give it an informative subject when you compose it. Then you will be able to easily find it in the suppression list.

    In the Settings windows, selecting emails for the suppression list.
    Selecting emails for the suppression list.
  9. Finally, you can send this mass mailing via the GMass button. Each rejected candidate will receive a personalized email, as if it came directly from you.
  10. If you want, once you’re sure you are completely done with this hire, you can re-nest this job title under a different Label, such as “Recruiting/Former Searches/Tank technician”. This way, you can keep a record of all previous recruiting efforts while still keeping your Labels tidy.

That’s it! With the help of GMass, you’ve been able to manage an entire recruiting effort all through your Gmail account. That keeps context switching to zero, since everything–including discussions with other stakeholders at the job–is done within the Gmail interface. It’s a great way to stay focused and increase productivity.

Ready to send better emails and save a ton of time?


GMass is the only tool for marketing emails, cold emails, and mail merge — all inside Gmail. Tons of power but easy to learn and use.


TRY GMASS FOR FREE

Download Chrome extension - 30 second install!
No credit card required
Love what you're reading? Get the latest email strategy and tips & stay in touch.


Sending a mail merge campaign is a powerful tool for staying in touch with customers or potential customers, but they still run the risk of being “detected” as a mass email campaign instead of a personalized email campaign.

That’s because when we normally send person-to-person emails, we respond to the person’s previous email instead of starting a new email thread. Pretty much all email campaigns you’ve ever seen are sent and received as new threads.

GMass, however, allows you to send an email campaign as a reply.

Today I will show you how you can easily send out an email campaign while having the emails go out as replies to each person’s email. 

How to Send a New Campaign As Replies

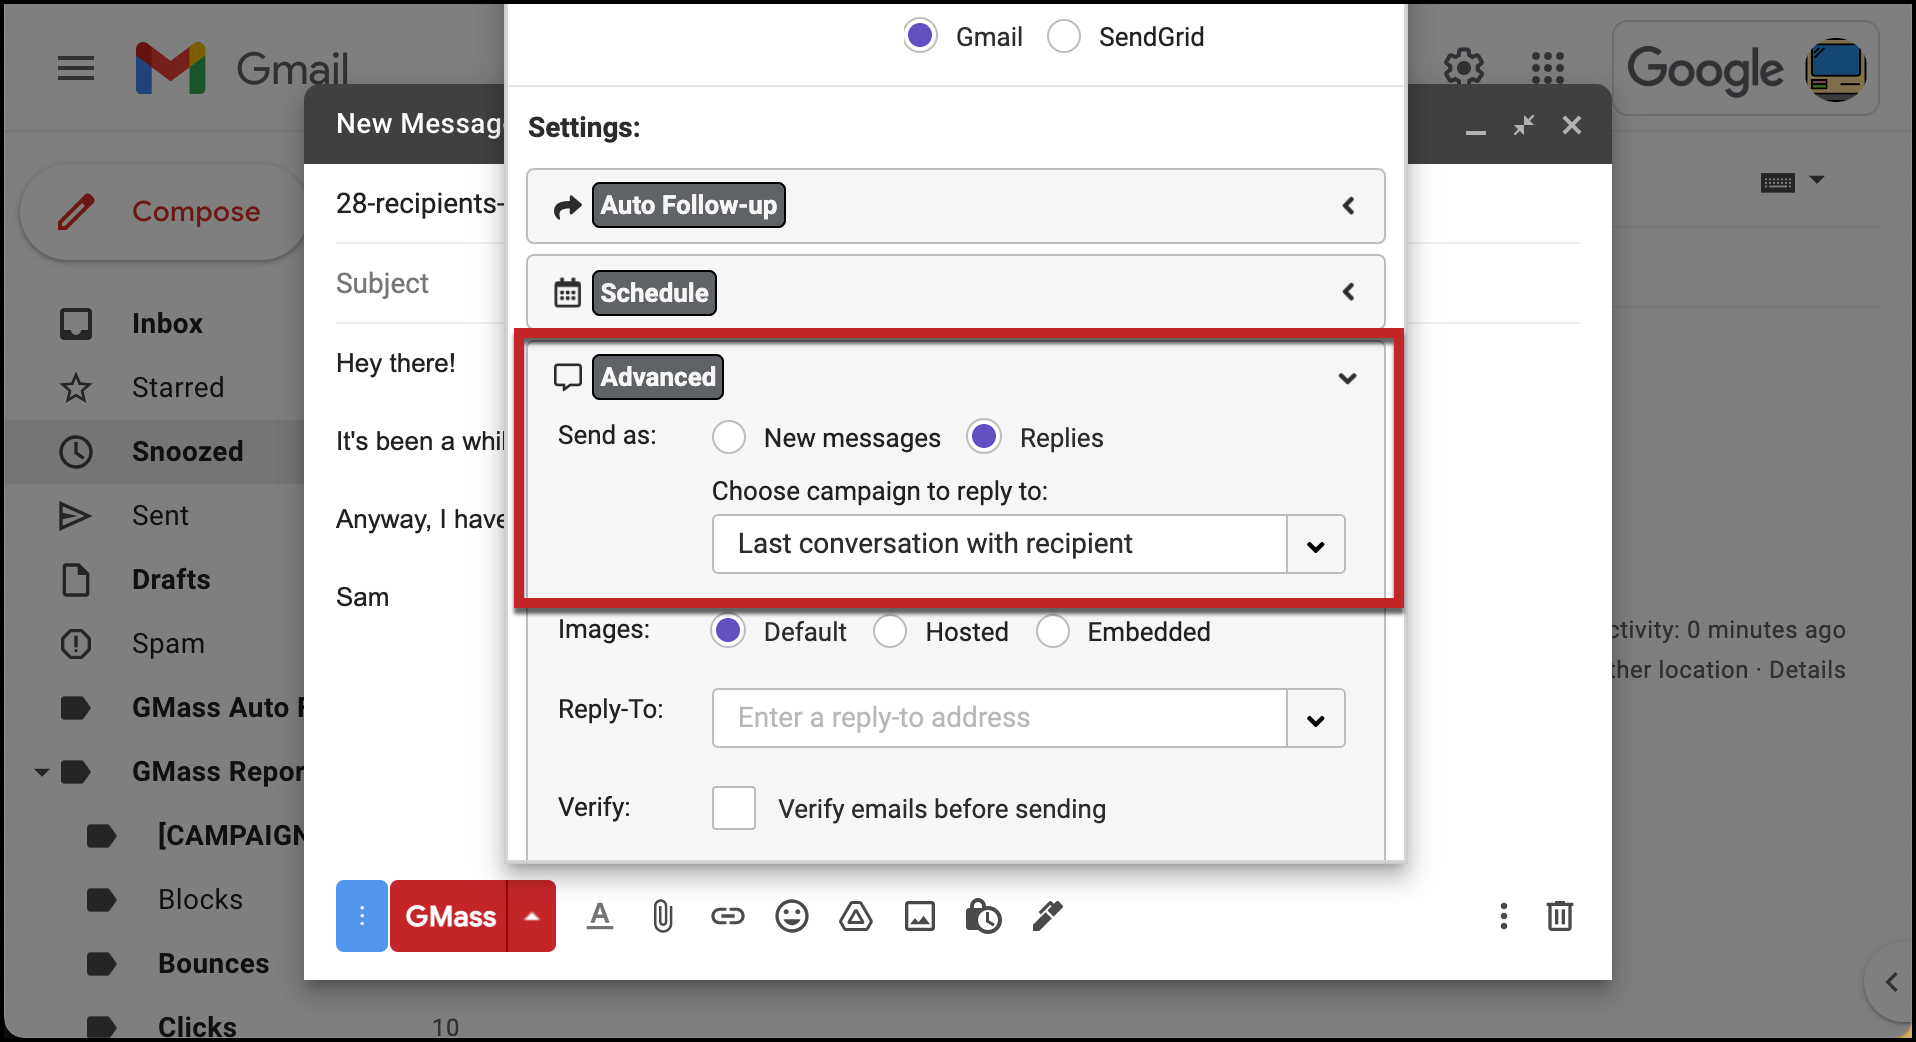
1. Go to the Advanced section of the GMass settings box

How to set up send as replies for a campaign

Open up the GMass settings box in your Gmail compose window. Then head down to the Advanced section. The first option is “Send as:” — toggle that to “Replies.”

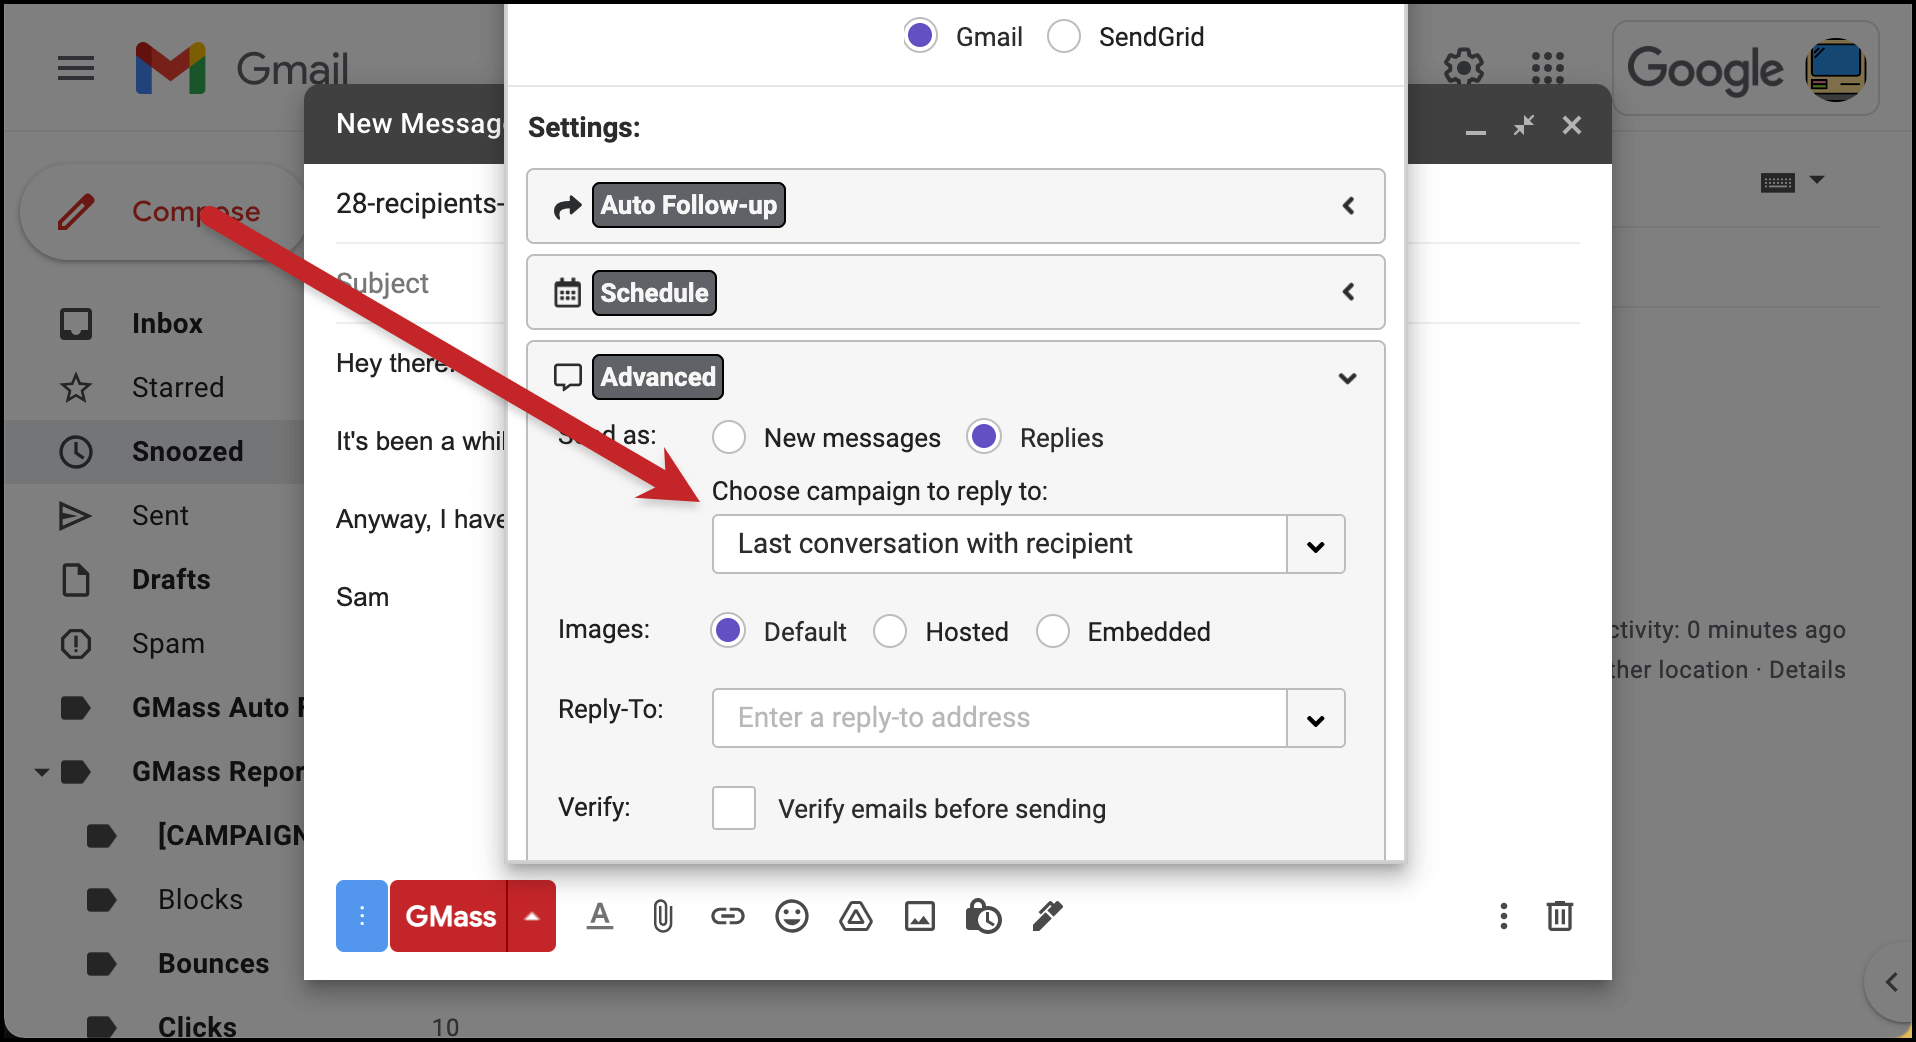
2. Choose which emails you want to reply to

Choose how you want to send replies

You have two choices when it comes to replying. You can either send your new campaign emails as a reply to…

  • Your last email conversation with each recipient, regardless of what it is
  • A specific past GMass campaign (which you can choose from the dropdown box)

You might choose the first option, replying to the last email conversation, if you’ve had back-and-forth correspondence with your recipients. The second option could be good if you want to follow up to a specific email campaign you sent with GMass, especially if there wasn’t much back-and-forth correspondence.

And… that’s it. Your campaign will now go out as replies to your prior conversation (or replies to a specific prior campaign) for each recipient.

Let’s look at an example of this in action.

Example: Answering Job Application Emails

As I’ve blogged about in the past, GMass can be used effectively as an automated Applicant Tracking System. In cases in which job applicants are emailing you their resume and letter of application, it’s a great idea to use the “Send as replies” feature to send out emails as replies to these candidates, because it gives the impression you have taken the time to actually hit “reply” and respond to them personally —instead of just sending out a form letter.

Although that is actually exactly what you will be doing, it will feel personal, and GMass never prevents you from manually sending out your own replies as well, if you want to.

Let’s say that after meeting a few applicants, you have learned more about the types of skills they might bring to the table, and now you’d like to ask all applicants by email whether they have that skill, so that you can zero in on a small list of prime candidates. This is a perfect opportunity for a Send as replies style mail merge.

1. Write your email in Gmail like you normally would

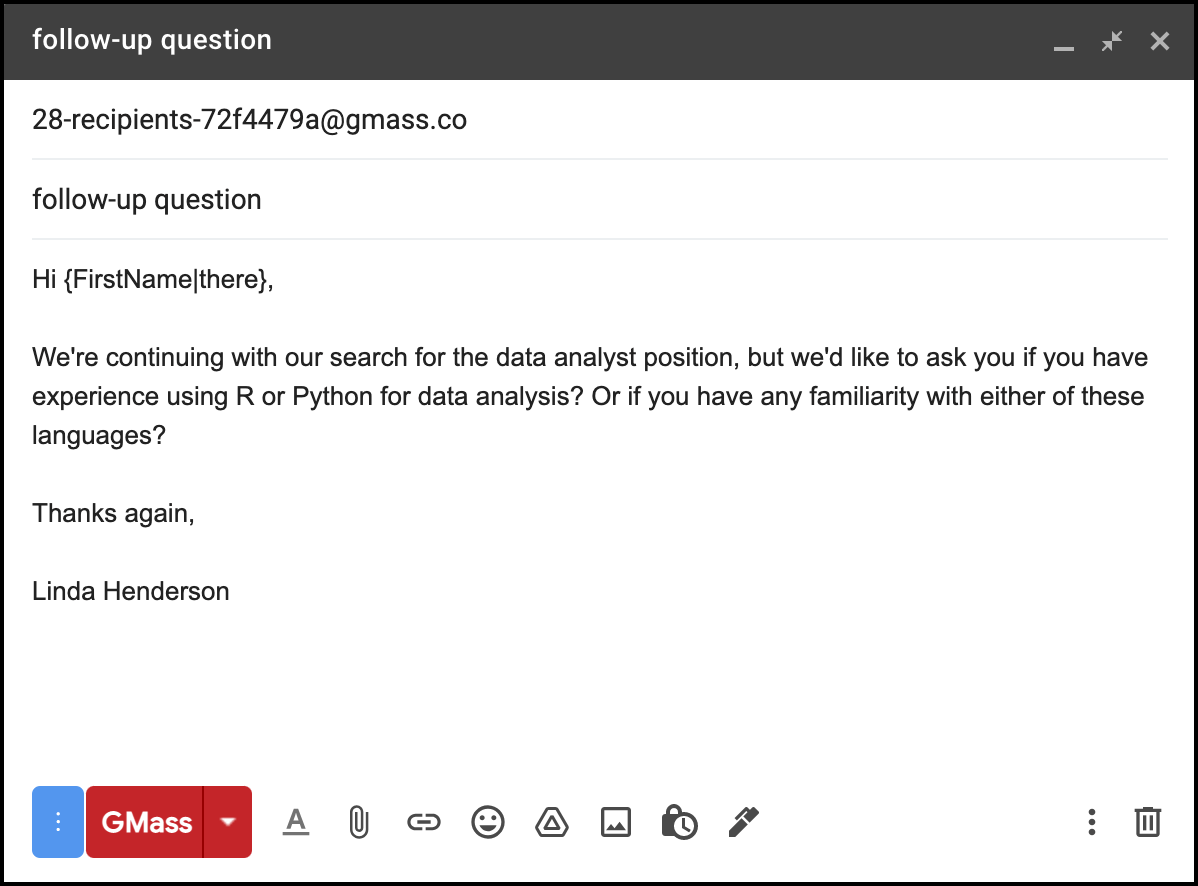
Compose your email as usual in Gmail

Head to the Gmail compose window and write the email you want to send as a reply.

2. Click the arrow next to the GMass window to open the settings

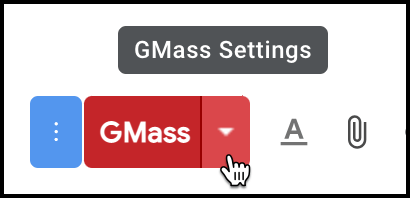
The GMass settings button

Again, just standard stuff here: Click the arrow; as you can see above, when you mouse over it, it reminds you it’s the GMass Settings.

3. Go to the Advanced section of the settings box to send as replies

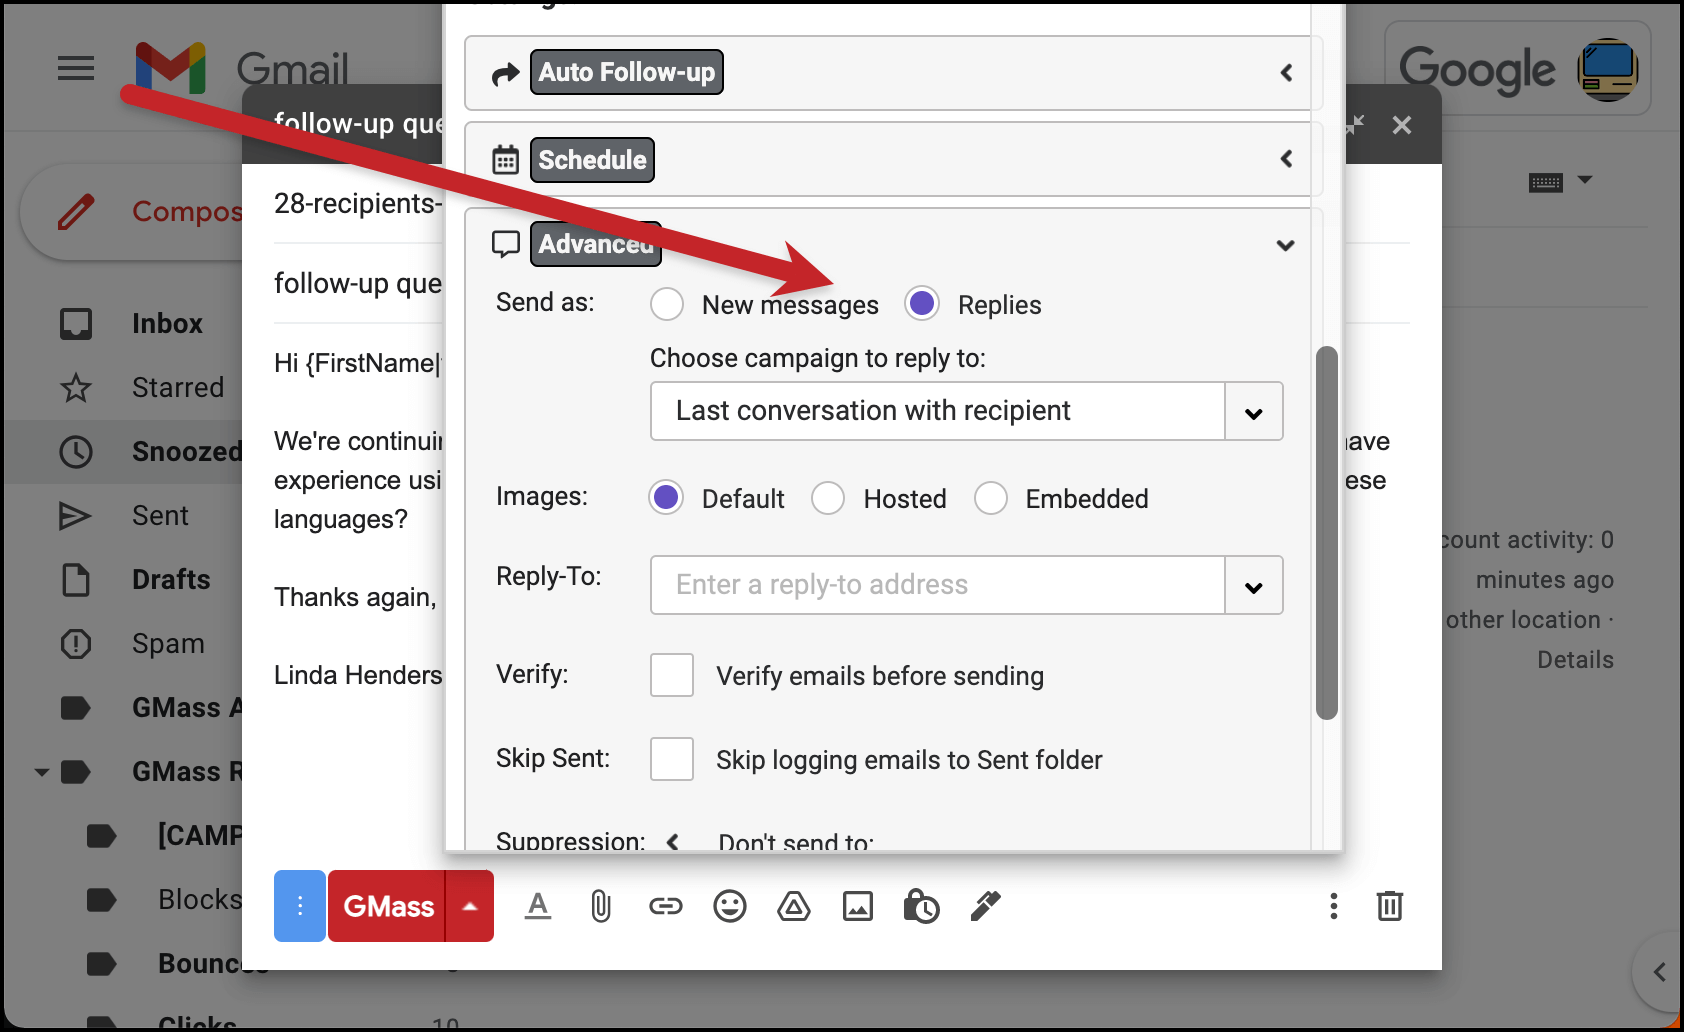
Send as replies options

We have to choose between sending as replies to the last conversation with the recipient, or to a specific GMass campaign.

Here, it makes sense to send as replies to the last conversation, since the recruiting process often involves a lot of replying back-and-forth.

Then choose any other settings for your campaign and when you’re ready to send, hit the GMass button.

4. The results

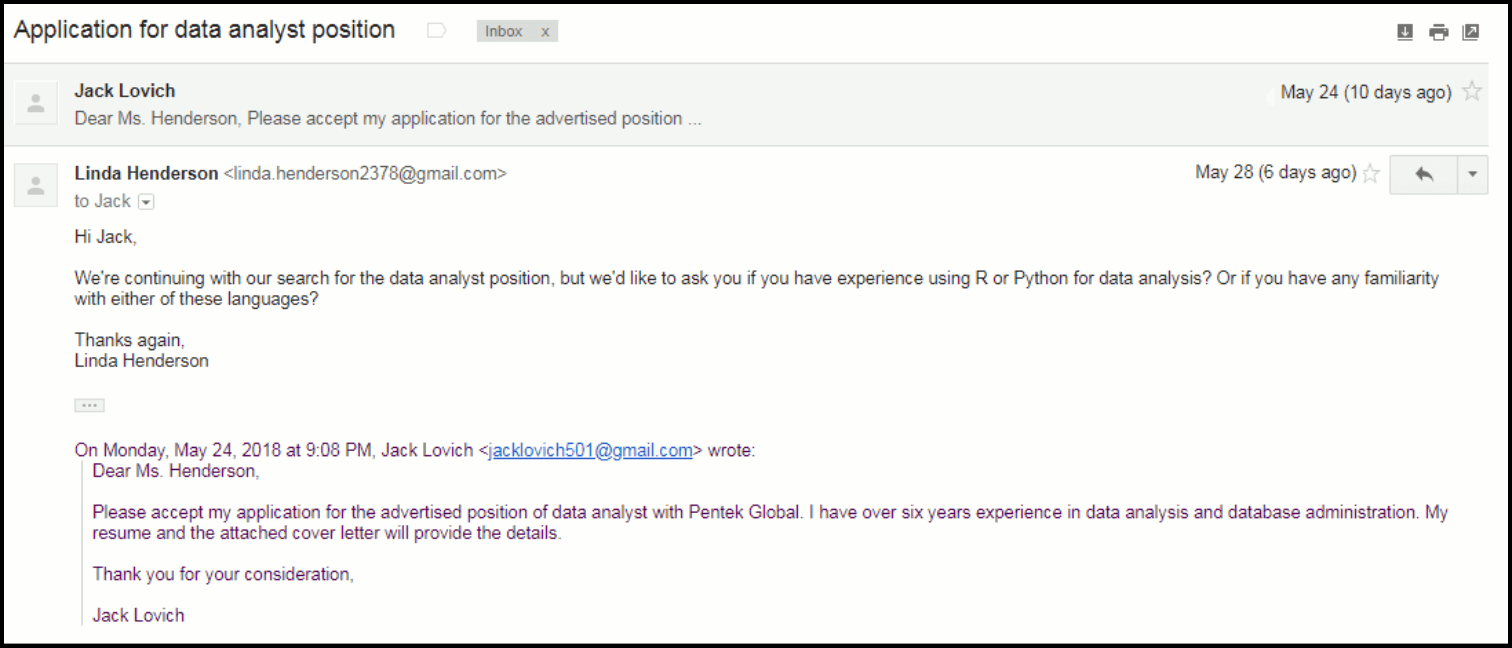
Now the emails you sent will be received in the same thread as the original job application email that each candidate sent you. Let’s take a look to confirm that:

The result of sending as a reply

Looks good! You’ve reached out to multiple people, but addressed each individually and replied to their last email instead of starting a new email thread.

So what’s the Subject Line?

When you check the Send as replies setting, if a prior conversation with the recipient is found, the Subject Line from that prior conversation is used, and we add a “Re: ” to it if necessary. That’s what forces the email to show up as part of that prior conversation. In this case, the Subject Line that you set for the campaign is ignored.

If no prior conversation with the recipient is found, then the Subject that you set is used.

What if the Last Email was From You?

The previous scenario covers the case in which one uses Send as replies when the last email related to the recipient is from the recipient. But what happens if the last email related to the recipient is from you and to the recipient? For example:

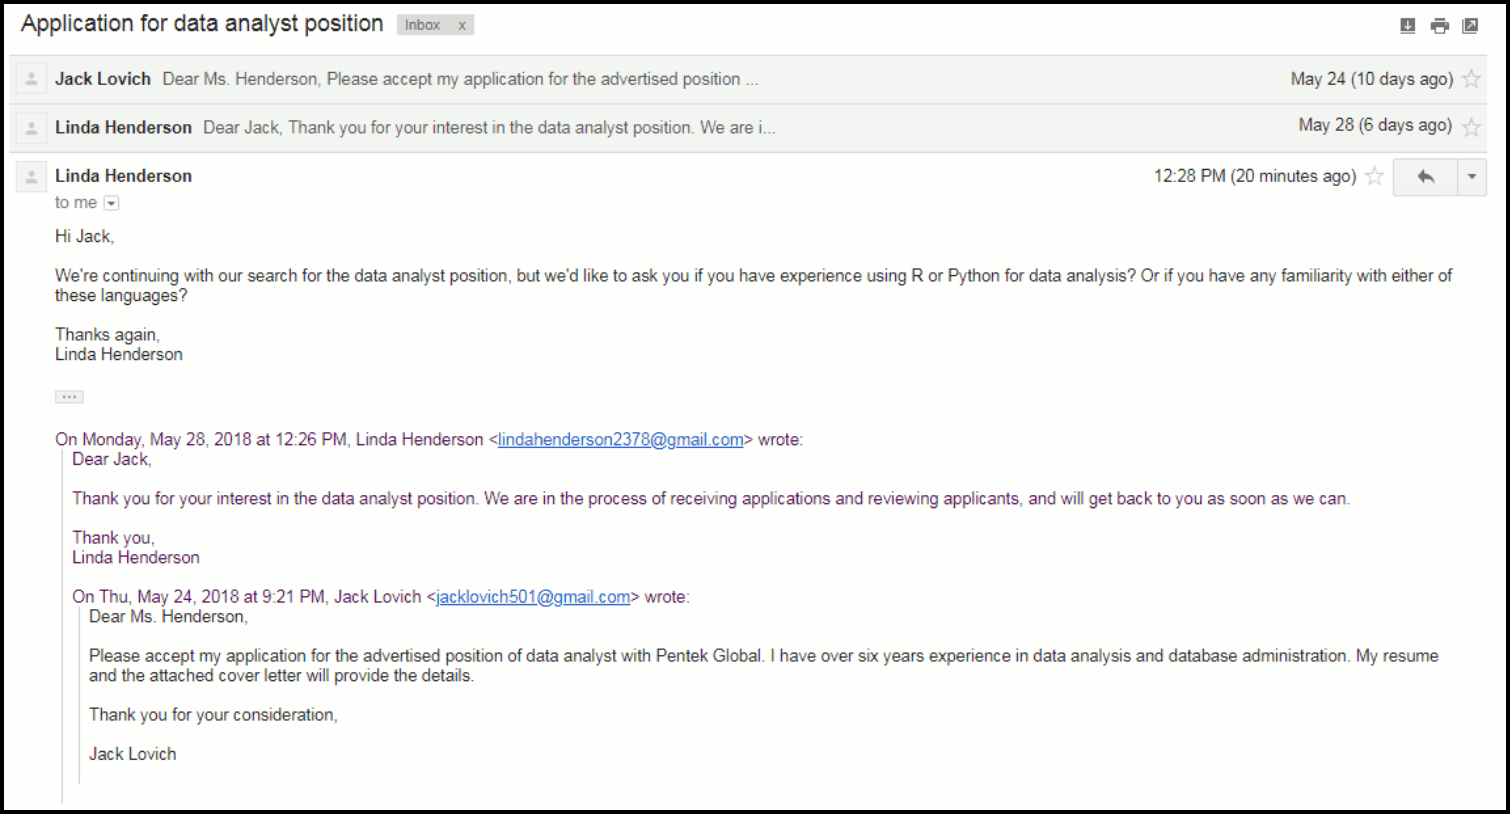
  1. Jack sends email to Linda; in this case, for a job application.
  2. Linda replies, thanking him for the application [this step was not shown in the previous example ].
  3. Jack does not reply.
  4. Some time passes, and a question occurs to Linda, something she wants to send out to all job applicants. So, Linda uses GMass to send an email campaign (including to Jack), using “Send as replies”.
  5. What happens: In Jack’s case, the new email goes out as a reply to Linda’s last email to Jackso it looks like Linda is manually following up with Jack.

Let’s take a look at what that looks like on screen:

Sending when the last email was from you

What if There is no Prior Email From or To the Recipient?

It depends on the scenario.

If you use “send as replies” to your last conversation with a recipient and there is no prior conversation with that recipient, your message will go to them in a new thread and start a new conversation.

But if you use “send as replies” to a specific campaign and a recipient in your new campaign was not a part of that prior campaign, they will be skipped entirely and will NOT receive the message.

Other uses for “Send as Replies”

This feature is useful anytime you want to reach out to more than a few people about an issue that you were already engaged in, one-on-one, in an email, with each of them. Examples might include:

  • Following up on any kind of sales email, for those that are still undecided. This works well if there has been any changes in the features, price, or other aspects of the product or service you are selling. A reply could take the form along the lines of, “I know you’re probably still thinking about our last discussion about our product, but wanted to let you know that we now offer…” This could be a good time to send your replies to a prior GMass campaign (since you’re building on the prior cold email offer, not your prior one-on-one conversation with the person).
  • Personalized mass “thank yous” for everyone that RSVP’d to an event, including weddings, parties, conferences, and other gatherings.
  • Any kind of business update for people who have had correspondence with you about your product or service. So, for example, if someone wrote you about your business in the past, perhaps to inquire about a product, you can write them back (even months later) as a reply, letting them know you now offer an upgraded product or service–or a new product entirely.
  • Teachers whose schools use Gmail for schools can use this feature to communicate to all parents as a reply to each parent’s last email if they want to broadcast a general message but make it feel more personalized.
Ready to transform Gmail into an email marketing/cold email/mail merge tool?


Only GMass packs every email app into one tool — and brings it all into Gmail for you. Better emails. Tons of power. Easy to use.


TRY GMASS FOR FREE

Download Chrome extension - 30 second install!
No credit card required
Love what you're reading? Get the latest email strategy and tips & stay in touch.


The General Data Protection Regulation (GDPR), a new law passed by the European Union two years ago with implications for email marketing, started enforcement on Friday, May 25th, 2018.

Some users have asked us whether GMass is GDPR-compliant, so let’s discuss that now.

First, the Bottom Line

Since GMass is just a plugin and we don’t help our customers collect any user/subscriber data, there is nothing GMass can do to make sure you are GDPR-compliant. Essentially, this law doesn’t apply directly to GMass itself, other than how we conduct our own email marketing for our own business.

However, GMass users need to take action on this individually. That’s because a typical marketing service might have a feature that helps its users create opt-in sign-up forms, but GMass doesn’t have that — our users have their own opt-in forms, and they have to get their data into a spreadsheet somehow in order to use GMass.

Making Sure You’re Compliant

There are a number of important issues to keep in mind to make sure your GMass marketing campaigns are GPDR-compliant (and, again, this applies regardless of whether you use GMass or some other service). Generally, all these rules are intended to prevent email marketers from collecting data about users without their explicit consent:

  • Be aware of which data is protected: GPDR does not only apply to data gathered after May 25, but data gathered before as well (in fact, it applies to any data collected after the passing of the law two years ago). And it applies only to data collected from clients living in Europe. Bear in mind, even if you are not based in Europe, the GPDR applies to you if any of your clients live in Europe.
  • Be aware of the risks of non-compliance: There are serious fines: “Up to €10 million, or 2% of the worldwide annual revenue of the prior financial year, whichever is higher”. And that’s for the “lesser” infractions!
  • Always obtain active consent for being on your email list, not just passive consent. This means for a user to grant consent, the user must, for example, check a checkbox. Pre-checked checkboxes don’t count!
  • Store your email recipients’ consent: This includes who they are, when they consented, and what they were consenting to.
  • Allow people to easily withdraw consent.
  • You don’t need consent to include organizations (companies, schools, etc.) on your mailing list. This is because the GDPR is meant to protect individuals, not organizations.

Although there has been much media coverage about GDPR, the good news is that by taking some basic precautions, you can continue to use GMass and Gmail without concerns. Not only will you be complying with these regulations, you’ll be enhancing your brand by assuring clients that you take their privacy seriously.

If you would like to learn more about the GDPR, here are some helpful resources:

Ready to transform Gmail into an email marketing/cold email/mail merge tool?


Only GMass packs every email app into one tool — and brings it all into Gmail for you. Better emails. Tons of power. Easy to use.


TRY GMASS FOR FREE

Download Chrome extension - 30 second install!
No credit card required
Love what you're reading? Get the latest email strategy and tips & stay in touch.


Here’s a useful Gmail trick to spruce up your emails: using images as links. This way, recipients can click on the image directly, whether it has words or not.

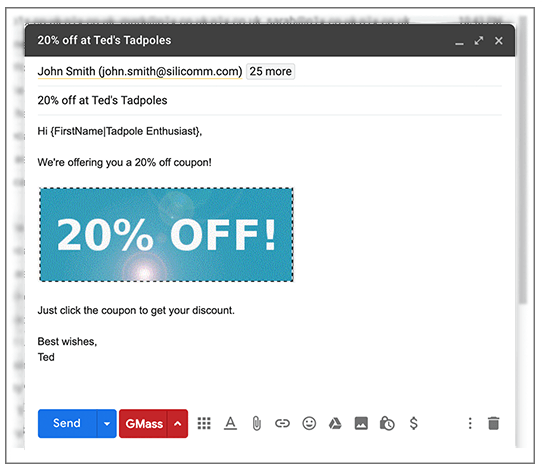
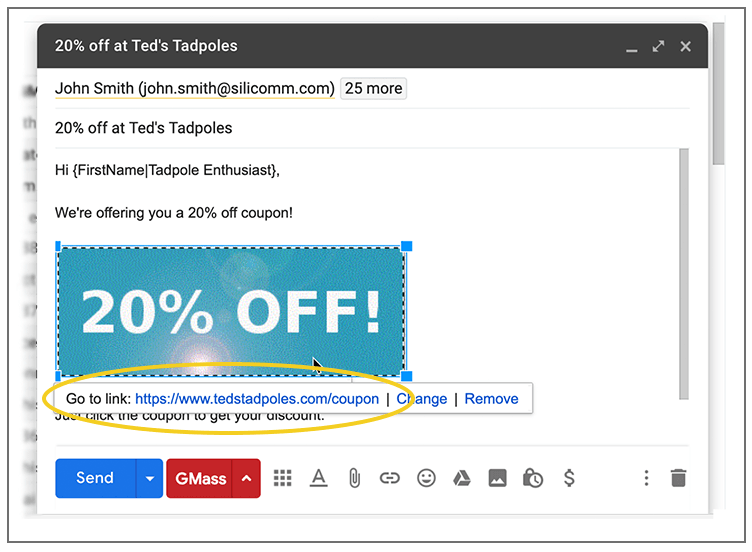
For example, let’s say you’re putting together an email and want to use this coupon image as a hyperlink:

Our clickable in-email coupon.

There are two methods I’ll demonstrate below, an easy layman’s approach and the programmer’s approach.

The easy way to hyperlink an image

Here’s how you can easily make an image a link:

1. Place the image into your Gmail email as you normally would.

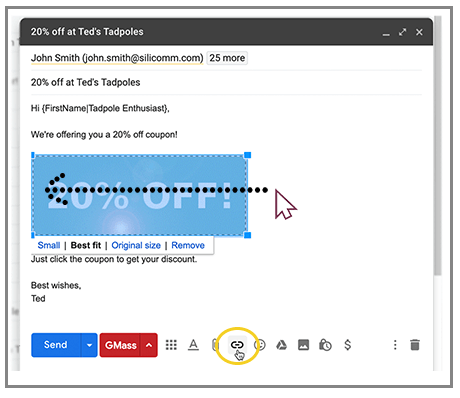
2. Then select the image. You can do this by clicking and holding to the right of it, then dragging the cursor left until the image turns blue. When the image is blue, this indicates it has been selected. Do not merely click on the image to select it. That won’t work. You have to drag your mouse across it to select it.

Dragging the cursor left to highlight the image.

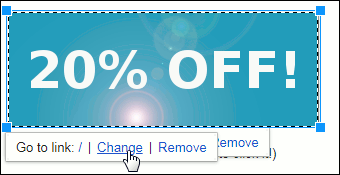
3. Click the link icon at the bottom of the Compose window. A small window will appear under the image showing you the option to change or remove the link. Click “change.”

Selecting the web link you want for this image.

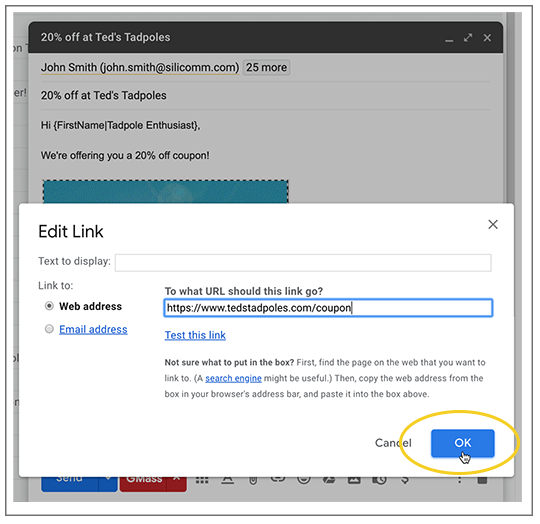
4. Enter the web address to which you want the image to link. 

Entering the web address.

5. Then click the OK button.

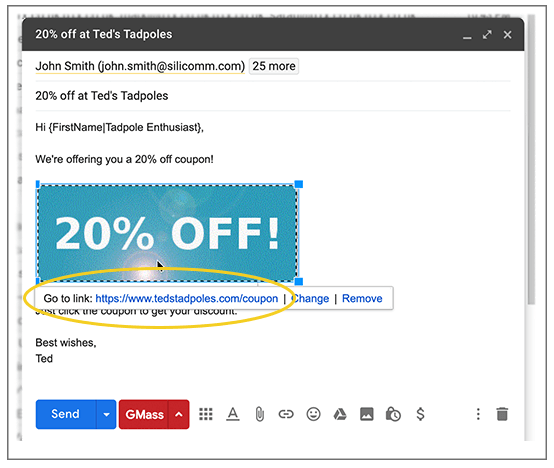
It’s a must to confirm that you have linked the image to where you intended it to link. This is important because it’s easy to create a new link rather than link the image, because sometimes the image looks like it’s selected when it’s not. To confirm that you’ve linked the image correctly, just click on the image, and then the URL will show with the “change” option. You should see the web address to which you want the image to link displayed under the image after the words “Go to link.” If it is incorrect, simply repeat the steps above, making sure you have definitely selected the image this time.

Checking that the link is correct by clicking on the image.

The programmer’s way


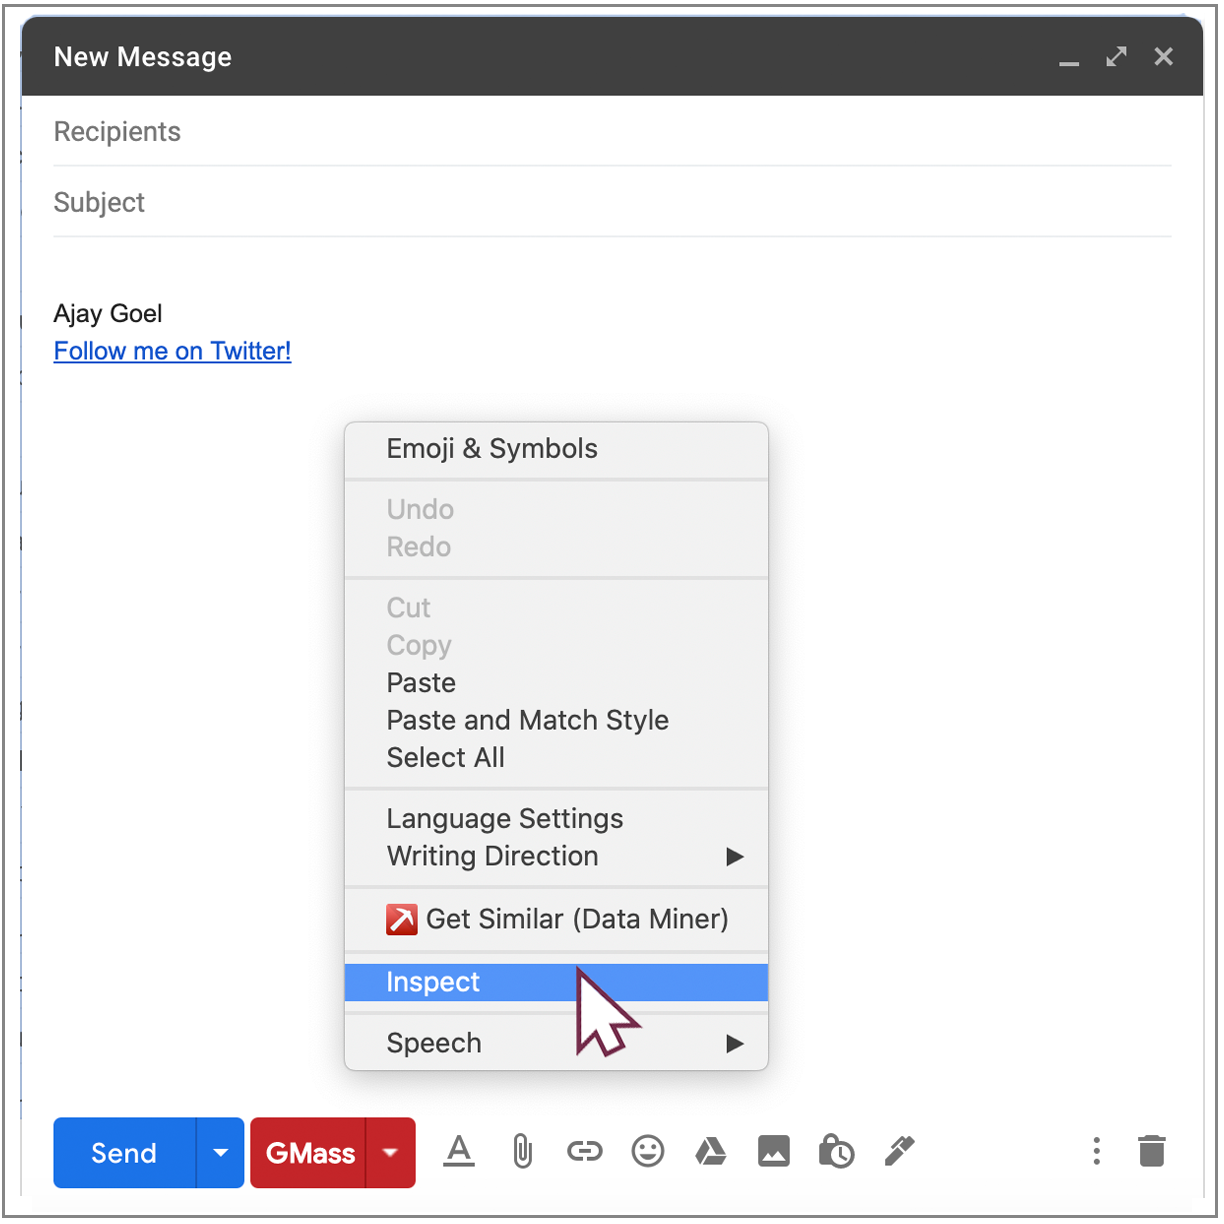
If you’re a programmer and you know HTML, you can probably shave a few seconds off the process here. But you have to be comfortable using Chrome’s Developer Tools and adding an “a href” tag to add the hyperlink to the image.

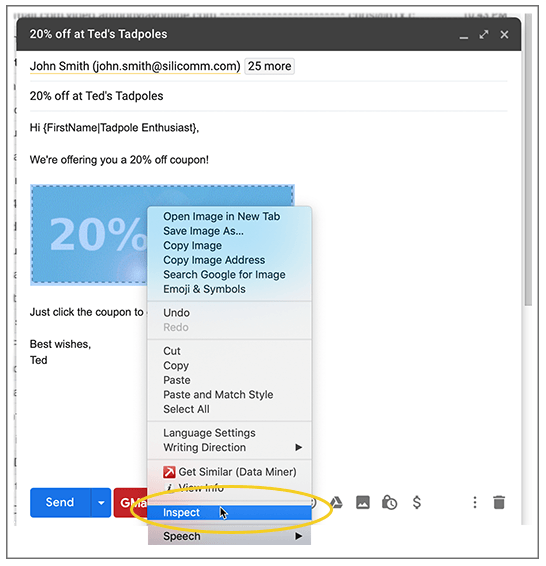
1. Inspect the image to launch Chrome’s Developer Tools.

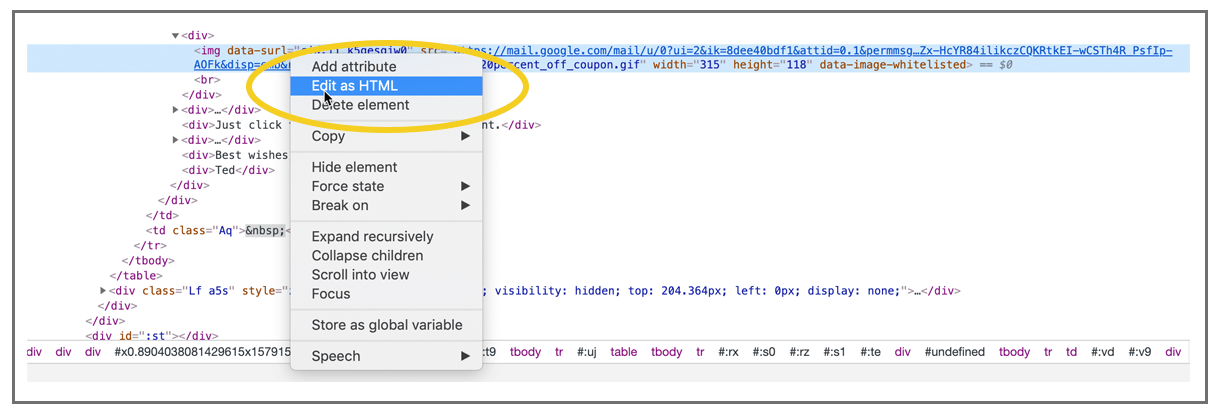
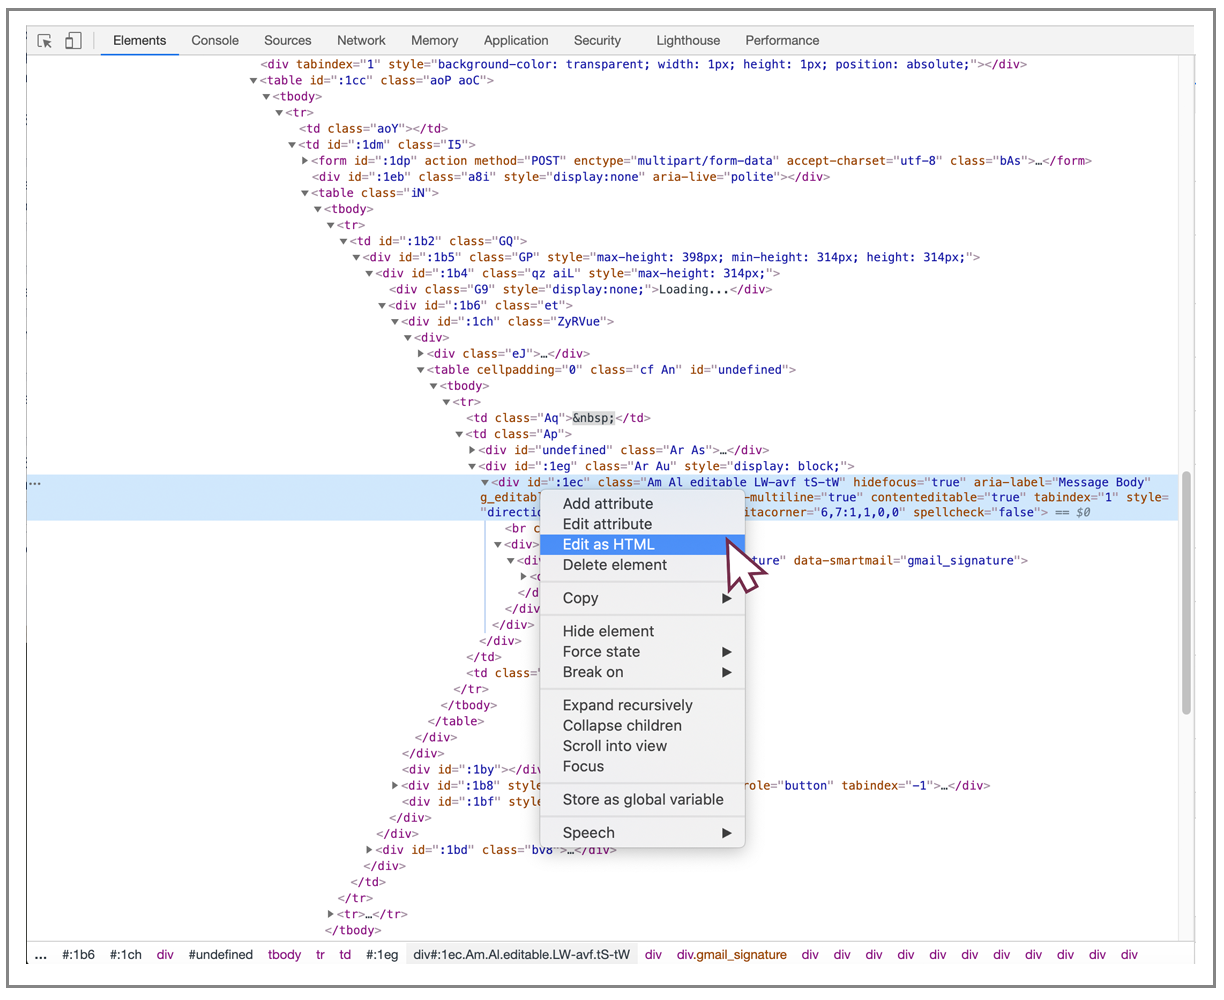
2. Bring up the HTML for the image.


3. Choose the option to edit the HTML and add the “a href” tag.

4. Don’t forget to add the closing “a” tag:

5. Exit and the link has been created.

And finally, test the link by single-clicking the image:

Conclusion

That’s all there is to it! When your recipients click on the coupon, it will open a new tab with the location to which you linked. Of course, now you can send out your coupon offer to all your customers, by using a Google Sheets spreadsheet along with GMass.

See why 99% of users say they’ve had their best deliverability ever with GMass


Email marketing, cold email, and mail merge all in one tool — that works inside Gmail


TRY GMASS FOR FREE

Download Chrome extension - 30 second install!
No credit card required
Love what you're reading? Get the latest email strategy and tips & stay in touch.


Gmail doesn’t have a native way to send HTML emails.

However, you can send an HTML email in Gmail — it’s just not as easy as pasting HTML code into the compose window.

Today, I’ll show you how to create HTML emails and send them in Gmail. The benefit of doing so is that you can design email campaigns and then edit and send them directly inside Gmail, either as a campaign or just as part of regular email correspondence.

And once you’ve done that, you can save your HTML email as a template to use again.

Why importing HTML into Gmail “doesn’t work”

If you take HTML code and paste it “raw” into the Gmail compose window, it won’t render anything else — it will just appear as HTML code. So, HTML on its own won’t help you format the shape or appearance of your emails.

Here’s how to work around that.

How to send HTML email with Gmail

There are three ways you can add custom HTML into the Gmail Compose window.

  1. Copy/paste the rendered HTML into the Gmail Compose window.
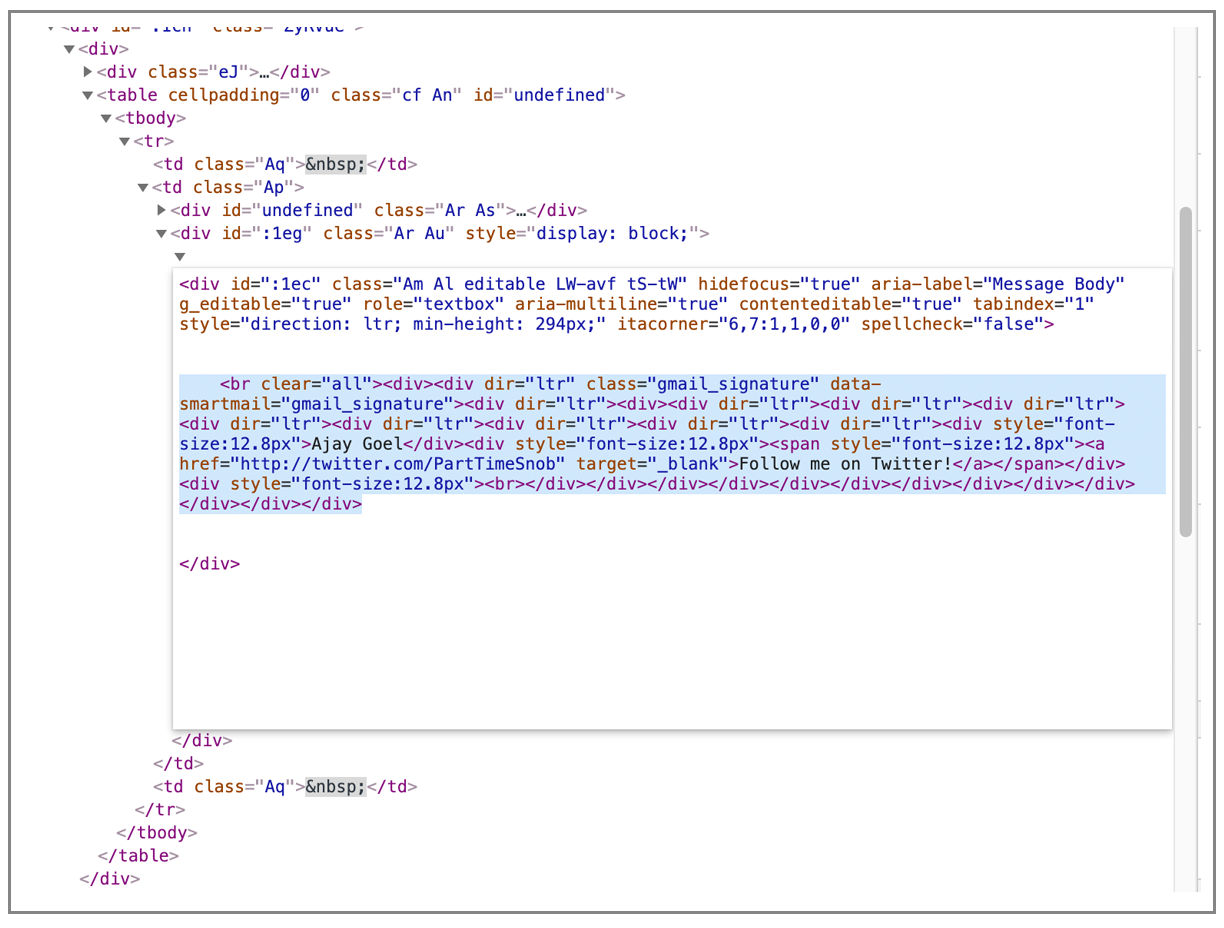
  2. Paste your HTML code into the Gmail Compose window using Chrome’s Developer Tools
  3. Use a Chrome extension to add an HTML editor to the Gmail Compose box

Option 1: Copy/paste rendered HTML into Gmail Compose Window

Once you’ve written your HTML, the process is basically just a matter of copy and paste. You create your page in HTML, load it into a browser, copy the contents of the browser, and then paste it into Gmail’s compose window. By “rendered” HTML, I mean what the HTML looks like in the browser, with colors, fonts, and images in place.

Let’s run through a quick example of that.

Creating and sending your HTML email in Gmail

Step 1: Write your HTML 

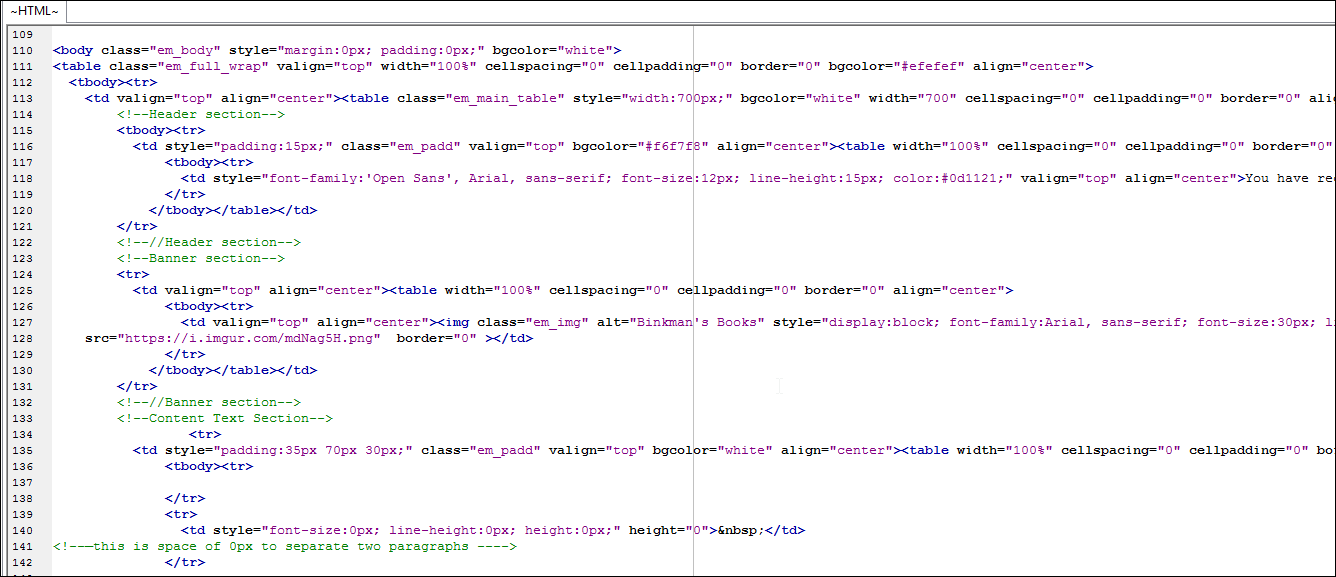
For this example, I’m using some boilerplate HTML adapted for our purposes. HTML can be either written directly or, possibly, composed with an HTML authoring tool. Gmail is a little picky with what it will allow as HTML in its emails, so here are a few important guidelines:

  • You can’t use external style sheets, though you can use inline CSS (e.g., <td style=bgcolor=”white” align=”center”>) as well as embedded CSS in the head. For more details about exactly what you can and should use in Gmail, see this pageNote: Gmail changed their support for CSS in 2016, so older posts online may claim they don’t support things they actually do. The post I linked to is up to date with that change.
  • Some HTML tags may not be supported. This list shows HTML tags that are supported and some that are not. Sorry, no BLINK tag.
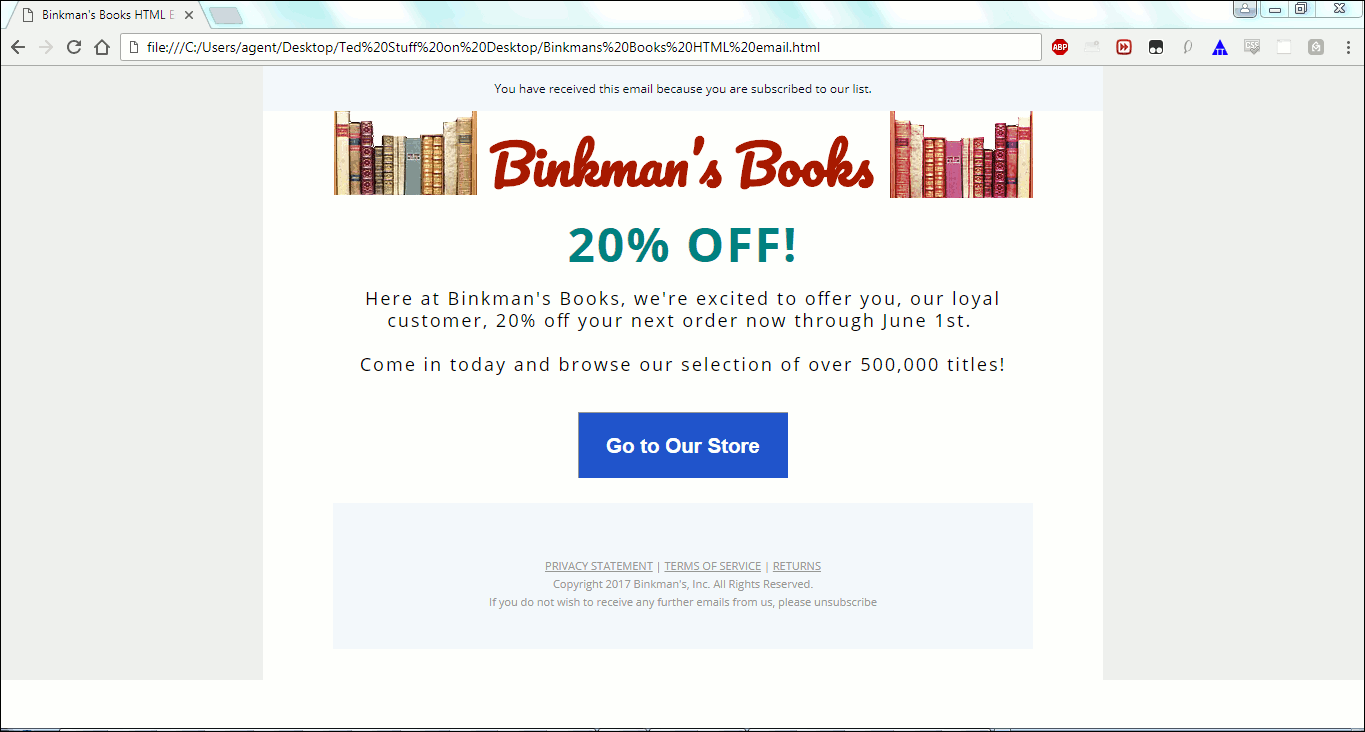
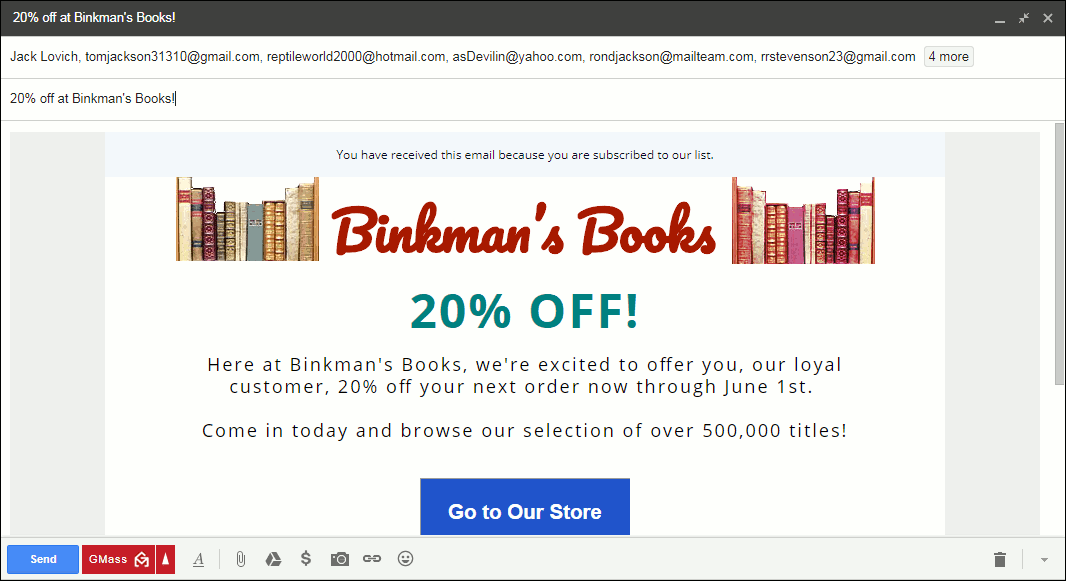
  • Gmail does not support web fonts. So, either use the standard fonts they provide or, if you want another font for something like a logo, make an image of that text. Then, in the HTML, link to that image hosted online, which is what I have done for the “Binkman’s Books” logo in my sample email below.
  • Either host your images while designing or embed them later. You can host images on Imgur, Amazon Web Services, or any other place intended for hosting images. Otherwise, you can embed the images in your file by uploading them to Gmail… but there’s a chance that’s going to break your design.
  • Using tables to organize the display of contents is the recommended way to go for HTML emails. However, even using tables, there are still issues galore to watch out for.
  • Google Docs for composing could be problematic. Although there are tutorials out there about using Google Docs to create your HTML email without coding, when I tried it, I found that what was displayed on Google Docs was not exactly what appeared in the email (e.g., something that was centered in Google Docs was left-aligned in the email).
  • Remember, Gmail is a work-in-progress. Gmail keeps changing, so blog posts or online answers from a few years ago are already out of date. If you’re researching how to do anything with HTML and Gmail, try to find content that is as recently written as possible.

A part of the HTML used to create the email.

With this method, it’s best to keep it simple. Because what Gmail will support is somewhat unpredictable, it’s best to keep things fairly simple in terms of the HTML.

You never really know how Gmail is going to interpret your rendered HTML. And if something breaks, you won’t be able to fix it inside the Gmail window (at least not easily).

Step 2: Display the rendered HTML page in a browser.

I used Chrome and just opened (Ctrl-O) the .html file that was on my computer.

The HTML as rendered in the Chrome browser.

Step 3: Open a Gmail Compose window and paste it into the main text area.

The HTML email should appear in the compose window. Double-check (including scrolling down to the bottom) that everything looks appropriate before you send the email.

HTML email now pasted to Gmail compose window.

Pros and cons of this approach

Pros:

  • A quick way to get your HTML designs into Gmail.
  • You don’t need to install anything extra.
  • You don’t need to do anything technical to pull it off.

Cons:

  • You never know how your email is going to look once Gmail gets its hands on it.
  • You can’t make quick and easy tweaks to the HTML once you’ve pasted it in.
  • You have to use linked, not embedded, images — which might affect deliverability.
  • You can’t store your template inside Gmail.

In my experience, the cons outweigh the pros for this approach except when I’m using extremely basic templates. (And in those cases… why not just build something similar inside Gmail to avoid the hassles?)

Option 2: Paste the HTML code into Gmail using Chrome’s Developer Tools

This technique is a Gmail and Chrome hack. You right-click in the Gmail Compose window, find the relevant HTML portion of the box’s element, and then paste in your HTML code.

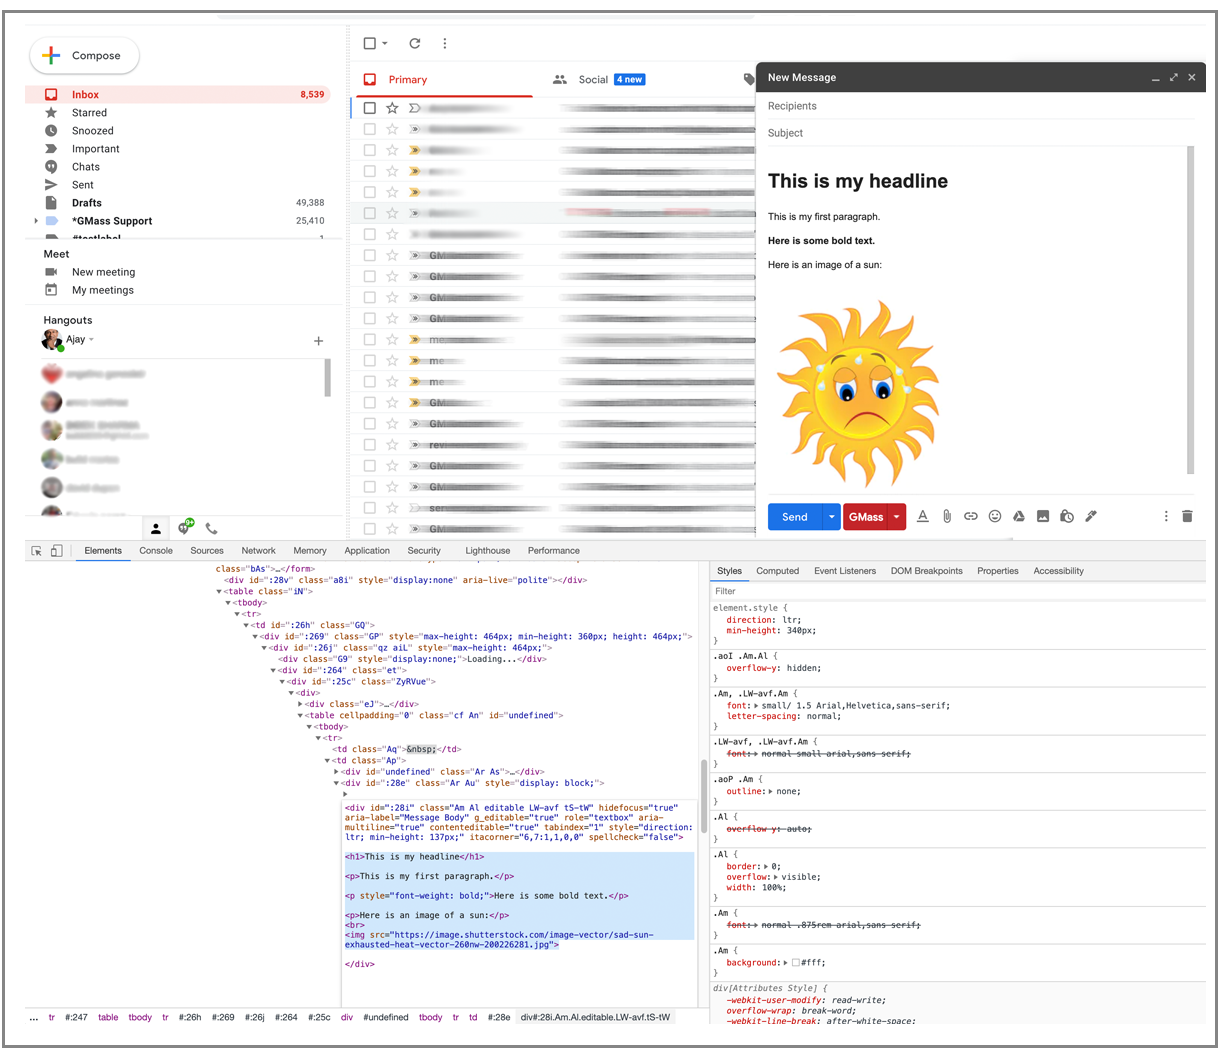
First, right-click anywhere in the Compose box and choose Inspect.

choose inspect

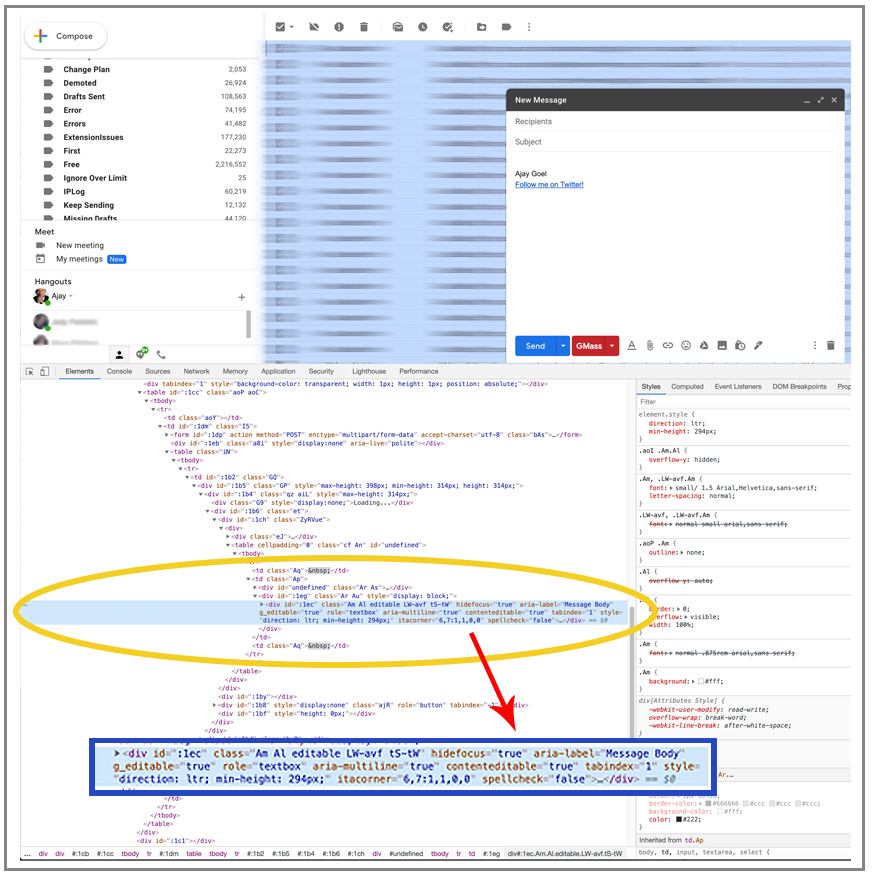
Chrome will then split itself and open up a pane showing the HTML of the Compose box, and one part will be highlighted.

inspect code

Find the “div” marked “contenteditable=true”, and then right-click and choose Edit as HTML.

content editable

The part inside the “div” tag is the part you should replace with your custom HTML code.

replace HTML inside div

Here I have my custom HTML code in the Sublime text editor:
custom HTML

Finally, here is my code pasted in:

placed customer HTML

And as soon as I click away, the Compose window is filled with the rendered version of the HTML.

Pros and cons of this approach

Pros:

  • Better control over the code inside Gmail than pasting in your rendered template
  • Once you’re already in there, you can make edits as needed
  • No extension or anything else to install

Cons:

  • It’s not intuitive or easy to work inside the Chrome dev tools area
  • This can be intimidating for people who don’t regularly work with code
  • This is a hack (at best)
  • This isn’t great for more complex designs with lots of code
  • No way to save your templates inside Gmail

Option 3: Use a Chrome extension to Send HTML Email in Gmail

There are several Chrome extensions that add a slick HTML editor to the Gmail Compose window so that you can edit the HTML behind the scenes in an easy-to-use manner. In Option 2 from this article, you are also editing the HTML behind the scenes — but doing so directly by hacking the code behind the HTML page. Chrome extensions let you do the same thing but make the entire HTML code process easier.

We’ll show you the easiest one, which is GMass (and since you’re here, you might just have it installed alread).


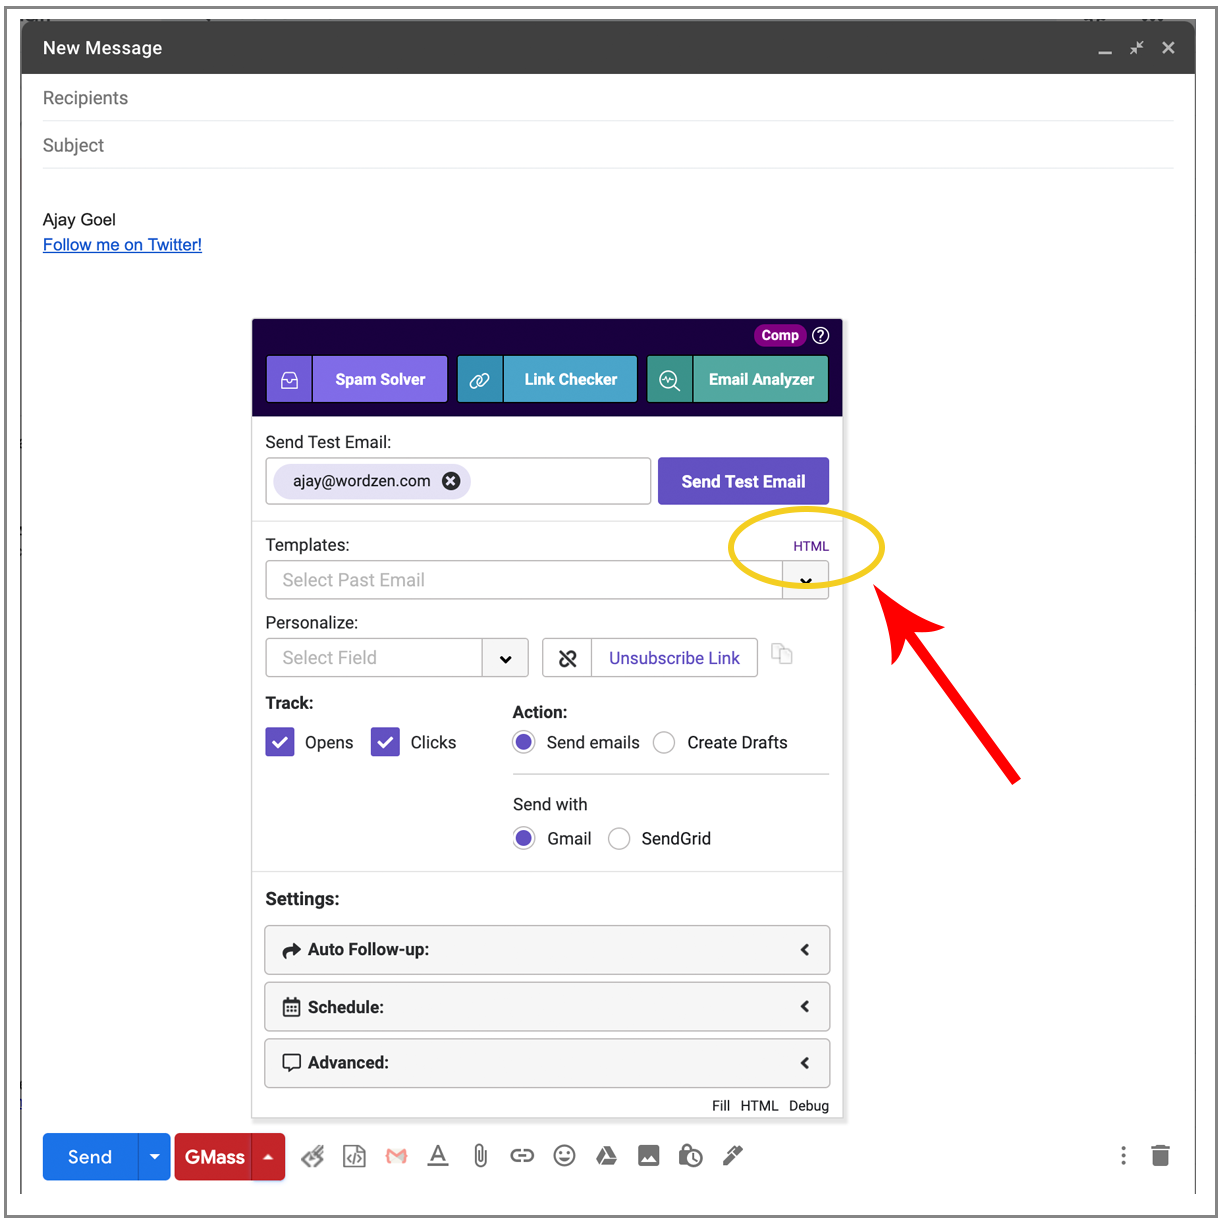
My own Chrome extension includes an “HTML” function so you can view and set the HTML into the Compose window.

Launch the Settings box and click “HTML”.

GMass HTML widget

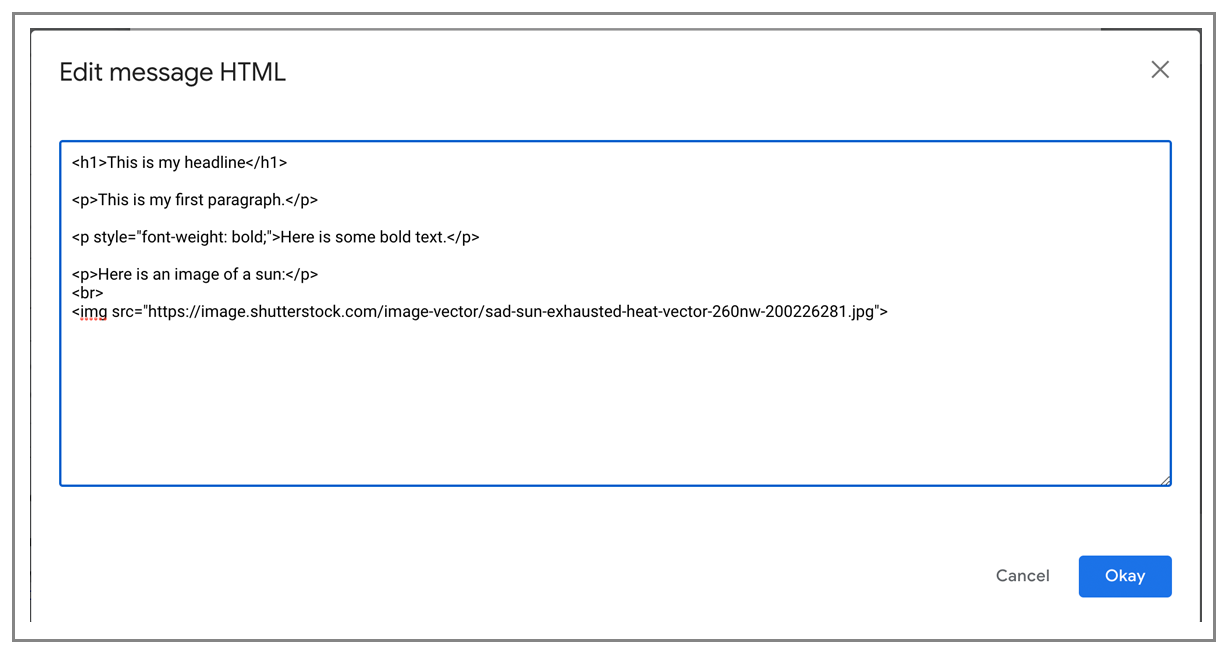
Paste in your HTML.

paste custom HTML

Hit Okay, and watch the magic happen.

Gmail with custom HTML

And if you need to edit or tweak anything, you can just go back into the HTML window to do so.

Pros and cons of this approach

Pros:

  • Best for more complicated designs
  • You can easily bring in embedded images for improved deliverability
  • It’s easy to edit and tweak your HTML
  • GMass automatically turns every message you send into a reusable template, so you won’t have to go through the whole HTML copying/pasting/tweaking process in the future
  • Great control over how your email turns out

Cons:

  • Requires installing the Chrome extension (if you’re not one of the 300,000+ people using GMass)

And, of course, GMass does a whole lot more than let you easily create HTML emails. (In fact, on our list of features, that probably ranks like #76 or so.) Here’s what makes GMass better and different than everyone else. It’s an email platform that works inside Gmail for all your email marketing, mail merge, and cold email campaigns.

If you want to try out GMass, you can get started by downloading the Chrome extension. You’ll be up and running in a matter of minutes — for pasting in HTML templates and beyond!

Ready to send better emails and save a ton of time?


GMass is the only tool for marketing emails, cold emails, and mail merge — all inside Gmail. Tons of power but easy to learn and use.


TRY GMASS FOR FREE

Download Chrome extension - 30 second install!
No credit card required
Love what you're reading? Get the latest email strategy and tips & stay in touch.


You can now unsubscribe an entire domain from your Gmail mail merge campaigns sent with GMass. Unsubscribing a domain is similar to manually unsubscribing a list of email addresses, only in this case, you’d be unsubscribing an entire company or organization. For instance, if you want to suppress any future emails to Uber, you could unsubscribe uber.com.

How to Unsubscribe a Domain

Head to the GMass dashboard. You can get there through this link, or by clicking the dashboard icon by the Gmail search bar.

Access the GMass dashboard via the icon

Click the Settings icon to open the left panel with your account-level settings.

Dashboard settings icon

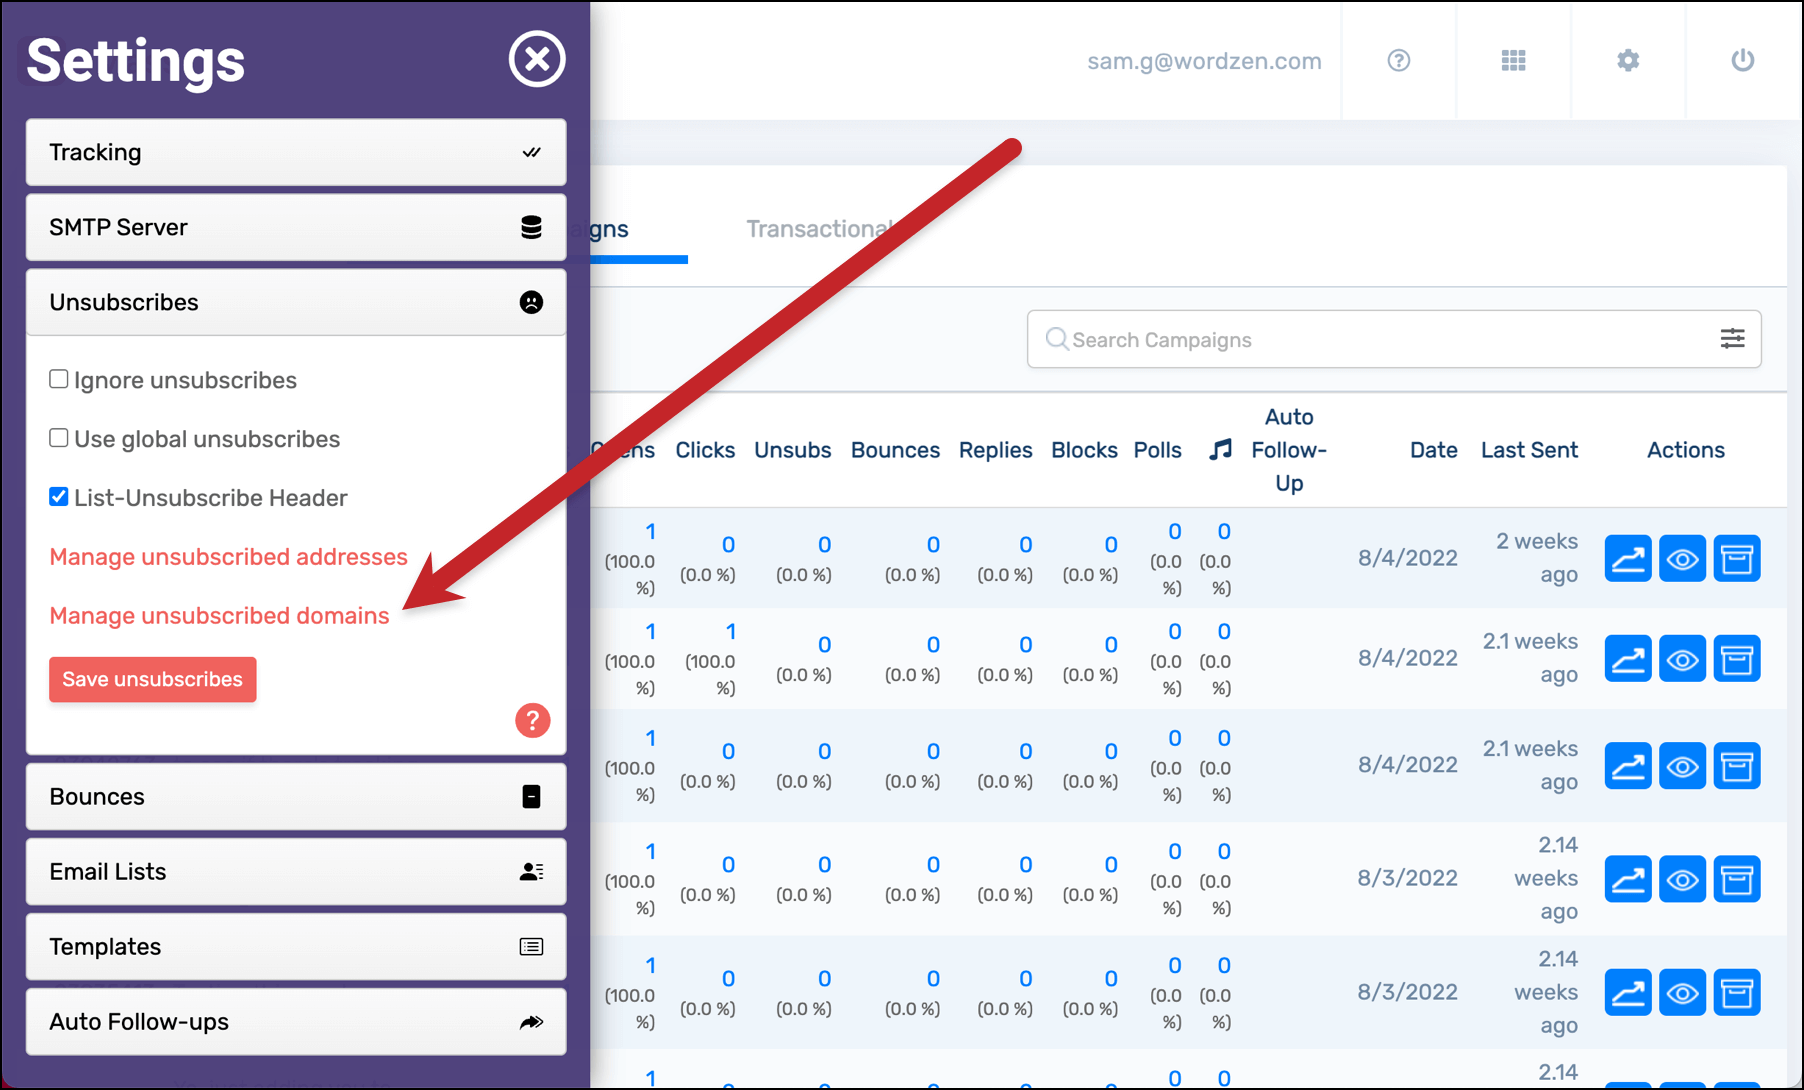
Click into the Unsubscribes settings in the left panel. Then click “Manage unsubscribed domains.”

Manage unsubscribed domains in the GMass dashboard

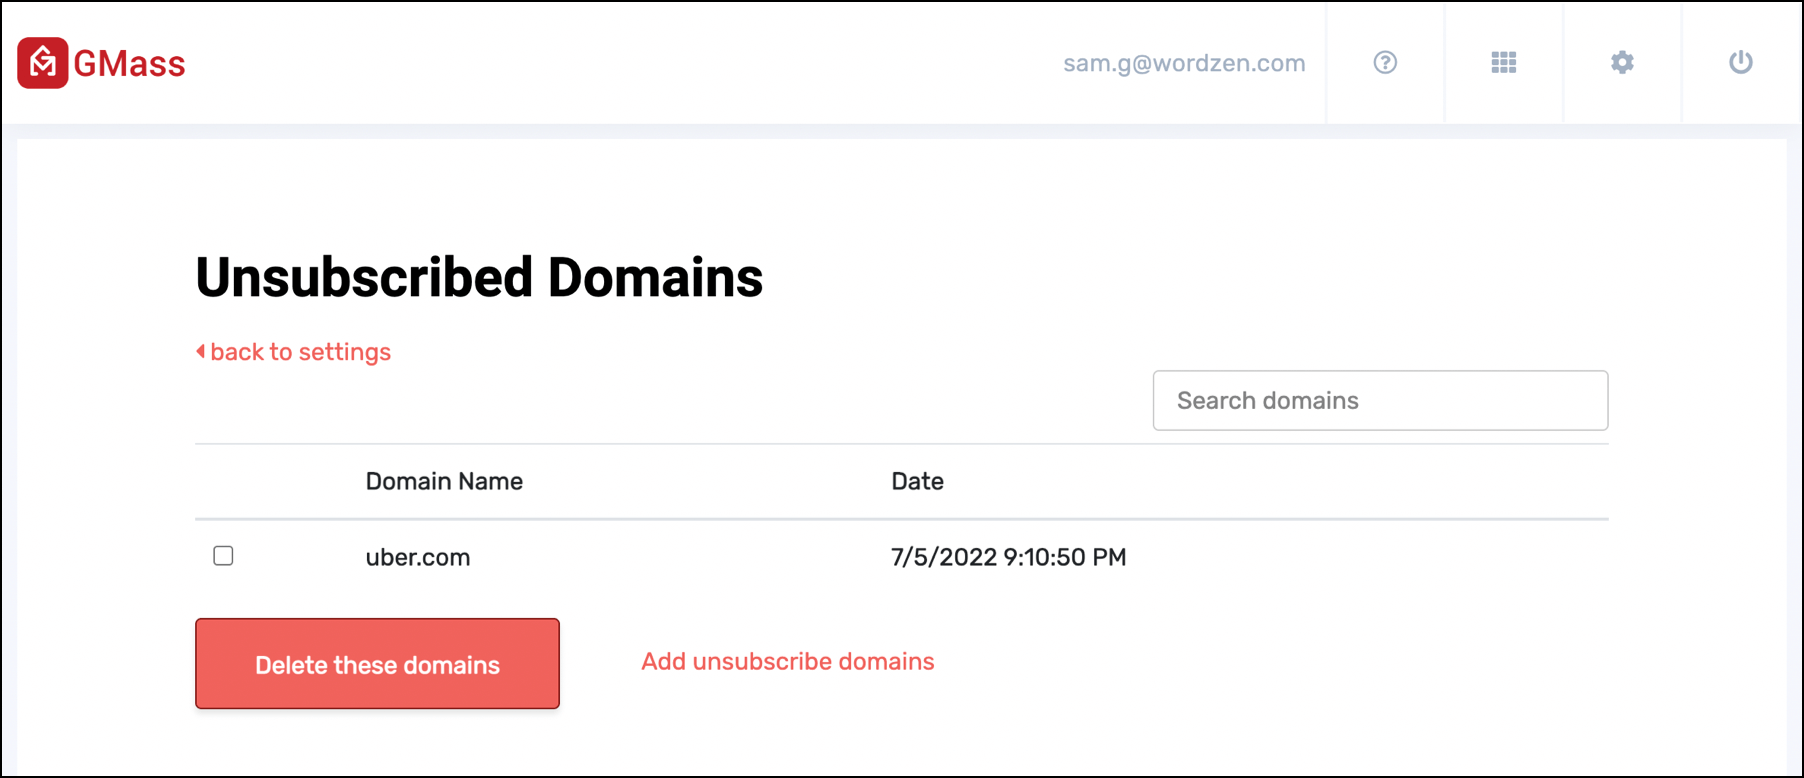
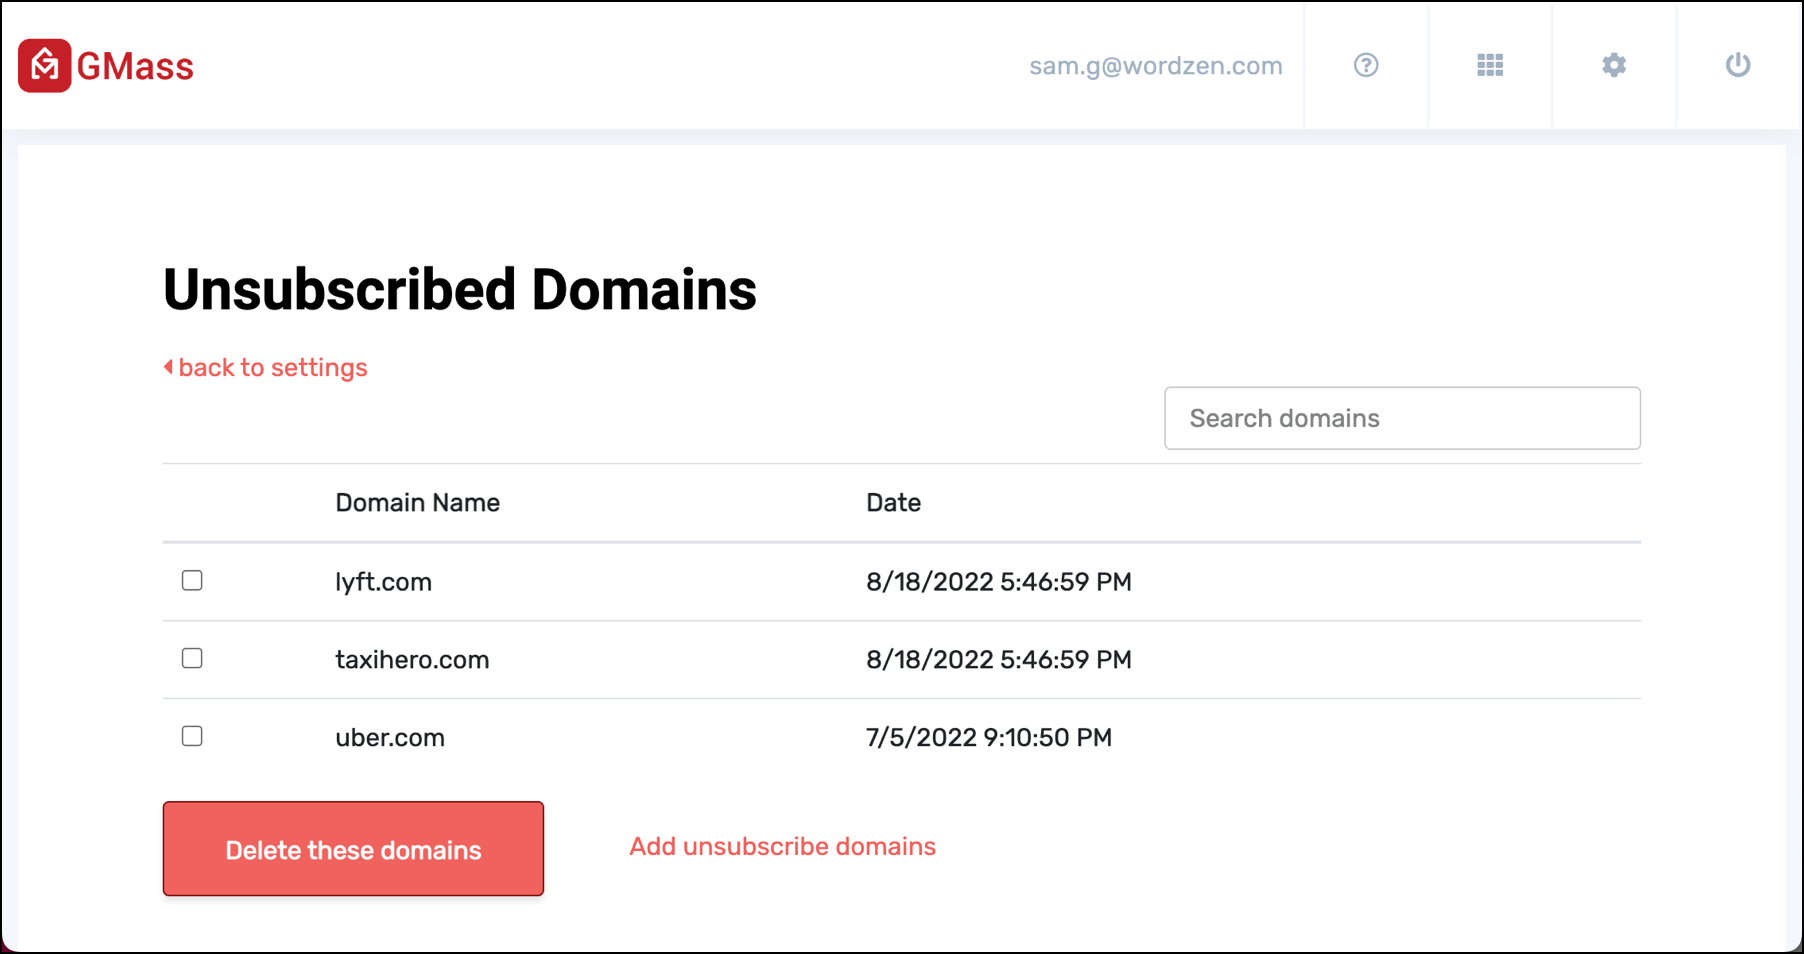
Now you’ll see any domains you’ve unsubscribed.

Manage unsubscribed domains

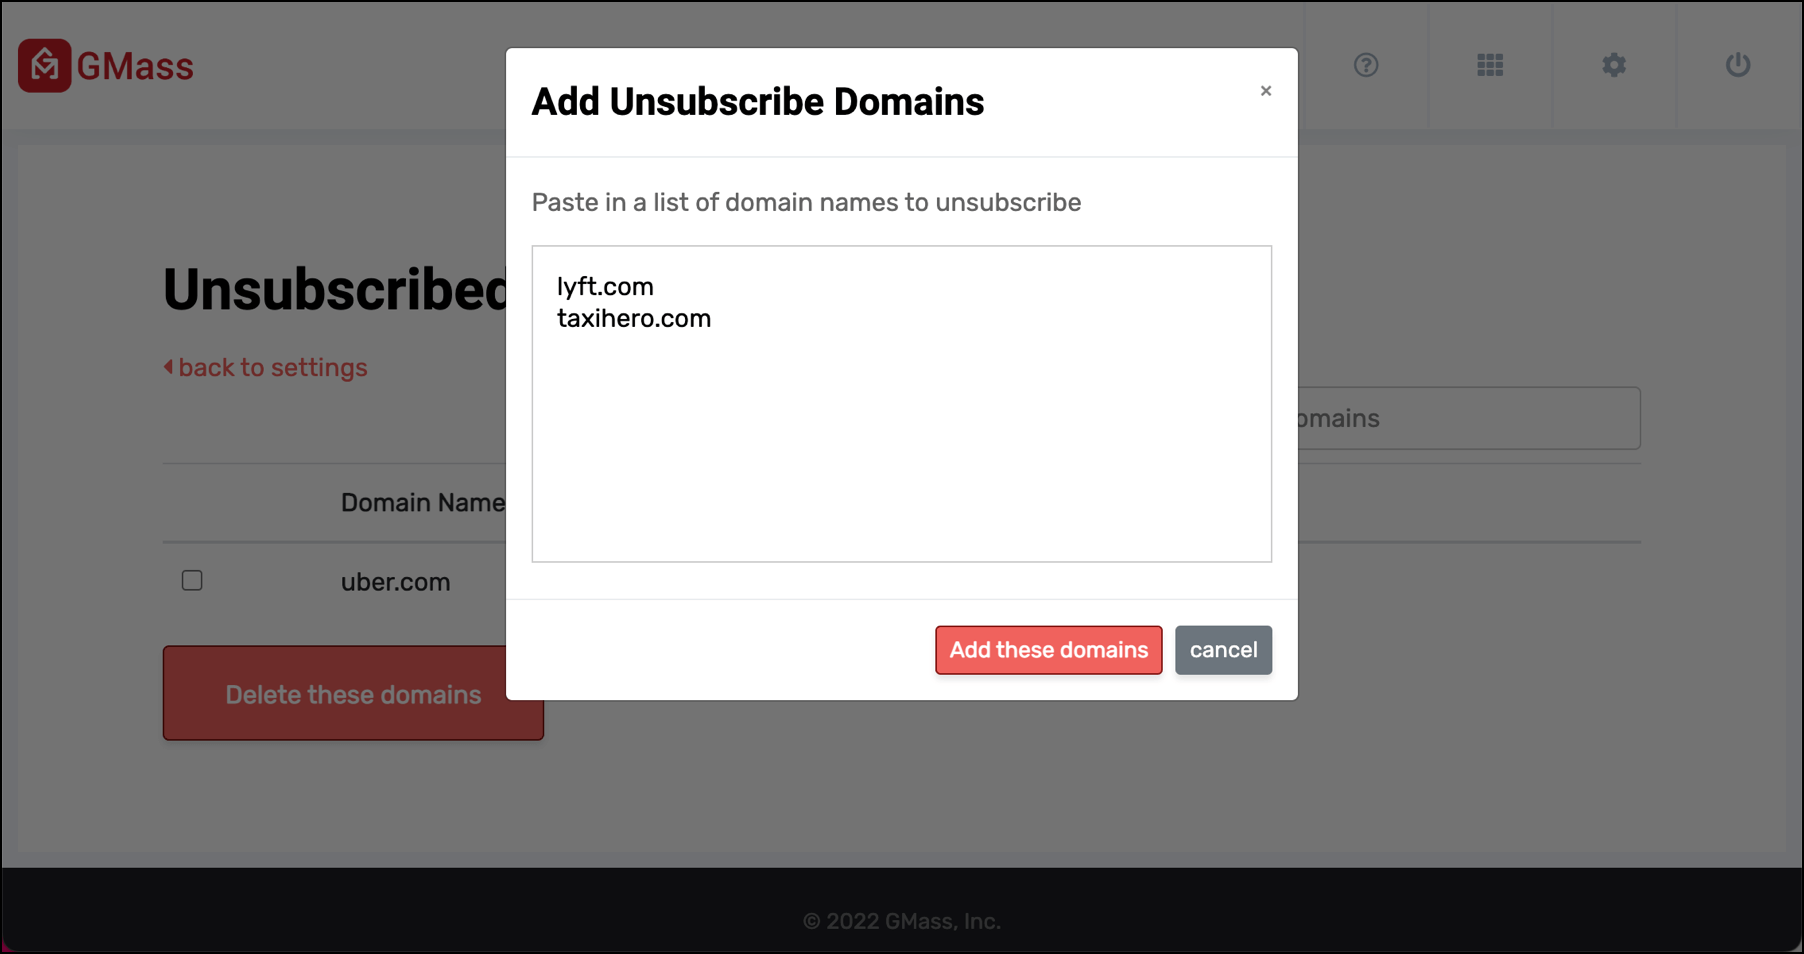
You can unsubscribe a new domain (or multiple new domains) by clicking “Add unsubscribe domains.”

Add domains to unsubscribe

Click the “Add these domains” button and you’re all set.

Unsubscribe domain results

Future campaigns will be cross-checked against your domain unsubscribe list and matching recipients will be suppressed from the campaign.

(Note: If you’re a long-time GMass user, you can still use the old method to unsubscribe a domain. Compose an email to [email protected], put the domains you want to unsubscribe in the body, then click the GMass button. Those domains will now be unsubscribed.)

Unsubscribed domains will be shared with your team members and other senders on your domain if you’re using global unsubscribes. Also, unsubscribed domains in any connected MultiSend accounts will be shared if you’re using global unsubscribes.

How to Resubscribe a Domain (aka How to Remove Domains from Your Unsubscribe List)

To remove a domain from your domain unsubscribe list, also known as resubscribing a domain, follow the same instructions above to get to the Unsubscribed Domains area of the GMass dashboard.

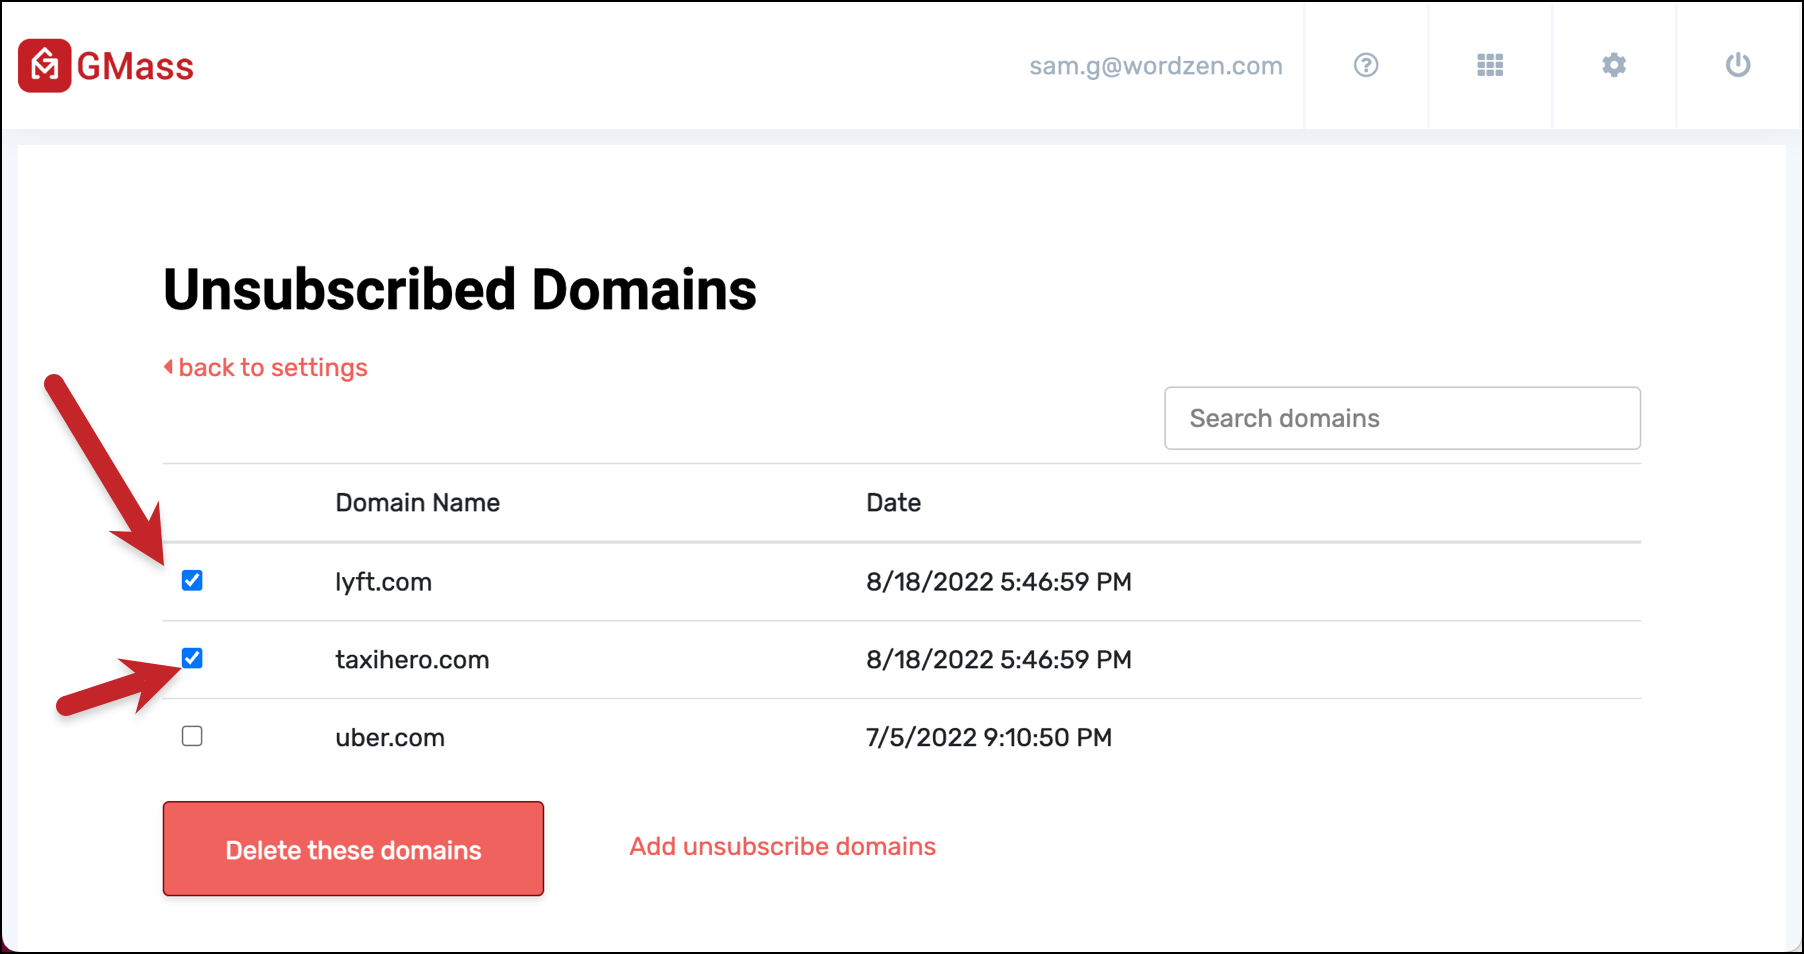
Check the boxes next to the domains you want to remove from your unsubscribe list.

Resubscribe a domain by checking the boxes

Then click the “Delete these domains” button. The result:

Manage unsubscribed domains

You can also check all the checkboxes by clicking the box at the top of the column to do unsubscribe management in bulk.

Downloading your Domain Unsubscribe List

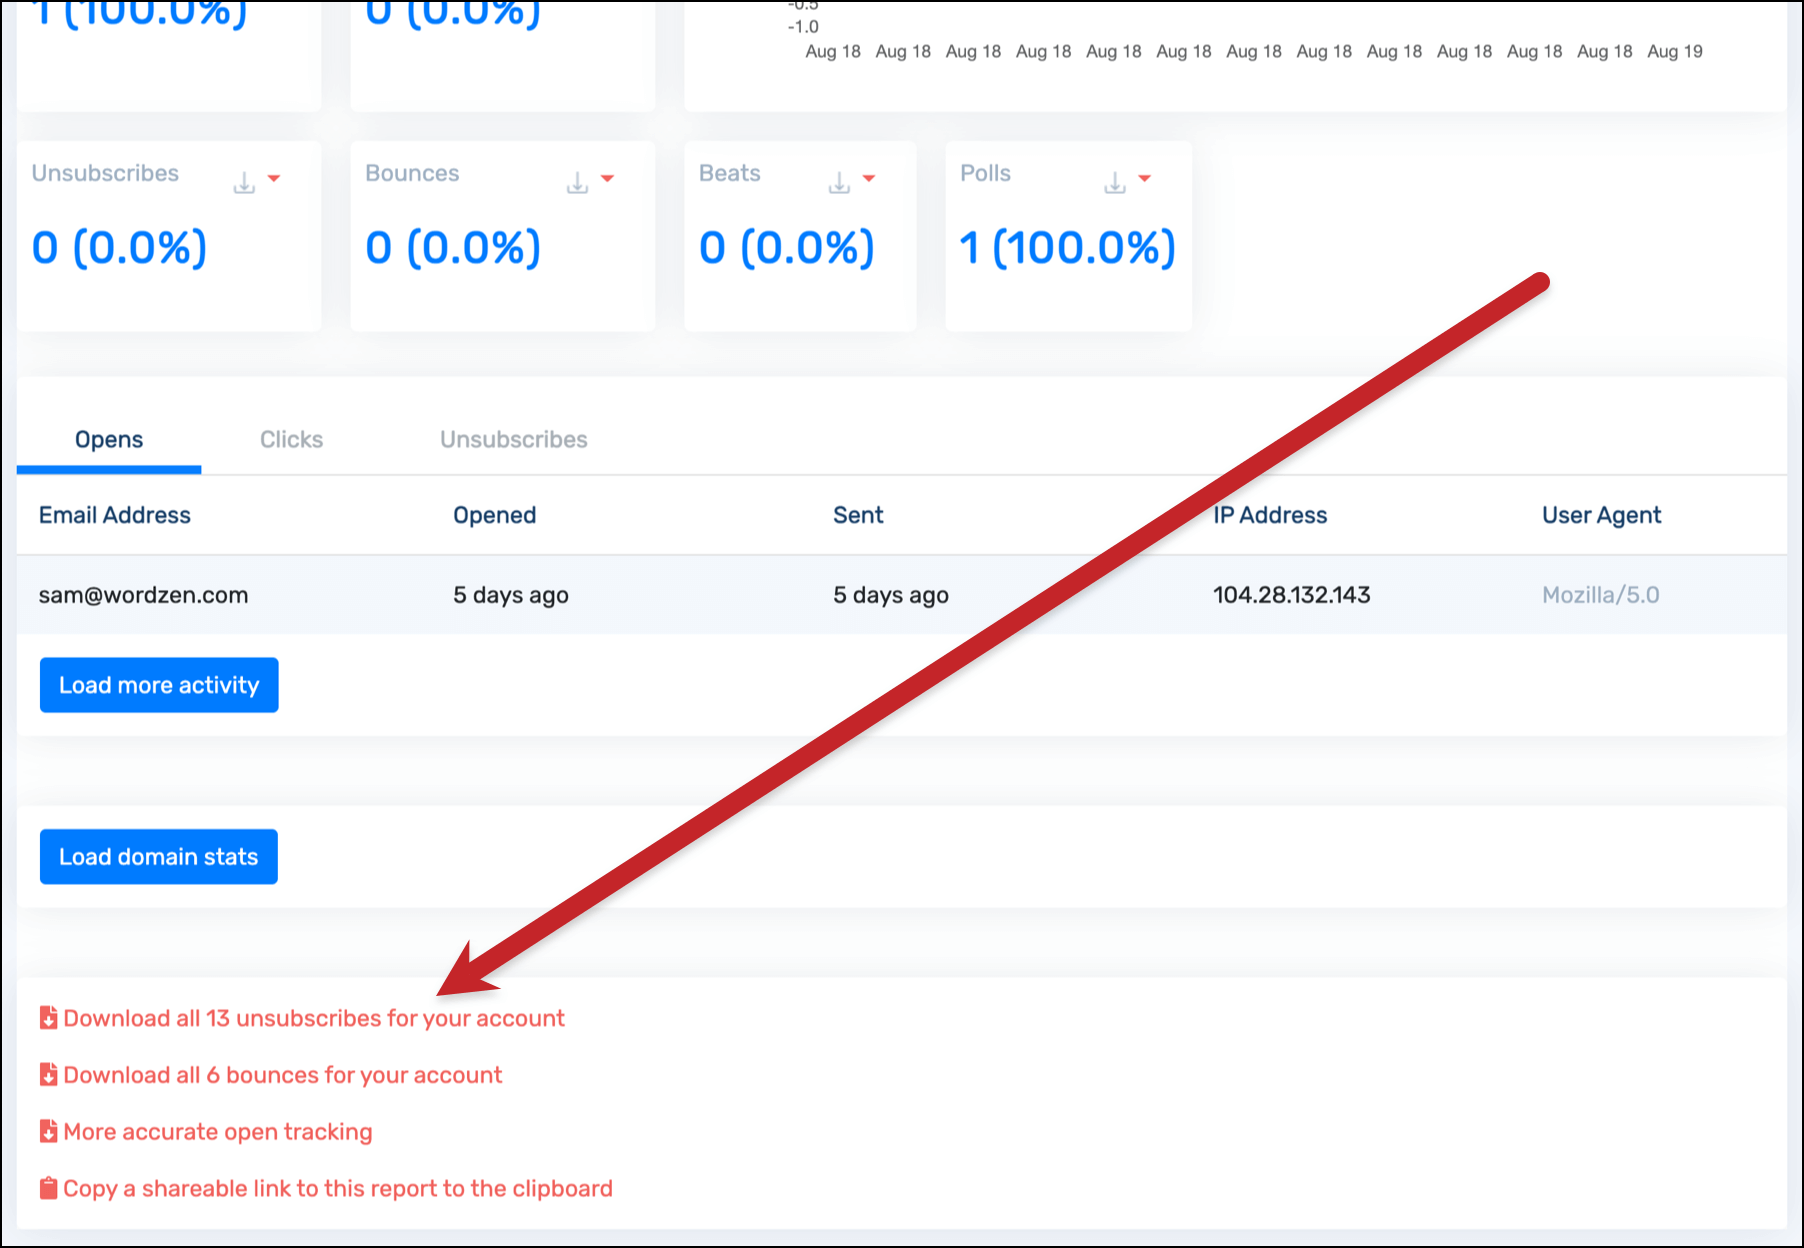
To download a CSV with your unsubscribed domains (as well as your other unsubscribed emails), go to any web-based campaign report, and click the download all unsubscribes link at the bottom.

Download all unsubscribes

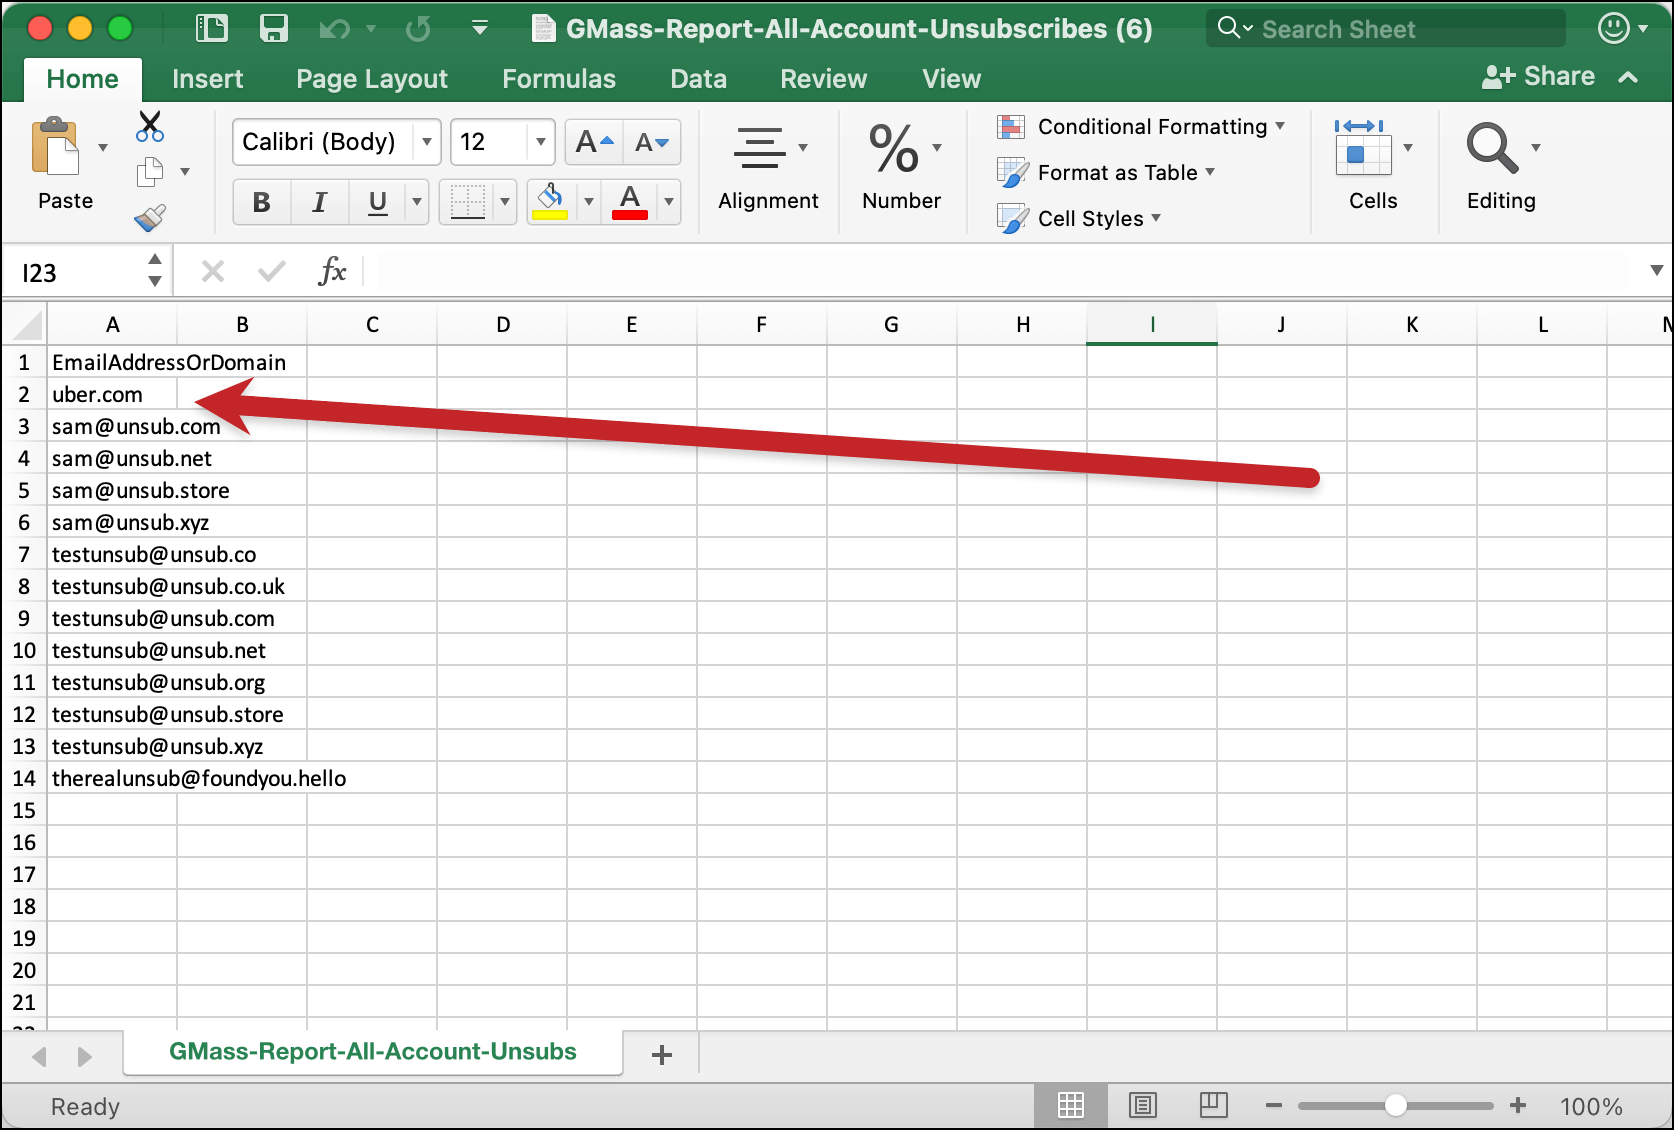
This will download a CSV report of all of your unsubscribed email addresses and unsubscribed domains. Your unsubscribed domains will appear at the top of the list.

CSV of unsubscribes with the domain at the top

That’s it! You’re now set to unsubscribe domains, resubscribe domains, and download a report with those domains.

See why GMass has 300k+ users and 7,500+ 5-star reviews


Email marketing. Cold email. Mail merge. Avoid the spam folder. Easy to learn and use. All inside Gmail.


TRY GMASS FOR FREE

Download Chrome extension - 30 second install!
No credit card required
Love what you're reading? Get the latest email strategy and tips & stay in touch.


Exciting news! GMass now works with the new Gmail.

If your Gmail account hasn’t been transitioned to the NEW Gmail yet, it likely will. You can also get the new Gmail yourself if you have a gmail.com account, and you can ask your G Suite admin to make it available for you if you have a G Suite account.

GMass now works with the NEW Gmail, meaning you can send mail merge campaigns inside the new Gmail, just like you can with the old Gmail. That makes GMass the only way that you can send email marketing campaigns from all three of Google’s email products: the new Gmail, the old Gmail, and the Inbox product, which ironically most people don’t even know about.

In the new Gmail, the GMass button conforms to the sleek new look of the new Gmail, and sits nicely next to the newly designed Gmail Send button.

GMass works with the NEW Gmail!

So go ahead and make the switch to the new Gmail!

Ready to transform Gmail into an email marketing/cold email/mail merge tool?


Only GMass packs every email app into one tool — and brings it all into Gmail for you. Better emails. Tons of power. Easy to use.


TRY GMASS FOR FREE

Download Chrome extension - 30 second install!
No credit card required
Love what you're reading? Get the latest email strategy and tips & stay in touch.


GMass is now available as an official Gmail Add-onThis extends the functionality of GMass to Android devices (iPhone coming soon), and adds some important new features.

How is this GMass Add-on different from the GMass Chrome extension?

First, let’s be clear on what is meant by a “Gmail Add-on” and how that differs from the GMass Chrome extension, which is what users have been using on the desktop.

Gmail Add-ons are a new way to enhance Gmail, bringing functionality into your Gmail experience wherever you log in. They are attached to your Gmail account and the code that runs them lives at Google. They are created by third party companies, but must be thoroughly reviewed by the Gmail team at Google for inclusion into the Gmail Add-on Store.

Chrome extensions, on the other hand, have similar features, but are associated with your Chrome installation on each desktop machine. The code that runs them lives on each device along with that installation of the Chrome browser.

It’s important to be clear that you can–and should–have both the GMass Chrome extension and the GMass Gmail Add-on installed at the same time; it’s not one or the other. By having both, you get the best experience with GMass, on both desktop and mobile.

The benefits of the Add-on

First, the GMass Add-on greatly enhances portability. Unlike with the Chrome extension which only works on desktops, with the GMass Add-on, as soon as you install it it’s immediately available on all devices with which you login to Gmail.

So, for example, you can be logged into your Gmail account on your home desktop computer, install the Add-on…and now you will be able to use the functionality on your computer at your office, your laptop computer–and your Android device!  It will even be available from the computer at the public library or a friend’s house.

Note: The GMass Add-ons is not currently available for iOS devices, but will be as soon as Google adds support for it.

The GMass Gmail Add-on also brings an entirely new feature to Gmail: a recipient’s campaign history window and unsubscribe/bounce status.

How to install it (it’s easy!)

It’s easy to install this Add-on. For experienced users, you can just follow this link and the typical steps. But for more detailed instructions in four easy steps, see the bottom of this post.

Where the GMass Add-on is found in your Gmail screen: Desktop vs. Android

The GMass for Gmail Add-on is found at a different location depending on whether you are using Gmail on a computer vs. an Android mobile device.

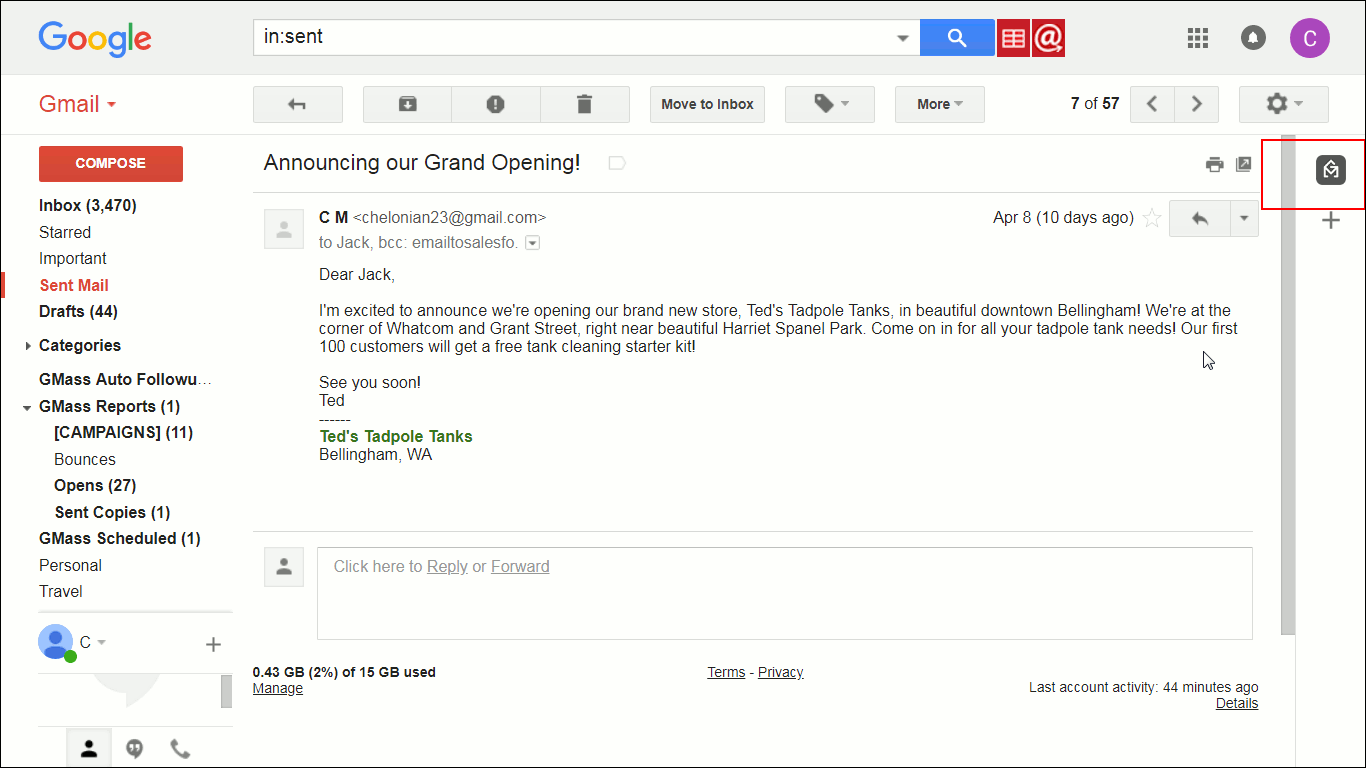
On a computer, it’s to the right of your Gmail window, as shown here and outlined (for this tutorial) in red:

Showing Gmail window open with GMass for Gmail Add-on indicated at the right of the screen.
GMass Add-on is found to the right of your Gmail screen.

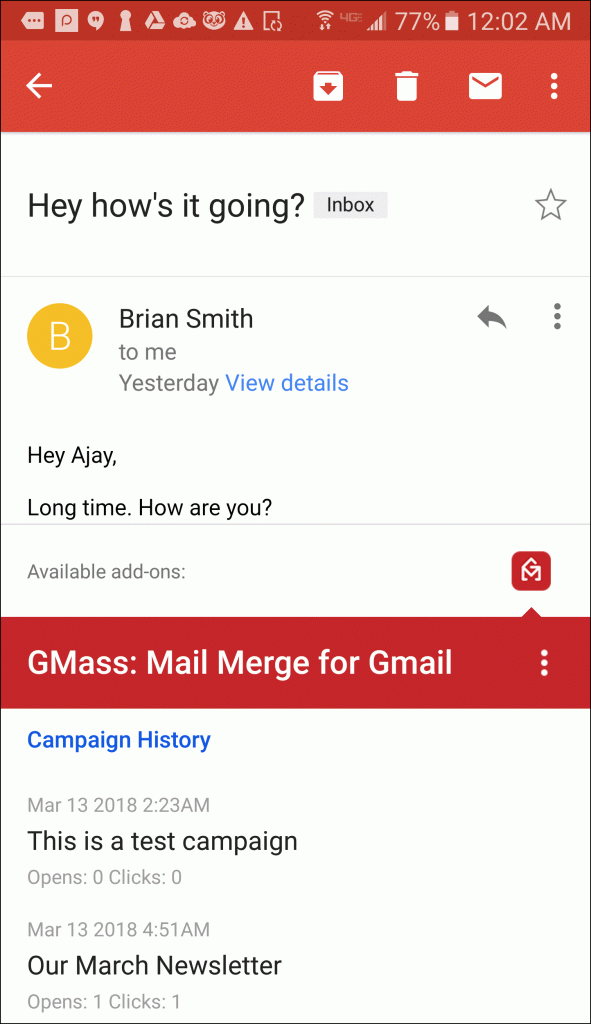
On an Android device, it’s found at the bottom.

GMass is integrated into the Gmail app on Android devices.

New Features: inline campaign histories and unsubscribe/bounce lists

One new feature that’s only available with this Add-On is that any time you open an email in your Gmail account, you can see a campaign history that includes the last five campaigns sent to that person.

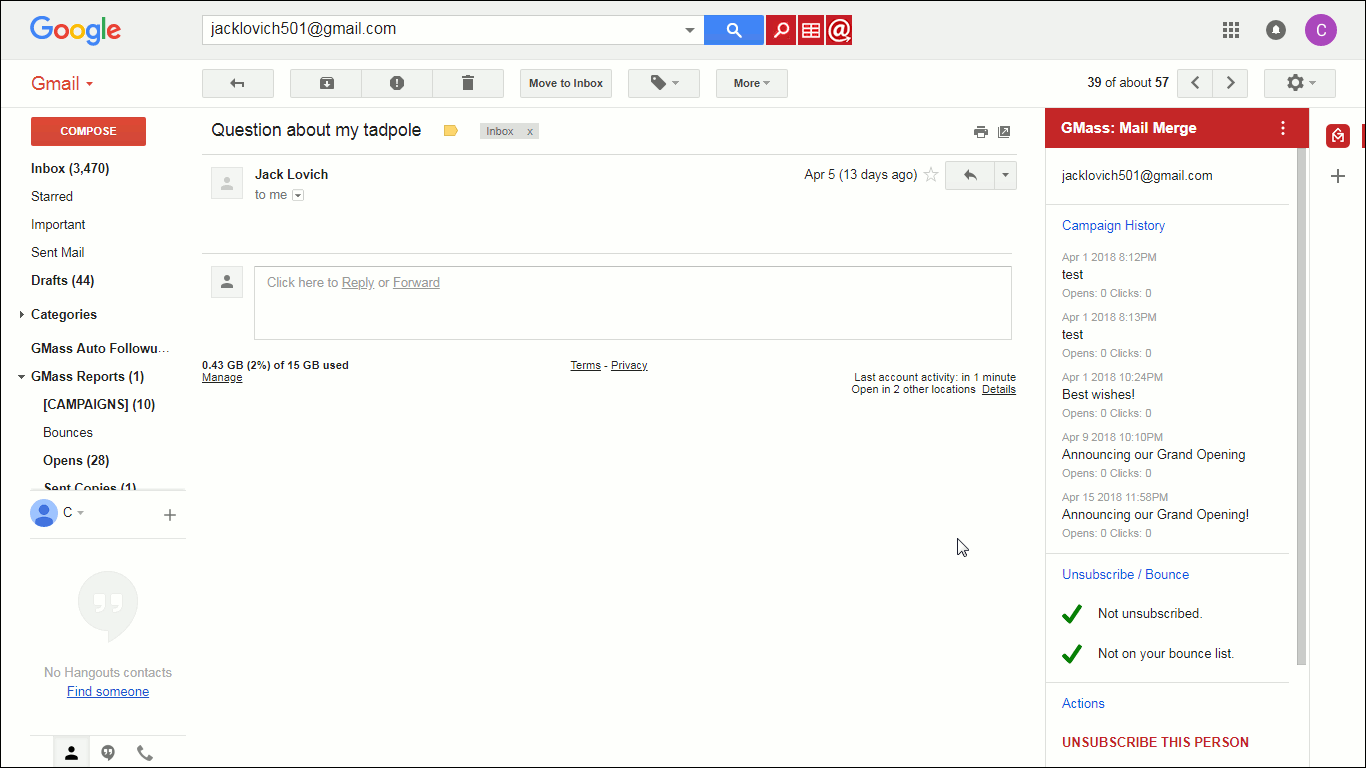
For example, let’s open on an email sent to me from my imaginary customer, Jack Lovich. The email will open as usual, but now click the grey (inactivated) GMass symbol button:

It will turn red (activated) and you’ll notice that a new section has opened, providing information about your GMass campaigns that this person was part of. Here that is shown on desktop:

Shows Gmail window with the GMass campaign history shown for this user, Jack Lovich.
GMass campaign history now shown for this recipient.

Scrolling down to the bottom reveals two more options: LAUNCH MAIL MERGE and HELP.

Shows the lower part of the GMass for Gmail Add-on section of Gmail.
The lower part of the GMass Add-on section of Gmail.

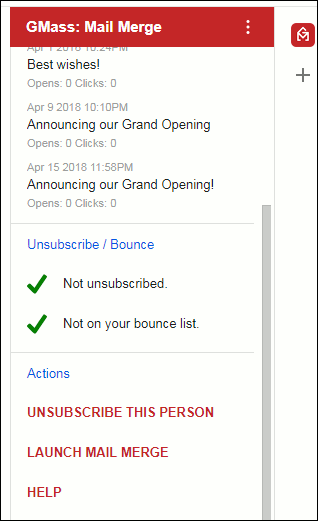
Using those green check marks, the GMass Add-on will also show you whether that person is on your unsubscribe or bounce list. If they are, you can remove them–if they’re not, you can add them.

In this case, this person is shown “Not unsubscribed”. If you click UNSUBSCRIBE THIS PERSON, it will immediately unsubscribe them.

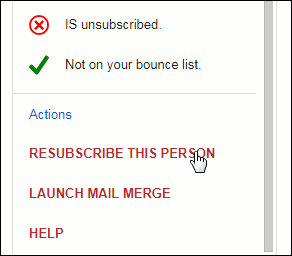
Don’t worry, if you want, you can restore them right away: after unsubscribing, the screen will change as shown below, and you can click RESUBSCRIBE THIS PERSON to restore the person’s subscription.

Showing about to click "Resubscribe this person" in the GMass for Gmaill Add-on.
Resubscring someone you unsubscribed is easy.

Taking GMass to the next level

I’m excited about the GMass Gmail Add-on, since it brings GMass to mobile and adds powerful capabilities for getting a quick look into every recipient’s GMass history at the click of a button or tap of a finger. It takes 30 seconds to install and is available wherever you can access Gmail on a computer or Android device. Give it a try today!


How to Install (detailed version)

  1. Visit this link and click the blue “INSTALL” button, shown below.

    Showing window of Gmail Add-ons, about to click the Install button for GMass Add-on
    About to install the GMass official Gmail Add-on
  2. Gmail will then launch a small pop-up window asking for your permission to install this (or any) Add-on, so click Continue at that point. It will then ask you to choose which Gmail account to associate this Add-on with. Choose the Gmail account you want. [Note: You can have the same Gmail Add-ons installed to different Gmail accounts; you just have to install them one at a time.]
  3. Gmail will then ask again for your permission, specifically allowing this Add-on to be able to access your Gmail account. That window looks like this:
    Gmail pop up requesting GMass to have access to your Gmail account.
    Gmail asking to allow GMass access to your Gmail account.

    Click the ALLOW button to allow this access. GMass will need this access to work with your Gmail account.

  4. It will process for a moment, and then you will see this window:

    The popup window telling you you have successfully installed the GMass Gmail Add-on.
    Success! You’ve install the GMass Gmail Add-on!

That’s it! You’ve installed the Add-on. Now, every time you’re logged into Gmail on any desktop computer, laptop, or Android device, you will have the new features this Add-on provides. To get started using it, just go to Gmail as you normally would, and follow along with the “New Features” section above.

Ready to send better emails and save a ton of time?


GMass is the only tool for marketing emails, cold emails, and mail merge — all inside Gmail. Tons of power but easy to learn and use.


TRY GMASS FOR FREE

Download Chrome extension - 30 second install!
No credit card required
Love what you're reading? Get the latest email strategy and tips & stay in touch.


If you have your contacts and their email addresses saved in an Excel spreadsheet, it’s easy to run an Excel mail merge to send each of them individual messages with Gmail.
The following quick example will show you the best way to do a Gmail mail merge with your list of email addresses in Excel.

How to Send Personalized Mass Emails with Excel in Gmail (Step-by-Step Process)

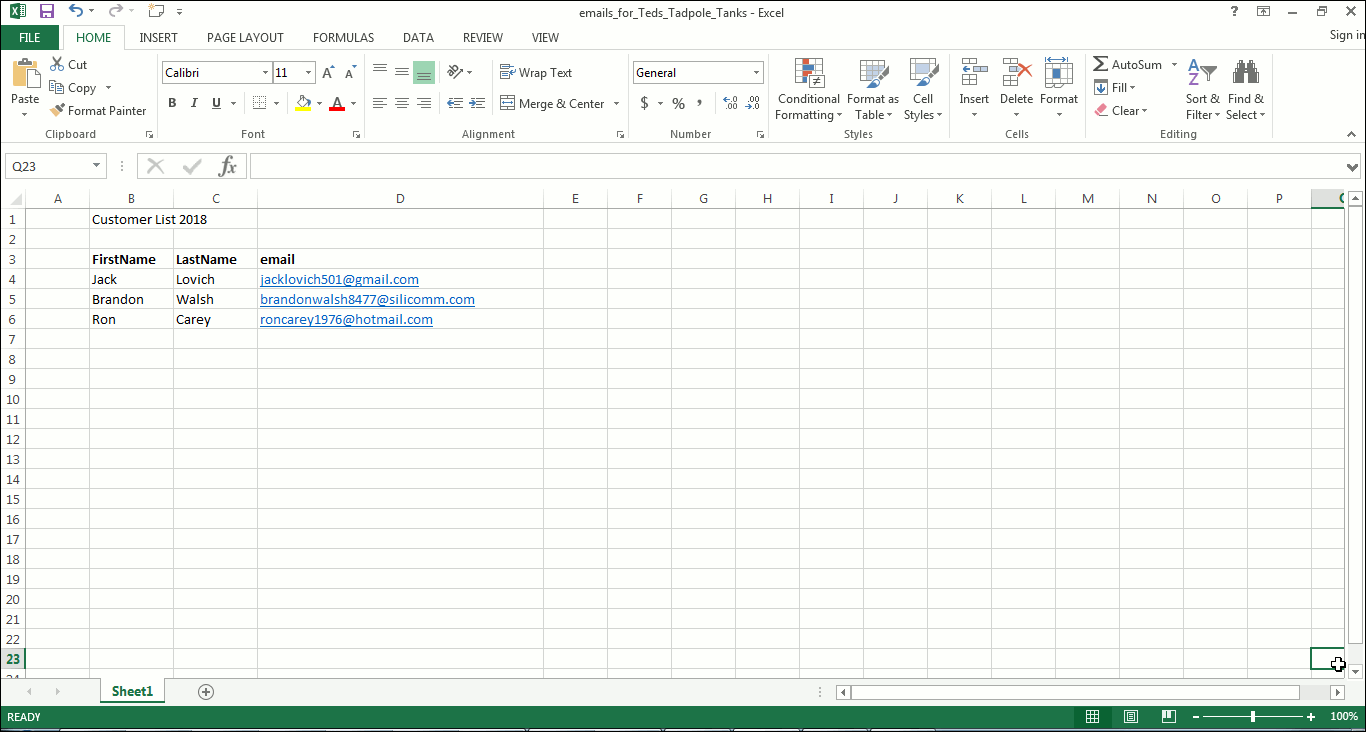
  1. First, we start with our Excel spreadsheet, in this case one with a few customers of Ted, our fictional shopkeeper, who wants to use his list to send personalized emails.

    An Excel spreadsheet is shown, with three customer rows, including email addresses.
    An Excel spreadsheet on your computer, with three customer names and their email addresses.
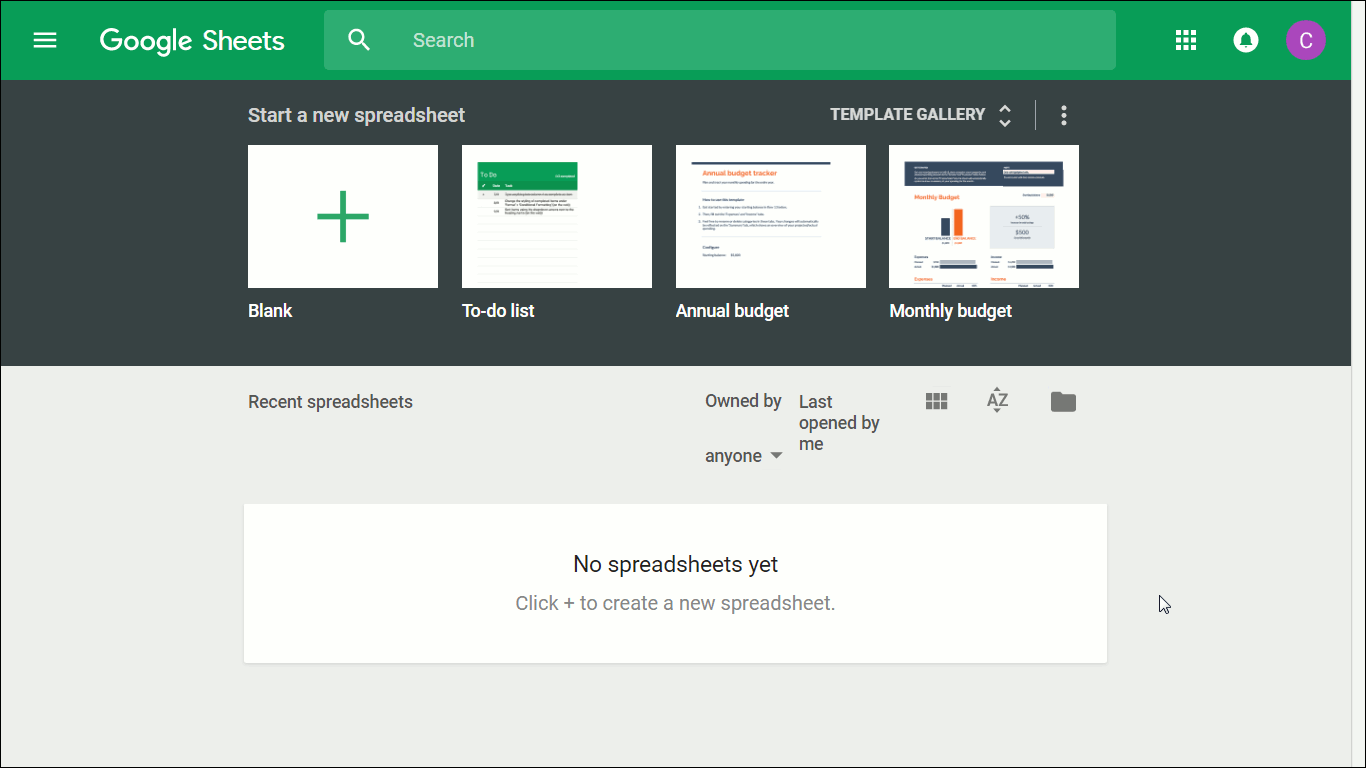
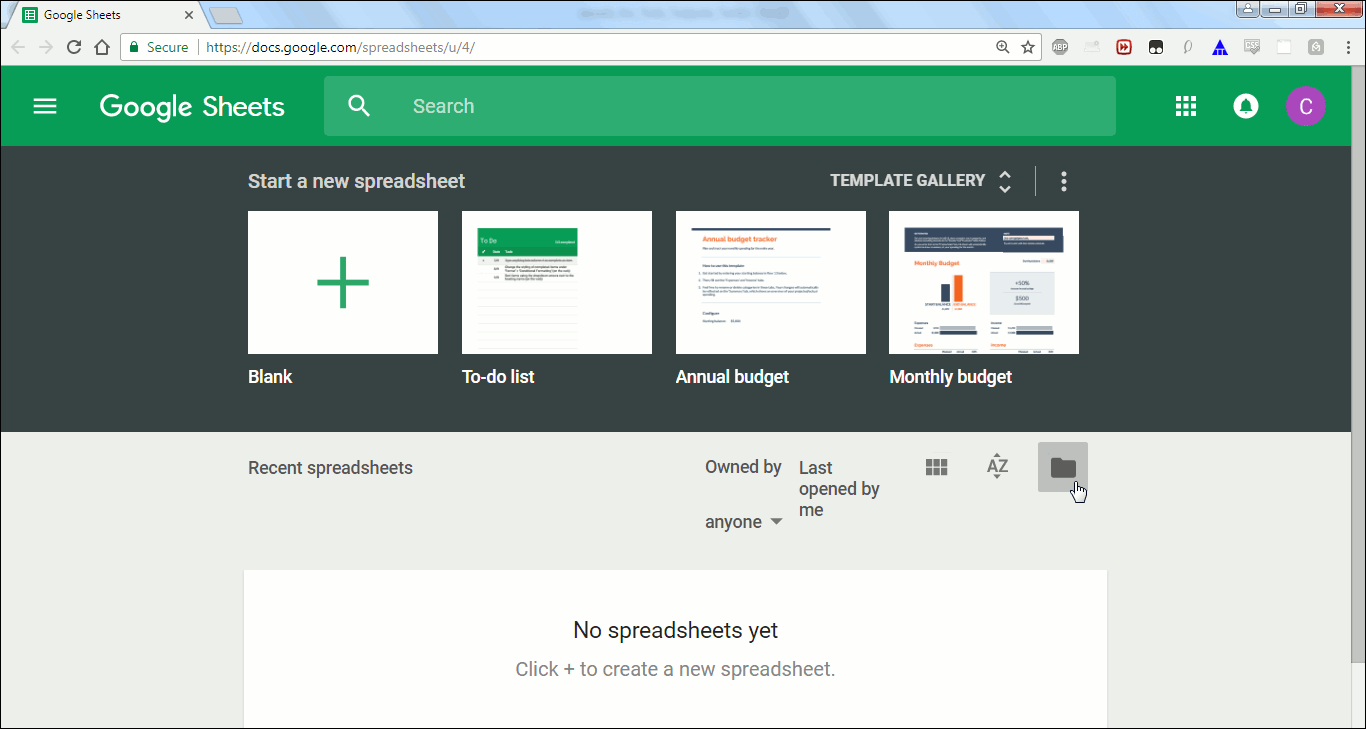
  2. Now we want to import this list of email addresses into Google Sheets. To do that, make sure you are logged into your Google account, and then go to Google Sheets. (In our example, it will start with no sheets; in your case, you may have previous spreadsheets already there.)

    Shows Google Sheets with no sheets shown.
    Google Sheets, with no sheets in it yet.
  3. Click on the folder icon on the right to open the File Picker.

    Shows cursor hovering over the File Picker icon in Google Sheets.
    Click this folder icon to open the File Picker.
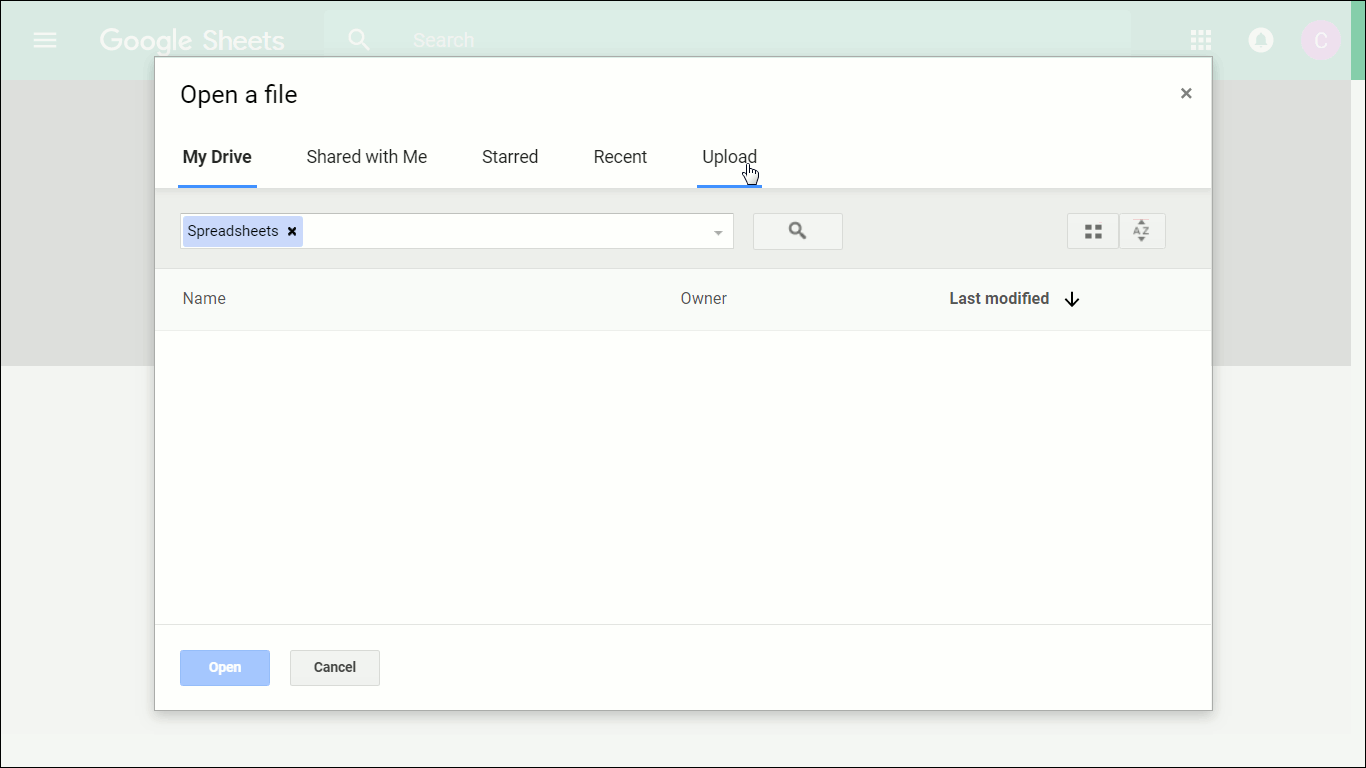
  4. This will bring up the Google Sheets File Picker, allowing you to pick your Excel file to upload. Click on Upload.

    Showing cursor hovering over Upload in the Google Sheets File Picker dialogue.
    Click on Upload to select your Excel file.
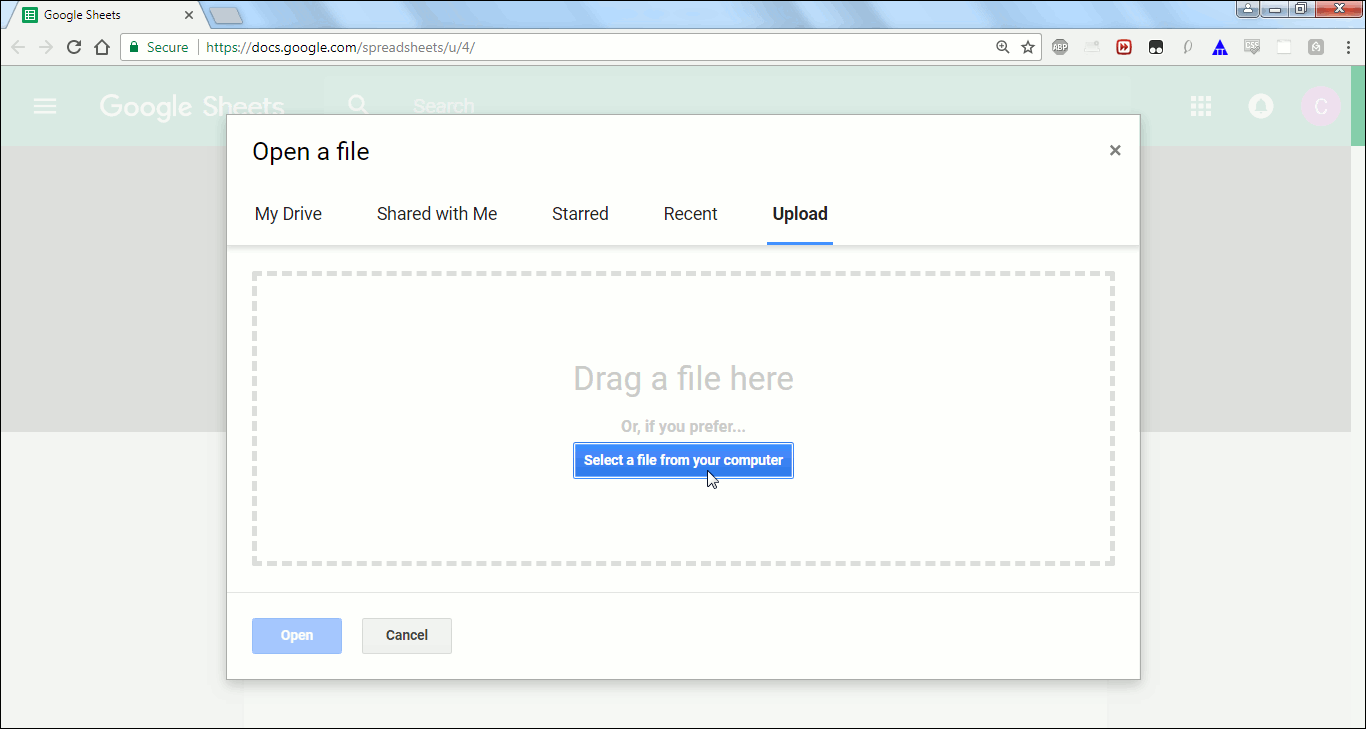
  5. The screen will change, asking you to either drag or select a file from your computer. In our example, we’ll select one. Click on the blue “Select a file from your computer” button.

    Showing cursor hovering on button to select a file from within the File Picker dialogue of Google Sheets.
    About to select our Excel spreadsheet after clicking here.
  6. From here, pick your Excel spreadsheet from the file manager on your computer. 

    Showing desktop File Manager, about to select an Excel file to upload to Google Sheets.
    Selecting the Excel file from your desktop’s File Manager via Google Sheets.
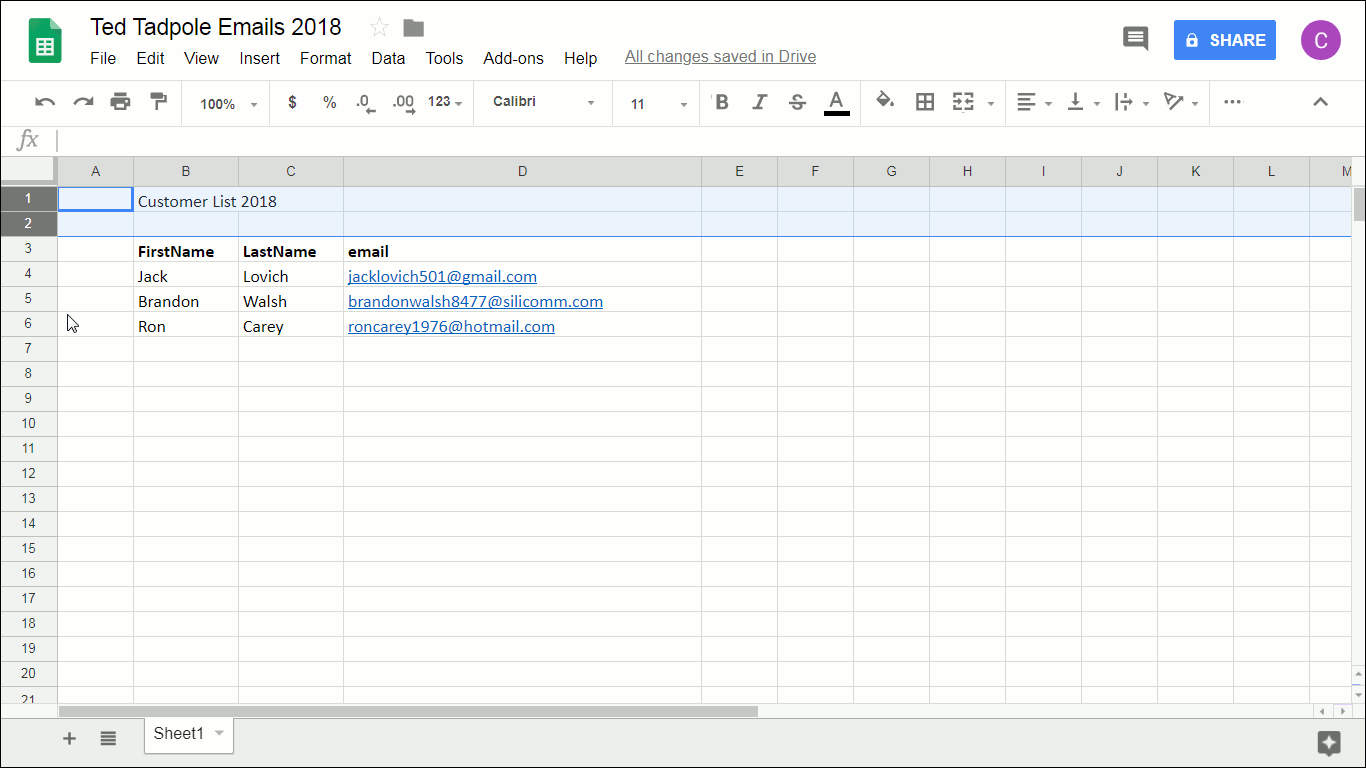
  7. This will then be uploaded to Google Sheets and converted into a new Google Sheet spreadsheet. However, before we can use it in GMass (which is the top tool for for mail merges in Gmail), we have to edit it, very slightly and quickly. That’s because this spreadsheet has text above the columns that hold the FirstName, LastName, and Email fields, and that will introduce an error. So, you will need to just make sure there is nothing above these columns. Let’s do that by selecting the two rows above and just deleting them. Do that by holding down shift, clicking on the row number, 1 and then row 2, which will select both these rows:

    Two rows in Google Sheets sheet are selected.
    Two rows that we want to delete are selected.
  8. Select Edit from the menu, and drop down to select “Delete rows 1 – 2”. 
    Shows Edit menu dropdown with "Delete rows 1 - 2 " selected. This is from within the Google Sheets sheet.
    About to delete rows 1 and 2.

    Our quickly cleaned-up sheet should now looks like this and your list of email addresses is ready to use with GMass for your Gmail mail merge:

    Showing Google Sheets sheet, now ready to use with GMass.
    Sheet is now ready to use with GMass.
  9. Now go to Gmail and click on GMass’s spreadsheet button near the top to connect to an email list in a Google Docs spreadsheet.

    Shows cursor hovering over the spreadsheet button in GMass.
    Click the spreadsheet button to connect to your Google sheet.
  10. This will bring up a window allowing you to select the Google Sheets spreadsheet you want to use to populate the email addresses in your mail merge.
    Shows the GMass spreadsheet connection window.
    The GMass spreadsheet connection window.

    From this window, select a spreadsheet from the dropdown.

    Selecting our Google Sheets sheet from the dropdown.
    Selecting the spreadsheet we just uploaded into Google Sheets from Excel.

    [Note: in this simplified example, there is only one spreadsheet listed. For regular users of Google Sheets, there may be many sheets to select from. Make sure you choose the correct one.]

  11. Then, once you have selected a spreadsheet, the “CONNECT TO SPREADSHEET” button will turn red. Click on the “CONNECT TO SPREADSHEET” button.
    [Note: For this tutorial, we are not going to address the Optional Settings.]

    Cursor hovering over the Connect to Spreadsheet button in GMass.
    Click the red bar button to connect GMass to the Google Sheets spreadsheet.

    The screen will change at this point. The GMass Google Sheets chooser window will be gone, and now you’ll see a Gmail Compose Window is open. In the To field, the email addresses of the contacts from your Google Sheet have now been populated.

    A new Gmail compose window, with email addresses from our spreadsheet.
    A new Gmail compose window, with email addresses from our spreadsheet.
  12. From here, you can send out your personalized emails as you normally would in GMass. For example, you can send out a sales email with the GMass personalized greeting feature, as shown below.
    The Gmail compose window, showing an email written and ready to be sent out.
    Ready to send out individualized emails with GMass.

    Tip: Because you’ve used a spreadsheet that indicated the first name and last name of each email recipient, GMass will intelligently personalize the greeting for all of them. For example, the second recipient, Brandon Walsh, will have an email that starts, “Dear Brandon.” Without using a spreadsheet to indicate first and last names to GMass, only Gmail addresses would automatically use the first and last names of the recipient. That’s a nice advantage of using spreadsheets: everyone can receive a personalized email!

  13. Now, just click on the red GMass button to send out the individual emails, and your Gmail mail merge is done!
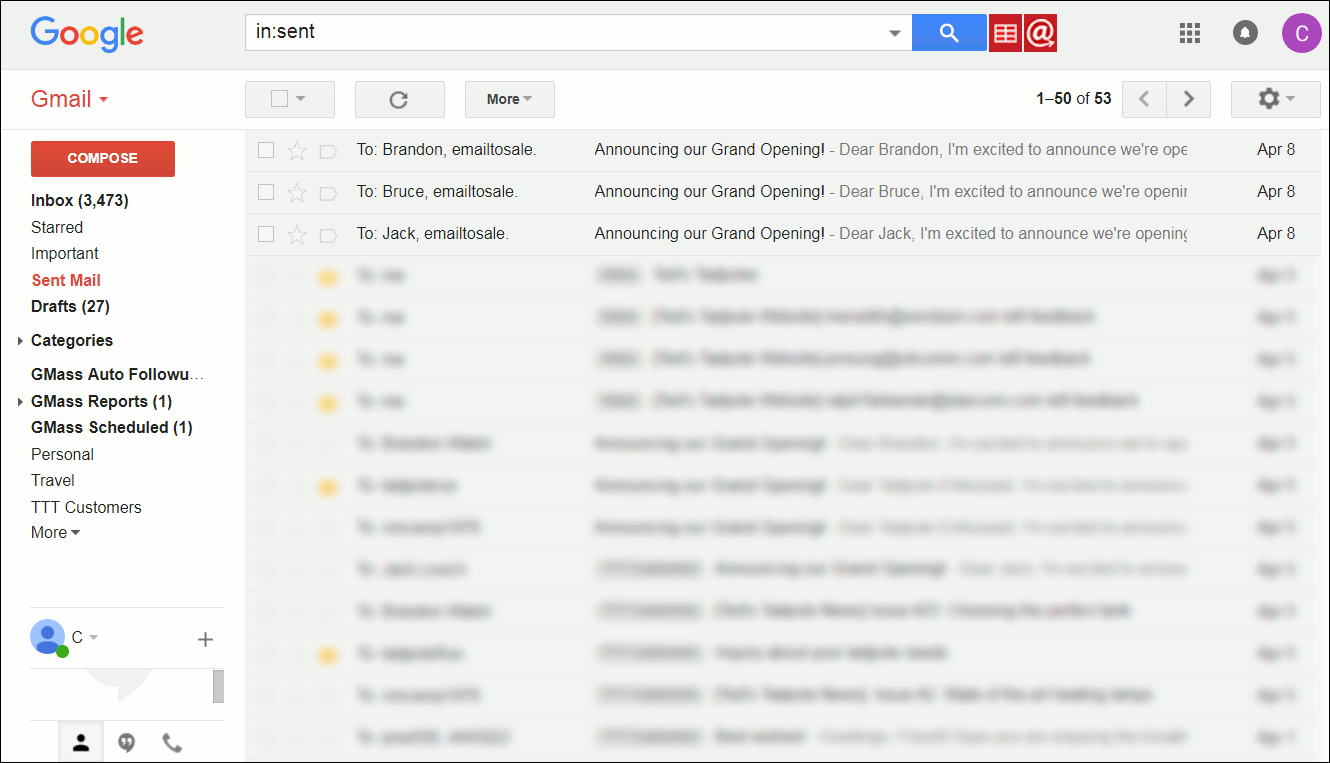
  14. You’ll get a message telling you “You did it!” Now let’s check that they went out as planned. Go to your Sent folder in Gmail.
    Showing the Gmail Sent folder, with the three emails having been sent out.
    Our three emails from the spreadsheet have gone out!

    It worked!
    Of course, the real power comes when you have a large number of names and email addresses in your Excel file. Within a few minutes, you can be sending all of these Google contacts personalized mass emails with GMass.

If you aren’t using GMass yet — Excel mail merges isn’t all it can do. In fact, GMass is one of the most popular cold email and newsletter tools in the world. You can use it for automated follow-ups, A/B testing, email analytics, and pretty much any other email campaign needs you might have.

To get started with GMass, download the Chrome extension. You’ll start a free trial (no credit card required) where you can send up to 50 emails per day as you test it out.

Ready to send better emails and save a ton of time?


GMass is the only tool for marketing emails, cold emails, and mail merge — all inside Gmail. Tons of power but easy to learn and use.


TRY GMASS FOR FREE

Download Chrome extension - 30 second install!
No credit card required
Love what you're reading? Get the latest email strategy and tips & stay in touch.


Salesforce is a giant in the CRM world, and–once it’s set up–it’s fairly simple to integrate it with GMass. Using GMass’s BCC feature, you can automatically log your outgoing emails into Salesforce.

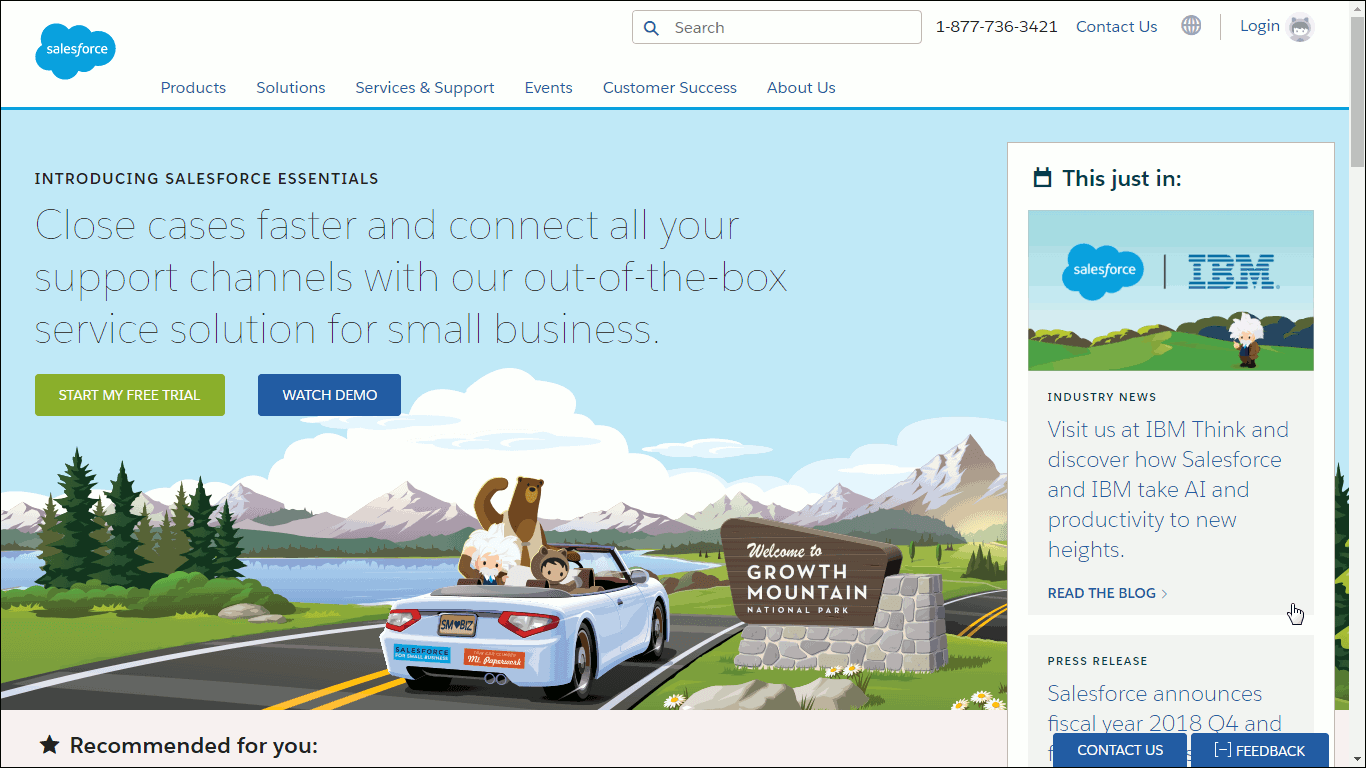
  1. First, you’ll need a Salesforce account. You may already have one, but if you don’t, Salesforce does offer a 30 day free trial, and it is fine to use for the purposes of this tutorial. Their website does not validate the input, so if you’re unsure of the details of your account (such as if you haven’t actually formed a company yet), you can still try them out.Shows Salesforce main website.
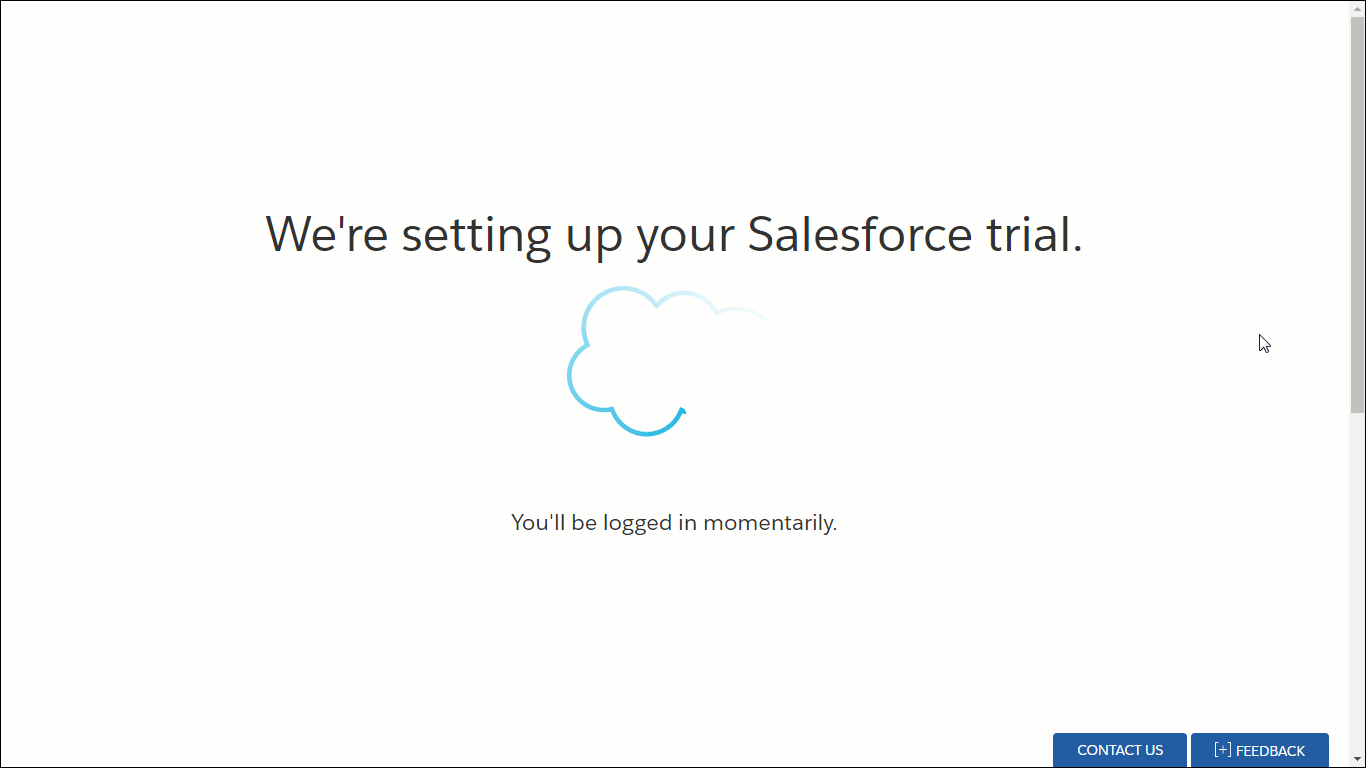
    [Note: I have been informed by at least one user that the sign up process brought him to a screen that just hung there without progressing, shown here:
    Salesforce sign up page shown hanging.This happened tested using Chrome, Firefox, Internet Explorer and Opera. However, if this happens, you will still receive an email to the email address you signed up with, and that email will have a link for you to sign in, and from there everything will work fine.
    ]

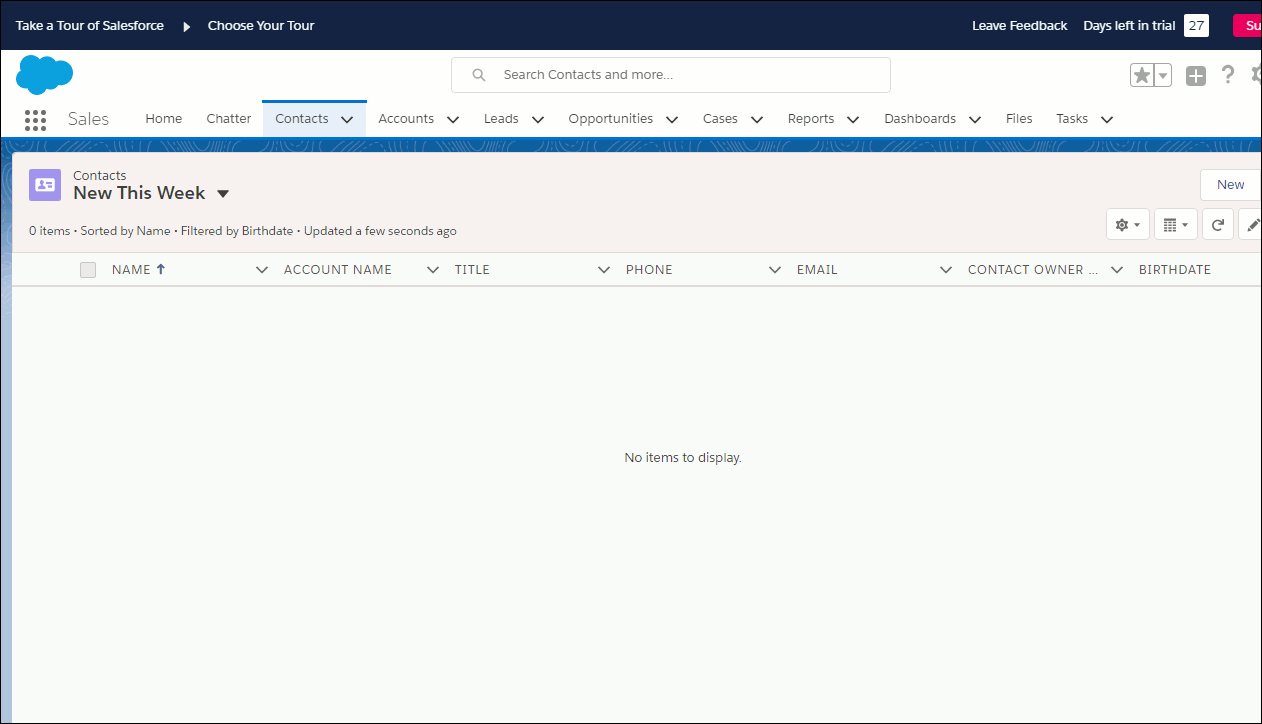
    Our goal is to have emails that you sent via GMass to be “logged” in Salesforce. This means that Salesforce will record that you sent this Contact an email at that time, and store the content of the email easily accessible from the person’s Contact page. This way, all your Gmail correspondence to this person is available from within Salesforce.[Note: If this is the first time you’re using Salesforce, you will probably be using what they call the “Lightning Experience”, which is their newest and slickest user interface. This is in contrast to their older user interface, which they call “Salesforce Classic”. You are free to use either, but for simplicity’s sake and to get you set up right away, we are going to do this all within the Lightning Experience interface.]Before starting to connect GMass to Salesforce, let’s just review your Salesforce Contacts to show that it does not yet have your GMass email recipients as contacts. In our example, the “contacts added this week” will start as completely empty (Of course, if you already have been using an active Salesforce account, you likely have a list of contacts already.).[Note: Salesforce does pre-populate your Contacts with sample contacts, but to keep things simple, we’ll avoid showing that.]
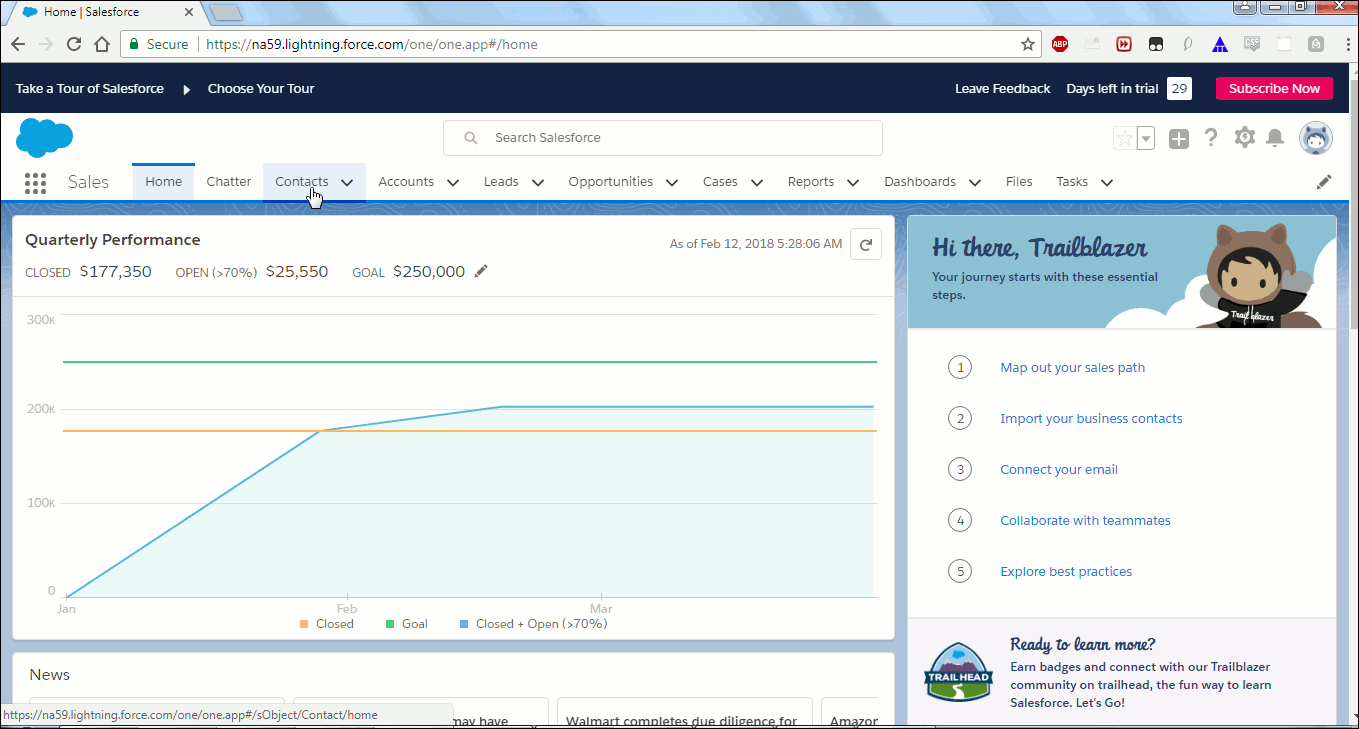
  2. To see the contacts, start by clicking on Contacts in the menu bar near the top of the Salesforce main page. Click directly on the word “Contacts” itself, not the down arrow.
    Salesforce main page, showing clicking on Contacts.
    How to find your Contacts from Salesforce main page

    As you can see below, I have no new contacts this week. That will change once we send out some emails using GMass.

    Showing Salesforce Contacts this week, which is empty.
    No new Salesforce contacts this week–yet!

    Now, in order to use the BCC function in GMass to log your emails into Salesforce, you will need to find your specific “My Email to Salesforce” email address. This will take a few steps, so gets its own section.

    Activating Email to Salesforce functionality.

  3. The first step within Salesforce is to activate the “Email to Salesforce” functionality, which, as a default, is disabled.
    [Note: if you already have this option activated from previous use, you should skip steps 3-14 and pick up this tutorial at step 15 ].
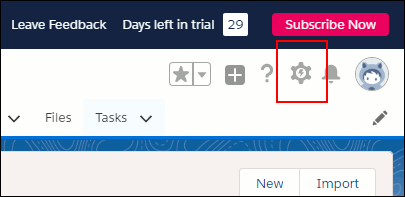
    To do that, first click on the Setup Icon, found between a question mark icon and a bell icon near the upper right corner of the Salesforce window. The Setup icon looks like this:

    The Salesforce Setup icon is shown.
    Click here to access Setup.
  4. Click on the “Setup” item in this dropdown menu.
    Shows clicking on Setup from within the small dropdown menu.
    Click on Setup from within this small dropdown menu.

    A new Setup tab will be opened.

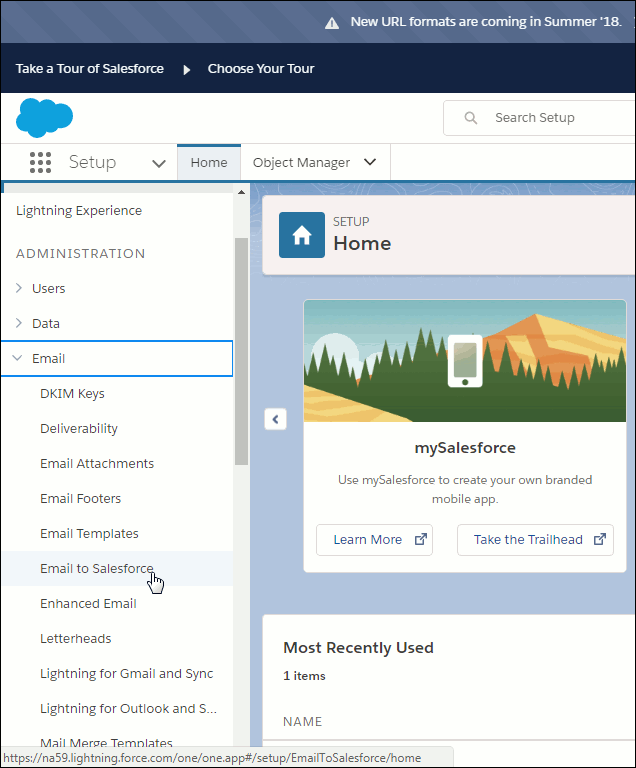
  5. From this Setup window (in its own tab), under “ADMINISTRATION” on the left hand menu, click on “Email”.  
  6. More options will be revealed. One of these menu items is “Email to Salesforce”. Click on it. Alternately, you can write “Email to Salesforce” in the Quick Find search box at the top of the left hand menu and it will bring it up and you can click on it there.
    Side menu of Setup page shown with Email option clicked to reveal a dropdown menu.
    Clicking on Email reveals more options below it.

    This will then change the center of this window to the Email to Salesforce page:

    Showing the Email to Salesforce page.
    Here you can activate the Email to Salesforce functionality.
  7. You need to edit the default settings to activate the functionality. Click the small Edit button.Email to Salesforce page with edit button about to be clicked.
  8. The screen will change to allow you to check or uncheck the checkboxes. Click on the small checkbox to the right of the word Active. It will become checked.

    Email to Salesforce page with Active checkbox checked.
    Check the checkbox next to Active to turn on the Email to Salesforce functionality.
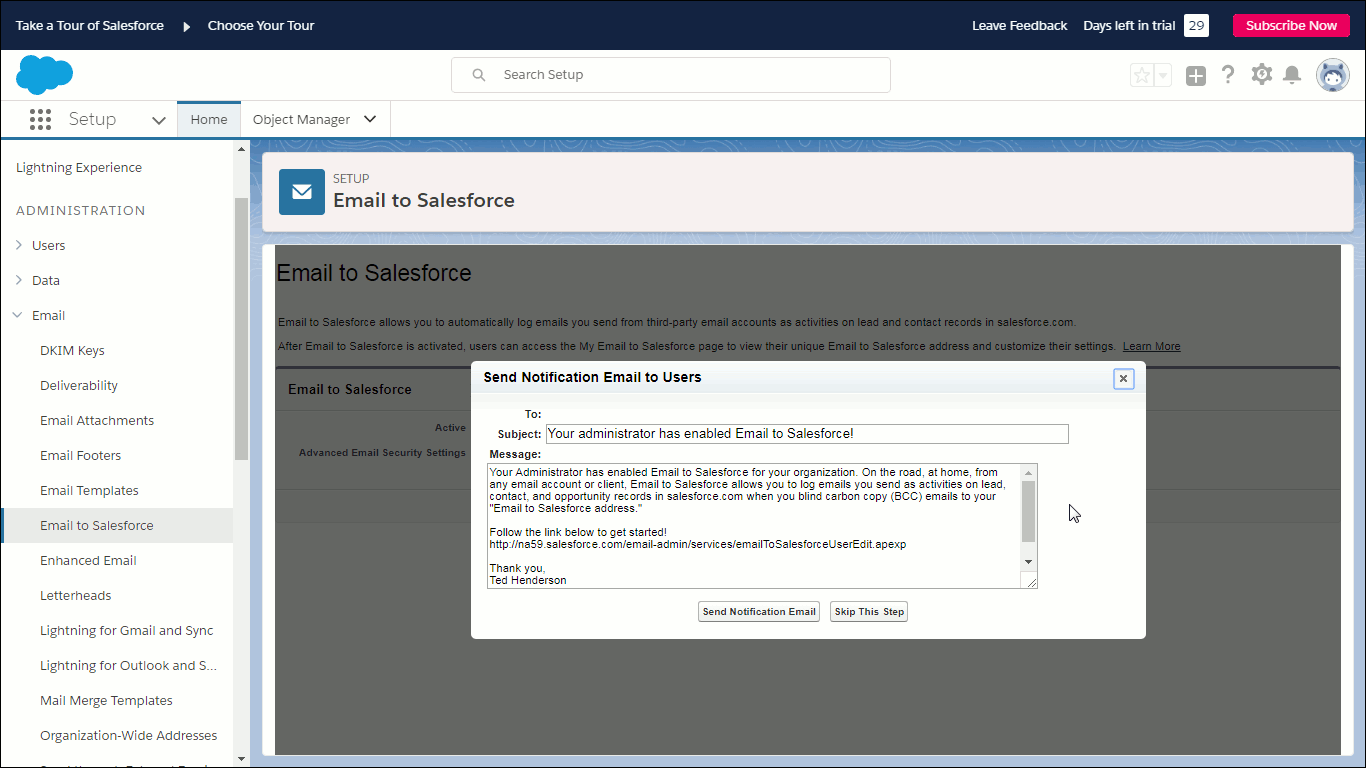
  9. Click Save. A popup window titled “Send Notification Email to Users” will come up.
    Showing email to be sent to other users of this Salesforce account.
    This email can be sent out to other users of your Salesforce account, such as co-workers.
    If you have users in your company that are registered with your Salesforce account, this email—or an edited version, since you can edit it on this screen–can be sent out to them, alerting them to the option for the “Email to Salesforce” option and providing them with a link to the page in which the email address to use is shown.

  10. If you would like to do that, click the “Send Notification Email” button. If you do not have other users in this account or do not want to alert users to this at this time, you can skip this step by clicking the “Skip This Step” button. Once you choose one of the two buttons and click it, the screen updates and a yellow notification area alerts you, “You have enabled Email to Salesforce for your organization.”

    Shows message area alerting you that you have enabled Email to Salesforce functionality.
    Congratulations! You have enabled Email to Salesforce.
  11. Close this “Setup” Salesforce tab in your browser and return to the original Salesforce tab.

    Finding your “My Email to Salesforce” email address

  12. Surprisingly, in order to refresh the user interface to show the “Email to Salesforce” menu item where you need it, you have to actually log out of Salesforce and then log back in. To do that, first click on the user icon found in the upper right of the Salesforce window. Currently, the default icon looks like this:

    Shows the default Salesforce user icon.
    The default Salesforce user icon (outlined in red)
  13. Then click “Log Out”.
    Shows user about to log out of Salesforce.
    Logging out (for just a moment).

    This will update the screen and show a Salesforce login screen.

  14. Click the blue Log In button to log back into Salesforce

    Shows user ready to log back in to Salesforce.
    Logging back in to Salesforce.
  15. Click on the user icon again in the upper right hand corner of the Salesforce screen.
  16. Click on “Settings”, located two lines below your username.
    Showing user about to click Settings under the dropdown from the user icon.
    Click Settings here to get to the User Settings area.

    A new screen will be displayed, including a new left hand side menu.

    Showing Personal Information page and the left side menu we will need in the next step.
    Need to use the menu on the left of this page.
  17. On that left hand side menu, locate the “Email” menu option and click it.

    Showing user about to click Email menu option from side menu in User Settings.
    You need to click Email from this menu.
  18. This will drop down a few more email-related options. Find “My Email to Salesforce” and click on it.
    [Note: this is not the “Email to Salesforce” link you clicked on in step 6, despite having a rather similar name. That was in the “Setup” page while this is in “Settings” page. Potentially confusing.]

    About to click My Email to Salesforce.
    Click on My Email to Salesforce to get to its page.
  19. This will bring up the My Email to Salesforce page.

    Shows the My Email to Salesforce page.
    Showing My Email to Salesforce page.
  20. The key piece of necessary information here is the email address that you will use in GMass. That is found in the yellow message area
    Showing message area indicating that My Email to Salesforce has been set up.
    Message from Salesforce showing the My Email to Salesforce for this account.

    Select and copy the email address displayed in the yellow message box. You will be using this in GMass.

    These email addresses are long and appear to be mostly gibberish, though they start with “emailtosalesforce…”. They are so long and multi-part that they don’t even appear to be an email address—but they are. For example, “Ted” from Ted’s Tadpole Tanks has this one:

    emailtosalesforce@3-1ytiqi3arioi4kh4h9oplu8fjxzc39zx94g2yc8k3rqckib12i.f4-22uxoea2.na59.le.salesforce.com

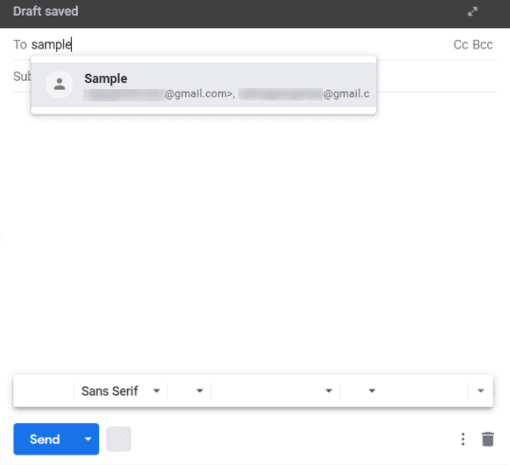
    Fortunately, you will never have to type that in ever in your life! You can paste it into Gmail the first time, and Gmail will remember it for you: just start typing “emailtosalesforce…” and Gmail will autocomplete it.

    Tip: While you are on this screen, take a moment to familiarize yourself with its options. You can specify which emails are acceptable ones that are allowed to email to the My Email to Salesforce address. By default, the email you used to sign up to Salesforce is pre-populated into the field to the right of “My Acceptable Email Address”. There are also somewhat more advanced options shown below that are a bit beyond the scope of this tutorial but are fairly self-explanatory. If you do make any changes to the default options, be sure to click save to save the changes.

    Shown are the options page for My Email to Salesforce functionality.
    Various options for how you want to configure My Email to Salesforce functionality.

    BCC’ing an email from GMass to Salesforce

  21. Let’s get back to GMass. Go to Gmail and write an email that includes however many people you intend to send individual emails using GMass—but don’t send it yet. In our example, Ted will be using three recipients.Then, in the compose window, click anywhere in the To field in order to reveal the option for including a CC or BCC in this email. (Alternately, you can use Ctrl-Shift-B while in the Gmail compose window). Finally, into the BCC field, paste in the “My Email to Salesforce” address that you should have stored in the clipboard (if you don’t, go back to Salesforce and copy it; see step 20). It will paste in your “My Email to Salesforce” address.  You should see something like this:

    Gmail compose window with email ready to go out, including BCC to My Email to Salesforce address.
    An email in Gmail ready to go out with GMass. Note the My Email to Salesforce in the BCC field.
  22. Now you can simply send via GMass as you normally would. Click on the red GMass button with the envelope to send out these three emails (and their BCCs)
  23. :

    Cursor shown poised over the GMass button, ready to click.
    Ready to send out, just need to click GMass…
  24. At this point you will notice that a warning popup window has appeared on top of your Gmail compose window. This is only because you included an email address in the BCC field of this email and GMass is making sure you intended to do this.
    Showing BCC Warning popup from GMass.
    Warning: Are you sure you want to send a BCC in GMass?

    [Note: Be sure to read and understand this important warning.]

  25. Click OK in the warning popup window. GMass will then send out your emails. As usual, your emails went out as individual emails to your list of recipients in the To field, but also, in each case, to the “My Email to Salesforce” address as a BCC—meaning your recipients will not know that a copy of the email they got was also sent to Salesforce (which is what you want).
    Gmail window showing three emails to customers and BCC to My Email to Salesforce address.
    Three individual emails sent out to your customers, with BCC to the My Email to Salesforce for each.

    Associating the email to a new Contact in Salesforce

    So, let’s see what happened back in Salesforce. First, you should know that Salesforce takes the attitude that it should not automatically associate the addresses from incoming emails to new contacts (though see note below in case you’re game enough to try setting that up yourself). So, in order to associate these emails to contacts, you’ll have to create the contacts yourself, manually, and associate these emails to those contacts.

    [Note: There are do-it-yourself ways to set up Salesforce to automatically associate emails sent to the “My email to Salesforce” BCC address. One is to follow the rather complicated and technical approach described in this page from Salesforce—though Salesforce states that often there are good reasons not to do this automatically. Another may be to use Evercontact with Salesforce.]

  26. To start, let’s find the emails that you sent via BCC to Salesforce. They will be found in Salesforce under Settings > Email > My Unresolved Items. Remember, as shown in steps 15-17, to get to this Email area, click your user icon in the upper right corner, then Settings. Then select “Email” from the menu bar on the left. It will drop down those same options as shown before, but this time select My Unresolved Items. This will bring you to the My Unresolved Items page:

    Showing The Salesforce "My Unresolved Items" page, under Settings.
    The Salesforce “My Unresolved Items” page, under Settings.
  27. Click on the Emails tab under the words “My Unresolved Items”.

    About to click Emails tab in the My Unresolved Items page.
    Let’s look at the emails considered “My Unresolved Items”
  28. You will now see the emails categorized as “unresolved items” in Salesforce. They are “unresolved” because they are not associated with other objects in Salesforce, like your Contacts.[Note: You will notice that in this example only two such Contacts are currently shown. But I sent out three emails in Step 22–what happened? This is something to be careful about. In preparing this tutorial, to test Salesforce I used the [email protected] email and added Jack Lovich as a Contact. I then deleted him from Contacts. However, once I did that, all further emails that were sent to the “My Email to Salesforce” via the GMass BCC option did not get logged in the My Unresolved Items emails. ]
  29. But at this point, you can associate them manually. To start that, I am going to choose to associate the 2nd email contact, shown as Brandon Walsh, with email shown as “[email protected]”. So, select and copy that email.
  30. Click on the magnifying glass next to the blank field that is to the right of the pulldown that says Contact.
    ABout to click magnifying glass button in My Unresolved Items > Emails page.
    Starting process of adding a new Contact (associated to this email address).

    This brings up the Contact Lookup window.

    Shows the Salesforce Contact Lookup window.
    The Salesforce Contact Lookup window.

    In this window, click the button labeled “New”. This will bring you to a new screen within that window populated with many empty fields, allowing you manually enter the Contact’s information.

    Showing Contact Lookup window and user manually entering information into fields.
    Manually entering information about this Contact.
  31. Paste in the Contact’s email address into the email field. Then manually fill in the other information you have, particularly the person’s first and last name, as shown above. Finally, click Save at the bottom of this smaller window.
    At this point, Brandon has been added as one of your Contacts! (I’ll show you that in just a bit).
  32. You still have to associate this email address to Brandon’s Contact. To do that, in the Lookup window, you will see that the bottom section is labeled “Recently Viewed Contacts”, and under that you will see a link for Brandon Walsh, the Contact we just added. Click that link. (If, though, you wanted to associate this email address with another Contact, you could choose any Contact that you searched for in the Lookup window.)
    About to click Contact name in the Lookup window.
    Click Contact’s link to populate it into the right place in My Unresolved Items Emails

    This

    will populate Brandon Walsh into the right field in the previous screen, which is My Unresolved Items > Emails.

  33. Click Save at the bottom of this My Unresolved Items > Emails tab screen. The screen will update and you will see Brandon’s email is no longer considered “unresolved”—it has disappeared from the list, and Salesforce lets you know the changes have been saved.
    Showing message from Salesforce that your change in the My Unresolved Items was saved successfully.
    You have “resolved” the BCC’d email that was also sent to Brandon.

    You can then repeat this process for your other unresolved emails, but for this tutorial we are just doing this first one.

  34. At this point, let’s check that Brandon has been added to Contacts. Click again on the Contacts tab. It should automatically bring you to the My Recently Viewed section:
    Brandon has been added to your Contacts.

    Here you will see that Brandon has been added.

  35. Also, let’s check that the email from GMass to Brandon has been logged in his Contact. Click on the link of Brandon’s name.
    Showing about to click Brandon Walsh link within Contacts.
    Clicking on Brandon’s link from within Contacts to bring up more on this Contact.

    This will bring you to Brandon’s Contact page. In the lower right hand corner on my expanded screen, under Past Activity, almost at the edge of the screen, you can see the email we just sent Brandon from GMass.

    Shows Brandon's contact page with link to our email shown.
    Can just see our BCC’d email to Brandon here at the bottom of his Contact page.
  36. Click on that link (“Email: Announcing our Gran…”). This will bring you to the full page about the Task of the email sent from GMass’s BCC to Salesforce and associated with Brandon’s Contact.
    Showing the full page of the email we BCC'd to Brandon through GMass.
    The full page for this email we BCC’d to Brandon through GMass.

    You Did it!

    Congratulations! You’ve successfully logged one of your GMass recipients into Salesforce and associated an email to him into his account.

    Now, here’s the good news: in the future, if, using GMass, you send further emails to Brandon and other such recipients who you have already added as Contacts into Salesforce and you BCC it to the My Email to Salesforce, Salesforce will automatically log the emails to these contacts, since they already exist in your Salesforce account. There’s no need to do any of these steps again.

    [Note: Whenever you add a new email address in the list of recipients, you will have to manually associate it with either an existing contact, or create a new Contact and then associate it with that one.]

    GMass + Salesforce can be a powerful combo, and even if you have never tried Salesforce, by following this tutorial you can start logging customers in Salesforce for free for 30 days to test it out. Give it a try!

Email marketing, cold email, and mail merge inside Gmail


Send incredible emails & automations and avoid the spam folder — all in one powerful but easy-to-learn tool


TRY GMASS FOR FREE

Download Chrome extension - 30 second install!
No credit card required
Love what you're reading? Get the latest email strategy and tips & stay in touch.


Building a mailing list in Gmail is helpful when you’re sending bulk emails. As you’re simply adding a contact list to your emails, you won’t have to type out each email address manually.

In this step-by-step guide, I’ll walk you through how to build an email list in Gmail.

However, the Gmail method has some serious drawbacks.

That’s why I‘ll also show you how to use a free mail merge tool to create massive email lists.

Further Reading

This Article Contains:

(Click on the links to jump to a specific section.)

Let’s dive in.

How To Create An Email List In Gmail Using Labels

Whether you want to send bulk emails to your blog subscribers or send mass emails to your colleagues, creating a distribution list in Gmail or Google Workspace (formerly G-Suite) can be helpful.

But how do you do that?
Simple!

Just use the Gmail labels feature.

Here’s a step-by-step guide on how to create a Gmail mailing list using labels:

Step 1
Log in to the Gmail app and click Google Contacts from the Google Apps drop-down menu.

Contacts

Alternatively, you can visit the Google Contacts page (also known as the Gmail Contacts app) to add a new contact, edit contact details, or create labels for your contacts list.

Step 2
To create contact lists, go through the list of contacts displayed and select the ones you want to include in the new label. Click the checkbox next to the contact to select.

Contacts list

Step 3
Click on the label icon to create a label with your new group of selected contacts.

Manage labels

Step 4
Once you click the label icon, a new window will appear.

Choose “Create Label” and enter a Google contact group name. Then, click “Save” to create your new label for the selected group of people within the Gmail Contacts app.

Create label

Note: The created Gmail group label (mailing list) will be displayed under “Labels” in the Preview pane.

Step 5
To send an email message to the Google contact group, click on the Compose button from your Gmail inbox and type the label name in the To address field.

Once you enter the name of the group, you’ll be able to see the email ids of all the Gmail group members.

Sample draft

Step 6
Now type in your email message and hit “Send.”

If you’re not a Gmail user and want to create group email lists in Microsoft Outlook instead, read my step-by-step guide on how to build group contact lists in Outlook. 

Go back to contents

Although creating a Gmail mailing list using the label option is straightforward, it has some serious limitations.

3 Major Drawbacks of Gmail’s Label Method

Here are three disadvantages of the Gmail “create label” method:

1. Impractical For Large Contact Lists

While Gmail’s labels feature lets you easily send mass emails, adding multiple contacts to your email distribution list is still a tough process.

Why?
It’s time-consuming and error-prone to manage labels in Gmail as you’ll have to manually go through your contacts to identify and add contact addresses. When adding a new contact or adding multiple contacts, you could accidentally add the wrong person or overlook a contact.

2. No Analytics

Gmail doesn’t give you any stats or analytics over your emails.

While this might not be an issue for casual Gmail users, it’s a significant problem for email marketers and salespeople sending multiple emails in bulk daily.

Why?
Without accurate data, such as when the recipient opened the email or what links they clicked, you won’t know if your email marketing campaigns are working or not.

3. No Automatic Follow-ups

Using Gmail’s labels for marketing follow-up emails is virtually impossible.

Here’s why:
If your mailing list includes 100 people, of which 50 didn’t respond, you’ll have to manually add contact addresses to your follow-up emails  — you can’t add multiple recipients at once. This is going to waste tons of time, something that most email marketers can’t afford.

Go back to contents

Clearly, creating email lists in the Gmail app isn’t really the best way to send mass emails.

Don’t worry. I’ll cover three simple methods for creating Gmail email lists using a powerful email outreach tool — GMass.

Creating an Email List in Gmail with GMass

Gmass

GMass is a powerful email outreach tool that allows users to run email campaigns from their Gmail inbox.

Its mass emailing features have made it a popular Chrome extension for employees from startups and giants like Google, LinkedIn, Facebook, and Twitter.

Individuals, schools, clubs, or Gmail users who want to send emails from their Google account to their subscribers or target audience can also use GMass.

The best part?
GMass is super easy to use, and anyone can get started in no time!

Now, I’ll cover the various ways you can create an email list in Gmail using GMass.

How To Create A Mailing List In Gmail with GMass

GMass gives you three simple ways to quickly build a mailing list in Gmail:

Here’s a step-by-step guide on how to create an email list in Gmail using GMass’s professional email method.

A. How To Build A Mailing List Using Gmail Search

Let’s imagine you are the owner of the new business, Ted’s Tadpole Tanks.

You have a personal Gmail account you’d like to use to send all those who have corresponded with you in any way about tadpole tanks to alert them of your grand opening.

We’ll use this example and provide a step-by-step guide to sending out this campaign.

Step 1
Log in to your Gmail inbox. Then, enter a search term in the search bar and click on Gmail’s search button (magnifying glass).

Search option

Now, Gmail displays all emails which include the word “tadpole,” our search term. These are people connected to the term “tadpole” in our emails and those we want to reach out to.

Tadpole word

Step 2
Now, click the “Build Email List” button (red magnifying glass).

Build email list button

GMass will start building an email list using the ids found in your search result (indicated by a black pop-up).

Gmass notification

Note: GMass’ “Build Email List” (red magnifying glass) button is only shown after you have either performed a Gmail search or clicked on labels. Either action will result in a specified subset of your Gmail emails being displayed. 

At other times, when it is not currently applicable, the button is not displayed.

Step 3
When GMass has completed building the email list, a Gmail “Compose” window will be displayed.

In the “To” field, an alias address will be displayed that represents the recipients in your list.
The Gmail send button will also be hidden (find out why).

Hidden search

You can choose to display the send button and the recipients’ addresses in your email list.

New message tab

Note: You can click the GMass icon next to the CC and BCC buttons to connect to an email list in a Google Sheet or past campaign. 

Step 4
Compose your subject and email message and click the “GMass” button to send the mail.

Compose email

You can click the “Sent Mail” folder to see individual emails sent to each recipient, as shown below.

See individual emails

Note: GMass will search for a maximum of 5,000 messages for email addresses. If you enter a search term(s) that results in more than 5,000 matching messages, only the most recent 5,000 messages will be used to find email addresses.

Go back to contents

B. How To Build A Mailing List Using Gmail Labels

GMass allows you to build a mailing list from a label in Gmail.

Unlike creating a mailing list using Gmail search, using the label option limits the mailing list to only those you’ve specifically tagged before. Labels provide an extra level of specificity to make your email campaigns more precise.
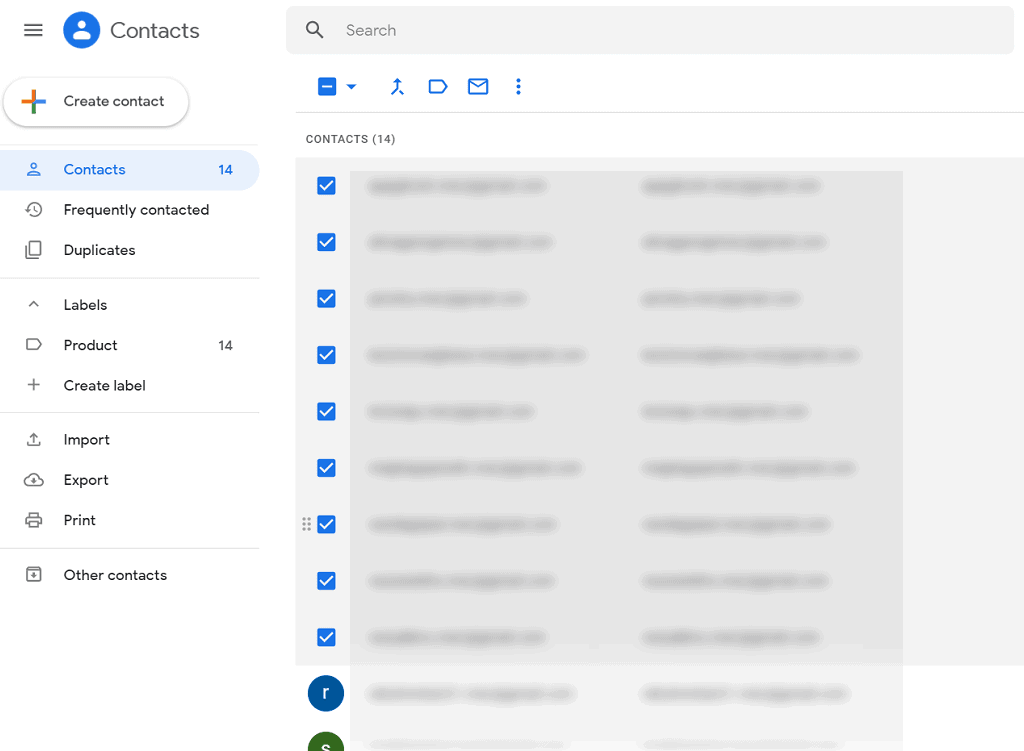
Step 1
Log in to your Gmail account and click a label of your choice from the left-hand side menu. Gmail will then display all emails under that label.

All emails

Step 2
Click the “Build Email List” button to generate a contacts list.

Build email list 2

Step 3
GMass will generate a mailing list of all email addresses taken from emails under that label. Then, a Gmail “Compose” window containing your recipients in the “To” address box will be displayed.

New message tab

Step 4
Compose your email message. Hit the “GMass” button to send the email.

Go back to contents

C. How To Build A Mailing List Using Any Transactional Emails Notification

A transactional email is an email that’s triggered by a user action (account creation, feedback/comments, purchase receipts, etc.) on your website.

Usually, these emails contain user ids in their subject line.

Mailing list

You can use GMass’s Build Email List feature for quickly creating a mailing list from these email notifications.

Step 1
Log in to your Gmail inbox and enter a search term that pulls a set of transactional email notifications. Click the “Build Email List” button.

Build email list 3

Step 2
GMass will start building an email list using the ids found in your search result (indicated by a black pop-up).

Gmass notification

Step 3
When GMass has built the email list, a Gmail “Compose” window containing an alias email ID representing your recipients is displayed in the “To” address field.

Hidden search 2

You can click on “Expand address” to display your recipients’ email IDs in the “To” address field instead.

New message tab 3

Step 4
After composing your email, click the “GMass” button to send it.

That’s it! Now you can easily build and manage email lists from your Gmail account!

Note: The GMass method only works on the desktop and Gmail mobile app for Android

Go back to contents

Benefits of The GMass Method

Here’s why the GMass approach is better than Gmail’s labels method:

  • Time-saving: GMass can easily search and find email addresses deep inside your Gmail account in seconds and speed up your list building process. You can even upload email lists stored in a Google Sheet, Excel, or CSV file quickly.
  • Automatic personalization: Automatically personalize various aspects of group emails on a recipient-by-recipient basis, including paragraphs, images, links, and attachments.
  • Automatic Follow-ups: Send automatic email follow-ups for your email campaigns. This way, you don’t have to manually follow-up on every email.
  • Customize Follow-ups: Customize everything about follow-ups — such as the number of follow-ups, time gaps between follow-up emails, and the follow-up email message.
  •  Detailed Stats And Analytics: GMass provides detailed stats and analytics of email recipients’ behavioral data. You can use this data to determine if your email campaigns are working or not and to help boost your client engagement.
  • Easily Run Email Campaigns: Create and manage email campaigns for multiple recipients from your Gmail inbox.
  • Use the GMass add-on to manage your campaigns from the Gmail mobile app.

With GMass, you’ll have everything you need to run successful email campaigns and make the most of your email marketing efforts!

Go back to contents

Wrapping Up

Creating an email list isn’t rocket science.

While Gmail’s label feature is helpful, it’s limiting. Instead, using email outreach apps like GMass is a much smarter option if you want to build email lists and send group emails in no time.

Why not download the GMass Chrome web extension today and see for yourself?

Email marketing, cold email, and mail merge inside Gmail


Send incredible emails & automations and avoid the spam folder — all in one powerful but easy-to-learn tool


TRY GMASS FOR FREE

Download Chrome extension - 30 second install!
No credit card required
Love what you're reading? Get the latest email strategy and tips & stay in touch.


People have been walking around with microphones in their pockets for years but only recently has mobile browser support reached the level required to build a fully cross-platform, feature-rich, browser-based audio recorder. GMass’s sister product is Wordzen, also an extension for Gmail, but with a completely different purpose — to write all of your emails for you. In the coming days, Wordzen will begin working inside the Gmail app on your mobile phone, and in order to achieve that, we had to figure out how to record audio from within the web browser on both iOS (iPhone) and Android.

In this post, I’m going to detail the key components of our audio recorder and uploaded application. Keep reading, or download a simple demo now. 

The application needs to record audio, show visual feedback, allow playback, and finally, the audio needs to be uploadable to my server for transcribing.

One of the newer APIs available is the MediaRecorder API. My first attempt at building this application started with this class. I implemented the entire application and it worked great on my desktop. It was easy to capture audio and the data was already compressed into .ogg format and ready to ship to my server. Then I tried it on iOS. It turns out that the MediaRecorder API is not supported and wouldn’t meet my needs. After I stopped cursing Apple, I began again from scratch.

After searching unsuccessfully for a demo that worked on all platforms, I was about to give up but I did find multiple demos that worked on individual platforms and so I set to combining what I’d learned into a single class that would work on all platforms. Even after finding examples that worked on my iPhone, I still found my demo didn’t work because of the security built into iOS that requires that microphone actions can only be triggered via a click. That was the last piece of the puzzle that allowed me to construct a working demo and it revolves around three steps:

  1. Capture the microphone so we can begin recording
  2. Accumulate captured audio data into a series of byte array chunks
  3. Combine the chunks into one large array and massage the array into the format of a .wav file

Step 1: Capture the microphone

Capturing the microphone revolves around creating an audio context and then asking the user for permission to use it. There are several shims involved to make this work in each platform so we have to look for what’s supported to get the right instances:

audioCtx = new (window.AudioContext || window.webkitAudioContext)();
if (audioCtx.createJavaScriptNode) {
    audioNode = audioCtx.createJavaScriptNode(bufferSize, 1, 1);
} else if (audioCtx.createScriptProcessor) {
    audioNode = audioCtx.createScriptProcessor(bufferSize, 1, 1);
} else {
    throw 'WebAudio not supported!';
}
audioNode.connect(audioCtx.destination);

Once we’ve done the setup, we can then ask the browser to prompt the user for access to the microphone. The result of this call is a promise that we can use to trigger a callback when it successfully completes:

navigator.mediaDevices.getUserMedia({audio: true})
 .then(onMicrophoneCaptured)
 .catch(onMicrophoneError);

Once the microphone has been captured, we can register to receive events about audio data coming in by listening to the onAudioProcess event:

audioInput = audioCtx.createMediaStreamSource(microphone);
audioInput.connect(audioNode);
audioNode.onaudioprocess = onAudioProcess;

Step 2: Accumulate captured audio

Although the audio process event returns multi-channel data, for our purposes, we only need one channel of audio data. This also creates a smaller file that will make uploads faster. When data arrives. We can do this by simply getting one channel’s data and adding it to our list of recorded data. This is also a good time to notify anybody listening that we’re still recording so we can show the current duration or other visualization:

recordedData.push(new Float32Array(e.inputBuffer.getChannelData(0)));
self.duration = new Date().getTime() - self.startDate.getTime();
config.onRecording && config.onRecording(self.duration);

Step 3: Massage the array into the format of a .wav file

Now that we have a large array of audio data “chunks”, we need to combine those chunks into a single array and generate a .wav file. Although we could do this synchronously, a long recording could hang the user’s browser. To avoid this, we’ll offload the heavy lifting work to a Web Worker that will return a DataView that we can use to construct a Blob which can be played or uploaded.

The first step of the .wav generation process is combining the chunks of data into a single Float64Array which simply creating a large enough buffer and then setting the chunks into it, advancing the offset by the size of each chunk:

var result = new Float64Array(count);
var offset = 0;
var lng = channelBuffer.length;

for (var i = 0; i < lng; i++) {
    var buffer = channelBuffer[i];
    result.set(buffer, offset);
    offset += buffer.length;
 }

Now that we have that complete list of bytes in one array, we can write the .wav file starting with the header and followed by the audio data bytes. To do this, I referred to the .wav file format specification. Because the data we’ve recorded is floating point and in the range of -0.5 to +0.5, we need to scale the values up to 16-bit signed integers. We can do that by multiplying each value of recorded data by 2^16 – 1 or 32,767 or 0x8000 – 1 or 0x7FFF:

for (var i = 0; i < dataLength; i++) {
    view.setInt16(index, data[i] * 0x7FFF, true);
    index += 2;
 }

Now that we have all the data in a DataView, we can convert the view into a Blob:

blob = new Blob([view], { type: 'audio/wav' });

And finally, we can play this blob in an <audio> tag:

document.getElementById('player').src = URL.createObjectURL(blob);

or pass it to the excellent wavesufer plugin to visualize it or play it:

wavesurfer = WaveSurfer.create({
    container: '#waveform',
    waveColor: '#007BFF',
    progressColor: '#03A8F3'
 });
wavesurfer.loadBlob(blob);

Step 4: Add an Oscilloscope (optional)

It’s always nice to give the user a bit of feedback and we can do that by converting the audio data into a waveform that they can see while they’re speaking:


This visualization is simply a line drawn over a series of points. We can get those points from our data and scale them to fit the width and height of a Canvas element. The audio context class allows us to connect an analyzer and extract byte time data from it:

var analyser = audioCtx.createAnalyser();
analyser.fftSize = 2048;
var bufferLength = analyser.frequencyBinCount;
var dataArray = new Uint8Array(bufferLength);
source.connect(analyser);
analyser.getByteTimeDomainData(dataArray);

The byte time data is an array of signed byte values ranging from -128 to +127. By scaling these values to the height of the canvas, we can stroke a path to create a wave form.

for (var i = 0; i < bufferLength; i++) {
    var v = dataArray[i] / 128.0;
    var y = v * height / 2;
    i == 0 ? canvasCtx.moveTo(x, y) : canvasCtx.lineTo(x, y);
    x += sliceWidth;
}
canvasCtx.lineTo(canvas.width, canvas.height/2);
canvasCtx.stroke();
Ready to transform Gmail into an email marketing/cold email/mail merge tool?


Only GMass packs every email app into one tool — and brings it all into Gmail for you. Better emails. Tons of power. Easy to use.


TRY GMASS FOR FREE

Download Chrome extension - 30 second install!
No credit card required
Love what you're reading? Get the latest email strategy and tips & stay in touch.


GMass