<img height="1" width="1" style="display:none" src="https://www.facebook.com/tr?id=1822615684631785&amp;ev=PageView&amp;noscript=1"/>

Over the weekend we deployed a new version of the GMass Chrome extension with a long overdue feature — the ability to set a friendly name for your mail merge campaign. If you’ve been a GMass user in the past, you likely know that we primarily used the Subject Line of your campaign to identify your campaign in Reporting and in the notifications we send you to update you on the progress of your campaign.

If you set a friendly name, that name will appear in most communication you receive about the campaign, including Reports. The friendly name will also show in dropdowns where you select a campaign, like when you load content into the Gmail Compose window, or when you are sending a behavior-based followup to non-openers, for example. You can then search the dropdown using that friendly name.

Type a few characters of the friendly name, and you’ll get the matching campaigns. Here in the “Load Content” dropdown, I search for “active”, and my campaign with friendly name “Active-Users-Update” shows up.

To set a friendly name, just expand the Advanced section of the Settings box, and you’ll see it as the last field.

Setting a friendly name is as easy as thinking of one.

It’s really that easy. Your friendly name can be a single word, or a phrase, or a made-up word — anything to help you remember or “tag” this email campaign in a way that’s important to you so you can reference it later.

Extra Information

  1. Once you set a friendly name for a campaign, you can only change it as long as the DRAFT for that campaign exists.
  2. The friendly name can contain non-English characters and can be up to 100 characters.
See why 99% of users say they’ve had their best deliverability ever with GMass


Email marketing, cold email, and mail merge all in one tool — that works inside Gmail


TRY GMASS FOR FREE

Download Chrome extension - 30 second install!
No credit card required
Love what you're reading? Get the latest email strategy and tips & stay in touch.


There are a lot of cases where you may want to send a mass email to all of your employees. Sure, companies are moving away from email for internal communication and towards group collaboration tools like Slack, but if you need to send personalized, even sensitive information to each employee in your organization, sending a mass email is still the better, faster, and cheaper way of doing it. Here are some examples of when you may need to send a mass email to your employees:

  1. It’s the end of the tax year, and you want to email everyone a link to their W2 form.
  2. You’ve had a security breach and need to reset everyone’s password into the CRM system. So you email everyone their new username and password.
  3. It’s time to do annual reviews with employees and you want to email them their meeting time with you, their respectable boss.

There are a bunch of other scenarios where you may need to send a mass email to everyone in the company. If you’re running your company on Google Workspace, it’s as easy as pie.

1. Export all your Google Workspace users into a Google Sheet

If you’re the admin of your Google Workspace account, just log in at https://admin.google.com, go to Users, and choose the option to export to a Google Sheet. Go ahead and also change the default from “Currently selected columns to “All…columns…”, because it’s easy to clean up the columns you don’t need later.

If you’re not the admin of your account, track down the person that is, and make sure they give you, the owner of the company, admin privileges.

2. Clean up the Google Sheet

Check out the resulting Google Sheet and clean up some of the awkward column names. The first few columns have bracket notations after them, like “[Required]”. Eliminate that part so that the column name is cleaner.

Clean up the column names, like getting rid of the part in the brackets.

You can go one step further and eliminate spaces too so that the column name is FirstName rather than “First Name”, but this isn’t required.

This is to make personalizing your Subject/Message in Gmail easier later on.

For this example, we’ll delete the 4th column and onward, because all I want to keep is the first name, last name, and email address columns, and I’ll add my own column where I’ll put in the meeting time for the employee performance review meeting.

I’m deleting the columns I won’t use for my mail merge.

Finally, I’ll add a column containing the time I want to meet with each employee.

I’m adding one column that I WILL use in my mail merge.

So now you have a Google Sheet with all of your employees’ email addresses and other information, and you have GMass installed in your Gmail account. If your Google Workspace Admin account is different from the Gmail account that you’ll use to send the emails, then you should also share the Google Sheet with the account you’ll use to send the email. In my case, I send all my employees mass emails from my main account of [email protected] and that’s also the Google Workspace Admin account, so I would not need to share the Google Sheet with a different account.

3. Prepare for GMass power

If you haven’t already installed GMass, you should do that first. Then go to your Gmail account, and make sure you’re connected to GMass.

Once GMass is installed, you’ll see the GMass buttons to the right of the Gmail search bar. Just click the Sheets icon up top, and choose the spreadsheet with your employees:

4. Compose your message

Connect to the Sheet, wait for the Compose to launch, put in your Subject and Message, and hit the GMass button. It’s that easy. Don’t forget to personalize the Subject/Message with any of the column headings in the Google Sheet. The basic syntax is {ColumnName}. But you can take personalization so much further. Check out our mail merge personalization guide.

In this example, since I want to inform each employee of their meeting time with me, their stupendous boss, I’ll use the MeetingTime column from the Google Sheet.

And that’s it. Keep reading to learn even more.

What else can you do?

If your email requires a response from your employees, perhaps to confirm that they will show up at the meeting time, you may want to set an auto follow-up, which would be an automatic “ping” email if they don’t reply.

If you’re fascinated by how seamlessly GMass works with Google Sheets, then see our full documentation on mail merging with Google Sheets.

Since in this example, we’re personalizing with the employee’s first name, last name, and their assigned meeting time, you want to learn more about personalization.

Now that you know how to send an email to all your employees, you also be interested in learning how to send a mass email to every contact in your Gmail account.

Ready to transform Gmail into an email marketing/cold email/mail merge tool?


Only GMass packs every email app into one tool — and brings it all into Gmail for you. Better emails. Tons of power. Easy to use.


TRY GMASS FOR FREE

Download Chrome extension - 30 second install!
No credit card required
Love what you're reading? Get the latest email strategy and tips & stay in touch.


As the sysadmin for GMass, I’ve always wanted an app that lets me log changes that I make to a server configuration or to code, but I’ve never found a logging app that was designed specifically with the sysadmin in mind.

I did, however, find a journaling app called Day One that is meant for personal journaling but I’ve found that it works well for my sysadmin needs. The key feature that makes it better than using Notes, Notepad, Google Docs, Word, or any other app that lets you type stuff, is that its little icon sits in the Mac Menu Bar so that adding a new entry is as easy as clicking the icon, typing your stuff, and hitting a button.

Day One makes it easy for me to quickly log a change to a server.

No browser to fire up, no need to remember a URL, and no need to log in. Just a few clicks and I can log an entry. Every time I modify my web.config file, for example, or update the GMass Chrome extension files, I log an entry describing what I’ve done.

Day One changed its business model in 2018

In mid-2018, Day One changed its business model, from a paid app to a subscription service. I welcomed the change because I’ve come to depend on the app and found its prior business model flawed. Since Day One lets you sync your entries across multiple devices, that means there’s a server involved that pushes and pulls information, and servers require maintenance, so it was always a mystery as to how Bloom Built, the company behind Day One, funded the maintenance and programming of servers when only collecting a one-time fee for downloading its app and using its servers.

However, when I switched to the subscription service, one of my devices became out-of-sync with the others. I’m not sure why this happened, but I suspect it’s because when I originally purchased Day One, I had done so with my Apple ID of [email protected], and when I purchased the subscription service, my Apple ID had changed to [email protected]. The one machine that’s been out of sync with Day One for the last year still showed the user logged in as [email protected]. To make matters worse, I had been making new journal entries from all of my various devices, including the out-of-sync computer. This presented the frustrating problem of getting the out-of-sync computer back in sync and making sure that any entries that were on the out-of-sync computer were also on the in-sync devices (before I resolved this, they were not).

The computer that is out of sync, which is also connected to my Apple ID.
The account on the computers that were syncing, which is not connected to my Apple ID (I think)

Day One does use Apple’s App Store subscription service to manage their own subscriptions. I wish they didn’t because this requires using iTunes, and I avoid iTunes like the plague…because, well, iTunes is basically the plague. How many times can one piece of software ask you to log in after you’ve hit Cancel a freaking hundred times??? I digress; my war with iTunes will be the subject of another article.

Determining when the sync broke

I eyeballed the changes and noticed that the entries across devices stopped matching up at the same time I purchased my Day One subscription. So I knew exactly what entries were missing from which device.

The issue affected four different journals, out of my ten total, and the in-sync devices were missing anywhere from 1 to 25 entries per journal. I noticed that Day One has an Export/Import option, so I figured I would just manually get everything back in sync.

Exporting the missing journal entries

If you go to File –> Import/Export, that will export an entire journal. I wanted to export select entries, namely the ones after July 2018. Do don’t go to the File Menu. Instead, just highlight the entries you want to export (select them with CMD+A on Mac or CTRL+A on Windows), and then Right Click –> Export. This is detailed here in the official Day One support article on exporting. You’ll get a few export file options. I like JSON because I know it’ll preserve everything, and because I’m partial to JSON since that’s the format GMass uses to communicates with Gmail.

Change the file name if you’re exporting multiple journals. Otherwise you won’t know which file is for which journal.

The export will produce a zipped set of JSON files. There is no need to unzip them because when you go to import them later on the other devices, the import will expect a zipped-up file, not the actual JSON file.

Last thing to note: The default filename won’t be very helpful if you have multiple journals. I recommend you rename the file to something that associates it with the journal from which you did the export.

Import the journal entries to the devices that don’t have them

When you import entries, they get imported as new Journals. In this screenshot, I’ve already dragged the entries from the imported Journals into the Journals in which they belong. That’s why the imported Journals show 0 entries.

This is where it gets a little tricky. You can’t just use the Import tool and expect everything to match up nicely. That’s because each file that you import isn’t connected to any particular journal at this point. When you go to import the file, Day One will create a new journal for those entries and just call the journal “Journal”. And if you do another set of entries, a “Journal 2” journal will get created, and so on, and so forth.

Let’s say you took any machine Day One was running on, did a full export of all entries, and then imported that same file. You might expect nothing to be different since all the data should match up. But in fact, you would now have duplicate journals with a duplicate set of entries in each.

So here’s what you should do:

  1. Import the ZIP files, one by one, and let the various new journals be created.
  2. Then go into each new journal, highlight all the entries, and DRAG them to the journal they should be a part of. They will disappear from the journal created upon import and appear inside the journal you wanted. This Day One support article details this process. Now you can delete the empty journals that were created for you during the import.

And voila! You’re done.

Final Step: Fixing the out-of-sync computer

In my case, I was decommissioning the machine that was out-of-sync in the first place, but since it had journal entries that weren’t present in the properly-syncing machines, I went through this process so that nothing would be lost. I imagine, though, that once the other machines had the missing entries, if I wanted the out-of-sync machine to now properly sync, I could simply log out of Day One, delete all the journals, and then log back in with the correct [email protected] account.

Conclusion–scratch this one off the list.

Finally, I can mark this DONE!

Day One is an awesome tool to log sysadmin events. The sync feature can be wonky though, especially if the email address of your Apple ID changes,. The import function is “dumb”, meaning it doesn’t apply much logic to figure out how to import entries, but it’s easy to work around it. The most satisfying part of all of this, is I get to check off my “Fix Day One Sync” to-do list on Wunderlist.

Have more questions about Day One?

Feel free to comment below, and I’ll try to answer any questions as a long-time user of Day One. You can also visit the recently created Day One Community Group on Facebook.

Ready to transform Gmail into an email marketing/cold email/mail merge tool?


Only GMass packs every email app into one tool — and brings it all into Gmail for you. Better emails. Tons of power. Easy to use.


TRY GMASS FOR FREE

Download Chrome extension - 30 second install!
No credit card required
Love what you're reading? Get the latest email strategy and tips & stay in touch.


GMass has a slick new feature that allows you to start a NEW conversation with the recipients you’ve been emailing with in a PRIOR conversation. Note that this has nothing to do with sending an email marketing campaign, which is the main purpose of GMass. This is just a trick you can use in your everyday email life.

Let’s say you’ve been emailing with your accountants discussing this year’s tax returns. But you also have a question about something unrelated to your tax returns, like a question about a house you want to buy. You don’t want to reply to the existing conversation about tax returns introducing this new topic. Instead you want to start a new conversation.

Typically, you would hit COMPOSE, and then copy/paste the email addresses from the conversation about your tax returns into the new COMPOSE for the conversation about your house.

With this little GMass trick, you don’t have to copy/paste. Be lazy.

  1. Just hit REPLY ALL on the existing conversation.

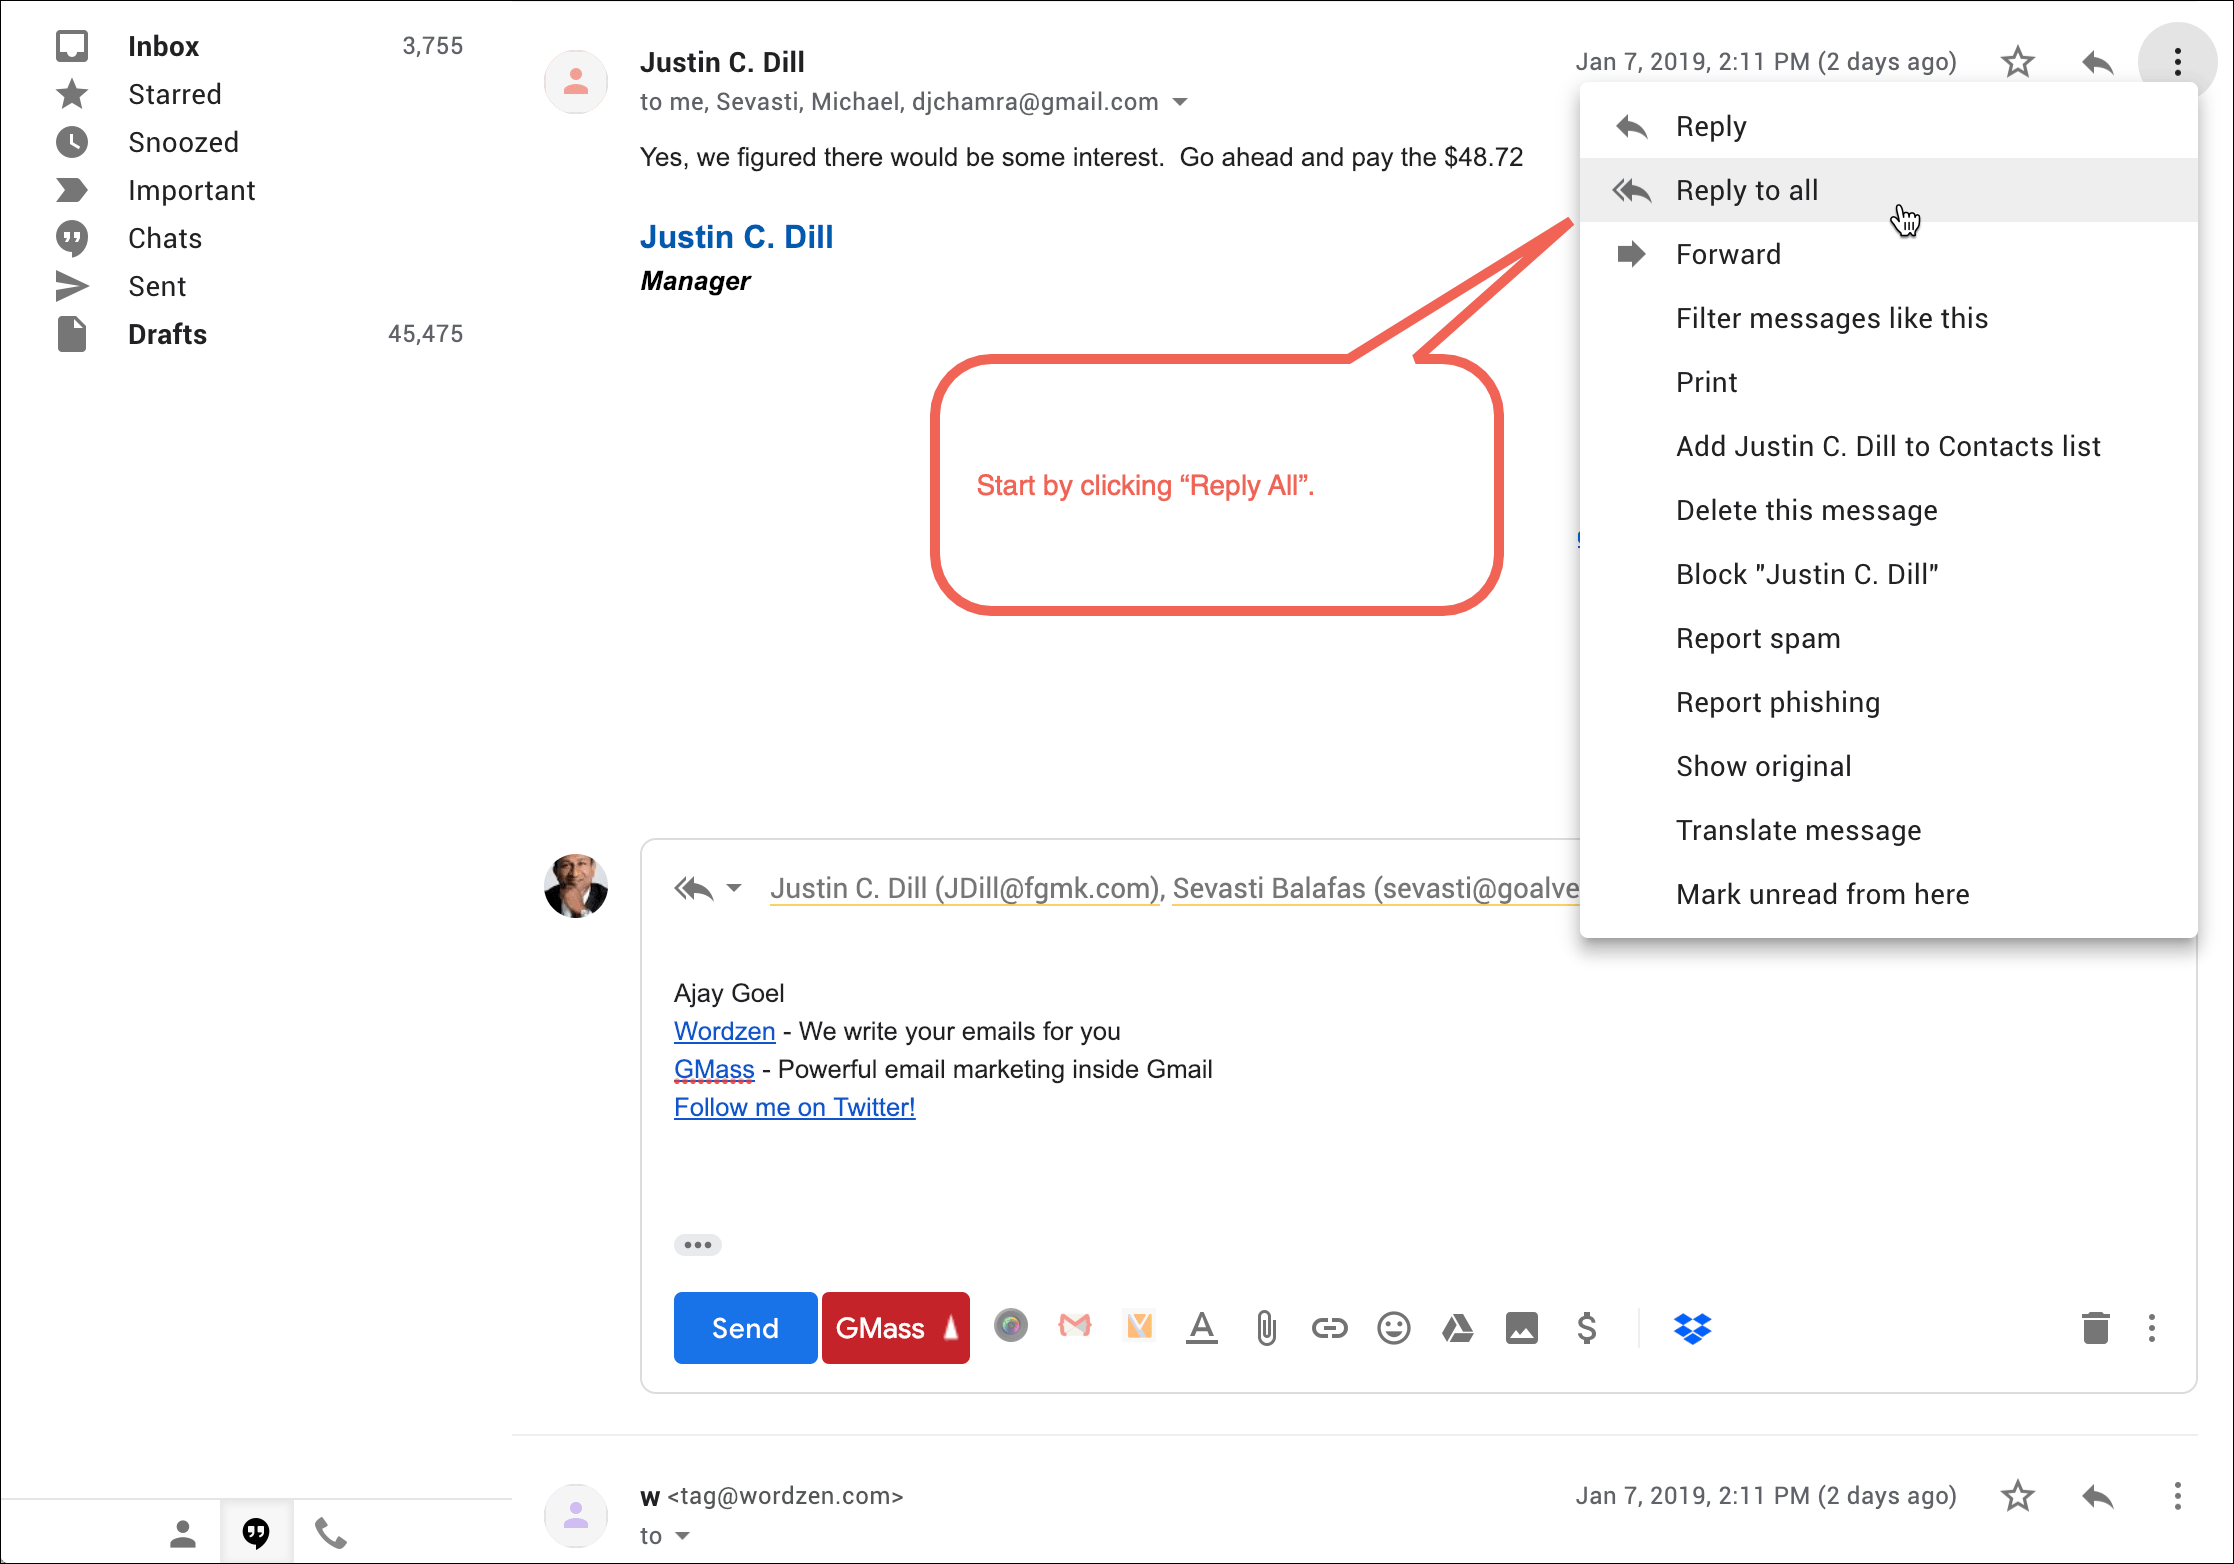
2. Then click the “Break Draft Free” link from the GMass Settings box.

3. Almost instantly, a new Gmail Compose will launch with everyone from the previous conversation pre-loaded into the To field.

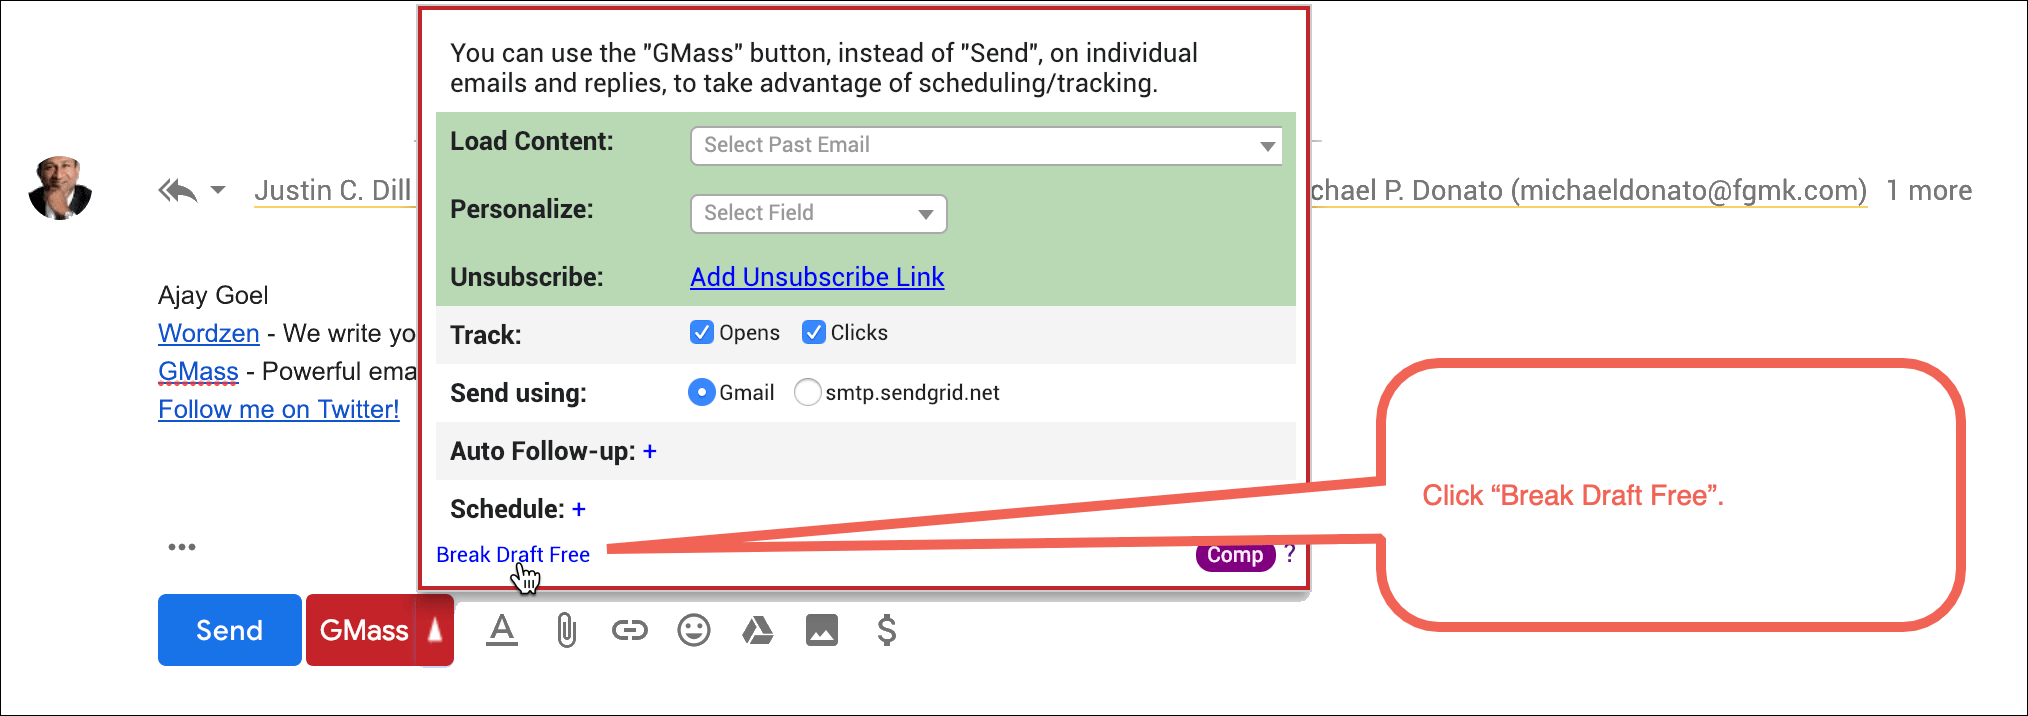
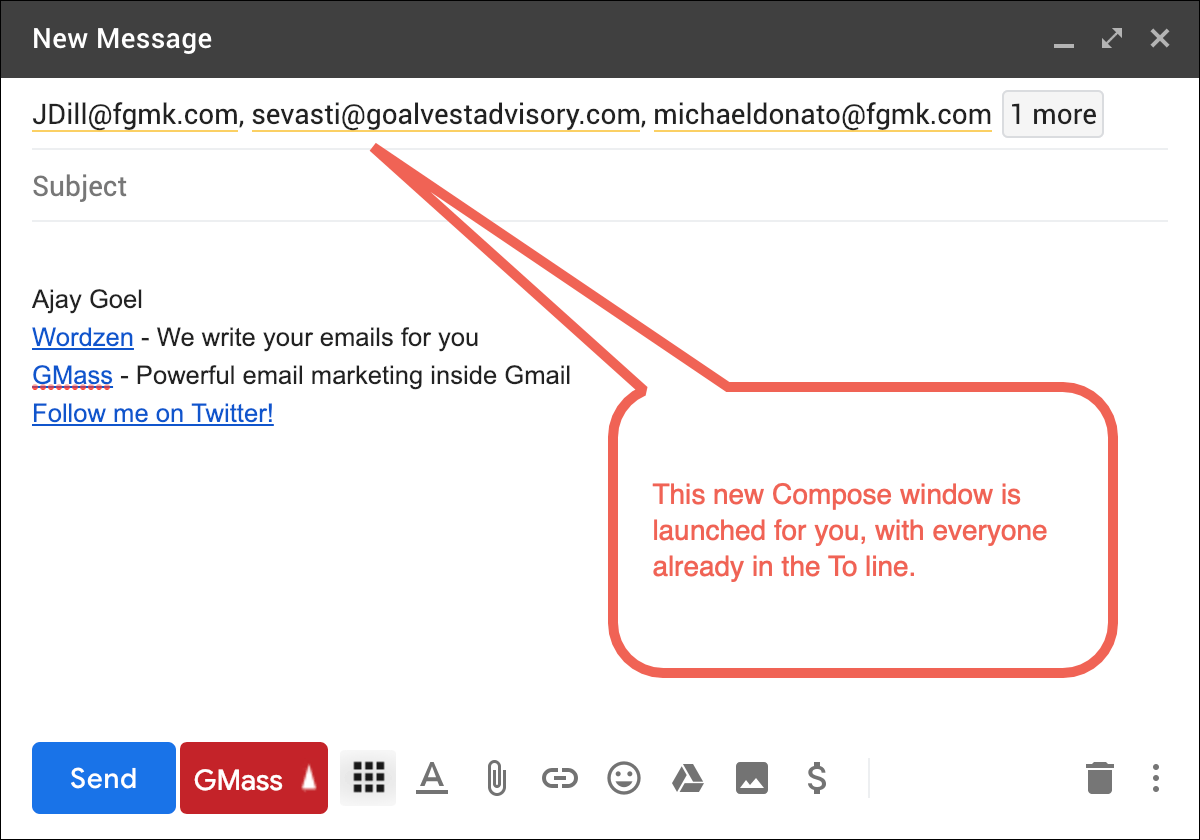
You can then move anybody into Cc or Bcc if you like.

See why 99% of users say they’ve had their best deliverability ever with GMass


Email marketing, cold email, and mail merge all in one tool — that works inside Gmail


TRY GMASS FOR FREE

Download Chrome extension - 30 second install!
No credit card required
Love what you're reading? Get the latest email strategy and tips & stay in touch.


2018 was a busy year for email marketers, and especially for GMass users. Before digging into what’s coming for 2019, let me tell you about the slew of enhancements made to GMass in the last few months.

Is your email address on the list?
Now you can see a list of active users who are currently sending through GMass on our real-time System Status page.

Have you made embarrassing personalization mistakes?
We now warn you if we think you’re about to make a grave personalization mistake, resulting in blank spaces or worse.

Set different campaigns to have different Reply-To addresses
A long-awaited feature, you can now set the Reply-To address individually for each email campaign you send. Why this will make your life easier.

Check your favorite domain
Have you seen our new Domains Tool? Plug in any domain, including your own, and see how our deliverability is to that domain.

I hate SEO
Sometimes NOT trying to SEO the heck out of something is the best way to succeed at SEO. Check out this little gem, where GMass outranks Google on Google.

What’s coming in 2019? You tell me.

That’s up to you. We have some plans, like a killer Salesforce integration, a built-in HTML code editor, and a soon-to-be-released link checker, but I really want to know what YOU want to see in GMass. If you have a thought, please comment on this blog post (no registration required).

I have one of the fastest dev teams on Earth, and when we set our minds to a particular feature, we build it in days, not weeks or months. I look forward to your feedback, and I hope you look forward to seeing your idea built by us.

Comment below. Tell me what you want to see in 2019.

Ready to transform Gmail into an email marketing/cold email/mail merge tool?


Only GMass packs every email app into one tool — and brings it all into Gmail for you. Better emails. Tons of power. Easy to use.


TRY GMASS FOR FREE

Download Chrome extension - 30 second install!
No credit card required
Love what you're reading? Get the latest email strategy and tips & stay in touch.


Speed has never been one of GMass’s strengths. Until now.

If, for example, you need to send 1 million emails in an hour, then GMass isn’t the right software for you. If, however, speed can take a backseat to optimal deliverability, then GMass is likely a winner for you.

There are two ways to send with GMass — natively through your Gmail account, or via a third party SMTP service like Sendgrid. In both cases, GMass “acts” like you’re sending the emails directly from your Gmail account. All emails show up in your “Sent Mail” folder, so they can be searched, and you can still use auto follow-ups.

We have now introduced a way to send faster, when using the SMTP option. You can choose to skip the logging of emails to your “Sent Mail” folder which more than doubles the sending speed.

Just how fast is fast?

There are too many factors to give you average speeds, because the speed at which a 5 KiloByte email sends over SMTP is far greater than the speed at which a 5 MegaByte (MB) email sends over SMTP. Rest assured, though, if you’ve been annoyed at how slow GMass sends over SMTP, you’ll be thrilled with this new option. Just check the “Fast sending” option when selecting to send via SMTP.

Here’s a screenshot:

Check the “Fast sending” box to skip logging to your “Sent Mail” folder and send emails by SMTP super fast.

Consequences of fast SMTP sending

Because sending fast skips logging emails in the “Sent Mail” folder, this prevents certain features from working:

  1. You can’t use any auto follow-ups when this option is on. Without the original sent email in your “Sent Mail” folder, follow up emails can’t be “tied” back to the conversation of the original sent email.
  2. If you’re using an SMTP service that has the option to send bounces back to you, like SendGrid, then GMass won’t be able to detect the bounces and add those failed addresses to your GMass Bounce List. That’s because the bounceback notifications will arrive as individual emails, instead of threaded to the original sent email, since the original sent email will be nowhere to be found in your Sent Mail folder.

Bottom line — only use the “Fast SMTP” option if you’re sending a regular email marketing campaign that doesn’t require auto follow-ups and doesn’t require reporting on bounces.

Ready to send better emails and save a ton of time?


GMass is the only tool for marketing emails, cold emails, and mail merge — all inside Gmail. Tons of power but easy to learn and use.


TRY GMASS FOR FREE

Download Chrome extension - 30 second install!
No credit card required
Love what you're reading? Get the latest email strategy and tips & stay in touch.


You can now set a custom Reply-To address per individual mail-merge campaign.

Now you can set the Reply-To directly in the settings for your campaign.

When should you set a Reply-To?

There are several cases when you may want to set a custom Reply-To for your mail merge campaigns.

  1. Let’s say you’re sending a campaign to some VIP contacts, and you want to personally handle the responses. In this case, you would leave your Reply-To blank, because you want the replies to come back directly to you. (If the Reply-To is blank, replies come back to the From Address of the email.)
  2. Let’s say you’re sending a promotional campaign to all of your customers, and you want your assistant Mary to handle the replies. Now you could set your Reply-To to [email protected].
  3. Let’s say you’re sending an announcement out about a new feature in your software product, and you anticipate people replying with questions about the feature. You may want to set your Reply-To to your support address. In GMass’s case, the support address is [email protected], so if I were sending a campaign announcing a new GMass feature, I would set the Reply-To to our Zendesk support address.

In the past, GMass used the Reply-To specified in your Gmail Settings and set that same Reply-To for your outbound mail merge emails. In Gmail’s Settings, Reply-To addresses are set per From Address used in your Gmail account.

Setting the Reply-To in Gmail’s Settings, but now you can set it in GMass’s Settings box.

GMass would set the Reply-To based on the From Address chosen from the Compose window in Gmail. This approach wasn’t the most flexible, because if you wanted replies for just a particular campaign to go to a different address, you would have to change your Gmail account-wide Reply-To setting, and that would affect even 1-on-1 emails that you may have sent around the same time you sent your mail merge. You would have to remember to change your Reply-To back after your campaign is finished. Furthermore, changing the Reply-To in Gmail Settings just for a GMass campaign takes you out of the GMass experience. Now, however, you can set your Reply-To address right in the GMass Settings box, and you can change or remove the Reply-To for each individual email marketing campaign you send.

Setting the Reply-To in GMass versus Gmail’s Settings

If you don’t specify a Reply-To in the GMass Settings box, but you do have a Reply-To set in your Gmail Settings, then GMass will still use the Reply-To in your Gmail Settings for your campaign. If you set both, then the Reply-To set in the GMass Settings box takes precedence.

Ready to transform Gmail into an email marketing/cold email/mail merge tool?


Only GMass packs every email app into one tool — and brings it all into Gmail for you. Better emails. Tons of power. Easy to use.


TRY GMASS FOR FREE

Download Chrome extension - 30 second install!
No credit card required
Love what you're reading? Get the latest email strategy and tips & stay in touch.


We’ve just released a new version of GMass with new features and a cleaner UI. Just reload Gmail to get the latest version of GMass and enjoy these new features and enhancements:

The arrows highlight all the improvements.
  1. We’ve re-organized some settings by placing them under the Advanced section. The Suppression settings, new message vs replies setting, and now, the new Reply-To setting are all under Advanced.
  2. Set a custom reply-to address for each campaign. Previously GMass would use the Reply-To set for your From Address in your Gmail Settings. If you don’t set a Reply-To for the campaign specifically, but you do still have a Reply-To address configured in Gmail, then GMass will use the one from your Gmail Settings.
  3. When sending emails via an SMTP server rather than native Gmail, you can choose a “fast sending” option, which will send faster than the normal SMTP sending by skipping logging the emails in your “Sent Mail” folder. This does have consequences though — you can’t use reply-based auto follow-ups if you choose this option.
  4. Sending test emails is now easier and more user friendly. Enter as many addresses as you want in the test addresses box. The individual addresses are now “tokenized”, so you can easily see and remove them. We’ve also added auto-fill, so as you start to type an address, you can choose from previously used test addresses.
  5. Now when you collapse a section we’ve added UI hints so you can still see what you’ve selected. For example, if you schedule your mail merge campaign to send later, and then you collapse the Scheduling section, a little “hint” will appear indicating that you’ve scheduled the campaign. This way, you can keep sections collapsed and still know what you’ve set.
  6. We’ve made editing an existing campaign more intuitive and faster.
    It’s a lot clearer now which button you should press after making changes to a campaign.

    Previously, if you made changes to an existing campaign by modifying the Settings box and hitting the GMass button, the settings would be saved, but a confusing message would appear indicating that you’ve re-scheduled the same campaign. Now the messaging is clearer, and we’ve added a green “SAVE Changes” button to make the workflow more intuitive. You can actually click either the “SAVE Changes” button or the GMass button to save changes. In addition, saving changes to a campaign with a large number of recipients used to take a while, and now it’s almost instant.

Ready to send better emails and save a ton of time?


GMass is the only tool for marketing emails, cold emails, and mail merge — all inside Gmail. Tons of power but easy to learn and use.


TRY GMASS FOR FREE

Download Chrome extension - 30 second install!
No credit card required
Love what you're reading? Get the latest email strategy and tips & stay in touch.


We’ve just updated GMass with an enhancement that will save you from crushing embarrassment. Sending a mail merge campaign with the wrong merge tags is one of the most feared mistakes of any email marketer. Now, if you use the wrong merge tags in your Subject or Message, GMass will warn you and give you the option of proceeding or canceling.

Let’s say you’re sending to contacts in this spreadsheet:

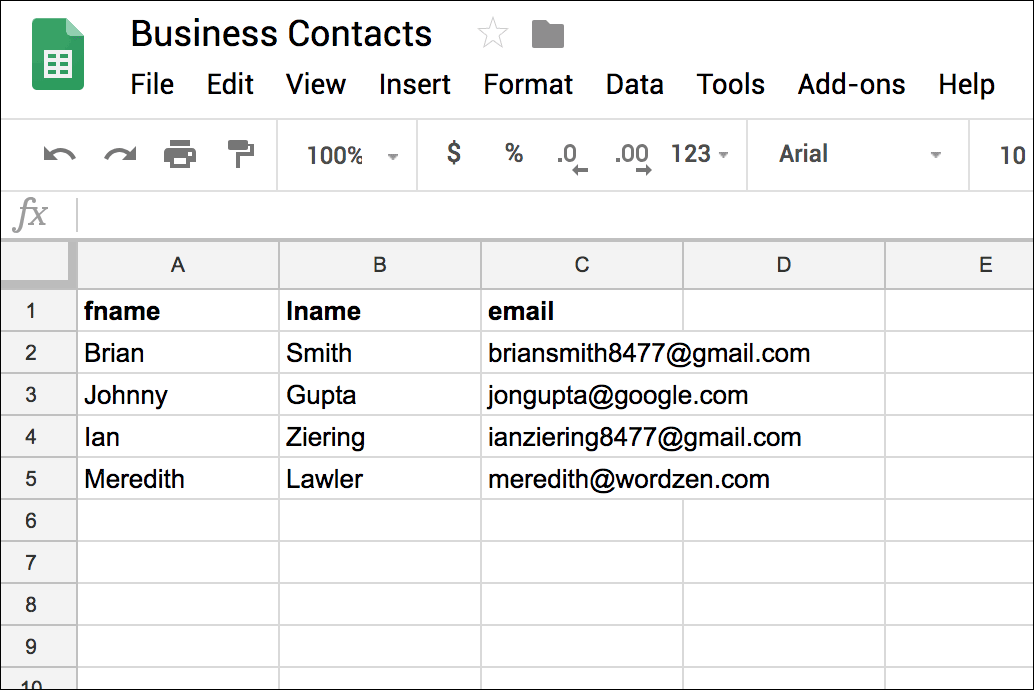
Notice that the column headings are:

fname, lname, email

Let’s say I mistakenly use “first” in my campaign instead of “fname”, like this:

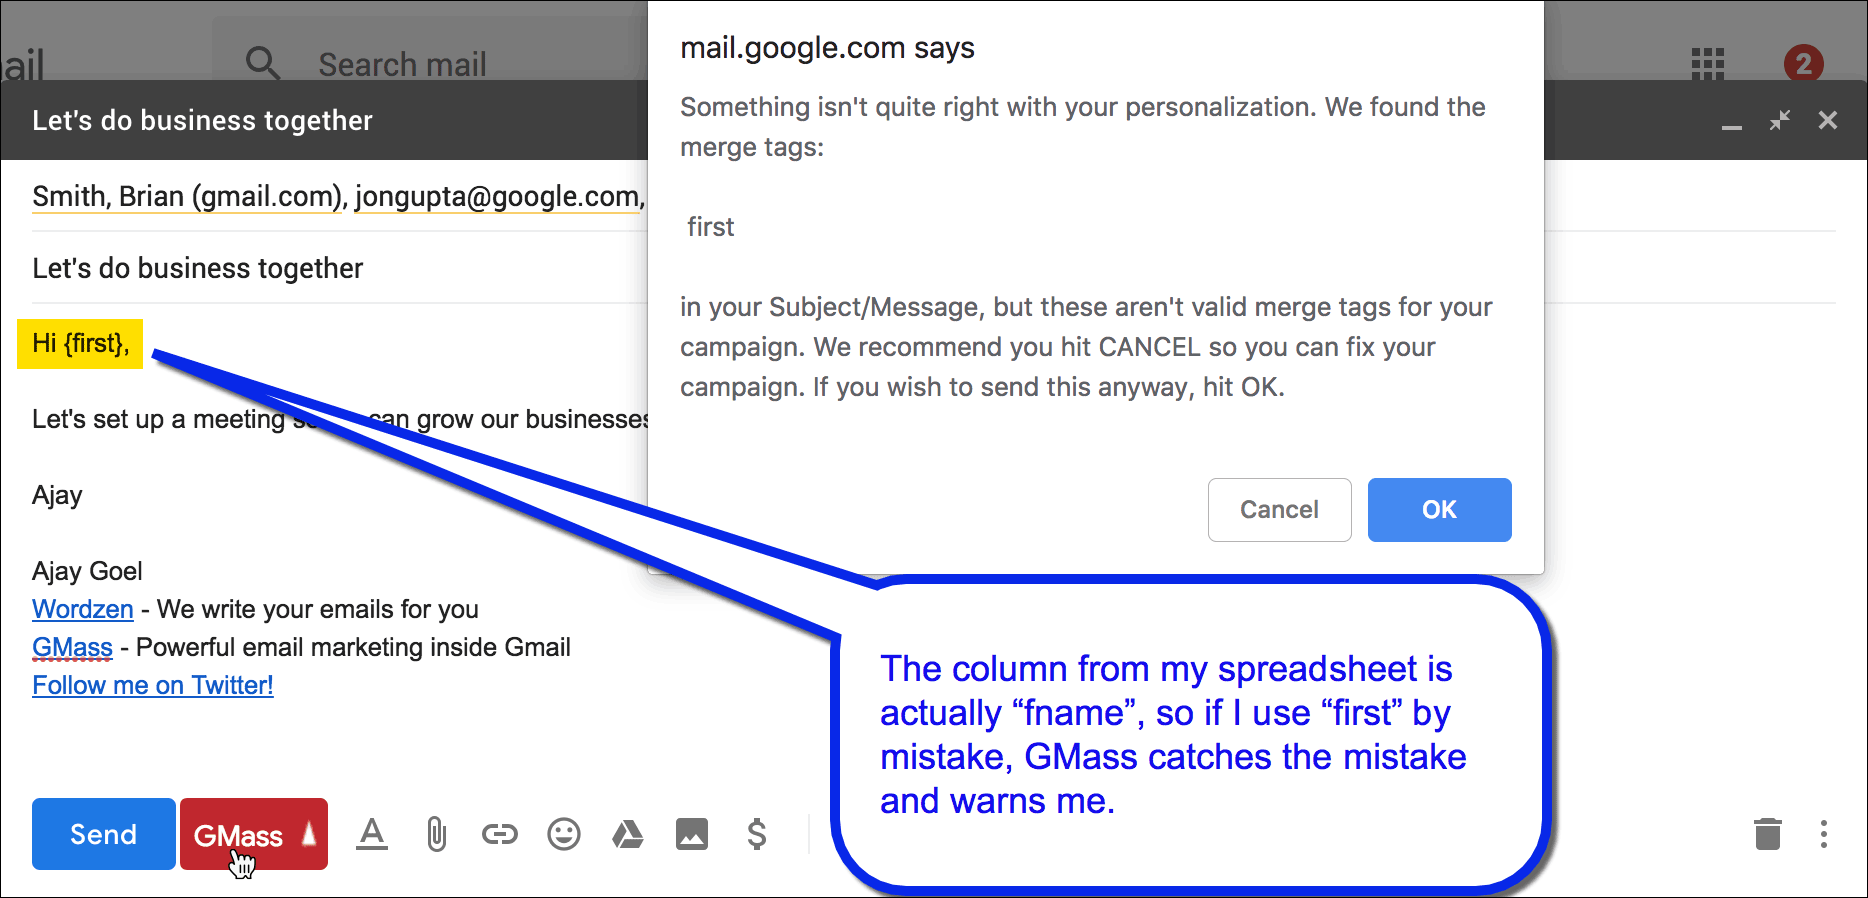
I now hit the GMass button. A warning popup appears telling me that I have a merge tag that doesn’t quite belong, and now I have the choice of continuing or not.

What would cause you to accidentally use the wrong merge tag in the first place?

  1. Maybe you are sending to a new spreadsheet, but you selected an old template from the Load Content dropdown that had different merge tags.
  2. While we recommend that you use the one-click merge tag buttons in the GMass Settings box, you might decide to type them manually.
  3. The one-click merge tag buttons don’t work in the Subject line, but you can manually copy/paste or type them into the Subject line.

Other ways to prevent personalization failures

  1. The easiest way to prevent an embarrassing personalization mistake is to use fallback values. In the case above, if the first line of my email said:
    Hi {first|stranger},

    Then even if “first” isn’t a valid merge tag, and if I hit OK to the warning causing my email to send, the emails would start “Hi stranger,” instead of “Hi ,”.

  2. If you want to be absolutely certain that your emails will look how you intend, you can always choose to Just create drafts, which will create all of your emails as Drafts first, so that you can review them, and then send them with one click when you’re ready.
  3. You should always send a test email to yourself before sending your actual campaign.

Resources

See our complete guide to mail merge personalization and the list of top reasons why personalization fails.

Ready to transform Gmail into an email marketing/cold email/mail merge tool?


Only GMass packs every email app into one tool — and brings it all into Gmail for you. Better emails. Tons of power. Easy to use.


TRY GMASS FOR FREE

Download Chrome extension - 30 second install!
No credit card required
Love what you're reading? Get the latest email strategy and tips & stay in touch.


Today we are launching a project we’ve been working hard on for several months: The Domain Deliverability Statistics tool.

Send and Open Rates

Using this tool you can see the domains we’ve delivered the most email too over the course of GMass’s life, and their open rates. You can search for any domain and see sends, open rates, and bounce rates across any time range.

Want to know how well or how poorly we’re delivering to gmail.com? Just go to the gmail.com domain page. Still have some old-timers on your list using aol.com addresses? Make sure we’re delivering to aol.com.

This is a free, public utility that is updated daily with new data.

Just for the fun of it, let’s look at GMass’s lifetime delivery to gmail.com, as of today.

Email deliverability to gmail.com

gmail.com is the most popular email receiving domain in the world, so this chart shows not only our stellar open rates to gmail.com, but also the growth of GMass’s sending volume over time.

SMTP Bounce Codes

In addition to send rates and open rates, the tool also shows SMTP bounce codes generated by the email server for each domain. Again, just for the fun of it, let’s examine the bounce code data for gmail.com.

Bounce codes for gmail.com

Now what this screenshot doesn’t show is that we actually organize bounce codes into two categories: Bounces and Blocks. Technically, “bounces” and “blocks” are the same thing, from an SMTP perspective. They are codes returned by the remote SMTP server indicating that the delivery of the email was unsuccessful. We took a human approach to separating out “bounces” and “blocks”, categorizing it as a true “bounce” if the email address is invalid and categorizing it as a true “block” if the remote server rejected an email for spamminess.

If you were to look at the actual gmail.com delivery page, you’ll notice that the top reason for a block to gmail.com is the dreaded 69585 block code, which is expected, but necessitates an explanation. The 69585 code is returned by Google to a sender before the email reaches its destination. It indicates that Google has prevented the email from leaving its network and reaching its destination because Google has deemed it spammy even before the recipient’s server has deemed it spammy. This can also happen where both the sender and the receiver are within the G Suite email ecosystem.

Ready to send better emails and save a ton of time?


GMass is the only tool for marketing emails, cold emails, and mail merge — all inside Gmail. Tons of power but easy to learn and use.


TRY GMASS FOR FREE

Download Chrome extension - 30 second install!
No credit card required
Love what you're reading? Get the latest email strategy and tips & stay in touch.


Here’s an SEO win that I never thought I’d experience. For a particular Gmail search term, we now outrank Google, on Google.

One of my articles about a Gmail bounce code outranks Google’s own page on that same bounce code.

If you’ve sent any sizable email marketing campaigns from your Gmail account, you’ve likely encountered the dreaded 69585 bounce. It looks like this:

The code “69585” is unique to Gmail and is not a standard SMTP code. A while back I wrote a detailed explanation of what this bounce means and how to handle it. And now, if you Google “69585” or some derivative of that search phrase, look what happens:

Can you believe GMass is #1 and Google is #3?

Amazing! The GMass article is #1, and the official Google article is #3, with a support forum article sneaking its way into the #2 spot. If there was ever any suspicion as to whether Google favored itself, you can let that suspicion go.

Now, about Facebook listening to us through our phones and targeting ads to us that way…

Ready to transform Gmail into an email marketing/cold email/mail merge tool?


Only GMass packs every email app into one tool — and brings it all into Gmail for you. Better emails. Tons of power. Easy to use.


TRY GMASS FOR FREE

Download Chrome extension - 30 second install!
No credit card required
Love what you're reading? Get the latest email strategy and tips & stay in touch.


If you’re the developer of a Chrome extension, after a user installs your extension from the Chrome Web Store, you may want to redirect the user to a particular website. For example, if you make a Gmail extension, you may want to redirect the user to Gmail immediately after they install the extension so they can begin using it.

Why is this necessary?

Recently, Google disabled inline installations of Chrome extensions. When inline installation was allowed, developers of Chrome extensions like myself had more control over what happens when a user installed an extension from our website. From the GMass website, you could install the Chrome extension without going to the Chrome Web Store, and then right after installation, I could redirect the user to gmail.com. It was an easy, seamlessess experience.

Now, however, since inline installation has been deprecated, some creativity is required to create that same seamless experience. Now, all Chrome extensions have to be installed from the Chrome Web Store, and by default, when the extension is installed, nothing happens. The user remains on the Chrome Web Store. The user isn’t taken to the website that the extension applies to, in my case, Gmail, automatically.

The developer has a couple of choices of how to redirect the user to the desired website, and in this article, I’ll discuss those options.

The super simple option to load Gmail after an extension install

If you’re developing a Chrome extension for Gmail, after the user installs the extension from the Chrome Web Store, you probably want the redirect the user to gmail.com. The easiest way to do this is to use the chrome.runtime.oninstall event in a background.js file, and this is also how I do it for GMass.

Designate a background script in your manifest.json file, and this code will do the trick:

chrome.runtime.onInstalled.addListener(function() {
  alert('You just made the best decision of today, by installing GMass!\n\nWe will now redirect you to your Gmail account so you can get started sending email campaigns inside Gmail.');

  chrome.tabs.create({
    url: 'https://mail.google.com',
    active: true
  });

  return false;
});

You can even throw in that JavaScript alert, but that could also get annoying, so consider carefully before you do that.

Notice that I’m using the chrome.tabs API to create a new tab which will load Gmail and now the be the focused tab in the browser. I could have also used:

window.open("https://mail.google.com");

…but doing so has a couple of disadvantages:

  1. window.open could be stopped by a popup blocker
  2. Depending on a user’s individual browser settings, this may open up a new window rather than a new tab in the existing window, which wouldn’t be as nice of a user experience

Note that you don’t need to add any additional “permissions” to your manifest to do this. I’m always wary of adding “permissions” because doing so forces a new warning message to pop up when a user’s browser updates your extension with the latest version.

A smarter option that detects what tabs are already open

The super simple option works for most cases, but if you want to give your users a really slick experience, it has a couple of flaws:

  1. If the user already has Gmail opened in a browser tab, it might annoy the user to now open up a second tab with Gmail in it. And you want happy users, not annoyed users.
  2. Many people have multiple Gmail accounts and are logged into them at the same time. Gmail “numbers” the logged-in Gmail accounts and creates URLs to those accounts in the format of https://mail.google.com/mail/u/0, https://mail.google.com/mail/u/1 and so on and so forth. If a user has an existing tab open to https://mail.google.com/u/1, and that’s the account he wishes to use with your extension, the super simple method will launch https://mail.google.com which will always redirect to https://mail.google.com/u/0, so now the user is on a different Gmail account than the one on which they want to use your extension.

It would be ideal to be able to detect if the user already has a Gmail browser tab open, and reload just that tab and bring the focus to it, or, if the user does not already have a Gmail browser tab open, then open one for them, and just assume it’s the 0-numbered user they want to open. Of course the user can obviously navigate to any Gmail account he wishes.

Note that regardless of how the webpage is reloaded, reloading is necessary after the installation of a Chrome extension in order for it to run and appear as part of that webpage, whether it’s for Gmail or something else.

One of my least favorite Chrome extensions is Mixmax. Perhaps I’ll dive into why I dislike it so much in a future article, but I do bestow praise upon their developer for doing something smart. He wrote a routine in background.js that detects if any Gmail tabs are already open, and if so, the focus is brought to that tab, and the tab is reloaded. If not, a new tab is opened. This kind of seamless experience, however, comes at a cost.

chrome.runtime.onInstalled.addListener(function(details) {
  if ((details.reason === 'install') || (details.reason === 'update')) 
  { 
    refreshBrowser('gmail-inbox', true); 
  } 
}); 

function refreshBrowser(target, bringToForeground) {
  if (target !== 'gmail-inbox') return; 
  chrome.windows.getAll({ populate: true }, function(windows) 
  { 
    var foundExisting = false; 
    windows.forEach(function(win) 
    {
      win.tabs.forEach(function(tab) 
      { 
        // Ignore tabs not matching the target. 
        if (target === 'gmail-inbox') { 
          if (!/https:\/\/(mail|inbox)\.google\.com/.test(tab.url)) return; 
        } 
        else 
        { 
          return; // Unknown target. 
        } 
        // Reload the matching tab.  
        chrome.tabs.reload(tab.id); // If this is the first one found, activate it. 
        if (bringToForeground && !foundExisting) 
        {
          chrome.tabs.update(tab.id, { active: true }); } 
          foundExisting = true; 
        }); 
      }); 
      // If no gmail tab found, just open a new one. 
      if (bringToForeground && !foundExisting) 
      { 
        chrome.tabs.create({ url: (target === 'gmail-inbox') ? 'https://mail.google.com' : 'https://www.mixmax.com', active: true 
      });
    } 
  });
}

Analyzing the code

Looking at the code, it loops through each tab in the window checking if its URL is either mail.google.com or inbox.google.com. If so, then that tab is reloaded. If no tab is found with Gmail, then a tab is created and its focus is set.

What is the cost that it comes with? You must add the “tabs” permission to your manifest.json, and doing so triggers a warning that will scare off some users:

Ouch. In today’s age of privacy and security, that warning is enough to scare off most would-be new users. And in fact, that could be why their user installs have been dropping, according to Chrome Compete. Technically if you only had the “tabs” permission declared in manifest.json, the warning would say: “Read your browsing history”, but in the case of Mixmax, they request a bunch of other permissions as well, and “Read and change all your data…” supersedes the “Read your browsing history” statement so that warning is used instead.

The reason you have to add the “tabs” permission to manifest.json to begin with in this scenario but not the super simple scenario I’m using with GMass above is that is explained by Google:

The majority of the chrome.tabs API can be used without declaring any permission. However, the "tabs"permission is required in order to populate the urltitle, and favIconUrl properties of Tab.

Meaning, if you want to read the URL of the tab, in order to detect that the user is already on a certain webpage, as the Mixmax example does, then you need to request the “tabs” permission. But if you just want to create a tab, as I do in the super simple example, then you don’t need the “tabs” permission.

To compare this is the warning you get when you install the GMass Chrome extension:

See the difference? Hopefully this warning is a lot less scarier than the prior one.

One day I hope GMass ranks among the most popular Chrome extensions for Gmail, but for now, I have the utmost respect for the currently most popular Gmail Chrome extensions, including StreakBoomerang, Yesware, Gmelius, and Sortd. I often examine how these other Chrome extensions handle an issue when I’m trying to solve an issue of my own. In researching these other extensions for this article, I was curious how each of them handles the post-install experience for the user. Here are the results:

  1. Boomerang: Creates a new tab that loads up a “welcome” page on their website, boomeranggmail.com, which then quickly redirects to gmail.com.
  2. Yesware: doesn’t redirect the user at all after install
  3. Gmelius: launches a new tab that loads gmail.com, regardless of what other tabs are open
  4. Sortd: detects what tabs already have Gmail loaded and reloads just those, and therefore requires a stricter warning upon install, similar to Mixmax
  5. Streak: doesn’t redirect the user at all after install

Summary

So to summarize, even though Google has deprecated inline installation for Chrome extensions, you can still control the experience of the user after they install an extension by redirecting them to the website of your choice. How sophisticated you want to get with that redirect, meaning whether you want to launch a new tab regardless of what tabs are already open, or whether you want to detect whether the website is already open, dictates which approach you take and what warnings the user sees when installing.

See why GMass has 300k+ users and 7,500+ 5-star reviews


Email marketing. Cold email. Mail merge. Avoid the spam folder. Easy to learn and use. All inside Gmail.


TRY GMASS FOR FREE

Download Chrome extension - 30 second install!
No credit card required
Love what you're reading? Get the latest email strategy and tips & stay in touch.


GMass