The Four Horsemen of Linux Mail Transfer: Exim, Postfix, Sendmail, and Qmail
Considering how important and popular email is today, it shouldn’t surprise anyone that there are millions of email servers currently operating on the public internet. According to a 2019 survey from securityspace.com (http://www.securityspace.com/s_survey/data/man.201907/mxsurvey.html), there are approximately 1.8 million email servers online!
Given the long history of email (dating back to 1971), and the massive number of email servers online, you’d be right to assume that there are many different email server platforms available. However, according to the securityspace.com survey, three types of email servers account for more than 95% of the global market share:
-
- Exim
- Postfix
- Sendmail
The top three email servers on the internet are Exim (with over 55%), Postfix (over 30%), and Sendmail (about 4%). All three of these email platforms, and Qmail, were originally developed for Unix-Like or Linux based Operating Systems.
Today, with the widespread availability of easy and low-cost cloud-hosted server providers, anyone can setup their own email server. This guide focuses on deploying, configuring, and discussing best practices and security concerns for Exim, Postfix, Sendmail, and Qmail.
Exim – Overview + Pros & Cons
Exim is an MTA (Mail Transfer Agent) for Unix-like operating systems first written in 1995 by Philip Hazel. Exim is licensed under the GPLv2 license. Exim is used extensively all around the world. According to the study noted earlier (http://www.securityspace.com/s_survey/data/man.201907/mxsurvey.html), as of 2019 Exim accounted for approximately 57% of all online public email servers on the internet. Exim4 is currently the default MTA on all Debian-based GNU/Linux systems, including Ubuntu.
Exim – Pros
- Default MTA on Debian-based Linux distributions
- Easy install, basic install is guided via user interface
- Popular and well documented
- Plenty of community support
- Secure
Exim – Cons
- Arguably more difficult to maintain/administer post-deployment than Postfix
Postfix – Overview + Pros & Cons
Postfix is an MTA (mail transfer agent) for Unix-like operating systems developed by Wietse Venema in partnership with IBM in 1997. Postfix is licensed under the IBM Public License. As of 2019, Postfix is still under active development by its creator and a team of contributors. According to the following study (http://www.securityspace.com/s_survey/data/man.201907/mxsurvey.html),as of 2019 Postfix accounted for approximately 34% of all online public email servers on the internet.
Postfix – Pros
- Easy to configure and use
- Elegant (author’s opinion)
- Popular and well documented
- Plenty of community support
- Secure
Postfix – Cons
Sendmail – Overview + Pros & Cons
Sendmail is an MTA (mail transfer agent) for Unix-like operating systems first released in 1983. Sendmail is a descendant of the original ARPANET delivermail program written by Eric Allman. Allman developed Sendmail as a replacement for delivermail for BSD systems, starting with BSD version 4.1c in 1983. Sendmail is licensed under the Sendmail license. At one point (1996), Sendmail accounted for approximately 80% of all public email servers available on the internet. According to the Security Space study (http://www.securityspace.com/s_survey/data/man.201907/mxsurvey.html), in 2019 Sendmail accounted for approximately 4% of all online public email servers on the internet. Sendmail was acquired by Proofpoint in 2013.
Sendmail – Pros
- Native Windows port available
Sendmail – Cons
- Not as easy to configure as Exim or Postfix
- Not as efficient with resources
Qmail – Overview + Pros & Cons
Qmail is an MTA (mail transfer agent) for Unix-like operating systems first developed in 1995 by Daniel J. Bernstein. At its release, Qmail was touted as a more secure replacement for Sendmail. Qmail’s source code was released to the public domain by its author. According to the Security Space study (http://www.securityspace.com/s_survey/data/man.201907/mxsurvey.html), in 2019 Qmail accounted for approximately 0.07% of all online public email servers on the internet.
Qmail – Pros
- Secure
- Low resource requirements
Qmail – Cons
- Unmaintained
- Most complicated of the four to install
- Config file structure and general operation is less elegant than Postfix or Exim
- Not as popular as the others (less than 1% market share)
- No Windows port
Installation and Configuration Procedure – Environment Setup Notes
Unless otherwise specified, the following environment is used for all installation and configuration procedures to follow:
- Ubuntu Server 18.04.3 LTS
- Kernel Version: 4.15.0-1045-aws
- Running on an entry-level Amazon Lightsail instance (at the time of this writing, $3.50/mo)
- 512 MB RAM
- 1 vCPU
- 20GB SSD
- 1 TB Bandwidth
These procedures assume you are starting with a fresh installation of Ubuntu.
As always, don’t forget to start by fully updating Ubuntu:
sudo apt-get update && sudo apt-get dist-upgrade
Also, we will need to allow TCP port 25 (the default SMTP port) through the firewall. In our Amazon Lightsail environment, that looks like this:

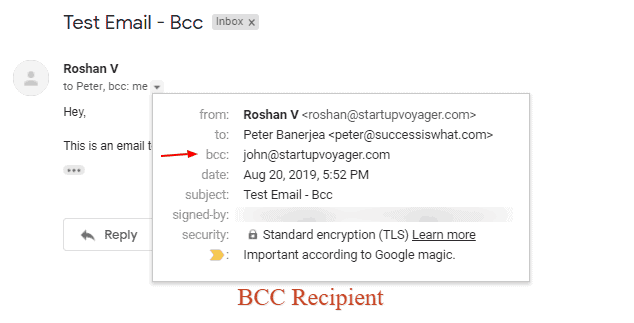
How to Use Mutt Email Client to Send a Test Email
Mutt is a lightweight, CLI-only email client. It is very useful for testing and as a lightweight general purpose email client.
To install Mutt:
sudo apt-get install mutt

We’re not going to go into a full configuration of Mutt. To manually launch Mutt and tell it to use our Maildir, run this:
mutt -f ~/Maildir
Mutt will ask you if you want to create /home/ubuntu/Mail (we don’t) so just press n
Once Mutt starts, it will look like this:

To send a test email with Mutt, do the following:
- To start the mail, press m
- Enter the email address to which you want to send a test email
- Enter the subject of the test email
- You will then enter Nano text editor to write the body of your message. Write whatever you want.
- When finished writing your test message, press ctrl + x
- Then press y
- Then press enter
If it has been done correctly, you should see something like this:

Finally, press y to send the email, and you should see “mail sent.”
Now, let’s go check our email to see if the message was delivered. Since this is a brand new email server with no DNS configuration or SPF, DKIM or DMARC, our test message will most likely be flagged as spam (if it gets delivered at all). For our tests, we used a Gmail account, and we were able to find our message in the spam folder:

Our email was delivered! This means our email server is correctly sending outbound mail.
Basic Install & Config Procedure for Exim
Exim – Intro & Unique Considerations
Exim version 4 is the default MTA for Debian-based Linux distributions, including Ubuntu 18. Therefore, installing Exim4 on Ubuntu is very straightforward.
Exim – Common config files
/etc/exim4/update-exim4.conf.conf – This is the config file where all settings configured via the configuration user interface are stored. You can either edit this file directly, or re-run sudo dpkg-reconfigure exim4-config
/var/lib/exim4/config.autogenerated – This is the master configuration file that is generated automatically every time you run sudo update-exim4.conf
This file should NOT be edited manually.
Exim – Useful commands
To start the Exim4 daemon:
sudo systemctl start exim4.service
To stop the Exim4 daemon:
sudo systemctl stop exim4.service
To restart the Exim4 daemon:
sudo systemctl restart exim4.service
To generate main Exim4 config files:
sudo update-exim4.conf
Run the configuration user interface for Exim4:
sudo dpkg-reconfigure exim4-config
Exim – Procedure
First, see what Exim4 package is available in the default repositories:
sudo apt-cache policy exim4
(At the time of this writing, Exim version 4.90-1 is available in the default repositories.)

To install Exim4, run the following:
sudo apt-get install exim4

To configure Exim4, run the following, which will display a user interface for configuring many Exim parameters:
sudo dpkg-reconfigure exim4-config
You should see the following screen, allowing you to choose the type of mail server configuration you want. For this example, we will be configuring Exim as an “internet site” or an email server that sends and receives email directly over the internet via SMTP.

The next screen will prompt you to enter the “mail name” of the server. This should be the domain name where you want to receive email. We will use the name “sjno.net.”

The next screen asks us to define on which IP addresses we want to listen for incoming SMTP connections. Since we want this server to be publicly available to the internet, we will set this to blank.

The next screen asks us to define our “local domains.” Local domains are domains for which this email server should be considered the final destination. We will use the domain “sjno.net.”

The next screen asks us to define our “relay domains.” Relay domains are non-local domains. In our case, this is everything other than “sjno.net.”For now, we will leave this as the default value (blank).

The next screen asks us to define IP addresses for which this system will unconditionally relay email messages. This is useful if we are setting up this email server to be a dedicated “Mail Relay” or “Smarthost.” For now, we will leave this as the default value (blank).

The next screen configures DNS lookup settings. For now, we will leave this as the default value (No).

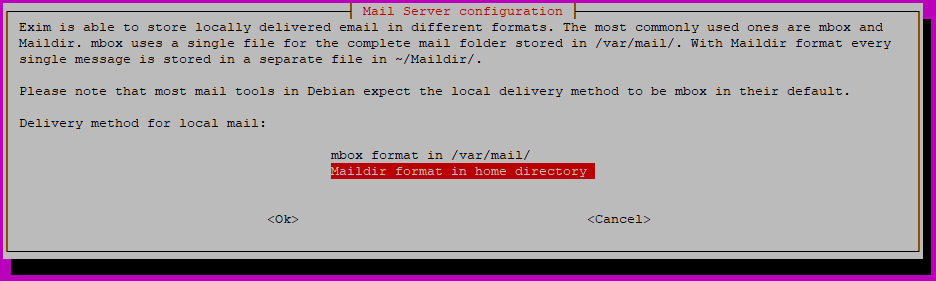
The next screen asks us our preference between two common local mail formats. These two formats are called “mbox” and “maildir.” This choice is mostly user preference. We prefer Maildir, so that is what we will select here.
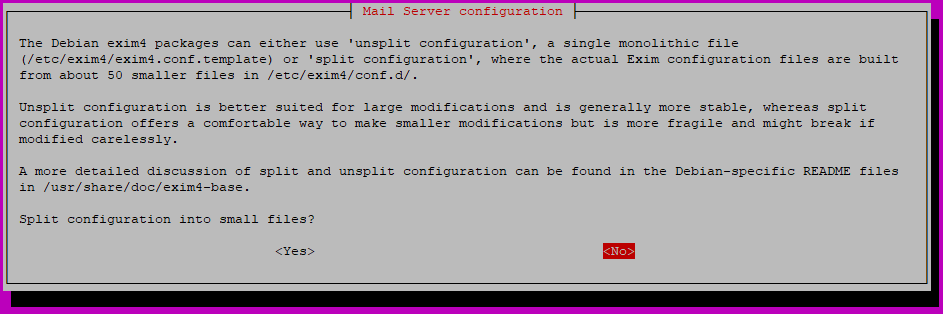
The next screen asks us whether or not we want to split Exim4’s configuration into smaller files, as opposed to the default “monolithic” configuration. There are pros and cons to each. For this example, we are going to choose not to split the config files (No).
The next screen asks us where mail addressed to postmaster@ and root@ should be delivered. If we leave this blank, mail for those recipients will be saved in /var/mail/mail (not recommended). We will enter the username of our default user, which is “ubuntu.”

Exim – Testing Initial Installation
We now have a basic installation of Exim! Let’s make sure it started and is running OK.
Run this:
ps aux | grep exim4
If Exim is running, the above command should output something similar to this (we can see that there is a running process /usr/sbin/exim4):

Next, run this:
sudo service exim4 status
If Exim was started successfully, the command above should output something similar to this (we can see that the active status shows “active (running)” ):

Next, run this:
netstat -aln | grep 25
We should see that our server is listening on port 25:

Also, we should now be able to use a free web-based tool to verify that our server is up and listening to the world. We like to use the “Test Email Server” tool from mxtoolbox.com’s SuperTool (https://mxtoolbox.com/SuperTool.aspx#).
If we point the “Test Email Server” test to the public IP address of our Amazon Lightsail instance, we should see something like this:

To send a test email using the Mutt email client, refer to the section: How to Use Mutt Email Client to Send a Test Email
These tests prove that our basic Exim email server is up, listening, and can send mail. You may be thinking “but that’s just an IP Address! What about DNS?” Continue on to the DNS Setup for Mail Server section for steps on configuring the basic DNS-related settings.
Exim – Troubleshooting
Server doesn’t appear to be listening or responding from the outside?
Don’t forget to open port 25 on your firewall. (See instructions for AWS in the environment notes section.)
Basic Install & Config Procedure for Postfix
Postfix – Intro / Unique Considerations
Postfix is available in the default Ubuntu repositories, therefore installing Postfix is rather straightforward.
Postfix – Common config files
/etc/aliases
/etc/postfix/main.cf
/etc/postfix/master.cf
Postfix – Useful commands
To start Postfix:
sudo postfix start
To stop Postfix:
sudo postfix stop
To restart Postfix:
sudo postfix restart
After modifying main.cf, be sure to run:
service postfix reload
To modify Postfix config programmatically:
sudo postconf
To see how to use Postconf:
man postconf
Postfix – Procedure
First, let’s see what Postfix package is available in the default repositories:
sudo apt-cache policy postfix
(At the time of this writing, Postfix version 3.3.0 is available in the default repositories.)

To install Postfix, run the following:
sudo apt-get install postfix
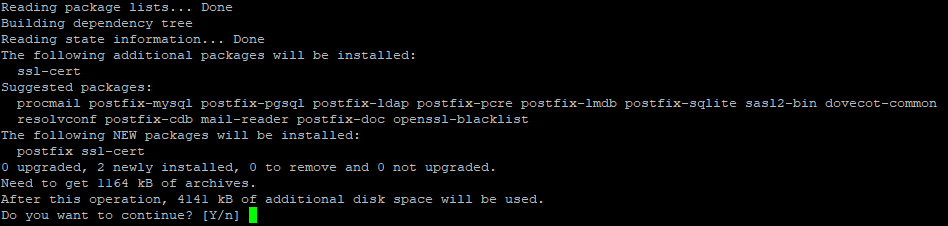
You should immediately be greeted by Postfix’s configuration user interface.
You should see the following screen, allowing you to choose the type of mail server configuration you want. For this example, we will be configuring Postfix as an “internet site” or an email server that sends and receives email directly over the internet via SMTP.

The next screen will prompt you to enter the “mail name” of the server. This should be the domain name where you want to receive email. We will use the name “sjno.net.”

Immediately after hitting enter on this screen, the Postfix configuration user interface will close and Postfix will start scrolling through some automated configuration and startup output. Be sure to read this output for useful tips on performing additional Postfix configuration.
By default, Postfix uses Mbox mail format. We prefer Maildir. First, let’s manually create the Maildir directory structure for our Ubuntu user:
mkdir -p /home/ubuntu/Maildir/{cur,new,tmp}
Then configure Postfix to use Maildir:
sudo postconf -e mailbox_command=
sudo postconf -e home_mailbox=Maildir/
Then, tell Postfix to reload its config:
sudo postfix reload
Postfix – Testing Initial Installation
We now have a basic installation of Postfix! Let’s make sure it started and is running OK.
ps aux | grep postfix
If Postfix is running, the above command should output something similar to this (we can see that there are several Postfix processes running):

sudo service postfix status
If Postfix started successfully, the command above should output something similar to this (we can see that the active status shows “active (exited)”):

netstat -aln | grep 25
You should see that your server is listening on port 25:

Also, Postfix has its own status command:
sudo postfix status

We should now also be able to use a free web-based tool to verify that our server is up and listening to the world. We like to use the “Test Email Server” tool from mxtoolbox.com’s SuperTool (https://mxtoolbox.com/SuperTool.aspx#).
If we point the “Test Email Server” tool to the public IP address of our Amazon Lightsail instance, we should see something like this:

To send a test email using the Mutt email client, refer to the section How to Use Mutt Email Client to Send a Test Email
These tests prove that our basic Postfix email server is up, listening, and can send mail! You may be thinking “but that’s just an IP Address. What about DNS?” Continue on to the DNS Setup for Mail Server section for steps on configuring the basic DNS-related settings.
Postfix – Troubleshooting
Server doesn’t appear to be listening or responding from the outside?
Don’t forget to open port 25 on your firewall. (See instructions for AWS in the environment notes section.)
Basic Install & Config Procedure for Sendmail
Sendmail – Intro / Unique Considerations
Sendmail is available in the default Ubuntu repositories, therefore installing Sendmail is fairly straightforward, though not as simple as Exim or Postfix.
Sendmail – Common config files
/etc/aliases
/etc/hosts
/etc/mail/sendmail.mc
Sendmail – Useful commands
To start Sendmail:
sudo service sendmail start
To stop Sendmail:
sudo service sendmail stop
To restart Sendmail:
sudo service sendmail restart
To run the Sendmail setup user interface:
sudo sendmailconfig
Run this command whenever you update the /etc/aliases file:
sudo newaliases
Sendmail – Procedure
First, let’s see what Sendmail package is available in the default repositories:
sudo apt-cache policy sendmail
(At the time of this writing, Sendmail version 8.15.2 is available in the default repositories.)

To install Sendmail, run the following:
sudo apt-get install sendmail

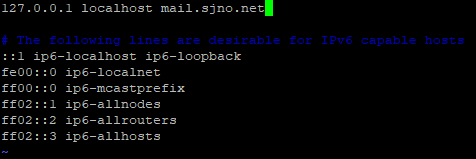
After install completes, we need to make a modification to our /etc/hosts file.
sudo vim /etc/hosts
We need to modify the first line that starts with “127.0.0.1 localhost” to include the FQDN (fully qualified domain name) or our mail server. For our example, we will use “mail.sjno.net”:
Save the /etc/hosts file, then run the following command and answer “Y” to every prompt:
sudo sendmailconfig
When it’s finished, you should see something like this (note: the first part of the output is omitted):

By default, Sendmail only listens on the local loopback interface (127.0.0.1). To tell Sendmail to listen on all interfaces, we need to modify etc/mail/sendmail.mc:
sudo vim /etc/mail/sendmail.mc
Find the line that looks like “DAEMON_OPTIONS(`Family=inet, Name=MTA-v4, Port=smtp, Addr=127.0.0.1′)dnl” and comment it out by adding “dnl #” to the start of the line.
Create a new line directly below that looks like “DAEMON_OPTIONS(`Family=inet, Name=MTA-v4, Port=smtp’)dnl”
Refer to the screenshot:

Then, restart Sendmail:
sudo service sendmail restart
Sendmail – Testing Initial Installation
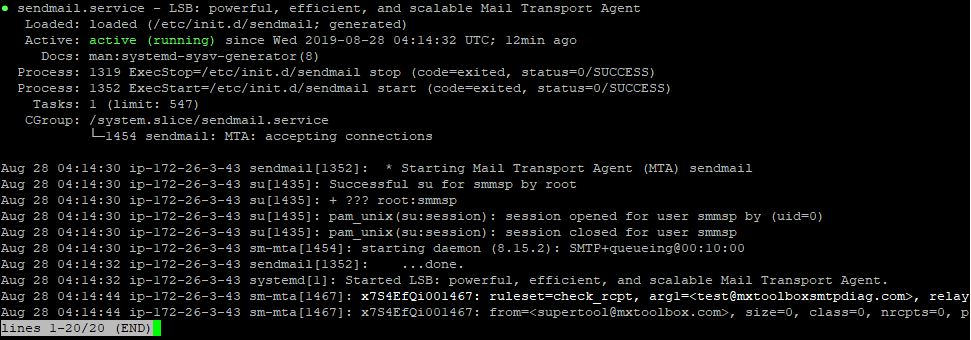
We now have a basic installation of Sendmail! Let’s make sure it started and is running OK.
ps aux | grep sendmail
If Sendmail is running, the command above should output something similar to this (we can see that there is a running process “sendmail: MTA: accepting connections”):

sudo service sendmail status
If Sendmail was started successfully, the command above should output something similar to this (we can see that the active status shows “active (running)”):
netstat -aln | grep 25
We should see that our server is listening on port 25:

Also, we should now be able to use a free web-based tool to verify that our server is up and listening to the world. We like to use the “Test Email Server” tool from mxtoolbox.com’s SuperTool (https://mxtoolbox.com/SuperTool.aspx#).
If we point the “Test Email Server” tool to the public IP address of our Amazon Lightsail instance, we should see something like this:

To send a test email using the Mutt email client, refer to the section How to Use Mutt Email Client to Send a Test Email
These tests prove that our basic Exim email server is up, listening, and can send mail! You may be thinking “but that’s just an IP Address. What about DNS?” Continue on to the DNS Setup for Mail Server section for steps on configuring the basic DNS-related settings.
Sendmail – Troubleshooting
Server doesn’t appear to be listening or responding from the outside?
Don’t forget to open port 25 on your firewall. (See instructions for AWS in the environment notes section.)
Basic Install & Config Procedure for Qmail
Qmail – Intro / Unique Considerations
Qmail is definitely the most complicated and at least intuitive of the four to configure on Ubuntu. Pay attention to the bit regarding daemontools-run below.
Qmail – Common config files
Many files in /etc/qmail
Many files in /var/ib/qmail
Qmail – Useful commands
To start Qmail:
sudo qmailctl restart
To stop Qmail
sudo qmailctl stop
To restart Qmail:
sudo qmailctl restart
To check Qmail status:
sudo qmailctl stat
Qmail – Procedure
First, let’s see what Qmail package is available in the default repositories:
sudo apt-cache policy qmail
(At the time of this writing, Qmail version 1.06 is available in the default repositories.)

At the time of this writing, installing the default Qmail package on Ubuntu 18.04 does not automatically install at least one necessary dependency to make Qmail work. Let’s manually install that package:
sudo apt-get install daemontools-run

To install Qmail, run the following:
sudo apt-get install qmail

Let’s create a Maildir directory for our user:
mkdir -p /home/ubuntu/Maildir/{cur,new,tmp}
Then, copy and paste the following to do some basic Qmail setup. Be sure to replace all instances of “sjno.net” below with your domain.
sudo sh -c "echo 'sjno.net' > /etc/qmail/defaultdomain
echo 'sjno.net' > /etc/qmail/locals
echo 'mail.sjno.net' > /etc/qmail/me
echo 'sjno.net' > /etc/qmail/rcpthosts
echo './Maildir/' > /etc/qmail/defaultdelivery"
Qmail – Testing Initial Installation
Restart Qmail:
sudo qmailctl restart
If Qmail is working properly, you should see output similar to this:

Check Qmail status:
sudo qmailctl stat
If Qmail started properly, you should see output similar to this:

ps aux | grep qmail
If Qmail is running as expected, you will see output similar to this:

netstat -aln | grep 25
This output shows that Qmail is listening on port 25.

Also, we should now be able to use a free web-based tool to verify that our server is up and listening to the world. We like to use the “Test Email Server” tool from mxtoolbox.com’s SuperTool (https://mxtoolbox.com/SuperTool.aspx#).
If we point the “Test Email Server” tool to the public IP address of our Amazon Lightsail instance, we should see something like this:

To send a test email using the Mutt email client, refer to the section How to Use Mutt Email Client to Send a Test Email
These tests prove that our basic Qmail email server is up, listening, and can send mail! You may be thinking “but that’s just an IP Address. What about DNS?” Continue on to the DNS Setup for Mail Server section for steps on configuring the basic DNS-related settings.
Qmail – Troubleshooting
If you see errors like this, make sure you have the “daemontools-run” package installed:
unable to open supervise/ok: file does not exist
Server doesn’t appear to be listening or responding from the outside?
Don’t forget to open port 25 on your firewall. (See instructions for AWS in the environment notes section.)
DNS Setup for Mail Server
Testing our email server by sending outbound emails and running tools against our public IP address is great, but what about DNS?
In order to tell the world how to get to your email server, we need to do some DNS setup. We will also setup SPF at the same time.
Requirements to complete this section:
- You must own a domain name. In this example, we will use the domain sjno.net.
- You must have the domain name configured with DNS servers. This is configured at your registrar (for example, godaddy.com).
- You must have access to make changes / add records on your DNS servers for your domain.
Assuming the three requirements above are met, we can create the necessary DNS records. There are many DNS providers available and all of their user interfaces will look different. Or, you could even be running your own CLI-only Linux DNS server with Bind9. Ignoring the differences between user interfaces, the concepts are the same. This example will show the DNS configuration with free DNS provider freedns.afraid.org.
First, let’s create an A Record for our new mail server. An A Record is the most basic type of DNS record. We are just creating a name for our mail server, and pointing it to the public IP address of our server. We’re going to call our server “mail.sjno.net”:

After saving our A Record and waiting a few minutes, we should be able to ping our mail server by name and see that the DNS is automatically resolving the IP address for us:

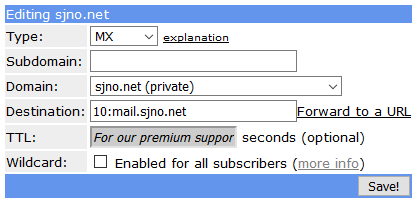
Next, we’re going to create an MX Record. An MX Record tells the world where to send email destined for our domain. We’re going to leave the “subdomain” blank (or @), and point it to the name of the A Record we created in the previous step:
After saving our MX Record and waiting a few minutes, we should be able to use our trusty online tool (https://mxtoolbox.com/SuperTool.aspx) to do an “MX Lookup” for our domain:

Next, we’re going to configure an SPF Record to tell the world that our email server is an allowed and trusted sender for our domain. Even though this is an SPF Record, we’re not going to use the SPF Record type, we’re actually going to use a TXT Record to record our SPF info. There are a few different ways to configure SPF, but we’re going to do it like this:

This is a shorthand way to say “trust the email server we have defined in the MX Record for this domain.” The destination or “content” of your SPF TXT record must be wrapped in quotes. Some user interfaces will automatically add the quotes for you, and others won’t, so watch out for that.
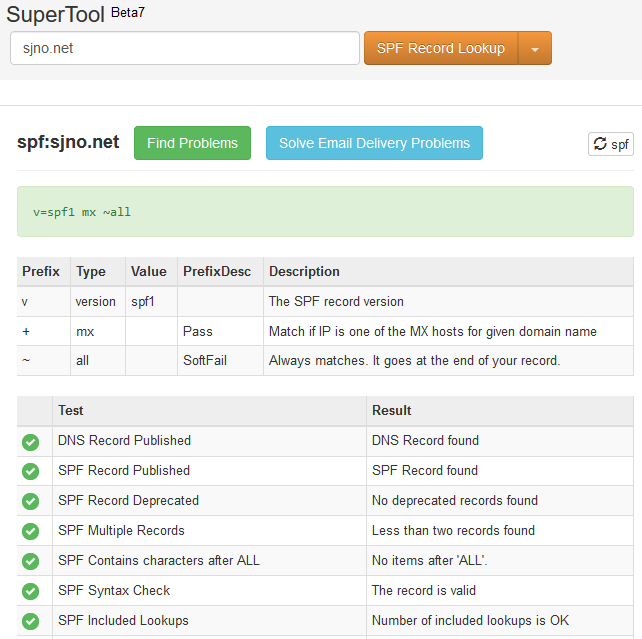
Once again, using our trusty tool (https://mxtoolbox.com/SuperTool.aspx) and this time performing an “SPF Record Lookup,” we should see that our SPF Record has been published successfully for our domain:
What is SMTP?
SMTP or Simple Mail Transfer Protocol is a communication protocol first defined in 1982. SMTP is the main protocol behind what we know as email. SMTP defines how email should be submitted to an email server from an email client, and also how email is sent and received between email servers. SMTP is an application layer protocol which requires that a TCP connection first be established to the email server before SMTP data can be sent across the connection.
Why is SMTP important? How is it used?
SMTP is important because it is the main internet standard behind email. The first email message was sent in 1971. Nearly 50 years later, email has become the single most important communication tool driving the modern world. Global communications today rely on email more than any other method of communication. The impact that email has had on global business is immeasurable.
Glossary of SMTP and Email Terminology
DKIM
DKIM (DomainKeys Identified Mail) is an authentication method used to deter spam and phishing emails. DKIM utilizes cryptographic signatures to prove that an email was sent from a trusted email server and has not been tampered with. DKIM relies on DNS to publish DKIM information for a given email domain, usually via DNS TXT Record.
DMARC
DMARC (Domain-based Message Authentication, Reporting and Conformance) is an authentication method used to deter spam and phishing emails. DMARC complements SPF and DKIM by giving a recipient email server instructions on how to handle emails that do not pass SPF or DKIM for a given domain. DMARC relies on DNS to publish DMARC information for a given email domain, usually via DNS TXT Record.
DNS
DNS (Domain Name System) is arguably the most important protocol on the internet. To use a simple analogy, DNS is like the “phone book” of the internet. The DNS system allows computers to determine the IP Address for a given domain name.
IMAP
IMAP (Internet Message Access Protocol) is a protocol used by email clients to retrieve or download email messages from an email server to an email client. In most cases, IMAP is recommended as a better and more full-featured alternative to POP3.
Mail Relay
Mail Relay is both the service of routing email to another mail server for delivery, and a term for a mail server that provides that service.
MTA
An MTA (message transfer agent) is one component of an overall MHS (message handling system) or email server, that is responsible for transferring and routing email messages to the recipient’s email server.
Mutt
Mutt is a CLI (command line interface) email client that is useful on CLI-only Linux email servers for sending and receiving emails and also for troubleshooting email functionality.
MX Record
An MX record is a specific type of DNS record that defines the email server where emails should be sent for a given domain. For example, if you want to send an email to [email protected], your email client must first determine the email server used by the gmass.co domain. To make that determination, a DNS query will be made for the MX record for the gmass.co domain. Using a web-based MX lookup tool, we can see this information for ourselves. Refer to the screenshot (mx_lookup_1.png or mx_lookup_2.png). (I used MXToolbox.com and dnschecker.org to generate these screenshots.)
POP3
POP3 (Post Office Protocol) is a protocol used by email clients to retrieve or download email messages from an email server to an email client. POP3 is a very basic protocol. In most cases, IMAP is recommended as a better and more full-featured alternative to POP3.
SASL
SASL (Simple Authentication and Security Layer) is a standardized method for adding authentication support to connection-based protocols. SASL decouples authentication from the application, allowing secure authentication to numerous compatible application layer protocols (including SMTP).
SPF
SPF (Sender Policy Framework) is a basic email authentication protocol that is used to deter spam and spoofed email on the internet. SPF utilizes DNS (typically via a DNS TXT Record) to publish trusted email servers for a given domain.
SPF Record
An SPF (Sender Policy Framework) record is a specific type of DNS record that is used to publish trusted email sending servers for a given email domain. SPF records have mostly been deprecated in favor of DNS TXT Records, which can contain the same information and serve the same purpose.
STARTTLS
STARTTLS is a protocol command that is issued by an email client to tell an email server that the client wants to upgrade the current connection to a secure connection utilizing SSL/TLS certificates.
TXT Record
A TXT (or text) Record is a specific type of DNS record used to publish arbitrary text related to a given domain. TXT Records are often used to prove domain ownership. TXT Records are also used to publish SPF, DKIM, and DMARC information related to email service for a domain.
If you’re a web developer and found this post useful, you might also like my technical review of popular SMTP services.
Email marketing, cold email, and mail merge inside Gmail
Send incredible emails & automations and avoid the spam folder — all in one powerful but easy-to-learn tool
TRY GMASS FOR FREE
Download Chrome extension - 30 second install!
No credit card required
Ajay is the founder of GMass and has been developing email sending software for 20 years.
Love what you're reading? Get the latest email strategy and tips & stay in touch.

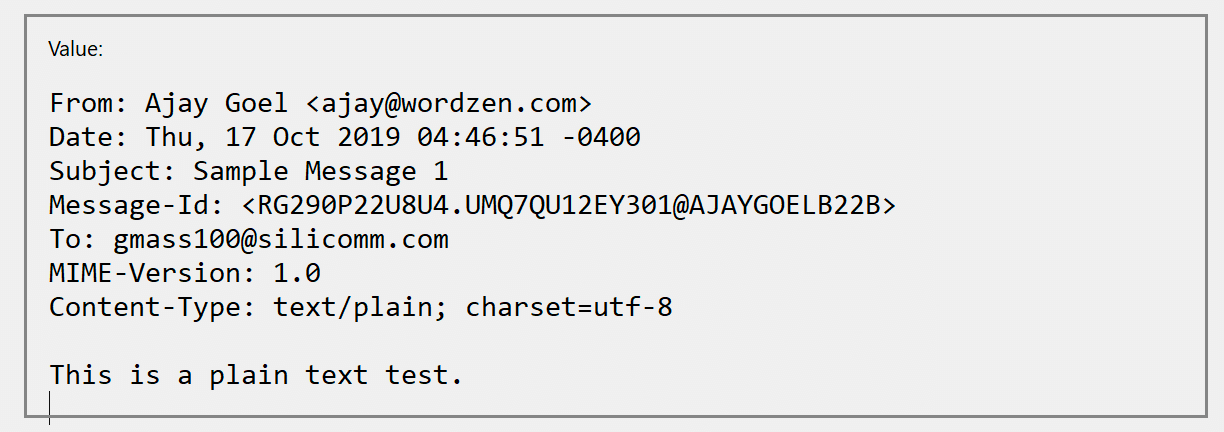 The Base64 encoded version:
 Submission to the Gmail API:
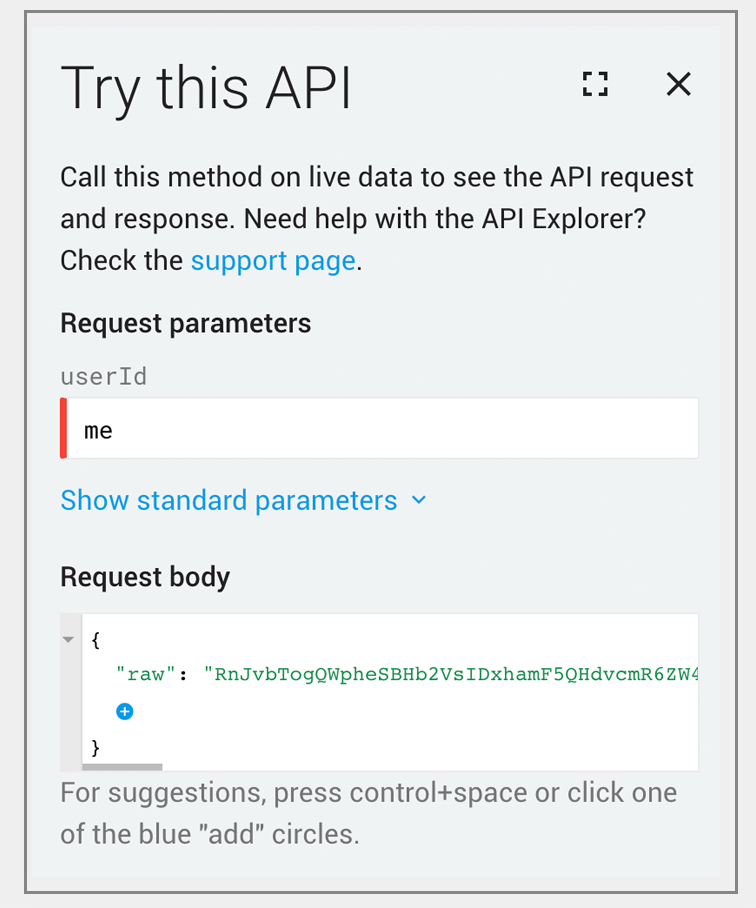 What appears in the “Sent Mail” folder of
 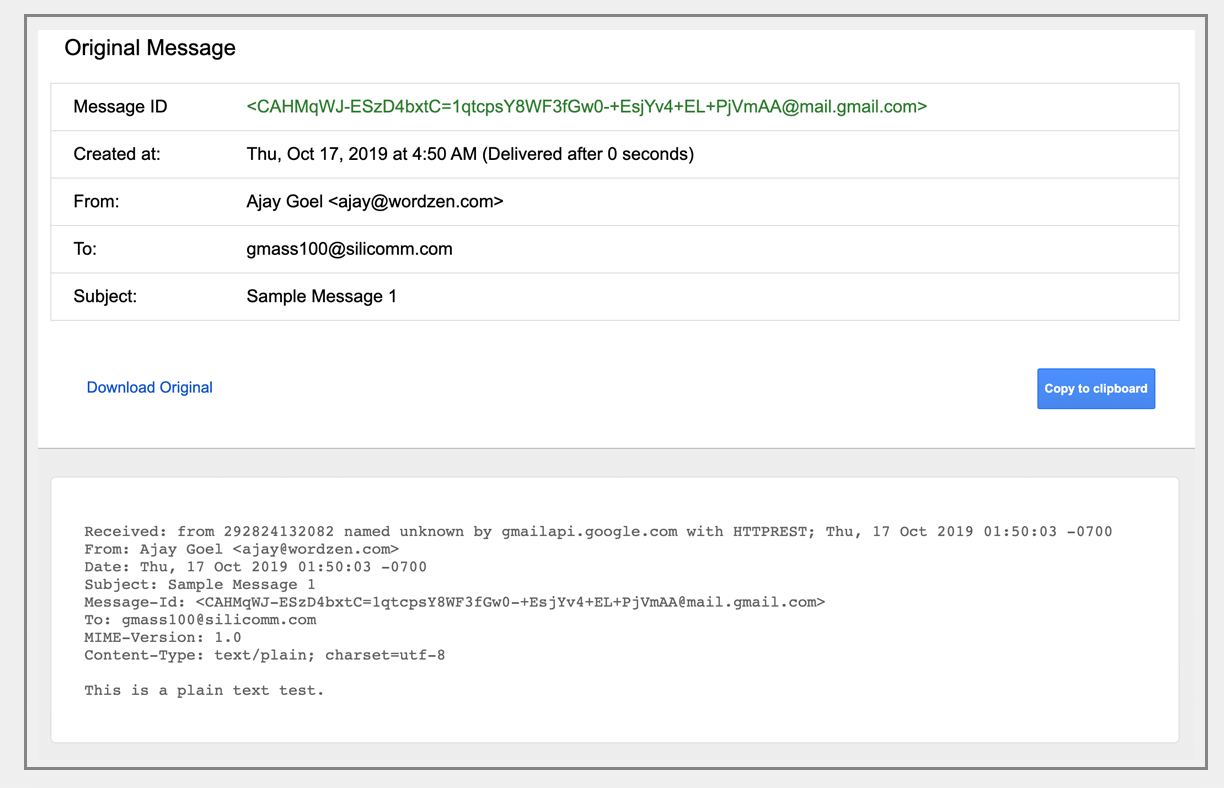 What is received by the server for
 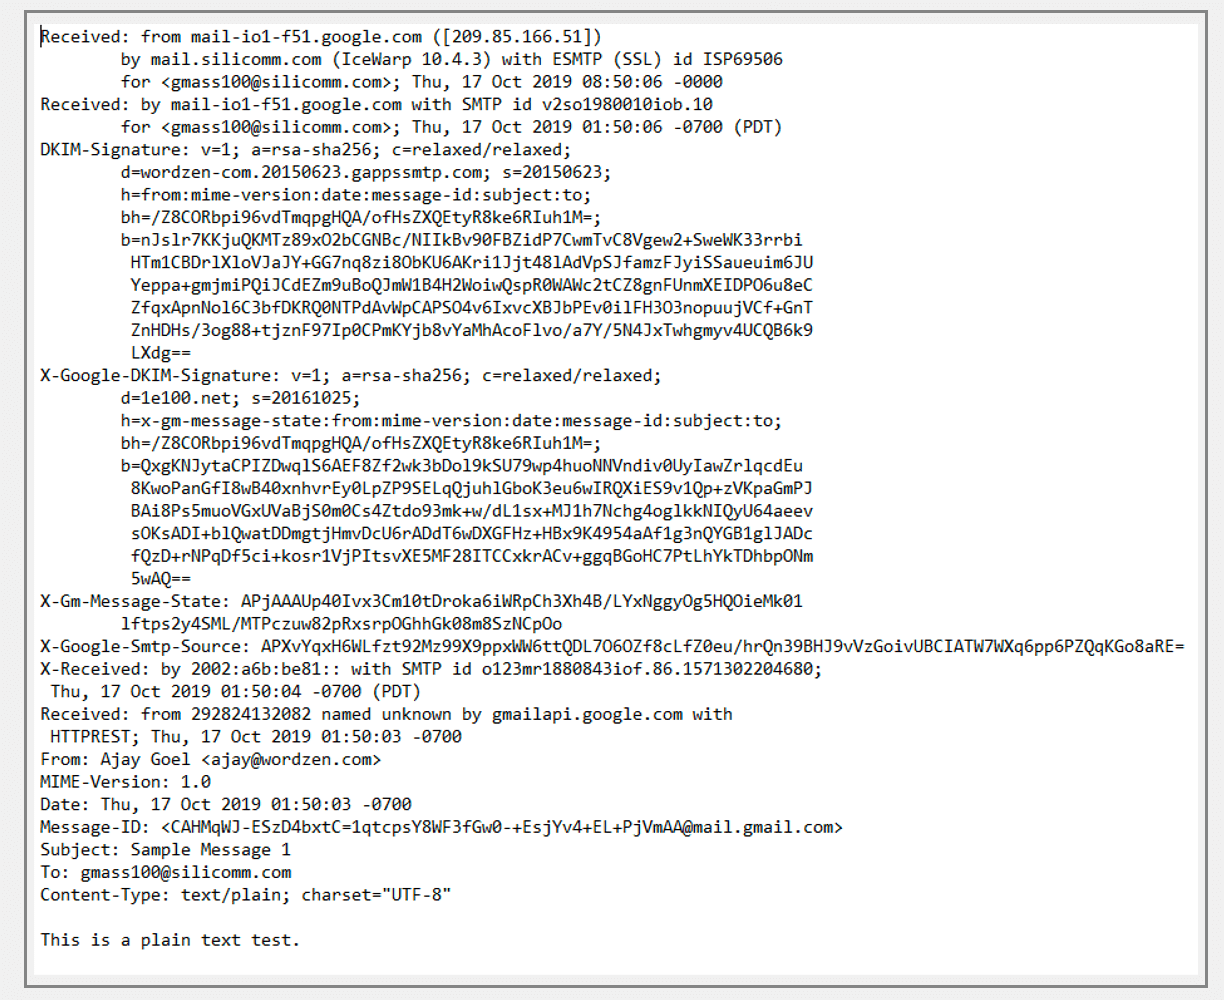 Conclusion: it works as expected!
 The Base64 encoded version:
 Submission to the Gmail API:
 What is received by the server:
 Base64 encoded:
 Submission to the API:

 Conclusion: The Gmail API replaces the plain text part that I’ve set with its own that is converted from the HTML part.