<img height="1" width="1" style="display:none" src="https://www.facebook.com/tr?id=1822615684631785&amp;ev=PageView&amp;noscript=1"/>

It’s 2020, when Google promised to shut off many third-party apps that weren’t verified by December 31, 2019. While I haven’t heard any reports of anyone being shut off yet, having been through Google’s OAuth verification process, and having run some Unverified Apps, I’ve learned the ins and outs of the whole process. All of these insights I’ve concluded on my own, thanks to Google’s insufficient documentation.

1. There’s no hierarchy to the API Scopes, and that’s just ridiculous

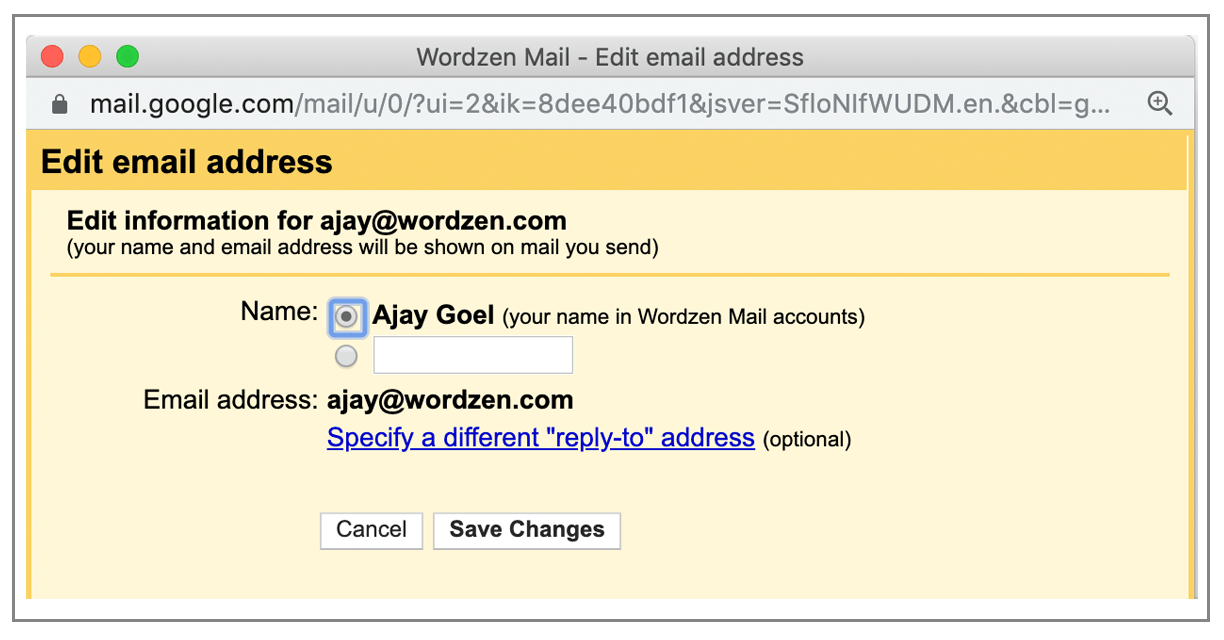
Let’s say you’ve been approved for the almighty https://mail.google.com Gmail API scope, which gives you full access to read, write, and delete data in a user’s Gmail account. Then later, you realize you don’t need this almighty scope — you determine you just need modify-only access to Gmail. You also want the benefit of a less scary warning for your user. You might think that you can just switch your OAuth code to use the less permissive scope, https://www.googleapis.com/auth/gmail.modify, and you’ll be good to go. That makes logical sense, after all.

But you’ll be shocked to learn that you’ve just re-entered “Unverified App” territory.


That’s right. Internally, Google doesn’t know that if you’ve been approved for the mail.google.com scope, which covers everything, you should also be approved for the “modify” scope, which grants a subset of permissions of the mail.google.com scope. There’s no hierarchy to the scopes as far as Google is concerned, which is absolutely ridiculous given that Google’s main business is to organize the world’s information. Funny that Google is so good at organizing trillions of web pages but is terrible at organizing a few hundred of its own API scopes.

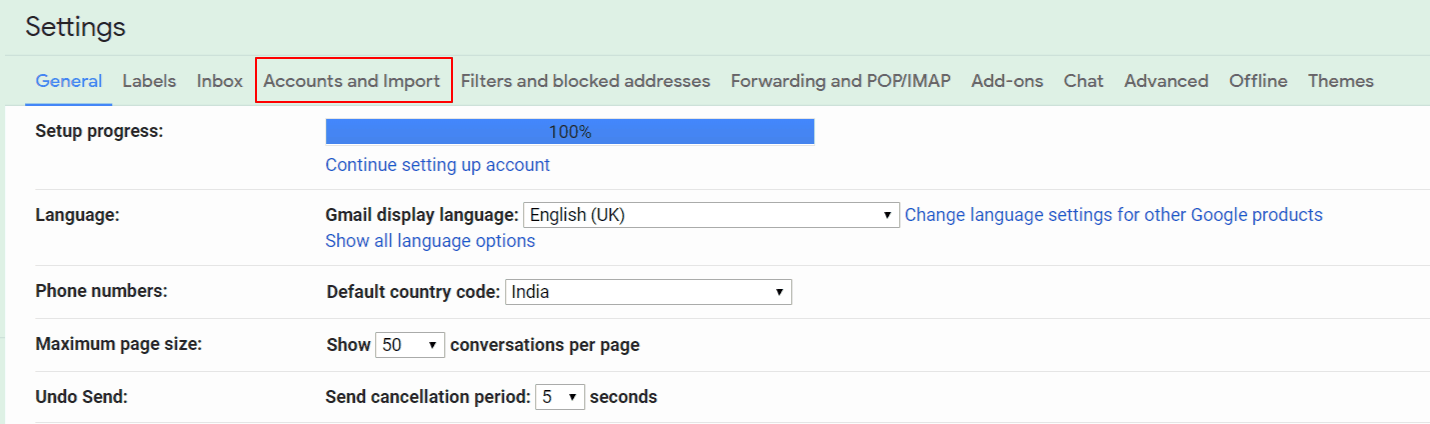
2. Where exactly do you designate the scopes you want to use?

The whole OAuth process might be confusing to you because you’ve likely noticed that there are three places to specify the API libraries you want access:

  1. In the Cloud Console, under the API Library section
  2. In the Cloud Console, under your specific OAuth consent screen
  3. In your code where you hit the Google OAuth2 endpoint

So which list is most important? Do you have to specify the scopes in the Cloud Console consent screen settings for your code to request access to that scope for a user? No, you don’t.

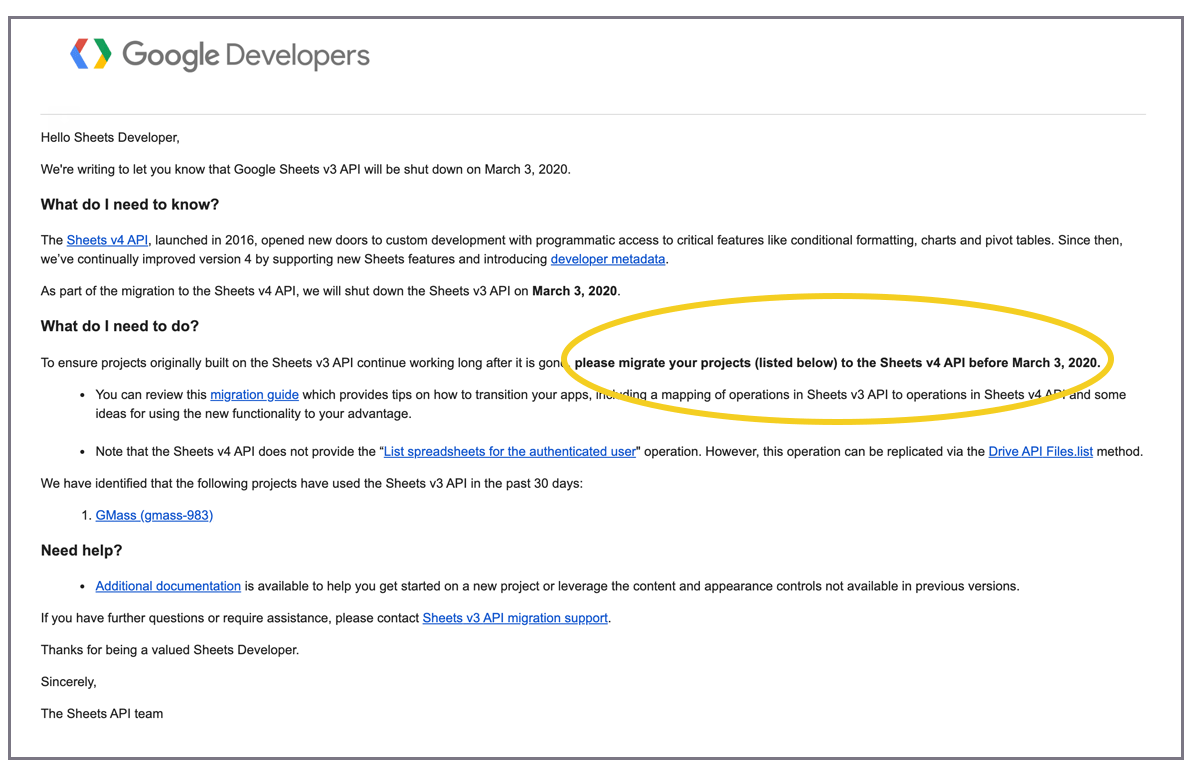
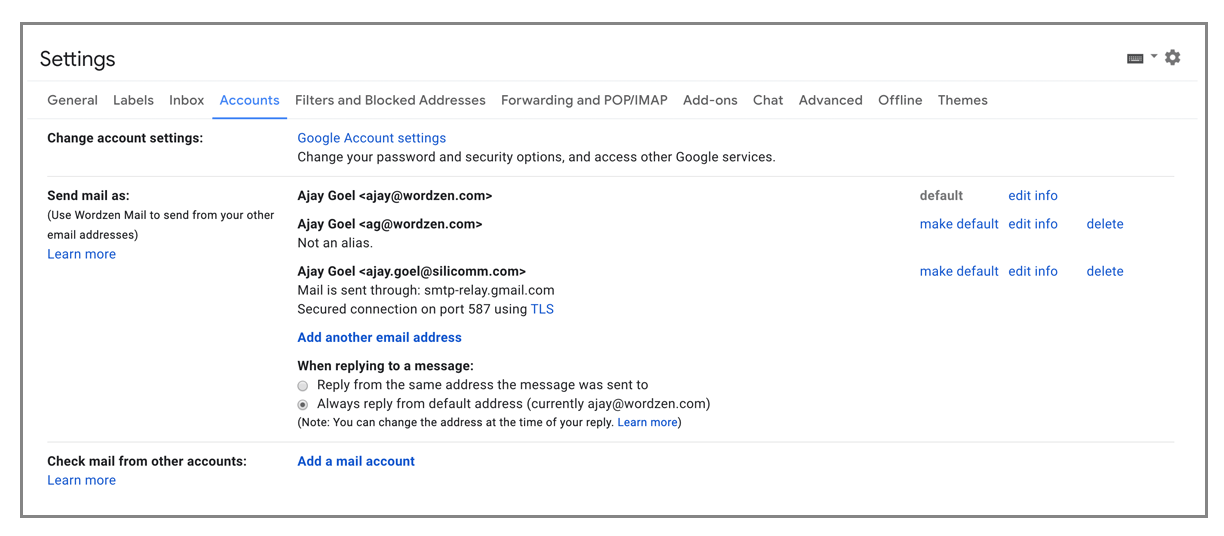
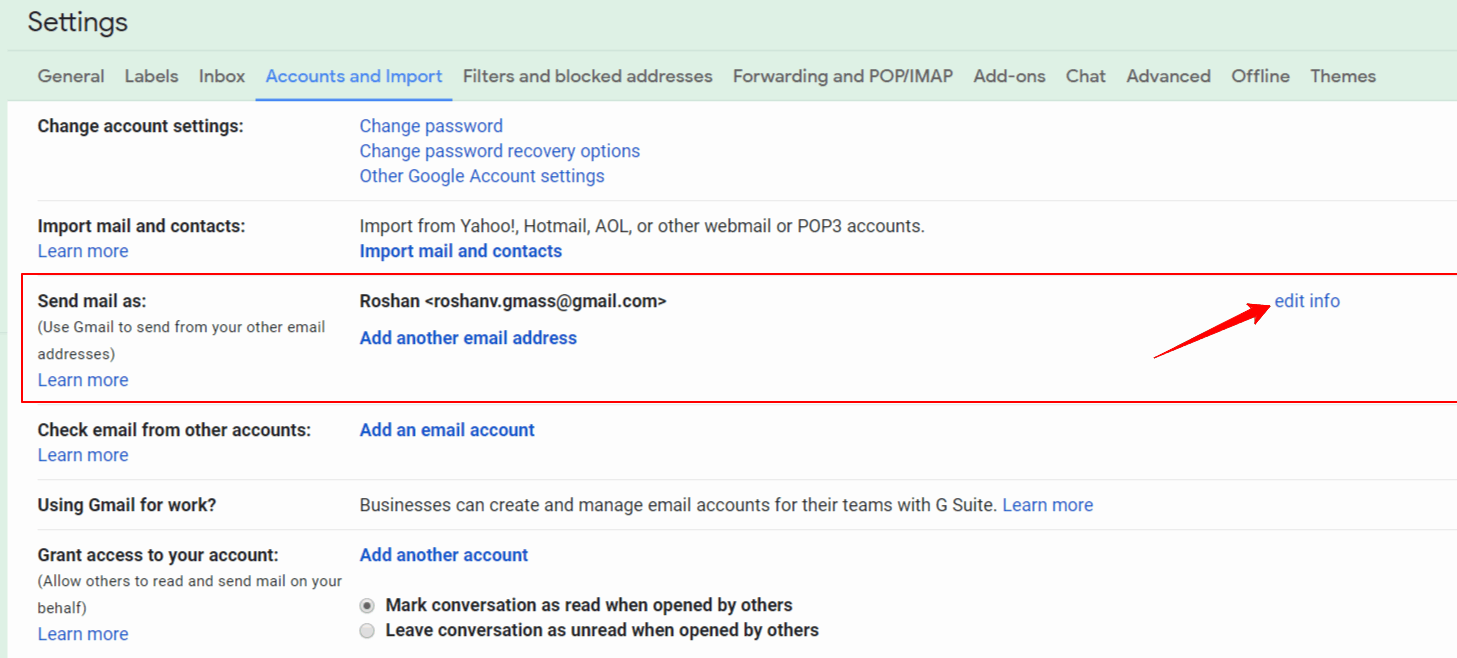
Here’s an example. In the Cloud Console for my GMass app, here’s the list of Enabled APIs:


My OAuth client consent screen lists these scopes:

In code, I can request access to a scope that’s not listed in either the Dashboard or my OAuth client page, and it might still work, depending on the scope that I add. For example, I can add the “https://www.googleapis.com/auth/genomics” scope, which has nothing to do with my project, and the user can still authenticate but IS presented with the Unverified App screen.

        private static readonly string[] GMass_Scopes = new[] {
        "https://mail.google.com",
        "https://www.googleapis.com/auth/userinfo.email",
        "https://spreadsheets.google.com/feeds",
        "https://www.googleapis.com/auth/genomics"
        };

        public ActionResult Login(string redir = null, bool connect = false, string emailaddress = "", string source = "extension")
        {
            OAuthState state = new OAuthState
            {
                Connect = connect,
                Redir = redir,
                Source = source
            };

            UriBuilder uri = new UriBuilder();
            uri.Scheme = "https:";
            uri.Host = "accounts.google.com";
            uri.Path = "/o/oauth2/auth";

            var qs = HttpUtility.ParseQueryString("");
            if (emailaddress != "")
            {
                qs["login_hint"] = emailaddress;
            }
            qs["access_type"] = "offline";
            qs["response_type"] = "code";
            qs["approval_prompt"] = "force";
            qs["client_id"] = OAuthHelper.ClientSecrets.ClientId;
            qs["redirect_uri"] = "https://extension.gmass.co/OAuth/AuthCallback";
            qs["scope"] = string.Join(" ", GMass_Scopes);
            qs["state"] = JsonConvert.SerializeObject(state);
            uri.Query = qs.ToString();

            return Redirect(uri.ToString());
        }

But, if I add the “https://www.googleapis.com/auth/drive.file” scope, also which is not enabled in Cloud Console’s API Library and not listed as part of my OAuth consent screen, then the user sails right through when logging in, and does not see the Unverified App screen. The “genomics” API isn’t documented as sensitive or restricted, so this difference doesn’t really make sense.

The rules are as follows:

  • An API scope only needs to be listed as part of your OAuth consent screen if it requires verification to be used. And to even get it to appear on this settings page, the API Library for that scope needs to be enabled.
  • If an OAuth scope does not require verification, or you choose to go Unverified, then the scope does not need to be listed on the Consent Screen settings, and your code can still request use of the scope, as I requested the use of the genomics scope in my code sample above.
  • If your code doesn’t request access to a scope, and then attempts to use the API for that scope, you’ll get this error from Google:
    Google.Apis.Requests.RequestError\r\nInsufficient Permissions: Request had insufficient authentication scopes.
  • If your code does request access to a scope, is granted access by the user, and then attempts to call an API for that scope, you will get an error if the API Library isn’t enabled in the Cloud Console.

The conclusion is that the scope need not be listed on your consent screen settings in order for you to request it, but the API Library does need to be enabled in order for your code to use the API once consent is granted by the user.

Bonus: What happens if your app has been verified and you need to add a scope later?

I contacted the Google OAuth team and asked them this very question. Here is the answer:

The steps to add a scope later are:

  1. Add the scope to your OAuth consent screen, and hit either “Save” or “Submit for Verification” if it’s a sensitive or restricted scope.
  2. The scope will now appear with the yellow warning sign.
  3. Do not modify your production code to use the scope. As long as your production code only requests the scopes that have been approved, your users won’t see the Unverified app screen. So, just the act of adding a scope to your consent screen doesn’t alter what your user sees when going through the OAuth flow.
  4. You’ll likely be contacted by the OAuth team requesting a YouTube video demonstrating the necessity for the new scope.
  5. After you answer their questions and are approved for the new scope, then it will show up as green in the consent screen settings, and only then should you add the scope to your production code OAuth flow.

3. Sensitive Scope? Restricted Scope? Google’s documentation is god-awful.

In the OAuth Verification FAQ, Google discusses sensitive scopes vs. restricted scopes. Yet while the genius who wrote this listed the restricted scopes, he did not list the sensitive scopes. In response to the question “What are sensitive API scopes?”, the page says:

Sensitive scopes allow access to Google User Data. If an app uses sensitive scopes, it must comply with the Google API User Data Policy and have its OAuth consent screen configuration verified by Google.

The app verification process can take anywhere from 3 to 5 business days.

To add to the confusion, in the Cloud Console, you might see this for your project under the “OAuth consent screen” settings:


Notice Google’s mistake here? They’ve flagged the gmail.insert and gmail.readonly scopes as “sensitive scopes,” except that they’re not actually sensitive scopes. They are “restricted scopes,” according to the FAQ. If that’s not enough, in Google’s own master scope documentation, where all the Gmail API scopes are listed, there’s not a single mention of some of them being sensitive or restricted.

You might think the main scope list would be the perfect place to specify what’s sensitive, restricted, or neither, but you’d be wrong.

There is one place where you can definitely tell whether a scope is sensitive or restricted, and it’s here. All other Google pages fail to tell you, or they give you incorrect information.

4. Want to mark your app as “Internal Only?” There’s a bug in the Cloud Console.

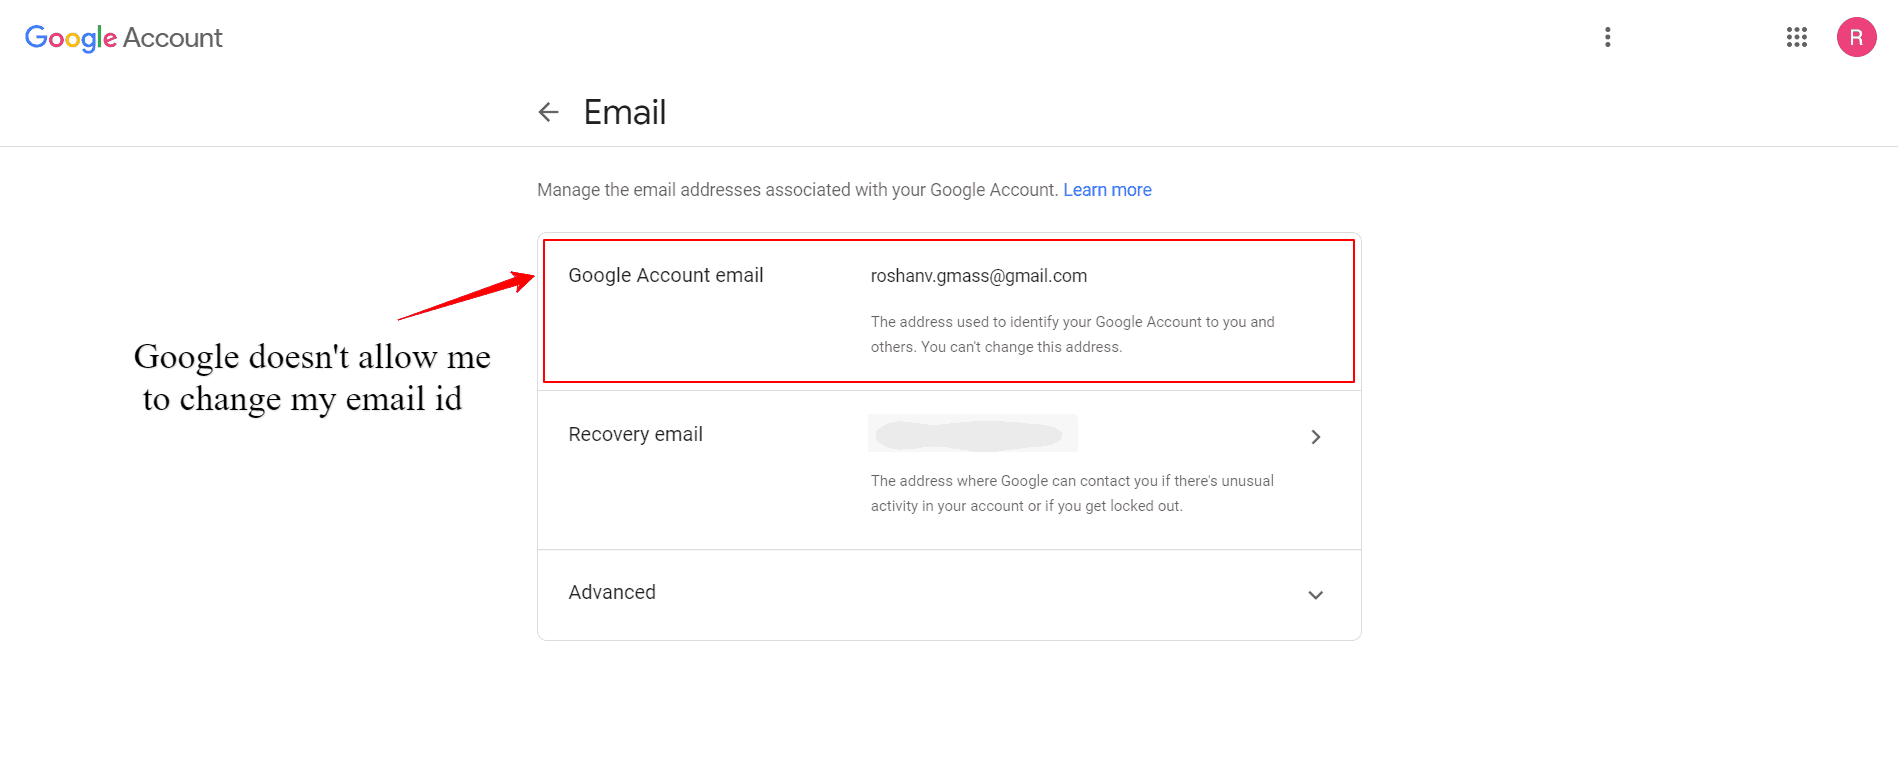
The docs say that an owner of a Cloud Console project can mark it “Internal Only,” but I haven’t found that to be the case. In one of my currently Unverified Apps, SearchMyEmail.com, the ability to set the project INTERNAL is disabled, telling me that I can’t mark it INTERNAL because I’m not a G Suite user.

Except that I am. I’m logged in with my [email protected] G Suite account, which is an OWNER of this Cloud Console project. I suspect there’s a bug here that only allows the CREATOR of the Cloud project to mark the project “INTERNAL.” In my case, I created the project with an @gmail.com account. For now, that means I’m stuck in circular logic. If I login to the creator account, which is a gmail.com account, I can’t mark the project INTERNAL because I’m not a G Suite account. If I log in to my G Suite account to mark the project INTERNAL, I can’t because I’m only the owner, not the creator.

5. Comfortable with being Unverified? It’s not as easy as it sounds.

You may choose to forego the whole verification process for a number of reasons. Perhaps you don’t want to pay for the security assessment. Perhaps your app is just for internal use. Perhaps you are under the 100-user threshold for requiring verification. You may choose to go Unverified thinking your users just won’t care whether you’re Verified or Unverified because they trust you. That’s all well and good, but if you choose to go Unverified, there are two things to know:

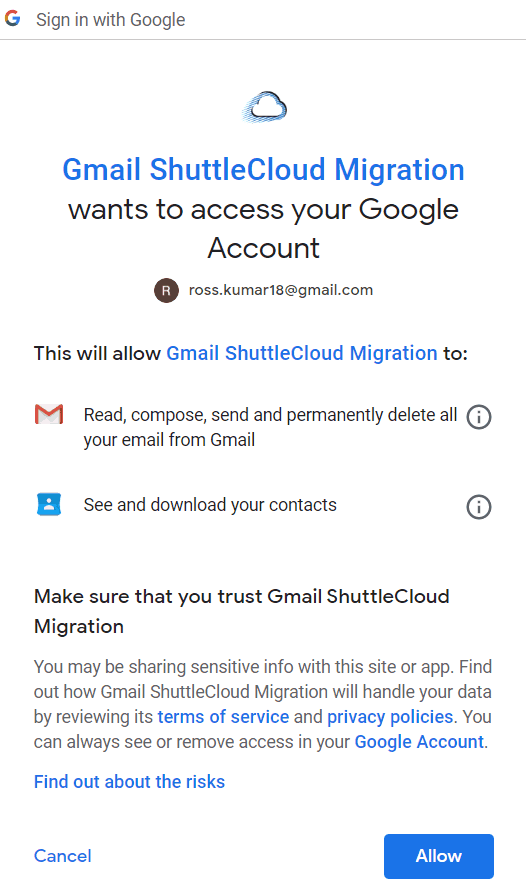
First, Google intentionally makes it difficult for a user to bypass the “Unverified App” screen. Here’s the standard Unverified App screen that users see:

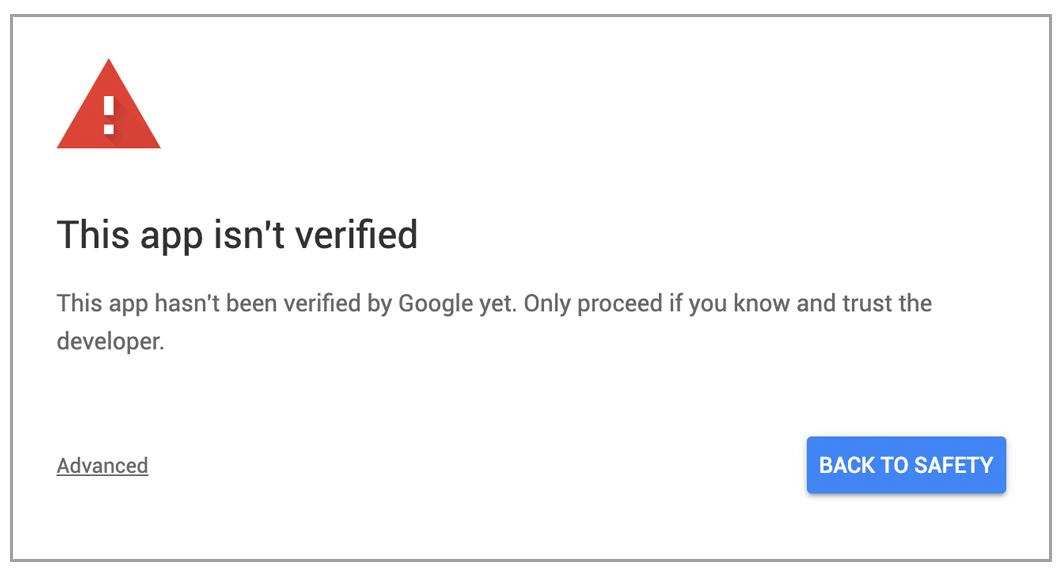
It informs the user that if they trust the app, they can “proceed.” But just how does one proceed? The word “proceed” isn’t linked. There’s no button that says “proceed.” Instead, the user has to click “Advanced,” and only then is the user given the option to proceed, after noting in parentheses that doing so is unsafe. Holy moly. Talk about scaring a user unnecessarily. Or should I say, scaring a developer into paying $15,000 – $75,000.

Here’s my recommended approach. On my app SearchMyEmail.com, which I’ve decided to let remain “Unverified,” we’ve built an animation showing the user exactly how to bypass the “unverified” nonsense.

Feel free to copy this technique. Just go to SearchMyEmail.com, choose to sign up as a “boss,” and then view the source for the interstitial page that has this animation.

Secondly, everything with Google OAuth is inconsistent. I should say, the only consistency with their OAuth rules is their inconsistency.

Check this out:

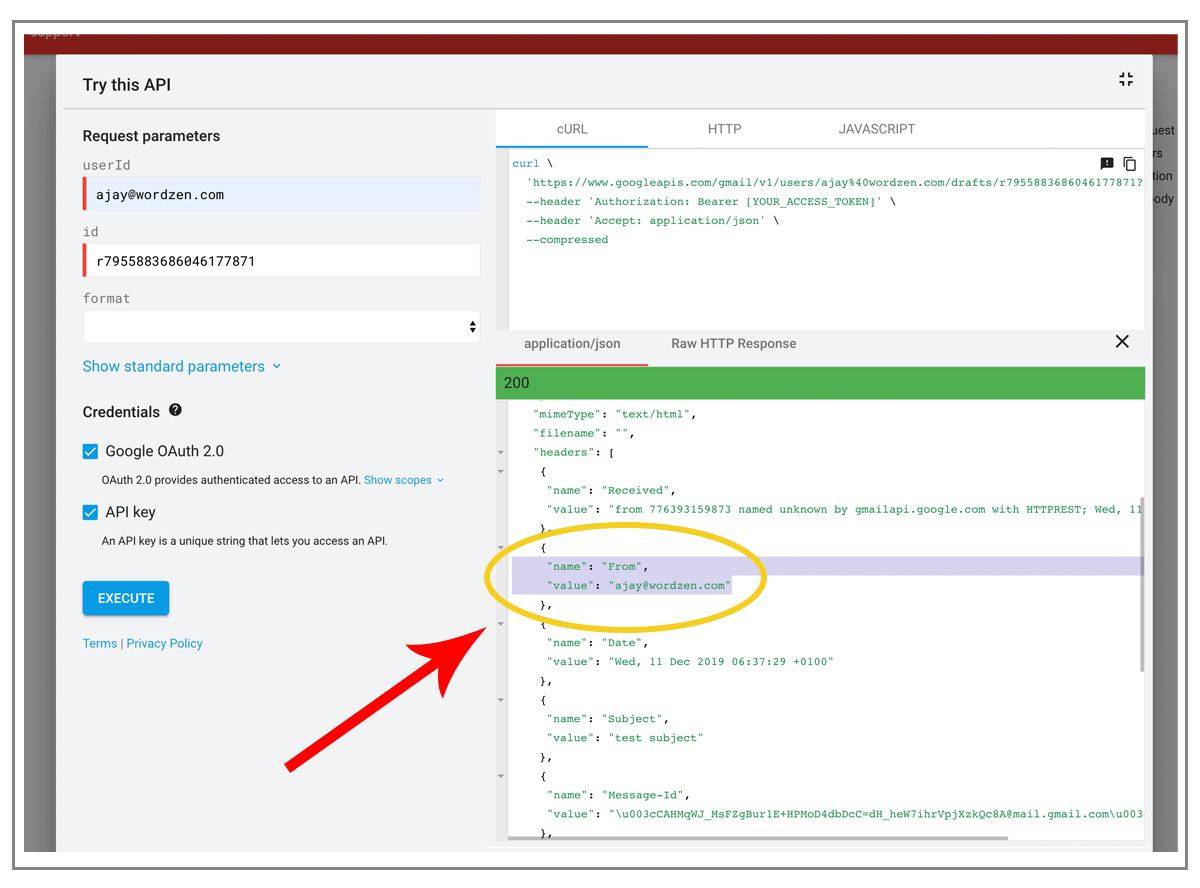
Sometimes, and it’s unclear when, being Unverified results in a user being unable to connect, regardless of what they do. In my SearchMyEmail.com app, two supposedly equivalent Gmail accounts, [email protected] and [email protected] behave entirely differently when authenticating into SME.

Since SME is Unverified, and since these are both @gmail.com accounts, they’re both likely to be shown extra warnings. This is what happens when [email protected] authenticates:

I’m told the app is unverified but given the option to continue.

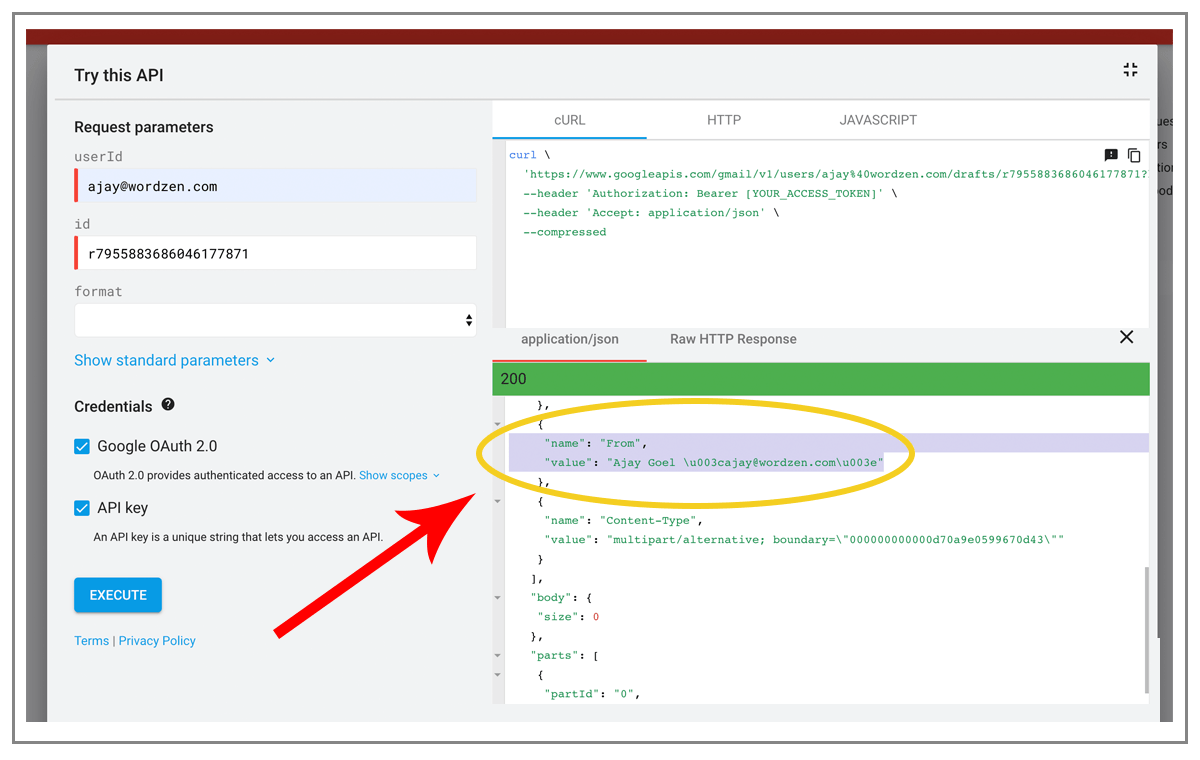
But this is what happens when [email protected] authenticates:

I’m told the app is unverified but NOT given the option to continue.

What’s the difference between the two @gmail.com accounts? The only one I can think of is that [email protected] was created 10 years ago, and [email protected] was created 10 hours ago, but nowhere in Google’s OAuth docs is it stated that account age makes a difference.

Even weirder, I have two apps that I’ve decided to leave Unverified, Wordzen and SearchMyEmail. Here are the Cloud Console config screens from each:

SearchMyEmail’s Consent Screen

SearchMyEmail’s Scopes

Wordzen’s Consent Screen

Both show the status as “pending security assessment.” BUT, when you go into the App Details:

It says “mail.google.com” behind the tooltip.

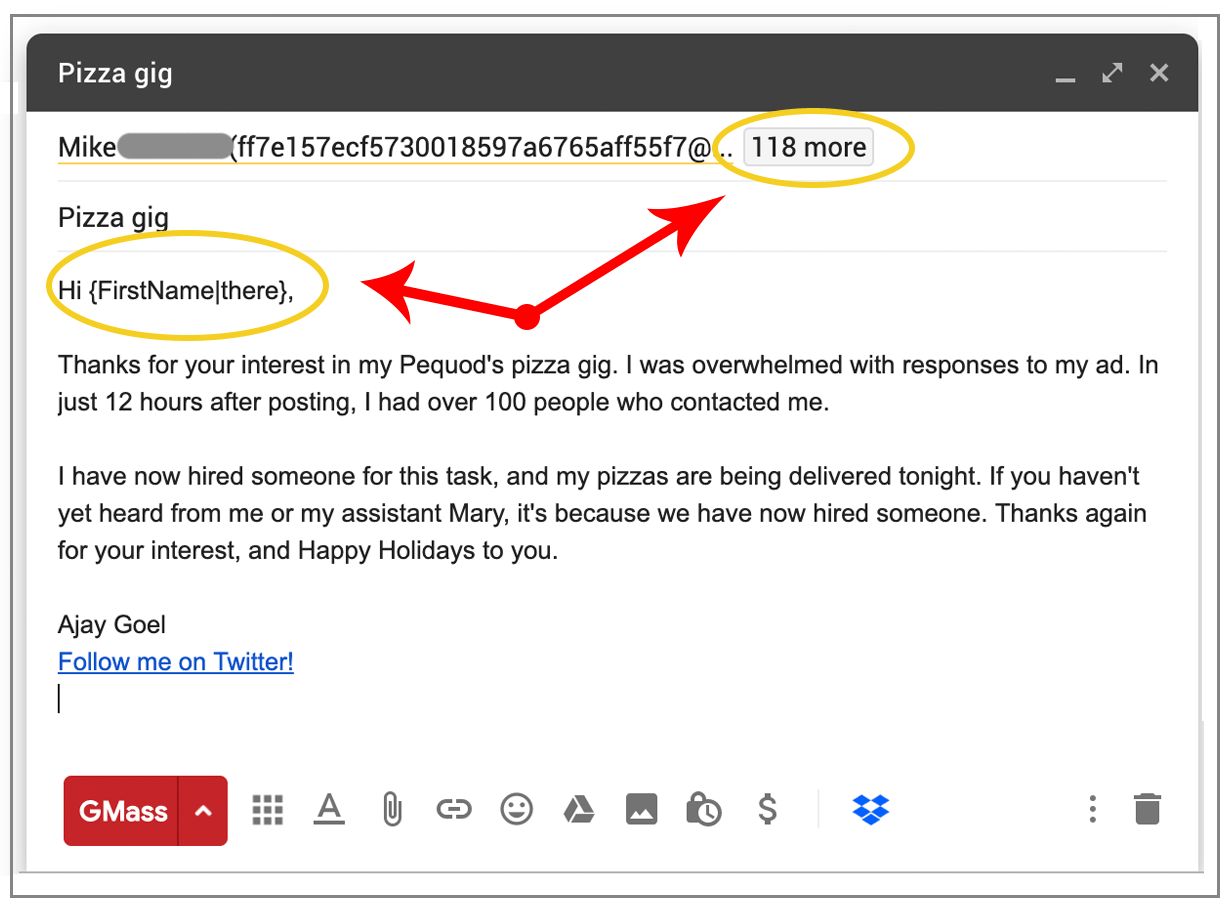
Well, look at that! The full https://mail.google.com scope is approved and granted. Yet the app is still labeled “pending security assessment.” I promise you Wordzen did not undergo the Security Assessment required by restricted scope apps. How did that happen? A Google miracle, perhaps. Update update update! It’s now January 25, 2020, and I spoke too soon. As I detailed on my live updates page, on January 13, I received notice from Google that Wordzen missed the deadline and use of the https://mail.google.com scope is now considered “unverified”.

Please, Google, fix this giant mess. But leave Wordzen’s awesome unfettered access alone (Never mind, they removed this access).

Email marketing, cold email, and mail merge inside Gmail


Send incredible emails & automations and avoid the spam folder — all in one powerful but easy-to-learn tool


TRY GMASS FOR FREE

Download Chrome extension - 30 second install!
No credit card required
Love what you're reading? Get the latest email strategy and tips & stay in touch.


Recently, Google announced that the old version 3 of the Google Sheets API will be shut down in March of 2020, forcing developers to migrate to version 4 to ensure the continuity of their applications.

[Update on Feb 28 2020: The v3 API will now continue to work until September 2020, although reading a list of Sheets will stop working on April 9. Google didn’t email anyone about this, but they did silently update their web page.]

Google Sheets API Announcement
The official email announcing the end of v3 of the Google Sheets API

The changes pose several issues for developers, because not all functionality available in v3 is available in v4. You wouldn’t know it from reading Google’s migration page though, which states:

“The v4 version is JSON-based, has an easier-to-use interface, and adds a substantial amount of functionality that is not possible in the v3 version.”

That may be true, but it also removes some critical functionality that developers have been relying on for years in v3.

Additionally, OAuth scope changes between v3 and v4 will also force developers to go through a nasty OAuth re-verification process if they still want the ability to list all of the user’s spreadsheets.

While there may be plenty more issues than I’ll highlight here, I’ve included the issues most relevant to my work.

Listing all the Google Sheets in a user’s account is now complicated

The v3 API made this easy, providing a specific endpoint the inside the https://spreadsheets.google.com/feeds scope. The v4 API makes this harder. You must have access to either the https://www.googleapis.com/auth/drive.readonly or https://www.googleapis.com/auth/drive scopes, and the method to retrieve spreadsheets is now based on a query against all Google Drive files:

https://www.googleapis.com/drive/v3/files?q=mimeType%3D'application%2Fvnd.google-apps.spreadsheet'

You have to read the files from the user’s Google Drive, which requires the additional scope, and requires permission to read all the files on the user’s Google Drive, not just Sheets. This not only poses a greater security risk for the user, but is likely to scare the user, resulting in abandonments of the OAuth login process. The warning that a user sees goes from this:

Google OAuth Screen
The OAuth permissions screen with v3 of the Google Sheets API

to this:

The much scarier OAuth permissions screen with v4 of the Google Sheets API

Finally, as detailed in Google’s Restricted API FAQ, the “drive” and “drive.readonly” scopes are becoming restricted scopes. That means that if your Cloud Console App previously did not require verification and a security assessment, the forced migration to v4 will require this, and will necessitate an expensive security assessment.

The list of Google’s “restricted” API scopes, showing that Drive access is restricted

If your app was previously verified and passed the security assessment, you will now have to add the “drive” scope and submit for re-verification. As Google stated in my “approval” email notification, changing scopes in my Cloud Console and using them right away will cause users to see the “unverified app” screen.

The “approval” email from Google explaining that you can’t switch scopes without needing re-verification

In Google’s defense, however, simply adding an unverified scope to your OAuth Consent Screen does not automatically switch your users back to the Unverified App screen. Only if you request that scope in your OAuth flow code, will users see the Unverified app screen. This means that you can safely add the “drive” or “drive.readonly” scope to your Cloud Console Project, request it to be verified, and in the meantime while the OAuth Team is reviewing your request, avoid adding the scope to your OAuth flow code. Then, when the OAuth team verifies the new scope, you can finally add the scope to your flow, and that way your users will never have to see the Unverified app screen.


After you add a new scope, you’ll see it with a yellow warning triangle in your Consent Screen Settings. As long as your code doesn’t use the scope though, users will still see the Verified app screen if you’ve previously been Verified.

An Alternative Solution: The File Picker API

If you don’t want to bother with any of this complexity, you can also switch to the File Picker API, which is an API that launches a Google UI that lets your user pick a Sheet, or any file really, from Google Drive, without granting you the ability to see all the files in Drive. If your app is doing anything with Sheets, the main reason for needing to list all of a user’s Sheets is to get the Google “id” value of the Sheet. The File Picker API will retrieve the “id” of a Sheet for you, without exposing all the files to your code. It requires a different scope, https://www.googleapis.com/auth/drive.file, that is neither sensitive nor restricted. It just launches in a separate window and might break the flow of your own UI. In my Chrome extension, the user clicks a button within the Gmail UI and is then presented with a list of his Sheets.


Letting the user choose from a list of Sheets.

After the user chooses a Sheet, the list of Worksheets is then displayed. If I were to switch this to the File Picker API, then I’d first have to launch the Picker, let the user choose a Sheet, and then display a separate window to display the Worksheets inside the chosen Sheet, along with other metadata about the Worksheet. Thankfully, the File Picker API does let you filter the view to show only the user’s Sheets rather than all the files. If that wasn’t possible, it would add insult to injury, making you launch Google’s own UI, and then forcing the user to search for his Sheets.


The File Picker API lets you set it to only show a user’s Sheets.

TL;DR: The v3 API made it much easier to list a user’s Sheets and let them pick one. Migrating to v4 will scare your users and force you to go through an unpleasant OAuth re-verification process. You could switch to the File Picker API, but that won’t provide as seamless of a user experience as you’re used to.

Individual worksheets must now be queried by their names

This is a big deal and will 100% break your code if you’re reading user’s Sheets offline. In the v3 API, every “worksheet” inside an individual Sheet was assigned a unique identifier that was used to retrieve just that worksheet’s cell data. Even if the user changed the name of the Sheet from “Sheet1” to “Leads” for example, you could still pull the worksheet’s data because the unique identifier, which looked something like this (), didn’t change. In v4, however, the concept of unique identifiers for individual worksheets goes away, and you must now use A1 notation to pull cell data. You can probably already tell why this is problematic, but just in case, let me break it down:

  • If you’re reading from a user’s Sheet offline, and the user changes the name of the worksheet, then future reads will break. With v3, it would still work.
  • You must now support foreign characters, since worksheets can be named अजय (those are Hindi characters).

Even more interesting, is that this code-breaking change isn’t even mentioned as an issue in the Migration Guide.

You can’t query a Google Sheet like a database anymore

The v3 API allowed programmers to use “structured queries” to query a Sheet and return only the matching rows of the Sheet. This allowed for the complex data filtering to happen inside the Sheets API, and saved client bandwidth since only the relevant rows would be returned by the API. The concept of “structured queries” disappears in v4, and if you want rows matching a certain criteria, the only option is to return ALL ROWS and ALL COLUMNS of a Sheet and then filter the data in code on the client’s end.

For example, let’s say your spreadsheet has 100,000 rows. But you only want the 500 or so rows where the Column called “PurchaseYear” has a Row value of “2010”. Instead of retrieving just the 500 rows you want, your code has to retrieve all 100,000 rows and then find the 500 relevant rows on its own. To illustrate the absurdity of removing this feature, imagine if you Googled the phrase “best smartphone” while researching your next phone purchase. It would be like Google giving you all 1.4 billion search results on one page, unordered.

You might thing “Wait, this is wrong. I saw a way to do this in v4.” You’re probably thinking of the DataFilter type.

But that method only allows you to filter data by cell range, not by the values of the cells, which is what’s needed to be useful and to resemble an SQL query.

TL;DR: Removing support for “structured queries” removes the ability to query a spreadsheet’s data based on cell values. Developers must now retrieve a worksheet’s entire dataset rather than just the columns and rows they need.

The easy way to port your code

My backend is .NET, and using the .NET library for the v3 Sheets API, retrieving all the data in a spreadsheet results in an iEnumerable of CellEntry. The .NET library for v4, however, retrieves all the data in a new data type called ValueRange.

//The v4 way of getting all the cell data. CellsNew is a ValueRange type.
var CellsNew = service.Spreadsheets.Values.Get("128Etx8HZMtsF1mB2BGD0b6qXA4m5Qn-rVTRPku4nw4Y", "A1:C25000").Execute();

//The v3 way of getting all the cell data. CellsOld is an IEnumerable&amp;amp;lt;CellEntry&amp;amp;gt; type.
var CellsOld = new SheetsHelper(token).GetCells("128Etx8HZMtsF1mB2BGD0b6qXA4m5Qn-rVTRPku4nw4Y/private/full/od6");

Since most of my code deals with analyzing the cell data in a Sheet, rather than migrate all of my code to use the ValueRange type, I made a strategic decision to keep using the old data type of iEnumerable<CellEntry>, and simply wrote a conversion function to convert the new type of ValueRange to the old type of iEnumerable<CellEntry>.

public static Google.Apis.Sheets.v4.Data.GridRange ToGridRange(string a1range)
{
    // trim off sheet name
    if (a1range.Contains("!"))
    {
        a1range = a1range.Split('!').Last();
    }
    string[] vals = a1range.Split(':');
    var c1 = ToRowColumn(vals[0]);
    var c2 = ToRowColumn(vals[1]);

    return new Google.Apis.Sheets.v4.Data.GridRange
    {
        StartColumnIndex = c1.Item1,
        StartRowIndex = c1.Item2,
        EndColumnIndex = c2.Item1,
        EndRowIndex = c2.Item2
    };
}

public static Tuple&amp;amp;lt;int, int&amp;amp;gt; ToRowColumn(string a1cell)
{
    string ALPHABET = "ABCDEFGHIJKLMNOPQRSTUVWXYZ";
    string first = string.Empty;
    string second = string.Empty;

    CharEnumerator ce = a1cell.GetEnumerator();

    while (ce.MoveNext())
        if (char.IsLetter(ce.Current))
            first += ce.Current;
        else
            second += ce.Current;

    int i = 0;
    ce = first.GetEnumerator();
    while (ce.MoveNext())
        i = (26 * i) + ALPHABET.IndexOf(ce.Current) + 1;

    string str = i.ToString();
    return new Tuple&amp;amp;lt;int, int&amp;amp;gt;(i - 1, Int32.Parse(second) - 1);
}

public static IEnumerable&amp;amp;lt;CellEntry&amp;amp;gt; ToCellEntries(Google.Apis.Sheets.v4.Data.ValueRange valueRange)
{

    var gr = ToGridRange(valueRange.Range);

    uint rowIndex = (uint)gr.StartRowIndex.Value;

    foreach(var row in valueRange.Values)
    {
        uint colIndex = (uint)gr.StartColumnIndex.Value;
        foreach (var cell in row)
        {
            yield return new CellEntry
            {
                Row = rowIndex + 1,
                Column = colIndex + 1,
                Value = "" + cell,
            };
            colIndex++;
        }
        rowIndex++;
    }
}

Now I can just use this line to convert from the new datatype to the old:

var cellsNewToOld = ToCellEntries(CellsNew).ToList();

This makes my migration much easier, since now all I have to do is change the code that pulls the data, not the code that analyzes the data.

In conclusion, I’m frustrated

These two functions are the essence of how I personally use the Google Sheets API, and I’m shocked that Google is forcing a migration to v4 without making these two functions easy. But then again, I probably shouldn’t be, because Google has had a habit of making things increasingly harder for developers recently. Still though, I’ll slog through the changes, and the world will go on.

I haven’t yet started the migration for GMass yet, but when I do, it’s likely I’ll find even more problems. I’ll update this post with anything else I find.

Resources

The official announcement from the Sheets API Team.

The official migration guide.

My live update page on the exhausting OAuth verification process.

Ready to transform Gmail into an email marketing/cold email/mail merge tool?


Only GMass packs every email app into one tool — and brings it all into Gmail for you. Better emails. Tons of power. Easy to use.


TRY GMASS FOR FREE

Download Chrome extension - 30 second install!
No credit card required
Love what you're reading? Get the latest email strategy and tips & stay in touch.


A few days ago, I posted this ad on Craigslist:


My wife and I used to live in Chicago, and Pequod’s was our favorite pizza restaurant. Now that we live in Dayton, Ohio, our access to delicious Chicago-style deep dish pizza is limited. For Christmas, I wanted someone to deliver my wife’s favorite pizza from Chicago to Dayton. My years of experience posting on Craigslist has prepared me to sometimes get no responses and sometimes be overwhelmed with responses. In this case, I was overwhelmed. Within the first 12 hours of posting, I had more than 100 responses from interested parties. Here are a few samples:

Some thought I was insane for offering $400 for a couple pizzas:


But most responded with genuine interest:

It’s surprising just how powerful Craigslist is, 20-plus years after its launch, but it’s also exciting how much interest a “strange” gig can garner. Especially when over the years, many have declared Craigslist dead. But then again, people declare email dead all the time too, and clearly that’s not the case. I’m sure you could find someone to declare me dead, too.

This story isn’t about the pizza delivery, the delicious Pequod’s caramelized crust, or how much I love my wife. This is about doing what most Craigslist posters don’t do — emailing everyone back with the gig’s status, so they’re not left wondering. As someone who responds to Craigslist ads, I can only imagine that being left to wonder — never getting a response to your response — feels awful.

Using my Gmail plugin, GMass, sending a message to everybody I was NOT hiring took about 90 seconds. Here’s how I did it.

Step 1: Search for everyone who responded

This was easy. Everybody who had responded had put “Pequod’s” in the Subject line and was still sitting in my Inbox, so my Gmail search criteria was:

in:inbox subject:"pequod's"

The search resulted in these messages:

Step 2: Click the “magnifying glass” to build a list of everyone who responded

Just click the GMass magnifying glass, and a Compose window opens containing the addresses of everyone who responded.

Here I manually removed the ONE address of the person that I did hire, leaving me with a total of 119 addresses to which I’d send the rejection letter.


Step 3: Compose my message.

Here I typed a simple email to let them know that I had now hired someone and to thank them for their time. I can even personalize each email to each Craigslist user with their first name.

Step 4: Change the Settings to send as “replies”

This is an important step. This will force each email to each person in the To line to send as a reply to the email that person sent me. If I don’t check this, each person will get a new email as a new conversation. If they forgot that they applied to this gig in the first place, they may be confused. Setting the campaign to send as replies ensures that their original email will be at the bottom of my reply.

This also means that the Subject line I’ve typed in the Compose window will be ignored, since a reply will use the Subject of their original message to me.

Step 5: Hit the GMass button and watch the magic happen.

The emails have now been sent. Here are a few examples of the original email and then my response on the bottom:

One hitch:

A lot of my emails bounced with this bounce message from Craigslist:

Craigslist, one of the largest sites in the world, can’t lick stamps fast enough? Ha! This means that my Gmail account was sending emails to @reply.craigslist.org addresses so quickly that Craigslist got mad and started rejecting the emails. I suppose this is a reasonable approach to prevent its users from getting spammed. Obviously, I’m not spamming; but still, I could have prevented this from happening by checking one more box in Settings:

Marking that “pause” box adds a few seconds between each email, and that would have prevented the Craigslist email server from freaking out over my sudden surge of 120 emails.

TL; DR

Craigslist is still the go-to spot to find someone to do something odd for you. And, it’s nice (and easy) to acknowledge all the people who took the time to contact you and that you didn’t end up choosing.

For more detail on how to use Gmail and GMass to manage Craigslist responses, see this beauty.

Ready to send better emails and save a ton of time?


GMass is the only tool for marketing emails, cold emails, and mail merge — all inside Gmail. Tons of power but easy to learn and use.


TRY GMASS FOR FREE

Download Chrome extension - 30 second install!
No credit card required
Love what you're reading? Get the latest email strategy and tips & stay in touch.


Mail merge is an antiquated term. Let’s just put that out there to start. The term dates back to when people would use software to print out “personalized” form letter templates and mailing labels.

But it’s the best term we’ve got — even as mail merging has gone fully digital.

Because, yes, you can mail merge with all your favorite email, word processing, and spreadsheet software.

You just have to know how.

In this article, I’m going to give a brief overview of how to create mail merges with all of the most popular apps (namely, Microsoft Office and Google Workspace/Gmail).

I’m also going to (hopefully) answer any lingering questions you might have about running your own mail merges.

(Also: Note that our blog has several related articles available where we’ve done deep dives into the merge process with different apps. I’ve linked to those throughout this guide.)

Mail Merge: Table of Contents

What Is Mail Merge?

A mail merge lets you create personalized messages, documents, labels, and more that are automatically customized on a recipient-by-recipient basis. This spares you the trouble of manually personalizing each document yourself.

What types of document can you create using mail merge?

You can use mail merges to create personalized messages automatically for:

Note: A form letter is a template file used to create mass letters. Instead of typing a letter for each recipient, you can use a form letter to make quick, unique, personalized letters for each person.

Essentially, if there’s a document you need to personalize at scale, mail merges can take care of that for you.

Why would you use mail merge?

Mail merge is far better than CCing (or BCCing) a bunch of people on an email.

With mail merge, you can send personalized messages that are proven to get better engagement than generic mass emails. (After all, personalization and relevancy are essential for email success.)

Using mail merge also saves a ton of time over manually customizing anything, from emails to documents; once you use it, you’ll wonder why you ever tried to do the process by hand.

How to do a mail merge

There are two documents that are essential to running a merge: A template file and a data source.

Your mail merge template is an email or document that uses specific merge tags or merge fields as placeholders for where your data will go.

Your software will then insert the relevant info into each mail merge field for each email message, mailing labels, or any other merge document.

And the software gets that info from your data file, often a spreadsheet (but sometimes a database or customer relationship management platform).

For instance, if you have a column in your Google Sheet data file called FName, anywhere your merge software sees the {FName} field in your email message it will insert the recipient’s first name. Then it will create another email for the next recipient (with their first name inserted) and on and on.

How to Mail Merge in Gmail

While I don’t have hard data to back this up, I’d feel confident saying the most common mail merge use case today is someone sending personalized emails through Gmail/Google Workspace.

Fortunately, Gmail also has the most robust mail merge options out there.

There are a few different methods you can use for a Gmail mail merge, which we cover at extended length in that linked article.

In brief, the three options are:

  1. Sending mail merges from inside Gmail using a Chrome extension like GMass.
  2. Sending mail merges through Gmail from inside a Google Sheet, using a Google Workspace Marketplace add-on.
  3. Using Gmail’s comically limited built-in mail merge feature. (It’s free for a reason.)

I’m going to give you the walkthrough of using GMass to send your Gmail mail merge.

One, you’re reading this on GMass, so we really know every possible nuance of what it takes to send a high-quality mail merge. But two, the other options for mail merges in Gmail are much more flawed.

We see it on (literally) a daily basis: Someone tries one of the other methods, gives up, comes to GMass, and leaves a 5-star review two days later.

A quick step-by-step overview of doing a Gmail mail merge

Create your data file in a Google Sheets spreadsheet. (GMass has a native Google Sheets mail merge integration.)

Google sheet

The first row of your sheet will become the names of your merge fields; each column header corresponds to a different field.

Once your sheet is ready, head over to Gmail.

Make sure you have the GMass Chrome extension installed. (If you don’t, it takes about 30 seconds. Here’s our quickstart guide if you need.)

Now open a Gmail compose window, just like you would if you were typing a regular email.

Click the GMass icon in the To field, then connect your Google Sheet of contacts.

GMass icon in the compose window

You can now compose your email. Type a left curly brace { to bring up your list of merge fields; there’s no long, complicated “insert field” process here.

You can use the GMass settings box for all sorts of other features, including tracking, auto follow-ups, setting the sending speed, scheduling, A/B testing, quick polls, and dozens of others.

When you’re ready to send a personalized email to everyone in your Google Sheet, click the red GMass button to send.

Gmass

Pros and cons of a Gmail mail merge

I’m well aware of how self-serving it’s going to sound but, again, GMass really is the best way to send your mail merge emails. (300,000+ people who’ve left nearly 8,000 reviews averaging 4.8/5 over our eight years agree.)

Some of the pros are:

So what are the cons? Well, GMass isn’t free. If you’re, say, sending 10 emails one time where you want to mail merge in people’s first names, a paid GMass subscription might be overkill. (Then again, when you try to do it using Google’s free option…..)

But GMass is reasonably priced — in fact, we’re the least expensive cold email software out there — so it’s at least worth trying to see everything it can do to charge up your Gmail mail merges.

How to Mail Merge in Google Docs

In general, Google products work better for mail merges than Microsoft products.

Except if you want to create a template document in Google Docs to create mailing labels or other printed docs.

In that case, the Word document merge is far superior to the Google Docs merge.

The main reason: Unlike Word, Google Docs does not have a native mail merge function. So you’ll need to bring in a third-party Google Workspace add-on.

A quick step-by-step overview of doing a Google Docs mail merge

I always recommend starting with a data file rather than a mail merge template; this is no exception.

Create a new Google Sheet with the data you want to merge. The first row of the spreadsheet should be the headers you’ll use in your merge; each header becomes a field.

Now, in Google Docs, create your merge document. Depending on your add-on of choice, the merge field tags will use different syntax. In this screenshot, I’m using Autocrat, and it uses double carats.

Template

Once your document is done, head back to Sheets. You can install Autocrat (or your other mail merge plugin of choice) from the Add-ons menu.

Now connect your Docs file with your Sheet in the document (much like you did with an Excel workbook, make sure you’re on the right sheet in your workbook). Match up each field in your Doc with the correct column in the spreadsheet.

map source data

Then hit the “start mail merge” button in your add-on. That will produce each merged document in your Google Drive.

Check out our complete guide to the mail merge Google Docs process for even more screenshots and helpful details.

Pros and cons of Google Docs mail merges

Again, there aren’t many pros of doing a Google Docs mail merge — unless you operate completely out of the Google Workspace suite. In that case, yes, grab an add-on and run your merges.

I didn’t even get into using Google Docs to create mail merge emails. That’s because it won’t get involved in the process.

We can go directly from a Google Sheet to Gmail without needing the extra step in the middle of using Docs. (This differs from the Microsoft Office process, where an Outlook merge requires using both an Excel spreadsheet and a Word document.)

How to Mail Merge in Microsoft Word

A quick step-by-step overview of doing a Word mail merge

To run a mail merge in MS Word, first up: You’ll need an Excel file to use as your data file.

Create a new Excel spreadsheet and use the first row as your line of headers. Each column header will correspond to a mail merge field.

Enter Contact information

Now head over to Microsoft Word and create a new Word document.

There’s a whole tab in Word around mail merging: the Mailings tab.

Click to open the Mailings heading, then you can choose what type of merge you want to create: letters, email messages, envelopes, labels, or a directory.

Letters

Since this is your first time, you may just want to use Word’s built-in mail merge wizard to walk you through the process.

Either way, you’ll need to use the Select Recipients option to find your list (in this case, your Excel file), then select the correct spreadsheet in the Excel Workbook.

Now you can insert field names from the sheet into your template document either manually (with the format «FieldName») or via the mail merge wizard or Mailings tab. You can also include things like a greeting line, an address block (good for mailing labels), or any other mail merge field.

Address block

Once you’re done you can preview your merged document (whether it’s a form letter, mailing labels, or personalized email) in the Mailings tab bar. Then choose Finish & Merge to generate your individual, custom documents.

We have a complete step-by-step walkthrough of how to mail merge Word from Excel available if you need.

Pros and cons of Microsoft Word mail merges

MS Word is a solid choice if you’re looking to create physical mail merge documents, like address labels or a form letter.

There are also add-ons, like the Mail Merge Toolkit for Word, which allow you do to even more with personalization. (It also allows you to send different attachments to each recipient, which isn’t possible normally.)

It’s less ideal if you’re trying to send bulk emails.

Basically, when you use an Excel Spreadsheet → Word document → email software (Microsoft Outlook, Gmail, the rest) chain, you’re adding unnecessary steps — steps where things can go wrong.

You’ll need to manually set up the connection between Word and either Outlook or Gmail, which is less intuitive than native options.

How to Mail Merge in Outlook

Let’s make one important distinction clear off the bat: It’s hard to run a mail merge in Microsoft Outlook. (Or Outlook 365.)

You can’t just connect an Excel file data source to Outlook; it doesn’t have a native mail merge feature. You’ll need to add an intermediary step and get Word involved.

But if you’re a Microsoft Outlook user and you want to send mail merge emails, here’s your step by step mail guide.

A quick step-by-step overview of doing an Outlook mail merge

Much like I described in the Word instructions, go to Microsoft Excel and create an Excel spreadsheet. (Or import a CSV, if that’s where you’ve got the email addresses for your mass email.)

The first row should, again, be your column header for each merge field.

Now head over to Microsoft Word and create the email message in your main document. Use the Insert field option in the Mailings tab to insert merge field names in the proper spots. (Again, if needed, you can use Word’s mail merge wizard here.)

Once you’re ready to start sending your personalized mass emails, go to the Select Recipients menu.

You should select your Excel spreadsheet here; however, you do have the chance to select a recipient list from your Outlook contacts. (Unfortunately, the Outlook contacts route is less ideal than the Excel spreadsheet, since you will unexpectedly run into missing fields a lot.)

Once you’re connected, you can preview the results in your Word document. If all looks good, you can go ahead and choose to start mail merge.

In the Finish & Merge menu, choose Send Email Messages… from the dropdown. Choose your data file header for email addresses, then set the subject line and other options.

It’s finally time to head over to Outlook.

Click the Outbox folder and you’ll see your personalized mass emails there.

Take a look at them, then click the Send/Receive All Folders button to send your merged emails.

Here’s our full guide to step by step mail merges in Outlook if you want more granular detail or a more robust walkthrough.

Pros and cons of Microsoft Outlook mail merges

As I said at the beginning of this section… unfortunately, there aren’t many pros of sending personalized mass emails through Outlook.

The process requires three different Microsoft Office apps, which is cumbersome. You can’t even pull this off in the Outlook web app; you’ll need either a paid Office 365 subscription or the full version of Outlook on your desktop.

Also, there are a lot of features missing. The Mail Merge Toolkit add-on can help with some, but not all, of your personalization needs. And there’s no way to do things like tracking your merges, sending automated follow-ups, throttling your sending speed, or anything else that experienced emails take for granted.

So what are the pros? If you live inside the Office suite and want to keep everything there, this is the mail merge email process for you.

However, if you’re just doing this to send through Outlook, there are ways to do that with a Gmail alias that will allow you to use much more robust software in a much less Byzantine process.

Mail Merge FAQ: Answers to Your Questions

What are the advantages and disadvantages of email mail merge?

Mail merge for your email marketing or cold emailing has several strong advantages, such as:

  • Personalization: Mail merge personalization makes your form letter sound like individual correspondence, so it’s more likely to be read.
  • Saves time: Once you set up your mail merge template, it takes relatively little time to create a large number of personalized messages because it’s tied to your Excel data — the single spreadsheet where all personalized information is kept.
  • Controls the appearance of your message: A mail merge template lets you manage how the type and images look, so your email is attractive even where the personalized content is different.
  • Allows for testing: You can quickly adapt a template to create two versions of the message for A/B testing. This way, you can effortlessly know what version of your message works best.

On the other hand, a mail merge also has some disadvantages for email campaigns:

  • May require additional software: To go beyond the features of Microsoft Word, you may need email merge software, like GMass, with advanced features to automate data collection or add conditional formatting.
  • Requires accuracy: If your Microsoft Excel database is incomplete, inaccurate, out of date, or saved under a new name, then mail merge may not work.
  • Risk of error: If you make a mistake in your mail merge template or personalization data, that error will get reproduced on all the emails that use those elements. As a result, it’s essential to allow time to test your email before sending it to your entire list.

Can you perform an email merge with an attachment?

When you’re using Word, you don’t have the option to include an attachment with a standard mail merge message, but you can if you use the Mail Merge Toolkit add-in for Microsoft Office.

However, if you’re after a better solution, use a purpose-built mail merge platform like GMass that not only lets you include an attachment but even allows you to choose different attachments for each recipient.

Can you send a mail merge from a shared mailbox?

If you want to send a mail merge from a shared mailbox (such as from an email address named for a department, company, or event instead of a person), you can arrange it in Outlook.

Start by finding the “Other User’s Folder” and open it to navigate to the shared mailbox. Associate that mailbox with the spreadsheet that contains your recipients’ data and prepare the mail merge as usual.

How do you do a mail merge in Word for labels?

One of the coolest features of MS Word’s mail merge functionality is the ability to drive printed labels with placement designed in Word and data-driven by your personalization data sheet.

If you know how to do a letter or email mail merge in Word, labels are very easy.

Under the Mailings tab in Word, click the Start Mail Merge selection and then the Step-by-Step Mail Merge Wizard. Choose Label as your template document type, and under Label Options, select a label manufacturer and style number (for example, Avery 5160, etc.).

From there, follow the wizard’s prompts.

How do you do a mail merge with Outlook?

To create an Outlook mail merge, you’ll need to use Microsoft Word, Excel, and Outlook.

Starting in Word, choose the Mailings menu, then Start Email Merge, and then Email Messages.

When your message is ready, click Select Recipients to link to the Excel spreadsheet with your data. Then, select Finish & Merge to send your email to your list using Outlook.

What is extended mail merge?

If you’re a Salesforce user, you have two options for mail merge — standard and extended.

Standard mail merge is the preferred approach for those with specific CRM software and operating systems, such as Luminate CRM and Windows 10.

Extended mail merge is a mail merge tool for all other Salesforce users. Although the tools are different, the results are the same — personalized emails to recipients listed in Salesforce.

Mail Merge: Which Should You Choose?

Mail merge is a powerful and underutilized technique to create personalized emails, documents, and printings at scale.

You can run mail merges with Microsoft Office and Google Workspace — however, different platforms excel at different types of merges.

If you want to send mail merge emails, Gmail is far superior to Outlook. The best option is using a third-party option, like GMass, to turn Gmail into a fully-functional mail merging email platform.

If you want to create printed mail merge items, like envelopes or mailing labels, Microsoft Word will work better than Google Docs. Word has a built-in merge feature that excels at printed items. (It’s much less useful for emails, though.)

Ready to get started?

You can download the GMass Chrome extension from the Chrome Web Store and get set up on a free trial in a matter of seconds. Join the 300,000+ others who are sending out personalized mass emails and other mail merge campaigns effortlessly and without a learning curve.

Ready to transform Gmail into an email marketing/cold email/mail merge tool?


Only GMass packs every email app into one tool — and brings it all into Gmail for you. Better emails. Tons of power. Easy to use.


TRY GMASS FOR FREE

Download Chrome extension - 30 second install!
No credit card required
Love what you're reading? Get the latest email strategy and tips & stay in touch.


We’ve got good news and bad news on how to send mass email from Excel.

The good news? It’s possible.

The bad news? It can get a bit convoluted and requires bringing Microsoft Word into the equation when you’re sending through Microsoft Outlook. (And in complex cases, you might even need to bring Excel VBA and at least one VBA macro into the equation.)

More good news: There’s a simple solution to send your email blast which we’ll cover in this article.

In this article, I’ll show you how to perform a mail merge using an Excel spreadsheet to send your personalized mass email messages whether they’re cold email, email marketing, or any other type of email campaign.

I’ll also go into detail about common merge issues with MS Excel, as well as the fixes for those problems.

How to Send Mass Email from Excel: Table of Contents

(Click on the links below to jump to a specific section)

How Does a Mail Merge Work?

A mail merge automatically fetches data from a spreadsheet (or other data source) and inserts it into an email template. This data can be your contacts’ names, company names, or any other details. (You’ll need a list of addresses; it’s most common to put them in column A.)

To send a mail merge, you need two files:

  1. A data file. Obviously in this article we’re covering a Microsoft Excel file but we’ll also get into Google Sheets. Really, your data file can be any spreadsheet or database that contains your contacts’ information.
  2. A template file. The main document that has placeholders for inserting the data that is fetched from your data file. For our purposes here, we’re focusing on an email template.

Here’s what your template file might look like.

shows an email template

When you’re sending email with a mail merge, your data file will be the spreadsheet that contains all your contacts’ details.

shows a spreadsheet

The mail merge function would then combine the email template with your data file to create individual emails for each contact.

How do merges make your life easier?

How do merges make your life easier?

The mail merging process automatically creates separate, personalized emails for each recipient. This way, you save tons of time as you’re not wasting hours manually creating a new customized document for each person.

Imagine manually composing 100 different emails for 100 different recipients!

You can use mail merges without having to individually select recipient data from your Outlook contacts or elsewhere to send different documents like:

  • Bulk email
  • Cold emails
  • Email marketing messages (newsletters, promos, and more)
  • A form letter
  • Mailing labels
  • Envelopes
  • Return address labels
  • Personalized brochures
  • And more…

How to use mail merge for sending mass emails in Excel

Mail merging is the most commonly used method to send mass emails.

Here, the data file will be a mailing list, which is usually stored in a spreadsheet, like Google Sheets or Excel. Your mail merge template will be the email that you send to your list.

However, sending mass emails from Excel with Microsoft Word Mail Merge can be challenging due to formatting errors and other issues.

Find out the most common Word mail merge formatting errors you encounter when sending emails from Excel, as well as how GMass fixes these problems here.

Send mail merges easier with GMass

Unfortunately, an Excel mail merge is a time-consuming and often convoluted process to send bulk email with which many people struggle.

What if there was an easier way to send emails that were personalized to your entire mailing list? There is, and the solution is called GMass. You can use GMass to send email quickly and efficiently from Excel.

What Is GMass?

GMass is a powerful mail merge tool that makes it incredibly easy to draft and send mass emails from Gmail.

Our ease coupled with the most robust feature set of any Gmail-based email service provider have led to 300,000+ users (leaving 7,500+ reviews with a 4.8/5 star average).

What’s more —

Anyone can get started with GMass immediately — just download the Chrome extension and sign up with your email. There’s no credit card required… there’s not even a web form. It’s that simple!

shows the GMass webpage

If you have your contact data saved in an Excel file rather than keeping it as Google Contacts, GMass can easily use it to create a data merge that personalizes your emails to multiple recipients.

How to Send Mass Emails with Excel — The Easier Way

Here’s a detailed walk-through for how to send a mail merge in Excel using GMass.

I’ll be using the Excel spreadsheet, shown in the image below, to walk you through the process.
shows an excel sheet

Step 1: Import Your Excel sheet into Google Sheets

The first step is to import your Excel spreadsheet into Google Sheets. (It just takes a few seconds.)

Google Sheets is free and available to anyone. All you need is a Google account!

Note – If your contact data is in a CSV file, you can also import it into Google Sheets. Here’s a LinkedIn Learning tutorial on how to import a CSV file into Google Sheets.

Here’s a step-by-step guide on how to import your Excel file into Google Sheets:

  • Open Google Sheets.

shows the Google Sheets webpage

  • Click on the folder icon in the bottom-right to open the file picker.

shows how to open the file picker

  • A new window showing the Google Sheets File Picker appears.
    Click on the Upload tab to upload your Excel file.

shows how to upload a file to GSheets

  • You can now select the file you want to upload from your computer.
    To select your file, click on the Select a file from your device button.

shows the drag or select file window

  • Select the Excel spreadsheet you want to upload from your computer and click on the Open button.

shows how to open an excel file into GSheets

  • Your file will be automatically uploaded and converted into a new Google spreadsheet.

Voila!

shows a GSheet

Step 2: Format your new Google spreadsheet

Notice how my Google Sheet has the text — Ted’s Tadpole Tanks — in the first row?

Remove text and blank rows from your spreadsheet for the mail merge (with GMass or, really, anything else).

Here, I’m deleting rows 1 and 2 from my sheet:
shows the rows to be deleted from a GSheet

Once you’ve selected the rows to be removed, click on the Edit menu and click Delete selected rows.

shows the Edit menu in GSheets

After deletion, the sheet looks like this:

shows the GSheets after deleting rows

Your spreadsheet should also have the following. . .

  • The first row of your Google Sheet should contain column names such as FirstName, LastName, Email, etc. Ideally, column names shouldn’t contain spaces, special characters, or codes. Instead, stick with alphanumeric characters for each name. GMass will automatically use these field names as the mail merge labels that will be placed in your email placeholders.
  • The actual data should start in the second row.
  • At least one column should contain your recipients’ email addresses. GMass will auto-detect this column during the data merge.

Step 3: Connect GMass to your Google spreadsheet

Here’s a step-by-step guide on how to connect GMass to your Google spreadsheet:

  • Log in to your Gmail account.
  • Click the GMass sheet button beside your Gmail search bar.

shows how to connect GMass to GSheets

  • A pop-up window appears:

shows the GMass-GSheets connection window

  • You can now select the spreadsheet you want to use for the mail merge from the Google Sheets drop-down list.

shows how a GSheet is connected to GMass

Note – If there’s only one sheet (Sheet1) in your Google spreadsheet, it’s selected by default. However, if your spreadsheet has multiple sheets, you can select the required sheet from the worksheet drop-down menu. 

Once you’ve selected a spreadsheet, click on the Connect to Spreadsheet button.

  • After clicking the connect button, GMass will automatically read each recipient’s address and other data from your spreadsheet. It will also insert their addresses into the To field of a new email when you send (though in the compose window, you’ll see an alias address representing your list.)

shows a new compose window in Gmail with email ids from the GSheets inserted

  • Now you can compose your email using the advanced personalization features of GMass. To access these personalization settings, click on the settings arrow next to the red GMass button.

shows the GMass settings window

Click the Personalize drop-down list, and all the column names you added in your Google Sheets file will show up.

To personalize your email message, select the column names in your spreadsheet from the drop-down menu. You can insert these placeholders anywhere in your email subject and email body.shows the GMass personalization settings

  • Here’s how my personalized email looks:

shows the final personalized email

Notice the {FirstName} label?

That’s a personalization tag corresponding to the FirstName column in my Sheet.

  • Once you’ve finished composing your mail, hit the GMass button to send the email.

Note – GMass will automatically personalize the email for each prospect or contact based on the mail merge labels you’ve used in your email messages. For example, the second line of the spreadsheet, Brandon Walsh, will receive an email that starts with “Dear Brandon,” since the {FirstName} label was used in the email body.

Using your Outlook email address in Gmail

Even though you’re sending through Gmail you can still use your Outlook address for your email campaign. (You could also use a Yahoo mail address, AOL email address, and so on.)

And we even have a technique for sending mass email through Gmail with GMass where you can use your Outlook address — but still get the top-of-the-line deliverability by sending through Gmail’s servers. Here’s an explanation of how to set up that Gmail alias. (It only takes a few minutes.)

How to Send a Mass Email with Excel — The More Complicated Way

It’s easy to do your mass emailing from Excel through Gmail/GMass. But if you really want to keep everything within the Microsoft ecosystem, you can.

It’s just a little more complicated.

Send Personalized Mass Emails From Outlook with Excel

It’s common for organizations to send mass emails using Outlook and Excel Mail Merge. You can use mail merge in Microsoft Office to create a form letter with unique personalization elements like greetings or salutations for each contact.

However, the process can be challenging due to Word mail merge formatting errors and other issues.

Here’s a walk-through for how to create a mail merge in Word and Excel to create personalized mass letters:

Step 1: Format your Excel workbook

Before you start a mail merge in Word and Excel, you need to ensure that your Excel file is properly formatted.

However, unlike the GMass method, it can be a little more confusing.

Here are six things to keep in mind when formatting your Excel workbook for a data merge with your Word document:

  • The column header of your Excel table must contain the field names you want to use in your mail merge template. For example, if the Excel column name for your contacts’ first names is “FirstName,” the Word mail merge function will use this as the corresponding placeholder in your template.
    • shows an excel sheet
  • Organize your Excel data to have one record per row.
  • Your data must start in cell A1 in the Excel worksheet.
  • All edits to your Excel document must be done before initiating the mail merge with your main document. (With GMass and Google Sheets you can update after connecting.)
  • Your Excel workbook must be stored on your computer.
  • Data entries with numerical values such as currencies, postal codes, percentages, dates, etc. must be in the proper number format. To do this, you need to:
    • Select the column that contains the numerical value.
      • Click on Home and go to the Number section.
        shows the excel menubar
      • Click on the Number Format box and choose the required format from the drop-down menu that appears.
        shows the various number formats in excel

Note – If your contact data is a TXT or CSV file, you can import it to Excel by clicking on From Text/CSV in the Data section in the menu bar.

Step 2: Prepare the document template for your Word mail merge

The next step is to prepare a mail merge template for your form letter in Microsoft Word. Here’s a step-by-step guide on how to do this:

  • Open a new document in Word.
  • Select the Mailings tab and click on Start Mail Merge group. A drop-down list showing every different document type pops-up.

You can choose between an email, envelope, letter, directory, or label template. For example, to create mailing labels, you need to select the Label template as your document type.

As we are sending a letter (I mean, not really, but it actually works better to send email message templates), choose Letters as your main document from the drop-down list.

shows different mail merge documents in word

Note: You can also use the Step-by-Step Mail Merge Wizard to streamline the mail merge in Word process. For example, the wizard lets you select the starting document for your mail merge as shown here:

shows the word mail merge wizard

  • Type in the “letter” you want to send to your mail merge recipients.

Step 3: Select Your Recipient List

After composing your letter, you need to choose the list of mail merge recipients for it. Here’s a step-by-step guide on how to select your recipients in MS Word:

  • Click on the Select Recipients button.

shows the Select Recipients tab in word

  • From the drop-down menu that appears, click on Use an Existing List.

shows the select recipients menu in word

  • A dialog box pops-up. Select the Excel file you want to use as the contact list for your letter and click Open.

shows the word file picker window

  • Choose the Excel worksheet you want to merge with the Word doc and click OK. If your Excel workbook has only one sheet, you’ll see only Sheet1.

shows the window to select the excel sheet you want to merge with word

  • If you want to edit your mailing list, choose Edit Recipient List.

A Mail Merge Recipients pop-up window will be displayed. In the pop-up window, clear the checkbox next to the name of the person you don’t want to include.

shows the Edit Recipient window in word

Step 4: Add personalized content to your letter

Now you can add personalized content (like names and addresses) to your letter.

Word lets you add three personalization variables to your current document:

  1. Insert Address Block – you can insert a person’s address to your document.
  2. Insert Greetings/Salutations – add a personalized greeting to your letter.
  3. Insert Mail Merge Fields – add other mail merge labels from your Excel worksheet.

Insert Address Block

Go to the Mailings tab and click on Address Block.

shows the Insert Address Block window in word

From the dialog box that appears, select the format for the recipient’s address block and click OK.

An address tag will be automatically added to your Word document, as shown in the picture below:

shows the address block tag inserted into word

Insert Greeting Line

Click on Greeting Line from the menu bar, choose the format you want to use, and click OK.

shows the Insert Greeting Line window in word

A greeting tag («GreetingLine») will be automatically inserted into your letter.

Insert Merge Field

You can also insert other mail merge labels in Word like the recipient’s first name, contact number, company name, etc. by clicking on the Insert Merge Field from the menu bar.

These fields are the column labels in your Excel sheet.

shows the insert other fields menu in word

Quick Tip – You can also use the Match Fields dialog box to manually map your Excel column names with your template field names. While it’s more time-consuming, it gives you more control over the personalization process.

shows the Match Fields window in word

Step 5: Preview and finish the mail merge function

Once you’re done creating the letter, you can preview what it looks like with the data added from your Excel spreadsheet.

Here’s a step-by-step guide on how to preview your letters with Word’s mail merge function:

  • Go to Mailings > Preview Results to preview your letter for each recipient.

shows the Preview Results menu in word

  • You can enter the recipient number (the corresponding row number in your Excel file) in the text box or click on the Next and Previous buttons to scroll through your recipients.

shows the settings to used to preview the document for each contact

  • After verifying the data, select Finish & Merge to complete the mail merge process between Word and Excel.

shows the Finish & Merge drop-down list in word

A drop-down menu appears. You can choose to:

  1. Edit Individual Documents – further edit individual letters.
  2. Print Documents – print labels, letters, or any other merged document type.
  3. Send Them as Email Messages – send the merged document as a bulk email.

Note – Sending letters as email messages requires you to set up Outlook or Gmail with Word manually. Using the GMass method for merges is a much simpler process.

Step 6: Save the letter

When you’re done working with your merged document, you can save it by going to File > Save or by pressing the Cmd/Ctrl + S keys.

To reuse your mail merge document, open it and click Yes when Word prompts you to keep the connection from Excel to Word.

shows the window asking you if you want to keep the connection between your word and excel files or to stop it.

Conclusion

Creating a mail merge in Excel to send emails doesn’t have to be so complicated.

While you can use MS Word to create mail merges for letters, it can be tricky to use when sending mass emails .

Instead, use a mail merge and email marketing tool like GMass.

Its powerful mail merge features let you draft, merge, and send emails faster and easier than any other solutions. So why not download the Chrome extension and try it out today?

Email marketing, cold email, and mail merge inside Gmail


Send incredible emails & automations and avoid the spam folder — all in one powerful but easy-to-learn tool


TRY GMASS FOR FREE

Download Chrome extension - 30 second install!
No credit card required
Love what you're reading? Get the latest email strategy and tips & stay in touch.


If you’ve used the Gmail API, you may have encountered some quirks with From Addressing when creating and sending a DRAFT. As an example, if you’re working with a DRAFT in the Gmail UI, and then you change the From Address to a different choice in the From dropdown in the Compose window, that change will not immediately be reflected in the DRAFT if you then call users.drafts.get on that particular DRAFT. Why? Because Gmail hasn’t saved the DRAFT yet. This is just one of the quirks we’ll examine and work around in this article.

1. Create a DRAFT with the Gmail API; then open it up in the UI

When you create a DRAFT with the API using users.drafts.create, it doesn’t necessarily need a From Name/From Address. But if you then open the DRAFT in the UI and make changes, a From Display Name will be set. Here is some sample C# where I’m calling the Gmail API to create a DRAFT with just a Subject and an HTML body.

I can then retrieve the DRAFT that was created by using the Gmail API Explorer. Notice how the From Line contains my account address, [email protected] but no From Name:


However, if I then open up this DRAFT in the Gmail web interface, and then make a simple change like adding a few spaces to the Subject, that action re-saves the DRAFT and also sets the From Display Name.

I added a “space” to the Subject line, and that triggered the saving of the DRAFT, which is reflected in the “draft saved” message.

Now if I retrieve the same DRAFT using the API explorer, the From Name is also present in the From Line:

2. Retrieve the From Address/Name of a DRAFT using the API

A DRAFT created in the UI will almost always have the correct From Name and From Address, however this wasn’t always the case. For a while after the Gmail API was released in 2014, a DRAFT retrieved from the Gmail API would always show the Google Account Name as the From Name, and not the actual From Name set in Gmail Settings, or the From Name chosen from the From dropdown in a Compose window, in the case where multiple From Addresses/Names are set up. For most users, this was fine, because by default the From Name is NOT set separately in Gmail — the From Name by default is pulled from your Google Account. It’s only different if you proactively set it differently in Gmail’s Settings:

If you selected the second radio button, you can set the Gmail From Name separately from your Google Account Name.

Additionally, if you had multiple From Addresses/Names configured for your Gmail account, even if you a From Address other than your default Gmail account, the behavior of the Gmail API method users.drafts.get was to show the Google Account’s name in the From Line, not the specific From Name that corresponded to the From Address.

That issue, however, was corrected sometime in 2019. Now, the DRAFT does correctly display the From Address and the right From Name, provided it has been saved since the last change was made to the From Address.

3. Changing the From Address using the dropdown in the Compose doesn’t always take effect

When you select a From Address/Name from the dropdown in the Compose window, the DRAFT does not save, and the change is therefore not reflected in the DRAFT. Let’s test this:


The DRAFT needs to be saved via a change to the Subject or Message for the change in the From dropdown to be reflected in the DRAFT.

Now, does this mean that if you were to click the Gmail Send button after making a change to the From dropdown, that your change wouldn’t be reflected in the email that is sent? No. Your change would be reflected, because clicking the blue Gmail Send button triggers a “save” operation on the DRAFT before it’s sent.

Similar to how the blue Send button triggers the saving of the DRAFT, you can also trigger the saving of a DRAFT programmatically. If you’re developing a Chrome extension and using JavaScript and the Inbox SDK API to manipulate the Gmail UI, then you can use the fromContactChanged event to detect when a change has been made, and then forcibly add a “space” to the Subject Line to force the DRAFT to save in a few seconds.

Here’s a code sample to accomplish this:

4. Retrieve account-wide From Address info

Another way you can retrieve From Line information is by using the users.settings.sendAs methods of the API. The “list” method will pull a list of all possible From Addresses/Names from the account, not specific to a DRAFT, though. The information here corresponds to the information under your Settings–>Accounts tab in the Gmail web interface:

This is the list of From Addresses and corresponding Display Names I’ve configured for my Gmail account.

There’s one key difference, though, that’s important to be aware of if you plan on retrieving From Line information using the Users.settings.sendAs.list method. If you have set your default Gmail account to use the From Name of your Google account, meaning you haven’t set it separately in Gmail settings, then the API will return an empty string for the From Display Name.

Let’s demonstrate this by video:

5. Working client-side? Use the Inbox SDK API to pull the From Line from the Gmail web UI.

If you’re working with Gmail inside the interface and are developing a Chrome extension and want to get the current DRAFT’s From Address and Display Name, you can also use Inbox SDK’s API, and specifically, the getFromContact method of the ComposeView object. A ComposeView is just a fancy term for an actual Compose window in Gmail.

However, there’s an important factor to consider when using the getFromContact method. If your Gmail account doesn’t have any additional From Addresses set up, meaning all your emails are sent by your default Gmail account, then a From dropdown doesn’t show up in the Compose window.

If you don’t have any additional From Addresses set up in your Gmail account, then a Compose window doesn’t give you a From dropdown.

If there’s no From dropdown, then getFromContact has difficulty pulling accurate From Line information for the ComposeView. It can’t find what it can’t see.

If there’s no From dropdown, then the properties of the  Contact object it retrieves are set to your logged-in Gmail account. Contact.name is set to the Name set for your overall Google account, and Contact.emailAddress is set to your logged-in Gmail account. Sometimes, it’s unable to pull the name set on your Google Account and instead sets Contact.name to “Default”. In the past, this has caused issues for GMass users, but we’ve now worked around this by ceasing our use of getFromContact and relying on the From Address/Name in the Gmail DRAFT retrieved from the API instead. Essentially, we’ve moved the processing from the front-end to the back-end to ensure greater accuracy.

TL; DR

There are several techniques to pull From Email and From Display Name information from a Gmail DRAFT and from an overall Gmail account, but there are some oddities to take into consideration.

See why GMass has 300k+ users and 7,500+ 5-star reviews


Email marketing. Cold email. Mail merge. Avoid the spam folder. Easy to learn and use. All inside Gmail.


TRY GMASS FOR FREE

Download Chrome extension - 30 second install!
No credit card required
Love what you're reading? Get the latest email strategy and tips & stay in touch.


If you’re running SQL Server somewhere in Amazon Web Services (AWS), you’ve probably heard that it should not have a public-facing IP address. Your SQL Server likely stores your organization’s most precious data, and you want to protect it like you would your first-born, and that means cutting it off from outside access.

What happens when you have a public-facing SQL Server?

In time you will see lots of entries like this in your Event Application Log:


Even if you disable your “sa” account, you’ll still get hammered with login attempts, but with a slightly different Application Log message:

Every SQL Server that’s publicly accessible on the Internet is eventually subject to a brute force attack on the “sa” account. So not only should your SQL Server be protected from the outside Internet, the “sa” account should be disabled as well. Disabling the “sa” account is easy.

My trick to blocking public access to SQL Server

Setting up your SQL Server so that it can’t be accessed by the Internet but can be accessed by your web and application servers is trickier, though. Amazon provides an article on how to do that via multiple VPCs, but I’m a simple man, and I like simple solutions. After testing several scenarios, I arrived at the following plan that adequately protects my SQL Server instance and, incidentally, saves money on my AWS bill.

The trick is to put all of my servers, applications, web, and SQL Servers, in the same Availability Zone, and then lock down the Availability Zone using a Network ACL in my Virtual Private Cloud (VPC). A simple DENY rule blocking port 1433 to my VPC accomplishes this. Any servers in the same Availability Zone and subnet will still be able to access port 1433, since the ACL only protects the subnet from anything outside the subnet, not inside.

You’ll notice that I have an ALLOW rule for my own IP right above the DENY rule that blocks all access to port 1433, the standard TCP/IP port used by SQL Server. This is so that I can still manage my SQL Server from my personal workstation. You might be wondering why you need to bother with the Network ACL, which applies to the entire subnet, rather than just setting Inbound rules in the Security Group that holds the EC2 Instance. The reason is that Security Group rules are only for ALLOWING port access. You can’t put a DENY rule in a Security Group, but you can in a Network ACL.

Save money on your AWS bill

The added benefit of having all of your servers in the same Availability Zone is that you don’t pay for bandwidth between your servers. If your servers are across different Availability Zones, then you pay $.01/GB transfer. For me, that portion of my data transfer alone has been racking up $250/month in fees recently. Actually, there are two conditions necessary for avoiding data transfer fees between your instances: 1) They must be in the same AZ; 2) They must communicate with each other via their private IP address, not a public IP address.

It’s important to note that I host my own SQL Server on an EC2 Windows instance. I don’t use RDS, but the same concepts I’m using here should also apply if your SQL Server lives on an RDS endpoint. I considered RDS but decided against it because I’m a power SQLAgent user, and SQLAgent has restricted capabilities in RDS.

You might argue that putting all of your servers in the same Availability Zone is silly since the whole point of multiple AZs is to allow for redundancy in case one zone goes offline. You’d be right, but if a poor man’s solution to locking down your SQL Server appeals to you in the first place, I’m betting you’re not worried about redundancy across Availability Zones. In my 4+ years of hosting with AWS, not one of my Availability Zones has ever gone down.

Moving my servers into the same Availability Zone

To get this setup working, I had to consolidate all my servers into one Availability Zone, which was tricky because my servers were across three of them, us-west-2a, us-west-2b, and us-west-2c. To make matters worse, my SQL Server was on us-west-2c while most of my application and web servers were in us-west-2a. I had a choice to make: switch my SQL Server to us-west-2a OR switch the rest of my servers to us-west-2c. Because changing Availability Zones results in instance downtime since you have to stop and re-start the instance, and because taking down my SQL Server brings down my entire system, I opted to switch the rest of my servers to us-west-2c, which I could do in batches to prevent a disruption in customer’s email campaigns.

Lastly, to avail myself of the cost savings by having all servers in the same AZ, the servers must also communicate with each other by their private IP, not by their public IP. This makes sense, because if all of your application servers are hitting your SQL Server by its public IP, then the traffic is first leaving your AZ and then coming back in via a public routing. If, however, you connect by a private IP, then your traffic stays inside your subnet and AZ.

I had two options to change easily from public IP access to private IP access of the SQL box: change the DNS entry for database.gmass.co, or put in a “hosts” entry into all my application servers, hard-coding database.gmass.co to the private IP address so that it resolves to the private IP rather than the public IP from the Internet’s DNS system. The TTL on database.gmass.co was low enough that I just changed the IP address of database.gmass.co from the public-facing IP on the SQL Server to its private IP. Plus, this way, if I ever set up a new server, I won’t have to remember to put in that “hosts” file entry.

So now, while my SQL Server still has a public-facing IP address, it’s impossible to know what that IP address is. Furthermore, if someone did figure out that public IP, they’d be stopped in their tracks from accessing the server because between the Network ACL, which protects the whole AZ, and the Security Group’s Inbound Rules that protect the individual instance, no inbound access is allowed. Even Remote Desktop (RDP) access is allowed only from my personal workstation.

To lock down the SQL Server even further, the EC2 Security Group allows only outbound access over port 25 so that the server can send email notifications to me about certain events, such as a BACKUP success or failure.


Note: By the way, database.gmass.co isn’t the real domain name for my SQL Server.

Don’t like this approach?

If you’re an enterprise user and don’t want a “hacky” solution to securing something as important as your SQL Server, see AWS’s Best Practices Guide to SQL Server deployment.

See why GMass has 300k+ users and 7,500+ 5-star reviews


Email marketing. Cold email. Mail merge. Avoid the spam folder. Easy to learn and use. All inside Gmail.


TRY GMASS FOR FREE

Download Chrome extension - 30 second install!
No credit card required
Love what you're reading? Get the latest email strategy and tips & stay in touch.


Looking to change your email name or email address?

Your email name and address are the first things people see when they get your email, so it better be perfect, right?

But how do you edit your email name and address to fit your email sending needs?
You don’t have to be a chameleon to make it happen.

In this article, I’ll give you a simple walk-through guide on how to change your email name and address.

Here’s what this article contains:

(Use the links below to jump to a specific section)

Here’s a break down of the terms I’ll be using throughout this article:

    1. Recipient – the person who receives your email.
    2. Primary email address – the email address you use to sign in to your email account.
    3. Secondary email address – the email address you use as an alternative to your primary address, such as a business address or a recovery ID in case you forget your password.
    4. Google Account Name – the name you use across all your Google apps such as Docs, Drive, and Calendar, etc.
    5. G Suite Account – work or school Gmail accounts ending in @companyname.com or @schoolname.edu.

Email Names vs. Usernames: What’s the Difference?

Most people think email names and email usernames are the same things.
They’re not.

Young boy surprised that email name and email username are not same.

An email name (also known as a sender name) is the name that’s displayed when you send an email. Your email username, however, is your email address.

For example, in the image below, the email name is “John” and the username is “[email protected]”.

How do you find this information?
In most email clients, you’ll have to tap or hover your mouse over your profile picture to access this information.

So how do you change it?
Changing your sender name is fairly simple.
However, you might not always be able to change the email username.

How to Change Your Email Name

Note – I’ll be talking about Gmail here, but the process is the same for different email services like Microsoft Outlook.com, Hotmail, and Yahoo Mail. However, if you’re using Microsoft Exchange accounts, you can contact your administrator for help.

By default, your email name in Gmail and your Google account name are the same.

If you want to change your email name, you can choose to:

  • Change your name in Gmail only.
  • Change your name across all your Google apps.

Click on the links to jump to a specific method:

How to Change Your Email Name Only

Here’s a step-by-step guide on how to edit your sender name.

Note – You can’t change the email name from the Gmail mobile app. You’ll have to do it through your browser.

Step 1
Open your Gmail account by typing in your email ID and password.

Step 2
Go to your account settings by clicking the gear icon in the top right corner of your inbox.
From the drop-down menu that pops up, click Settings.

Step 3
If you’re using a regular Gmail account (that ends in gmail.com), click on the Accounts and Import tab.

If you’re using a G Suite account, click the Accounts tab.

Step 4
Under Send mail as, click edit info against the email name you want to change.

Step 5
Enter the new name or alias you want to display in your emails in the name field.
Select the button next to your new display name and click on Save Changes.

How to Change Your Google Account Name

You can also change your Google account name. Changing your Google account name will also change your Gmail email name automatically.

Here’s a step-by-step guide on how to do this:

Note – You can also update your Google Account name from the Android and iPhone Gmail app.

Step 1
Log in to your Google Account.

Step 2
Click Personal info in the left sidebar.

Step 3
Under Profile, click NAME.

Quick Note – You can also change your password by clicking the PASSWORD option.

Step 4
Click the pencil icon to edit your current name.

Note – If you’re using a G Suite account, you need to contact the admin to change your name.

Step 5
Enter your new name and click the DONE button.

How to Change Your Email Address (Username) in Gmail

Changing your email address can be tricky.

Why?
Gmail usually doesn’t allow you to change your email ID if it ends in gmail.com.

Usually?
While there is a step-by-step method in place, it doesn’t work for every user. Gmail doesn’t specify why, but you can always try it!

But if you have a G Suite account, you may find it easier to change your username. All you have to do is ask the G Suite administrator for help.

However, if you’re still unable to change your username, you’ll have to create a new Gmail account and import the data from your existing account.

Inconvenient, right?
But don’t worry.

I’ll show you Gmail’s method to change your username, and if that doesn’t work, I’ll show you how to import your user data quickly into a new account:

How to Change Your Existing Email Address

Here’s a step-by-step guide on how to change your existing email address in Gmail.

Note – this isn’t guaranteed to work for every user.

Step 1
Log in to your Google Account.

Step 2
Click on Personal info in the left sidebar.

Step 3
Under Contact info, click EMAIL.

Quick Note – You can add your phone number to boost your account security by clicking the PHONE option.

Step 4
Click on Google Account email.
If you can’t open this setting, it isn’t possible to change your email address.

However, if you’re able to open this, follow the next step.

Step 5 (If you can click on Google Account email)
Select edit, next to the email address you want to change. Enter the new email address for your account and follow the on-screen instructions.

Note – You will receive a verification email at the new address. To complete the address change, you need to click on the verification link in that email. 

Additional Tip: Add Secondary Email Addresses

In addition to your primary email ID, you can add other IDs to your Google Account and use them to sign in.

To do this, click on the Advanced option in the EMAIL section of Personal Info.

You can add secondary email ids like Contact email, Alternative emails, and About Me emails for your Google Account.

Note – Google will send a verification code to the secondary email address to confirm the update.

How to Import Data from an Existing Account to a New Gmail Account

If Gmail doesn’t allow you to change your email address, you’ll have to create a new email account (with the address you want) and import your existing data there.

Here’s a step-by-step guide on how to do that.

I’m transferring data from an old ID – [email protected] to a new account – [email protected]

Step 1
Create a new Gmail account and log in to it.

Step 2
Go to your account settings by clicking the settings icon (the gear icon) in the top right corner of your mailbox.

From the drop-down menu that pops up, click Settings.

Step 3
If you’re using a regular Gmail account (that ends in gmail.com), click the Accounts and Import tab.

If you’re using a G Suite account, click the Accounts tab.

Step 4
Under the Import mail and contacts section, click on Import mail and contacts.

Note – If you’re using a G Suite account and you don’t see the import mail option, you’ll need to contact your administrator.

Step 5
A new browser window will pop up.

In the text box displayed, enter your old address and click the Continue button.

You will now be asked to sign in to your old mail account.
Open a new browser tab and sign in to your old account.

You’ll now be signed in to both your old and new addresses.

Step 6
After signing in to your old account, click Continue.
Another browser window will pop up, asking you for access to your old email account.

Once you grant access, you’ll see a status message if the authentication was successful.

Step 7
Now close this window and go to the previous pop-up window (the one with your new account).

Select the import options for your old mail account.
You can now import contacts, old emails, and forward all new mail (for the next 30 days) from your old account to the new account.

Select the desired options from the menu and click on Start import.

Step 8
After the import is complete, a finished status message will be displayed on the screen.

Step 9
Now refresh your new Gmail account.
You can view the messages from your old mail account under the folder with your old account name.

Voila!

Note – To stop importing, click stop in the “Import mail and contacts” section. 

Conclusion

While it can be tricky to change the email name and Gmail address of your current account, it isn’t impossible.

Just follow the steps I listed above, and you’ll be fine!
If you have any more questions about this, let me know in the comments below.

Ready to transform Gmail into an email marketing/cold email/mail merge tool?


Only GMass packs every email app into one tool — and brings it all into Gmail for you. Better emails. Tons of power. Easy to use.


TRY GMASS FOR FREE

Download Chrome extension - 30 second install!
No credit card required
Love what you're reading? Get the latest email strategy and tips & stay in touch.


Is Woodpecker the right email outreach tool for you?

This Woodpecker review will help you decide if Woodpecker is a good fit for your email requirements. I’ll also highlight three great Woodpecker alternatives that can address all your email outreach needs. And you can also check out our top 7 cold email software solutions.

Here’s what this article contains:

(Click on the links to jump to a specific section)

Let’s get started.

What Is Woodpecker Email?

Woodpecker.co is an email marketing automation tool that lets you send emails and follow-ups from Gmail and Outlook. It’s chiefly used by B2B companies to personalize, automate, and track their outbound sales campaigns easily.

Shows Woodpecker's interface.

The Key Features of Woodpecker:

Here’s a closer look at some of Woodpecker’s key features:

1. Powerful Email Tracking

Woodpecker automatically tracks the various email metrics of your marketing and sales emails. It measures different stats, such as:

  • Open Rate – the percentage of email IDs that opened your email.
  • Click-through Rate – the percentage of people who clicked at least one link in your email.
  • Sent – the number of emails that were sent.
  • Delivered – the number of IDs that received your email, and more.

You can also manually mark your campaign replies as interested, maybe later, or uninterested. Woodpecker then analyzes this to calculate the number of positive responses you’ve received for a specific campaign.

This helps you identify which email templates, subject lines, and links are giving you the best results. You can then tailor upcoming campaign messages accordingly to boost your conversions!

Shows the metrics tracked by Woodpecker.

2. Cold Email Personalization

Woodpecker lets you add custom fields and snippets to give your mass cold emails a personal touch. This helps you edit each email on a person-by-person basis, making emails unique and personalized for each recipient.

Woodpecker automatically adds recipient details like:

  • Their first name.
  • Their company’s name.
  • The part of a prospect’s website or blog you liked the most.
  • The reason you decided to reach out to them, and more.

For added flexibility, Woodpecker even lets you import your contact data as CSV files for quick personalization.

3. Efficient Follow-ups with Email Automation

Woodpecker helps you send powerful automated follow-ups for your cold email campaigns. As these follow-ups are part of the same email thread, your clients will always have the context — even if they have not responded to your first email.

The tool automatically stops sending these follow-ups if it detects an auto-reply from the recipient. You can then choose to resume the sequence manually or not.

4. Simple Campaign Scheduling

Woodpecker lets you schedule all your emails and follow-ups in advance. This allows you to plan your emails and send them when and as required.

It lets you set a custom date and time within a chosen time zone to schedule your emails. As the tool automatically sends them when the time arrives, you won’t have to be online when they go out.

Displays scheduling settings of email campaigns in Woodpecker.

Three Drawbacks of Woodpecker Email

While Woodpecker is a good email marketing tool, it isn’t a perfect product.
Here are some of its drawbacks:

1. You Can’t Send Email Attachments

Woodpecker doesn’t let you add email attachments to your mass emails.

This can be a big issue when you want to send emails with documents such as presentations, white papers, or even proposals. As you can’t add attachments to your emails, you’re limiting the level of engagement you have with your prospects.

Additionally, email trackers that support attachments give you tons of helpful insights into your prospect interactions, such as:

  • The hours they spend on your documents.
  • The sections of the file in which they’re most interested.
  • If they’re forwarding or downloading your attachments.

If you use Woodpecker, you won’t be able to measure any of this. 

2. Woodpecker Works As a Separate Inbox

Another problem with Woodpecker is that it’s not embedded within your Gmail or Outlook inbox. Instead, it functions as a separate inbox altogether.

This may not be an issue for some users, but I’d rather have my email software work within my inbox.

Why do I prefer that?

  • I won’t have to open a separate dashboard or interface to monitor my email engagement.
  • The tool can categorize all my campaign replies, follow-ups, and reports under different labels right inside my inbox.

Unfortunately, this isn’t an option with Woodpecker.
If you use it, you’re going to have to juggle between tabs and inboxes to manage your emails.

3. It’s Expensive

The Woodpecker app prices its cold email plans starting at $29/month… but that’s for 500 connected prospects and 2,000 stores prospects. Once you start wanting to email larger lists, the price goes up significantly:

The cold email plan offers automated email, analytics, and teamwork features. It does not include API access (or Zapier usage); that costs another $20/month.

Their plans come with a free trial (no credit card needed).

Three Great Woodpecker Email Alternatives to Try

While Woodpecker is a powerful tool, there are some drawbacks to using it.
To help you solve those issues, here are three great Woodpecker alternatives:

1. GMass

Shows the GMass website and dashboard.

GMass is a powerful email marketing software that lets you run marketing campaigns from your Gmail inbox. Its mighty mass mailing capabilities have made it a popular email tracker used by employees from Google and Uber to social media giants like LinkedIn, Twitter, and Facebook.

GMass lets you:

  • Automatically track your email campaign metrics.
  • Quickly send emails and marketing campaigns to tons of prospects and customers.
  • Automatically personalize mass emails on a person-by-person basis.
  • Easily schedule emails in advance.

What’s more?
You can instantly get started with GMass — just download the Chrome add-on, enter your email ID to sign-up, and you’re done!

It’s that easy!

Here’s a closer look at some of its key features:

A) Advanced Email Analytics and Mail Merge Reports

GMass’ Campaign Report is auto-generated after you send each email campaign. It highlights all the core marketing statistics you need to analyze your email engagement.

However, unlike Woodpecker, GMass places your campaign reports right inside your Gmail inbox. You won’t have to open a separate interface to use them; all reports can be easily accessed from the Gmail sidebar!

Shows the location of GMass reports inside your Gmail account.

Here’s what your GMass Campaign Report contains:

  1. Total Recipients:
    The total number of email addresses to which you sent your email campaign.
  2. Unique Opens:
    The total number of unique email IDs that opened your email. Note: GMass tracks only unique opens to give you clear email stats. If someone opens your email a second or third time, it won’t show up on your report to artificially inflate the number of opens.
  3. Didn’t Open:
    The total number of recipients that didn’t open your email.
  4. Unique Clicks:
    The total number of unique IDs that clicked at least one link in your email.
  5. Replies:
    The total number of recipients that replied to your email.
  6. Unsubscribes:
    The total number of recipients that unsubscribed from your emails.
  7. Bounces:
    The total number of emails that were undelivered because the address was invalid.
  8. Rejections because your Gmail account is over-limit:
    The total number of email IDs that didn’t receive your email because Gmail limited the sending ability of your account.
  9. Blocks:
    The total number of emails that were undelivered because the address marked your account as spam.

Shows a GMass Campaign Report with the metrics it tracks.

For detailed information on GMass’ reports, click here.

B) Email Follow-Up Automation

Most email marketers have to follow-up on their campaign emails.

But what if you have to follow-up on hundreds of replies?
You can’t do that manually!

Don’t worry, GMass can help you.

It automates the process of sending follow-ups with up to eight stages of follow-ups (one step further than Woodpecker).

You can even customize everything about these follow-ups, such as:

  • The trigger for sending follow-ups.
    For example, you can set GMass to send a welcome email automatically the instant someone signs up for your newsletter. 
  • The number of follow-up emails each person receives.
  • The time gaps between follow-ups.
  • The content of your follow-up email messages.

Shows follow-up stages in GMass.

You can click here for more information on this feature.

C) Powerful Email Personalization

Email personalization is the perfect way to engage your customers effectively.

Think about it.

With what are you more likely to engage?
A generic marketing email?
Or one that’s specifically tailored to you and your needs?

For example, if you send cold emails for a webinar invitation, adding each recipient’s name will boost your attendance rates.

However, when you have hundreds of emails, manually personalizing each one will take you forever!

Luckily, GMass supports automatic email personalization to help you with this.

It gives you features like:

  • Auto First-Name Detection and Entry – GMass auto-detects a person’s first name from their email ID and adds it to each email addressed to that person.
  • Add personalized blocks of text – you can customize entire paragraphs of your email message on a person-by-person basis.
  • Add customized links, images – you can include personalized links, e-commerce URLs, and photos for each email recipient.

Shows how personalization works in GMass.

And while these benefits are helpful for marketing campaigns, they can also be invaluable for other uses, such as club management or job searches.

D) Automatic Reply Management

Your email campaign will probably receive tons of replies, bounces, and blocks.
How do you sort through all this information quickly to identify the responses that matter most?

GMass can automatically organize all your campaign responses under the Reports label of your Gmail inbox.

It categorizes responses as:

  • Bounces – emails that were undelivered because the recipients’ address was invalid.
  • Replies – responses where the recipient actually clicked the “Reply” button (unlike autoresponders, which send a reply from a machine rather than a human).
  • Delays – messages that were delayed because the recipient is currently unreachable.

This way, it’s easy for you to identify your most important responses and deal with any issues in your outbound sales campaigns.

E) Easy Email Scheduling

Sending emails at the right time is a surefire way to maximize engagement.
Ideally, you’ll need to send your campaigns when your recipients are most likely to check their inbox.

How do you ensure that your emails always reach your recipients at the right time?
By scheduling them in advance.

With GMass, you can easily schedule your marketing emails.
Compose your email, schedule it, and the tool automatically sends it out at the specified time.

It’s that simple!

If there’s any change in schedule, you can always reschedule your emails from the Gmail Drafts folder. Simply edit the date and time, and GMass will send it then.

Shows the scheduling settings in GMass.

Pros

  • User-friendly interface.
  • Can quickly integrate with your Gmail inbox.
  • Can create email lists instantly with Gmail account searches.
  • Supports downloading your campaign reports as CSV files.
  • Can easily import contact list from a Google Sheets file.
  • Can send email attachments.
  • Connect it with Zapier to automate email sequences.
  • Available as a powerful Gmail add-on for Android devices.
  • Powerful Salesforce integration.
  • Active customer support team.

Cons

  • The desktop version works only with Google Chrome.
  • GMass works only with Gmail and G-Suite accounts.

Pricing

GMass has three pricing plans:

  • Individual:
    • Standard: $25/month
    • Premium: $35/month
    • Professional: $55/month
  • Team:
    • Professional: starts at $145/month for a group of 5 and includes all features.

Customer Ratings

  • Capterra – 5/5 (270+ reviews)
  • G2 Crowd – 4.8/5 (290+ reviews)

2. Bananatag

Shows the interface of Bananatag.

Bananatag is an email automation tool that works with Gmail and Outlook. It gives you detailed analytics to break down your campaign’s engagement.

Key Features

  • Sleek drag-and-drop interface.
  • Real-time email open and link click notifications.
  • Powerful schedule and snooze feature to manage emails effectively.
  • Email attachment tracking to see how recipients use your attachments.
  • Reports that can be exported as CSV or XLS files.
  • Can sync data to various CRM software like Pipedrive, Salesforce, and Zoho.

Pros

  • User-friendly interface.
  • Can create custom email templates.
  • Gives you detailed insights into your email deliverability.
  • Track emails on mobile devices without using an app.
  • Available as Chrome and Firefox extensions.

Cons

  • Notifications come in as separate emails. This can clutter your inbox if there’s a large mailing list.
  • The tool doesn’t work for company email addresses (email IDs that end in @company.com).
  • The free version only tracks five emails per day.

Pricing

Bananatag is available in three pricing plans:

  • Free: automated email open tracking for up to five emails/day.
  • Pro: $12.50/month – track up to 100 emails/day with link tracking, detailed reports, and scheduling features.
  • Team: $25/month per user – includes Pro + track up to 200 emails/day + team management features.

Customer Ratings

  • Capterra – 5/5 (6 reviews)
  • G2 Crowd – 4/5 (20+ reviews)

3. Hubspot Sales

Shows the interface of Hubspot Sales.

Hubspot Sales is a powerful cold email outreach tool that helps you track and engage your leads in real-time. It also helps you create email templates to save tons of time when composing emails.

Key Features

  • Real-time notifications for lead engagements.
  • Can easily import contact details to personalize emails.
  • Built-in activity stream that logs the email interactions of your clients and customers.
  • Predictive lead scoring to help you prioritize potential clients.
  • Detailed and customizable email reports.
  • Seamless Salesforce integration.

Pros

  • Powerful lead nurturing features.
  • Can automate the activities of your sales team.
  • Can schedule emails and follow-ups in advance.
  • IMAP integration support.
  • Works with email providers like Gmail and Outlook.

Cons

  • Initial set up can be complicated for novices.
  • No mass emailing features. You can build an email sequence, but you need to hit the send button for each email.
  • Their paid plans with additional features can be costly.

Pricing

Hubspot Sales comes in two pricing schemes:

  • Professional: $450/month – includes Starter + sales automation for 300 workflows + Salesforce integration.
  • Enterprise: $1500/month – includes Professional with sales automation for 500 workflows + lead generation and team management + API access.

Customer Ratings

  • Capterra – 4.5/5 (2000+ reviews)
  • G2 Crowd – 4.3 /5 (600+ reviews)

Conclusion

While Woodpecker is a good email service, it isn’t a perfect solution. It’s expensive, can’t handle attachments, and forces you to switch between inboxes for your reports.

Why settle for that when there are better tools available?

While all three tools on the list are powerful, GMass has several advantages. It gives you powerful cold emailing and tracking features at a fraction of the cost! So why not download the Chrome extension today and try it out?

Ready to transform Gmail into an email marketing/cold email/mail merge tool?


Only GMass packs every email app into one tool — and brings it all into Gmail for you. Better emails. Tons of power. Easy to use.


TRY GMASS FOR FREE

Download Chrome extension - 30 second install!
No credit card required
Love what you're reading? Get the latest email strategy and tips & stay in touch.


Want to send an email to undisclosed recipients?

The undisclosed recipients feature keeps your email recipients’ details confidential by hiding them from your other email recipients. 

In this article, you’ll learn how to use the BCC field to send emails to undisclosed recipients.

However, the BCC method has always had limitations.
That’s why I’ll also give you a simpler way to email groups of people while keeping their details private by using a free mail merge program.

Here’s what we’ll cover:

Use the links to jump to a specific section:

Here’s a breakdown of the terms I’ll be using in this article:

  1. Recipient – the person who receives your email.
  2. Primary recipient – refers to the main recipient of your email (the person addressed in the To field).
  3. CC Carbon Copy recipients – refers to recipients that receive a copy of the email. They are included in the CC address field. They are visible to all the recipients in your email.
  4. BCC Blind Carbon Copy recipients – refers to hidden recipients that receive a copy of the email. They are included in the BCC address field. BCC recipients are the same as undisclosed recipients.
  5. Distribution list/mailing list – a list of email addresses to which you’re sending emails.

What Are Undisclosed Recipients?

An undisclosed recipient is a recipient whose email address is only visible to the sender. 

Nobody else in the email list — be it your primary recipient, CC’d recipients, or fellow BCC’d recipients — will be able to read an undisclosed recipient’s details.

How to Send an Email to Undisclosed Recipients in Gmail

Sending an email to undisclosed recipients with the Gmail client is easy.

But there’s a catch.
You have to include yourself as the primary recipient while including everyone else as BCC recipients. 

Here’s a step-by-step guide on how to send an email to undisclosed recipients:

Step 1
To start, log in to your Gmail account and click “Compose” to open the Compose window.
Alternatively, if you’ve enabled keyboard shortcuts in your Gmail account, you can press the “c” key to open a new email.

Shows how to open Gmail's Compose window.

Step 2
Type “Undisclosed recipients” in the To: field of the new message and include your own email address within angle brackets (<>).

For example, if your Gmail ID is [email protected], you must type Undisclosed recipients <[email protected]>.

Why include your own email address as “Undisclosed recipients”?
There’s nothing wrong with just typing your email ID in the To field of such emails. But when you do that, your recipients may find it awkward.

Why would someone address themselves in their own email, right?

To avoid this, you conceal your email ID under a term like “Undisclosed recipients.” However, you can also use other terms. For example, if you’re emailing your book club members, you can type “Book Club Members” instead of “Undisclosed recipients,” and then include your own email address within brackets (<>).

This is simply a form of email etiquette when you only have BCC recipients for your email.

Note – You can also create a new contact titled “Undisclosed Recipients” in your address book and then type your Gmail address in its Email field. As it’s now a saved contact, it’s far easier to add it whenever you compose an email for undisclosed recipients.

Step 3
Then, click the “BCC” button in the message window:

Shows the Gmail Compose window.

In the BCC field that appears, type the email addresses of the recipients who will be hidden. You can separate multiple addresses by using a comma, adding a space, or pressing the enter key.

Shows an email id in the BCC field.

Step 4
Compose the subject and text of your email message and click “Send” to send your message.

Note – When using Gmail for BCC recipients, Google adds a unique email header for each BCC recipient. This ensures that they only see their own address on receiving the message.

Three Benefits of Using Undisclosed Recipients in Your Email

1. Protects the Recipients’ Privacy

Using the BCC email feature to send your message can help maintain a recipient’s privacy. By including a recipient in the BCC line, their address remains hidden from all other recipients in the To, CC, and BCC fields.

This makes it a good option for group emails, where you don’t want recipients to know who else was added to the email, or you don’t want to reveal the email addresses of individuals in the group.

2. Protects Your Recipients’ from Spammers/Email Trackers

Sending mass emails to recipients in the To and CC fields may inadvertently expose them to spammers and malware.

How?

If spammers find your mailing list, they can send spammy, malicious emails to these addresses and even track them.

However, adding them as undisclosed recipients guards against this problem. As they’re only included in your BCC field, malware will find it harder to read their IDs.

3. Reduces the Possibility of Being Marked as Junk

Sometimes, spam filters deliver mail to a recipient’s junk folder if there are too many recipients in the To and CC fields. However, if you leave the To and CC field blank (by sending it to undisclosed recipients), you can bypass this risk.

Three Problems with the Blind Copy Method

1. Unintentional Reply All

A BCC’d recipient may click “Reply to All” instead of the “Reply” button when replying to your email. This can share their response to every address in the email chain resulting in:

  1. An unintentional breach of privacy for that sender.
  2. Tons of unrelated emails for the other recipients.

2. Improper for Formal Conversations

Remember, even if your undisclosed recipients can’t see the details of other recipients on the BCC list, they’ll know that they weren’t the only ones added. This can create a bad impression or even a sense of suspicion among your undisclosed recipients.

Why?

They’ll be busy wondering about the identities of the other undisclosed recipients instead of focusing on your mail! You should avoid using this for formal conversations, as it could lead to decreased trust in your correspondence.

3. Can’t Add Individual Recipients’ Names

Whether it is used in Gmail, Microsoft Outlook, Yahoo Mail, iPhone Mail, or any other mail server, the BCC feature doesn’t let users personalize their emails.

You can’t add a BCC recipient’s full name or reference their personal needs in your emails.

The reason?
If you mention their names, their identity is no longer hidden!

That’s why undisclosed recipients often receive generic emails that don’t address their personal needs and preferences. While this protects their privacy, it can limit your chances of making a connection with them. Moreover, they may wonder why you hid their identity in the first place.

A Simpler and More Professional Approach than BCC: GMass

What Is GMass?

GMass is a powerful mail merge program that makes it incredibly simple to send personalized emails to multiple recipients with your Gmail inbox.

Its mass emailing features have made it a popular Chrome extension that’s used by businesses, individuals, and groups like clubs, schools, and churches to send emails to multiple recipients from their email account.

If you’re looking to send bulk emails while protecting your recipients’ privacy, GMass can help you!

Shows the GMass website and interface.

Why You Should Use GMass for Your Email Sending Needs

1. Quickly Add Tons of Recipients

Say you have a mailing list of 1,000 registered users of your product in Gmail.

When composing your email, manually adding each recipient can be time-consuming and error-prone. For example, you may leave out an email address or mistakenly include someone else in your email.

With GMass, this is no longer a problem.
GMass gives you two automated, error-free ways to include multiple recipients in seconds:

  1. Use Google Contacts
    If you’re using Google Contacts, select the contacts you want as recipients, and GMass automatically adds them to the address field. It’s far more convenient than manually identifying and adding each recipient from your address book. (If you need help with your Gmail contact list, check out our extremely helpful step-by-step guide to Google Contacts.)
  2. Use GMass’s Build Email List Feature
    The “Build Email List” lets GMass automatically identify your email recipients. Instead of manually searching through your address book to select an email ID, simply enter a search term in the Gmail search box, and GMass pulls up the details of all the relevant contacts. You can now easily add these IDs to your distribution list.
    For a detailed guide on how to use this feature, click here.

2. Add Names and Further Personalization to Your Emails

You can’t personalize an email for undisclosed recipients in your usual webmail client.

You can only create and send a generic email to all of them. However, doing this can limit your chances of making a personal connection.

Think about it.

You can’t expect too many people to subscribe to your service if you don’t even mention their names, right?

Luckily, GMass gives you a professional way to personalize your emails automatically. You can add personalization variables such as:

  • {FirstName},
  • {LastName},
  • {Company}, to your emails.

The values of these variables are automatically determined by GMass from the recipient’s email ID and other data. This way, you can personalize each email without manually doing a thing!

GMass also provides you other personalization features like:

  1. Auto First-Name Detection and Entry – GMass accurately auto-detects a person’s first name from their email address. This allows you to insert a recipient’s first name anywhere in your email.
  2. Customize links and URLs – You can include customized links and URLs for each recipient in your email.Shows how GMass personalizes your emails.
  3. Include a personalized image – GMass lets you add a unique image for each recipient in your email.
  4. Personalize entire paragraphs  – You can automatically customize large blocks of text on a person-by-person basis in your email messages.

Click here for a complete guide on email personalization in Gmail.

3. Easy Email Scheduling

GMass’s scheduling feature makes it incredibly easy to schedule your emails in advance.

How does this help?
You can send emails at specific times of the day to maximize email open rates. As you’ve already scheduled them, you won’t have to be online when they need to be sent.

Simply compose your email, decide when to send it, and GMass automatically sends it when the time arrives.

Shows GMass' scheduling settings.
You can enter a custom date and time or choose from a set of default times to schedule your emails. Scheduled emails can also easily be rescheduled from the Drafts folder.

Conclusion

Using the BCC field to send emails to undisclosed recipients is risky, tedious, and ineffective.

Why settle for it when you have excellent email marketing tools available in 2024?

Smart email programs like GMass can quickly draft and send personalized emails to a large group of undisclosed recipients without compromising their privacy. Why not download the GMass mail merge extension and experience it yourself?

In the meantime, why not check out the other articles on this blog for more tips, tricks, and rules about email sending?

See why GMass has 300k+ users and 7,500+ 5-star reviews


Email marketing. Cold email. Mail merge. Avoid the spam folder. Easy to learn and use. All inside Gmail.


TRY GMASS FOR FREE

Download Chrome extension - 30 second install!
No credit card required
Love what you're reading? Get the latest email strategy and tips & stay in touch.


An email tracking tool can track email opens and other metrics to help a sales rep or marketing executive run effective email marketing campaigns.

It’s also useful for anyone who simply wants to know if their email has been opened or not.
But which tracking tool should you use?

In this article, I’ll list the 10 best email tracking software available today and answer some of the most common questions about email trackers.

This Article Contains:

(Use the links below to jump to a specific section)

  • The 10 Best Email Tracker Software
    (includes key features, pricing, pros and cons, ratings)

    • GMass – Advanced Email Tracking with Campaign Dashboard (Gmail)
    • MailTrack – Email Tracker with limited Gmail tracking (Gmail)
    • Boomerang – Real-time alerts and AI capabilities (Gmail)
    • Gmelius – Basic Gmail tracker with limited features (Gmail)
    • LeadBoxer – Best mail tracker for Google Analytics level reporting (Gmail and Outlook)
    • Bananatag –  Basic Gmail Tracking (Doesn’t work with corporate emails)
    • Yesware – Comes with attachment tracking (Gmail and Outlook)
    • HubSpot Sales – A bit complex reporting dashboard (Gmail and Outlook)
    • Cirrus Insight – Paid Only mail tracker, works with Gmail and Outlook
    • Streak for Gmail – Automatic email tracking, no dedicated dashboard (Gmail)

Let’s jump in.

The 10 Best Email Tracker Software

Let’s explore the features, pros, cons, pricing, and customer ratings of the top 10 email tracking tools available today:

1. GMass

GMass home page

GMass is a powerful email outreach and tracking tool that lets you run email marketing campaigns from your Gmail inbox. Its robust mail merge capabilities have made it a popular email tracker used by employees from Uber, Google, Twitter, and LinkedIn.

With the GMass Chrome browser extension, you can:

  • Automatically track several email metrics accurately.
  • Quickly send sales and marketing campaigns to tons of people.
  • Automatically personalize mass emails on a person-by-person basis.
  • Easily schedule emails in advance.
  • Send automated follow-up emails for maximum engagement.

Here’s a closer look at GMass’ key features:

A) Advanced Mail Merge Reports and Email Analytics

GMass accurately tracks various email metrics to give you detailed breakdowns in your Campaign Report.

The Campaign Report is automatically generated after sending each email campaign and highlights all the core email marketing statistics you need to understand how recipients interact with your campaigns and craft better emails.

Some of these metrics are:

  1. Total Recipients:
    The total number of email addresses to which an email campaign was sent.
  2. Unique Opens:
    The total number of unique email IDs that opened your email.
  3. Didn’t Open:
    The total number of email IDs that didn’t open your email.
  4. Unique Clicks:
    The total number of unique recipients that clicked at least one link in your email.
  5. Replies:
    The total number of recipients that replied to your campaign.
  6. Unsubscribes:
    The total number of email IDs that unsubscribed from your emails.
  7. Bounces:
    The total number of emails that came back as undeliverable because the address was invalid.
  8. Rejections because your Gmail account is over-limit:
    The total number of email IDs that didn’t receive your emails because Gmail limited your account’s sending ability.
  9. Blocks:
    The total number of emails that came back as undeliverable because the address rejected your email as spam.

GMass campaign reports inside Gmail

And unlike other email marketing tools such as Mixmax, SalesHandy, and ContactMonkey, GMass places campaign reports right inside your Gmail account.

You won’t have to open a separate tool or window to access your email tracking reports — they will be waiting for you right in your Gmail inbox!

However, GMass also lets you track your email campaign performance via a dedicated dashboard for maximum flexibility. You can also view your Campaign Reports as web-based reports on both desktop and mobile platforms.

B) Powerful Personalization

Email marketing is all about making a connection.

And how do you make a connection?
By personalizing your emails.

After all, what would you rather engage with?

Generic marketing emails?
Or those that are tailor-made for you and your needs?

But you can’t manually personalize hundreds of emails. That’s going to take forever!

Fortunately, GMass offers you automated personalization features to tailor your marketing emails on a person-by-person basis.

You get advanced functionality like:

Automatically personalized images using GMass

As the tool does all the personalizing, you won’t have to lift a finger to craft better emails!

C) Email Scheduling

Timing plays a huge role in email marketing. You need to send emails at the right time for maximum engagement.

For example, your email campaigns won’t be as successful if people receive your emails at 3 AM, right?

Ideally, you should send your campaigns when your recipients are most likely to check their inboxes.

To help you here, GMass allows you to schedule your emails in advance to plan your campaigns carefully. As the tool automatically sends these emails, you won’t have to be online when they go out.

If there’s a change of plans, you can always reschedule your emails via the Gmail Drafts folder.

GMass schedule settings window inside Gmail

D) Automatic Follow-Ups

After analyzing your campaign responses, you’ll have to send meaningful email follow-ups, right?

But what if you have to follow up on hundreds of emails?
You can’t do that manually…

Don’t worry.

GMass supports follow-up email automation to streamline the process for you.

It can send automated follow-ups to targeted recipients for maximum engagement. You can also customize everything about these follow-up emails, like:

  • The trigger for sending a follow-up. For example, GMass can send a follow-up email when a recipient clicks a particular link or replies to your email.
  • The number of follow-up emails each person receives.
  • The time gaps between each follow-up.
  • The follow-up email message.

Automated email follow-ups with GMass

Pros

  • Quick setup and onboarding.
  • User-friendly interface.
  • Can be used for both traditional emailing and cold email marketing.
  • Build email lists based on Gmail account search results.
  • Easily import contact lists from a Google Sheets file.
  • Send automated email campaigns.
  • Send unlimited emails per day via a third-party SMTP service like SendGrid.
  • Works within your Gmail inbox.
  • Available as a robust Gmail add-on for Android devices.
  • Powerful CRM integration with Salesforce and Hubspot.
  • Active customer support team.

Cons

  • The software works only on Google Chrome. Browsers like Internet Explorer aren’t supported.
  • Only works for Gmail and Google Workspace (formerly G Suite) accounts.

Pricing

GMass offers three pricing plans for individuals and teams.

  • Individual
    • Standard: $25/month (or less on an annual plan) – basic campaigns + mail merge personalization + overcome Gmail sending limits.
    • Premium: $35/month (or less on an annual plan) – everything available in Standard + A/B testing + auto follow-ups, and more.
    • Professional: $55/month (or less on an annual plan) – all features in Premium + high priority support.
  • Team
    • Professional: starts at $145/month for a group of 5.

Customer Ratings

  • Capterra – 4.8/5 (740+ reviews)
  • G2 – 4.7/5 (720+ reviews)

Back to contents

2. MailTrack

MailTrack home page

MailTrack is a simple web-based service that tracks Gmail emails to give you a read receipt for email opens. It adds a double checkmark (✓✓)  read receipt to your email message whenever a recipient opens it.

Key Features

  • Read receipt push notification for email opens.
  • Reminders for unopened emails.
  • Reply monitoring to track email responses.
  • Integrates with CRM software.
  • First-open email alerts.

Pros

  • Detailed daily email campaign reports.
  • Real-time alerts are available on Android and iOS mobile devices.
  • Has a plugin for Chrome, Firefox, and Opera browsers.

Cons

  • Can’t track email opens when there are multiple recipients for the same email.
  •  No support for Internet Explorer.
  • The app might alert you when you open your own emails. This can lead to tons of unnecessary desktop notification alerts.

Pricing

Has a free plan for unlimited tracking of email open rate. Paid plans start at $1.99/month and support features like click tracking of unlimited emails and daily reports.

Customer Ratings

  • Capterra – 4.5/5 (150+ reviews)
  • G2 – 4.5/5 (100+ reviews)

3. Boomerang

Boomerang home page

Boomerang is an email marketing tool that works with email service providers like Gmail and Outlook. Its powerful web-based service has made it a popular email tracker used by tons of small businesses.

Key Features

  • AI assistant to help you craft attractive emails.
  • Inbox Pause to pause new emails from coming into your Gmail inbox.
  • Email scheduling with real-time alerts.
  • Can send recurring email campaigns and follow-ups.
  • Response tracking to track email replies.

Pros

  • Add private notes to scheduled emails.
  • The app has powerful sorting features to declutter your inbox.
  • Supports a plugin for Google Chrome, Opera, Firefox and Edge.

Cons

  • The initial setup is complicated.
  • The UI is difficult to navigate.
  • At times, you may have to log in repeatedly.

Pricing

Has a free email tracking plan with ten message credits per month (each message credit lets you use Boomerang for one outgoing message). Paid plans start at $4.98/month.

Customer Ratings

  • Capterra – 4.7/5 (135+ reviews)
  • G2 – 4.5/5 (200+ reviews)

4. Gmelius

Gmelius home page

Gmelius is a collaborative workspace that doubles as a tracking software for emails. Gmelius’s email tracking service can monitor everything that happens to your emails after you’ve hit send.

Key Features

  • Detailed reports and email analytics.
  • Real-time alerts on mobile and desktop for all events.
  • Automatic email categorization.
  • Personalized mail merge campaigns.
  • CRM integration to sync all your email contacts.

Pros

  • Create an email template that can be personalized and shared.
  • Set reminders for automatic follow-ups.
  • Schedule recurring emails to send monthly invoices, weekly meeting agendas, etc.

Cons

  • Each app notification can clutter your inbox if you don’t use your device frequently.
  • Limited email tracking features in the free plan.

Pricing

Pricing plans start at $12/month per user and support email collaboration features, real time notification alerts, and email activity reports.

Customer Ratings

  • Capterra – 4.7/5 (30+ reviews)
  • G2 – 4.5/5 (300+ reviews)

5. LeadBoxer

LeadBoxer home page

LeadBoxer is an online lead generation and marketing tool that tracks your emails. Its Google Chrome extension tracks email opens, link clicks, and more to provide Google Analytics level metrics from within Gmail.

Key Features

  • Supports real-time alerts for your email opens.
  • Can automatically identify prospects from your marketing emails.
  • Provides detailed email campaign data such as your email click-through rate.
  • Automatic lead scoring to rank prospects.
  • Integrates with your CRM software.

Pros

  • Powerful Google Analytics level reporting for email and social media campaigns.
  • Reports are accessible on Android and iOS devices.
  • You can filter and prioritize email prospects by company name or location.

Cons

  • Expensive plans that start at $226/month.
  • Difficult to use as a standalone email tracking software.

Pricing

Pricing plans start at $222/month for ten users, unlimited leads, and unlimited tracking of web and email behavior.

Customer Ratings

  • Capterra – N/A
  • G2 –  N/A

Back to contents

6. Bananatag

Bananatag home page

Bananatag allows you to track emails, schedule them, and create an email template in Gmail and Outlook. It also gives you advanced email analytics and reports to break down a prospect’s overall engagement.

Key Features

  • Schedule and snooze emails to manage your email schedules effectively.
  • Detailed analytics and reports.
  • Intuitive drag-and-drop interface to add external images and craft better emails.
  • Attachment tracking (document tracking)to see how recipients interact with your email attachments.
  • Sync emails to your CRM software.

Pros

  • Can create email templates to save you tons of time when composing emails.
  • Simple setup and user-friendly interface.

Cons

  • This email tracking app doesn’t work for corporate email addresses.
  • Each notification is shown through separate emails. Constant desktop notification alerts can be overwhelming if there’s a large mailing list in your inbox.

Pricing

All pricing plans have custom pricing, and you’ll have to reach out to the Bananatag team for a quote.

Customer Ratings

  • Capterra – N/A
  • G2 – 4/5 (20+ reviews)

7. Yesware

Yesware home page

Yesware is a popular email tracking app for professional email marketers and sales reps.

It gives you detailed data like your campaign’s open rate, click-through rate, and attachment downloads (document tracking) in Gmail and Outlook.

Key Features

  • Real-time desktop notification alerts for each email open and click tracking.
  • You can personalize your emails by creating custom email templates.
  • Reply monitoring to track prospect responses.
  • Detailed tracking reports help take stock of your campaign progress.
  • Attachment tracking to monitor how prospects use your files.

Pros

  • Simple setup and user-friendly interface.
  • You can easily sync your emails and activities through its Salesforce integration.
  • You can set reminders to follow-up on customers.

Cons

  • No auto-save feature for email campaigns.
  • The app notifies you when you open your own emails — cluttering your campaign data.
  • When there are multiple recipients for your email, it doesn’t clearly state who opened it.

Pricing

Pricing plans start at $19/month per user and support real-time sales email tracking, Salesforce sync, and custom email templates and reminders.

Customer Ratings

  • Capterra – 4.3/5 (150+ reviews)
  • G2 – 4.5/5 (700+ reviews)

8. HubSpot Sales

HubSpot Sales home page

HubSpot Sales is sales tracking software that offers a suite of tools to boost productivity, track leads, and streamline the prospecting activities of your sales team. This sales software can also be used as a good solution for email tracking.

Key Features

  • Built-in email activity stream that automatically logs each prospect’s email data.
  • Automated and personalized email follow-ups.
  • Predictive lead-scoring to help prioritize potential customers.
  • Customizable reports that break down email metrics.
  • Salesforce integration.

Pros

  • User-friendly sales engagement platform.
  • Build email templates that can be customized and shared with your sales team.
  • You can schedule emails and follow-ups in advance.

Cons

  • No mass emailing features. You can enter them in a sequence to build an email list, but you need to hit the send button for each one.
  • The basic starter plan isn’t very feature-rich.
  • The reporting dashboard can be difficult to use.

Pricing

Has a free email tracker plan with limited features. Paid plans start at $50/month and support two users, basic sales email tracking, and lead generation features.

Customer Ratings

  • Capterra – 4.5/5 (300+ reviews)
  • G2 – 4.3 /5 (7500+ reviews)

9. Cirrus Insight

Cirrus Insight home page

Cirrus Insight is a popular email open tracker that works with email clients like Gmail and Outlook.

Key Features

  • Email scheduling to send emails at a time of your choice.
  • Allows you to save, personalize, and use each email template repeatedly.
  • Can send drip marketing campaigns to improve email outreach.
  • Email reminders to follow-up on sales and marketing pitches and quotes.
  • Can schedule meetings with prospects.

Pros

  • Detailed tracking of your email attachments (document tracking).
  • Its Salesforce integration syncs your emails and contacts.
  • Syncs with your Google Calendar to manage email schedules.

Cons

  • The starter plan isn’t very feature-rich.
  • The UI can be confusing for beginners.

Pricing

Cirrus Insight has paid plans starting at $10/month per user, supporting standard email tracking and productivity features.

Customer Ratings

  • Capterra – 4.2/5 (100+ reviews)
  • G2 – 4/5 (1000+ reviews)

10. Streak for Gmail

Streak for Gmail home page

Streak is a lightweight CRM and email tracking tool for Gmail. You can use it to track customers, emails and create mail merges.

Key Features

  • Intuitive email sidebar that displays details of tracked emails.
  • Detailed reports for email activity and actionable insights.
  • Personalization features for mail merges and follow-ups.
  • Collaborate with your team on marketing emails.
  • Automatic email response tracking.

Pros

  • You can sort your emails based on the type of response.
  • Color codes and customization let you manage your campaigns efficiently.
  • Reports and data can be accessed from within your Gmail inbox.

Cons

  • There’s no dedicated Streak dashboard.
  • The app doesn’t clearly indicate which address in an email thread viewed the email.
  • Their free plan isn’t very feature-rich.

Pricing

Has a free email tracking software plan with basic CRM features. Paid plans start at $19/month per user and support 800 mail merge per day.

Customer Ratings

  • Capterra – 4.5/5 (400+ reviews)
  • G2 – 4.5/5 (100+ reviews)

Back to contents

Now that we have explored the top email tracker software available today, I’ll answer some FAQs related to email.

4 FAQs About Email Tracking

Here are my answers to some of the most common questions about email tracking:

1. What is Email Tracking?

Email tracking involves monitoring the sent emails to obtain information for business decisions. You track metrics like open rate, click-through rate, and unsubscribe rate to gain insights into the performance of the tracked emails.

2. How Does Email Tracking Work?

Email tracking tools can inform you when your sent emails have been opened and replied to.

This is possible because mail tracker tools insert an invisible tracking pixel in outgoing emails. These pixel trackers can detect the exact time an email has been opened.

An email tracker can also show you whether recipients have clicked on links in your tracked emails or if they’ve unsubscribed from your emails.

3. What Are The Benefits of Email Tracking?

While anyone can benefit from email tracking, it’s especially useful for email marketers.
Here’s why:

1. It Helps You Manage Campaign Interactions

An email tracking tool lets you know when someone opens or engages with your emails. This way, the email tracking system helps you manage email campaign interactions without you having to lift a finger!

An excellent email tracking app can track when:

  • A recipient opens your emails.
  • They click on any link present in your email message.
  • They forward an email to someone else, and more.

None of the above is possible if you send emails normally or by using the BCC feature.

Additionally, you’ll also get an idea of when they opened your tracked email. This can help you gauge when recipients are most active so that you can send follow-up emails at the right time for maximum engagement.

2. You Get Unique Insights into Your Email Marketing Campaigns

Ideally, an email tracking service will give you detailed reports over different aspects of your campaigns, like deliverability and conversions.

You get information on campaign metrics like:

  • Open Rates (OR): The number of recipients that opened your emails.
  • Click-through Rates (CTR): The number of email IDs that clicked any link in your emails.
  • Bounce Rates: How many email addresses didn’t receive your emails.
  • Unsubscribe Rates: How many email IDs unsubscribed from your campaigns.

How does this help you?
These metrics will help you understand:

  • If your emails are going through.
  • If they’re connecting with your audience.
  • What’s going wrong with your emails.
  • What needs to be changed.

Email senders can use these metrics to fine-tune various aspects of their emails, such as their email openings, to make them more attractive to their audience.

3. It Provides You with the Right Context for Follow-ups

With an email tracking system, email senders get actionable insights into their prospects’ interests and behavior. This helps you tweak and customize your follow-ups for maximum engagement.

For example, if you know that a person regularly engages with your mails, chances are, they’re interested in what you’re selling. You can now move them down your sales funnel and maybe give them a call, as they’re primed for a pitch.

An email tracking system helps you understand the kinds of content and links that engage your recipients. This lets you customize your follow-ups to appeal to their interests.

4. Are Email Trackers Legal?

If you’re worried if tracking your emails will get you in trouble, don’t be!

As long as you are GDPR compliant (if you’re in the EU) and follow some email tracking best practices, tracking your emails is perfectly legal. You can follow practices like including a double-opt-in and a one-click unsubscribe option to avoid legal trouble.

Back to contents

Wrapping Up

Choosing an email tracking software doesn’t have to be tricky.

While each of the tools I covered here is good, the GMass browser extension stays ahead with its powerful email tracking and mail merge capabilities.

GMass has got all the features you need to get the best out of your email marketing campaigns, so why not download its free Chrome browser extension and experience it for yourself?

Ready to transform Gmail into an email marketing/cold email/mail merge tool?


Only GMass packs every email app into one tool — and brings it all into Gmail for you. Better emails. Tons of power. Easy to use.


TRY GMASS FOR FREE

Download Chrome extension - 30 second install!
No credit card required
Love what you're reading? Get the latest email strategy and tips & stay in touch.


A few minutes ago, we deployed a few enhancements to make scheduling, pausing, and resuming a better experience.

  1. “Skip Weekends” will now pause a long-running campaign as soon as it becomes Saturday. For example, if you start a large campaign on Monday, and you have applied the Skip Weekends setting, and the campaign continues to send 24 hours/day, as soon as it becomes Saturday, the campaign will pause and automatically resume sending on Monday morning, according to your local time zone.
  2. If you RESUME a paused campaign, you can now make changes at the same time, and clicking the RESUME button will both resume the campaign and save any changes you made. Previously, you would have to hit SAVE CHANGES separately from hitting RESUME.
  3. When editing a campaign, you can now change the time of a currently running campaign to a time in the future, click SAVE CHANGES, and the campaign will automatically stop and pick back up at the time you put in.
  4. The status message you get when you open up the DRAFT of a campaign is more informative, showing you when the campaign last sent, how many emails you sent, and providing links to download the list associated with the campaign.


Email marketing, cold email, and mail merge inside Gmail


Send incredible emails & automations and avoid the spam folder — all in one powerful but easy-to-learn tool


TRY GMASS FOR FREE

Download Chrome extension - 30 second install!
No credit card required
Love what you're reading? Get the latest email strategy and tips & stay in touch.


cURL error 28: Operation timed out after 5000 milliseconds with 0 bytes received

GMass