
Want to build a tool or enable one of your applications to create and send campaigns using the GMass API?
It’s not prohibitively complicated, but there are some sequential steps involved.
Those steps mirror the process you’d follow to send a campaign through the usual GMass Chrome extension but, you know, here the machines are doing all the work after you set this up once.
In this guide I’ll elaborate on GMass’s API docs and walk you through the process of creating and sending a campaign using the GMass API.
Create and Send Campaigns with the GMass API: Table of Contents
- Step 0: Getting Your API Key and Using It to Authenticate
- Step 1: Figuring Out Which Google Sheet (and Worksheet) to Use
- Step 2: Creating a New Mailing List From Your Google Sheet
- Step 3: Creating a Campaign Draft
- Step 4: Sending the Campaign
- Ready to Create and Send a Campaign Using the GMass API?
Step 0: Getting Your API Key and Using It to Authenticate
First up, you’ll need to generate and/or retrieve an API key.
Getting your API key
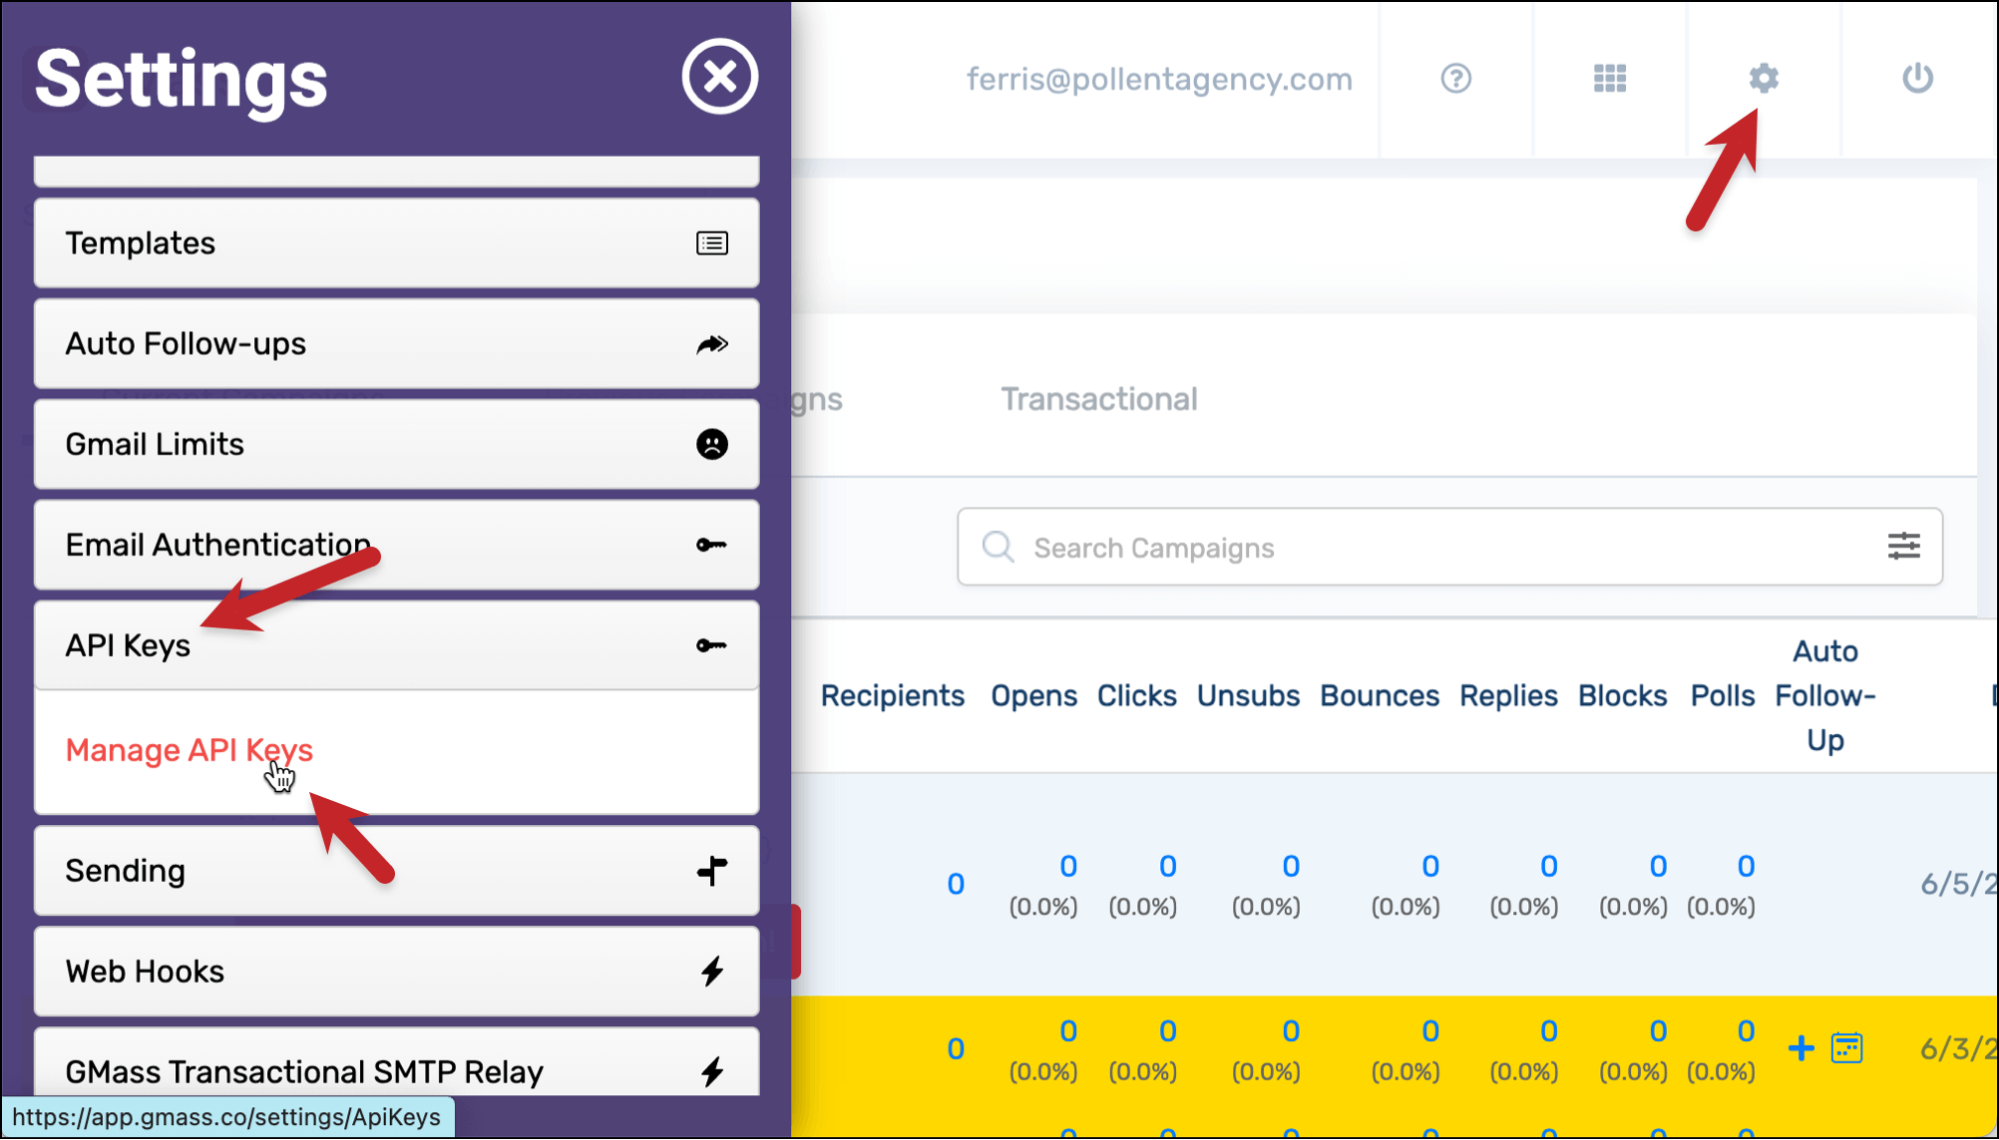
Head over to the GMass dashboard. Click on the Settings icon, then scroll down to API Keys, click into that section of the menu, then click on Manage API Keys.
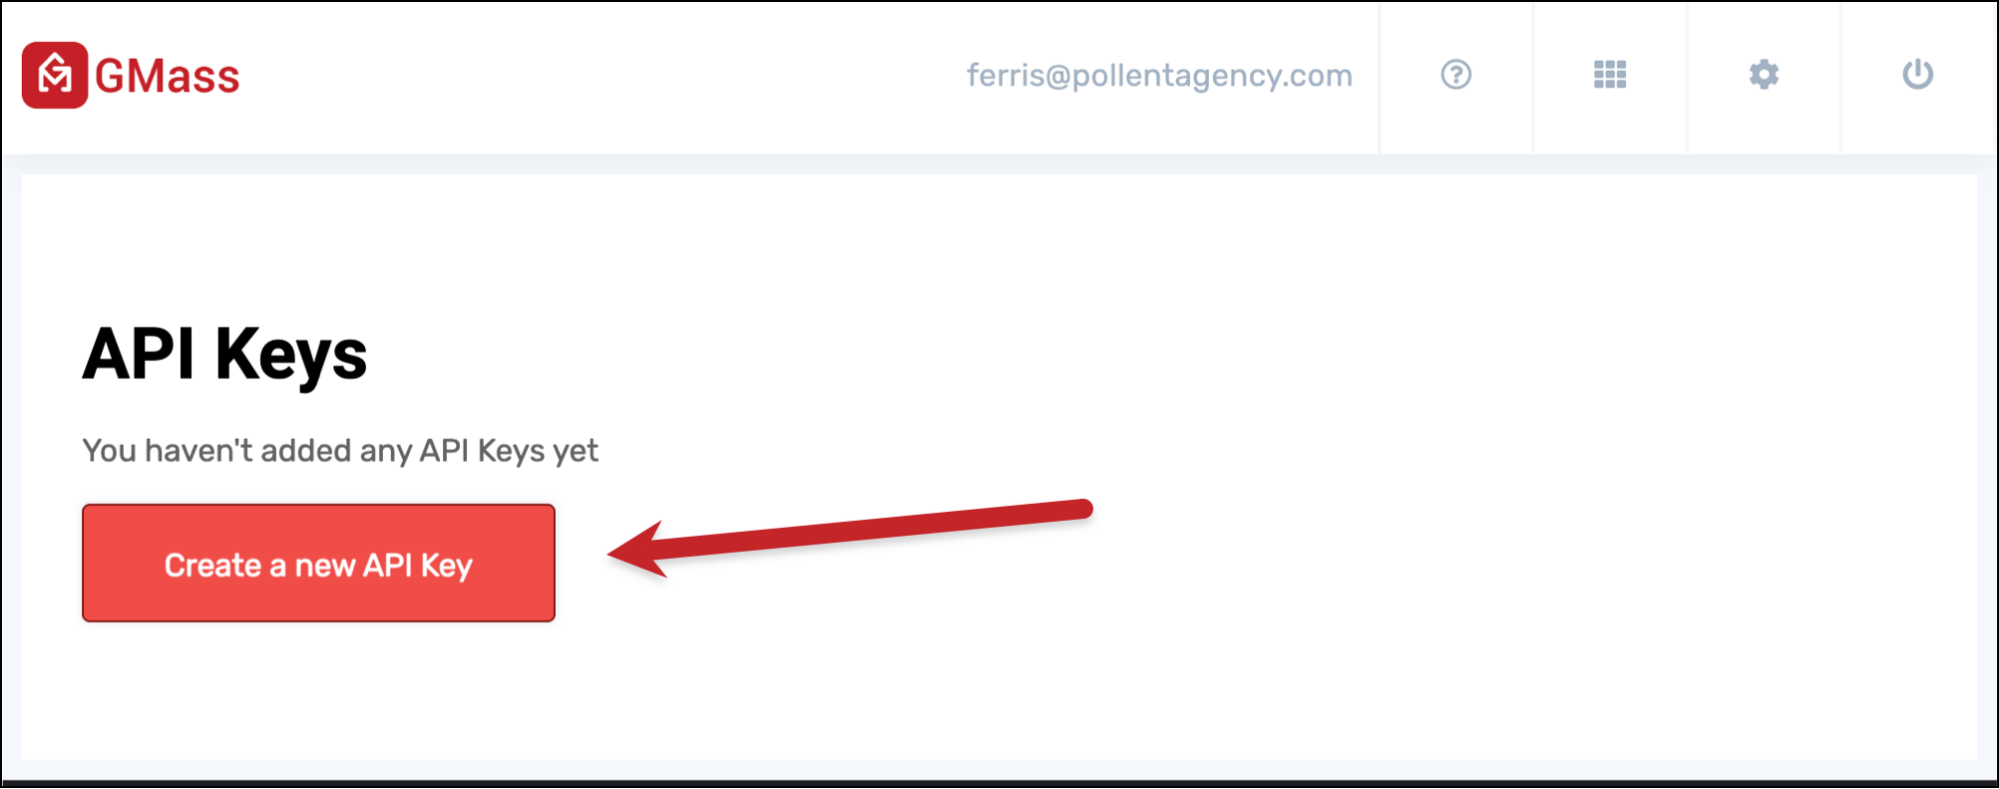
Click on the red button to Create a new API Key.
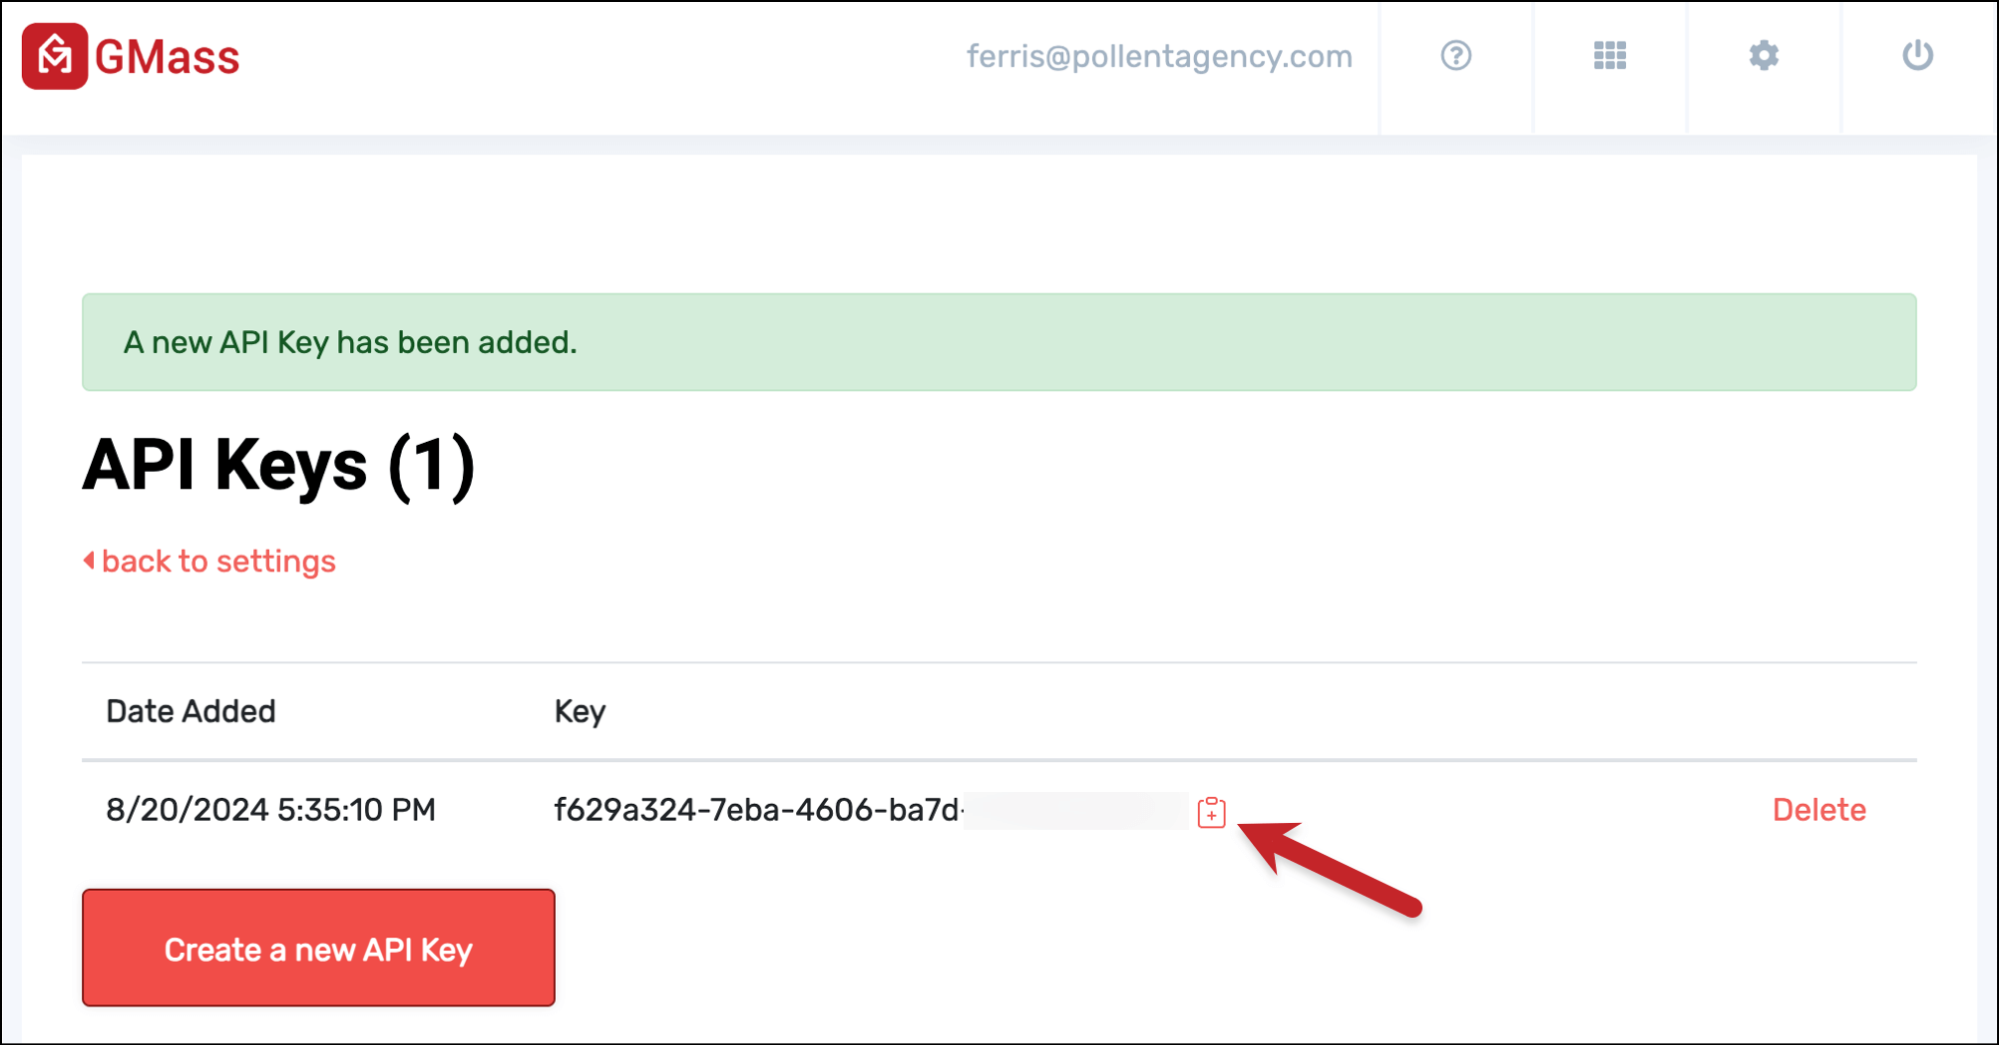
You can now copy your key by clicking the little clipboard icon. You can also come back to this area in the GMass dashboard anytime you need to retrieve your key.
Using your key to authenticate into the API
There are two options for passing your API key to GMass.
You can include it as a query string after calling any GMass API endpoint using apikey=your key.
All of the endpoints in the GMass API are constructed as https://api.gmass.co/api/. So for instance, when you’re retrieving the list of Google Sheets in your account, you can pass the query string as https://api.gmass.co/api/sheets?apikey=f629a324-e31s-34234-23423.
The other option is to pass your key with a HTTP header, using X-apikey.
(Note: I’ll be doing my demos throughout this article on the Swagger site for the GMass API. If you want to use that site for testing, just paste your API key in the bar at the top of the page.)
Step 1: Figuring Out Which Google Sheet (and Worksheet) to Use
If you’re not planning to connect a Google Sheet to your API-driven campaign, you can skip these next two steps. (For instance, if you’re re-using an old GMass list or you’re planning to add individual addresses later in this process.)
But if you are going to connect to a Google Sheet for your API-driven campaign, you’ll need to grab both the Google Sheet ID as well as the ID of the worksheet inside of that Sheet.
Getting your Google Sheet ID
You’ll use the /api/sheets endpoint to get the ID of your Google Sheet. That endpoint lists all the Google Sheets in your Google Account.
You can list every sheet in your account using the endpoint https://api.gmass.co/api/sheets?apikey=yourkey

And your application can grab the desired spreadsheetID from there.
Getting your worksheet ID
The worksheets are the different sheets inside of a Google Sheet. (Feels like at some point, someone should’ve come up with another name for one of these things.)
The GMass API can list all the worksheets in your Google Sheet, along with their IDs, using the /api/sheets/{sheetid}/worksheets endpoint.
For instance, here’s the response when I used the spreadsheetID for the “Demo sample group” Google Sheet which I retrieved in the prior step.
Also notice that the first worksheet in a Google Sheet usually has an ID of 0.

And now your application can grab the worksheet ID.
Step 2: Creating a New Mailing List From Your Google Sheet
Now that you have the Google Sheet ID and worksheet ID, you can create an email list based on the contacts in that Google Sheet.
(Again, this mirrors the process of sending a campaign using the GMass extension. You connect a Google Sheet and choose a worksheet, then GMass turns the recipients in that sheet into a list.)
Here we’ll use the /api/lists endpoint. (There’s also a GET /api/lists endpoint if you want to retrieve all your existing GMass lists. We’ll use the POST /api/lists endpoint to create a new email list.)
You’re required to pass a spreadsheetId and worksheetId here.
You can also pass optional values including:
- KeepDuplicates, a boolean option if you want to keep duplicate addresses from your sheet in your list or not.
- FilterCriteria, if you want to use GMass filtering to only build your email list based on specific rows in your Sheet that meet different conditions.
- AndOr, if you are using multiple filtering conditions and want GMass to base its filtering result on all of them (AND) or any of them (OR). The default, if this is unspecified, is AND.
- UpdateSheet, a boolean option if you want GMass to update your Google Sheet with reporting data or not.
As long as you have the spreadsheetId and worksheetId in there you can pick and choose any of the other options you want.

And if I go into the GMass dashboard now and check out my lists, I can see this new list the API generated is there.

And now that I’ve got a list alias generated, I can use it with the campaign I create.
Step 3: Creating a Campaign Draft
It’s time to create the draft of your email campaign.
We’ll use the /api/campaigndrafts endpoint to make it.
There are two parameters that are required here:
- subject, for the email subject line.
- message, for the email message.
You will also specify who the recipients are for this draft, so one of these is required:
- listAddress, where you can either use the list email address we generated in the previous step or a list email address you generated in the past, or…
- emailAddresses, where you include a comma-separated list of the email addresses of your recipients.
Then you can also include optional values as well:
- fromEmail, if you want to specify the From address for the campaign.
- messageType, if you want to specify if the message is plain text or HTML.
- cc, if you want to CC one or more people on every message in the campaign (use a comma-separated list).
- bcc, if you want to BCC one or more people on every message in the campaign (use a comma-separated list).
- attachments, if you want to include attachments with your message.
The result, as you can see in the screenshot, is a new draft ID. We’ll use that to send the campaign in the next step.

And if you head over to Gmail, this draft is now in your Drafts folder.

Step 4: Sending the Campaign
Now that we have the draft ID we can send the campaign.
The endpoint is /api/campaigns/{campaignDraftId}.
The only required value here is the campaignDraftId.
Here you can see my campaign generated where that’s all I’ve used.

But there are lots of optional parameters here you can use to fine-tune the settings on your campaign.
I’m going to split them up here by where you’d find them in the regular GMass settings box to help keep this list more digestible.
Tracking parameters
- openTracking, a boolean value of whether or not to track opens.
- clickTracking, a boolean value of whether or not to track clicks.
Action parameters
- createDrafts, a boolean whether you want to create the messages as drafts or go ahead and send the campaign right away. The default is false, meaning GMass will not create the emails as drafts for you to manually review first and will just send the campaign outright.
- useSMTP, a boolean option to send your campaign through Gmail’s server or to send the entire campaign through your SMTP server instead. The default is false, meaning GMass will send through Gmail natively.
Auto follow-up parameters
- stageOneDays, an integer specifying how many days to wait before sending your first follow-up.
- stageOneCampaignText, the message for your first follow-up.
- stageOneCampaignId, alternatively, if you want to use a rich-text message as your first follow-up, create it, grab its ID, and include that here. This will override stageOneCampaignText if you specify both.
- stageOneAction, where you specify who should get this follow-up stage. r=If No Reply, o=If No Open, c=If No Click, s=If No Reply or Click, a=Everyone (drip series).
- stageOneTime, you can optionally specify what time of day the follow-up should be sent. This doesn’t take a time zone offset; instead it uses the same time zone you specify in sendTime (see Scheduling, up next).
You can then repeat these for as many follow-ups as you’re including in your campaign. For instance, stageTwoDays, all the way up to stage eight.
Scheduling parameters
- sendTime, if you want to schedule the campaign for a future time. (If you don’t specify sendTime, the campaign will send immediately). This takes the form of “MM/DD/YYYY HH:MM -XX:XX”; the last part there is the time zone offset. (So “08/20/24 13:30 -04:00” would be August 20th, 2024 at 1:30 PM Eastern.)
- skipHolidays, a boolean option to skip sending on the holidays you’ve specified in your account. Note: Default is TRUE.
- allowedDays, if you want to only send on specific days. 1=Saturday, 2=Sunday, 3=Monday, and so on; you can enter these as a comma-separated string.
- throttling, if you want to add a pause between messages. This is an integer where 1 is a pause of 5-10 seconds, 2 is a pause of 10-60 seconds, 3 is a pause of 1-5 minutes, and 4 is a pause of 5-10 minutes.
- emailsPerDay, if you want to throttle the number of emails per day for this campaign. This is an integer representing that number of emails.
Advanced parameters
- sendAsReply, a boolean whether or not you want to send this campaign as a reply to your last message to the recipient or not.
- campaignIdToReplyTo. This setting is related to the Send As Reply option. Here you specify a GMass campaign ID if you want this campaign’s emails to be sent out as replies to a specific prior campaign. Otherwise, if sendAsReply is TRUE and this option is undefined, GMass will send your messages as replies to your last conversation with each recipient.
- MultiSend, a comma-separated list of additional sending accounts you want GMass to use to send your campaign. GMass will distribute your campaign evenly across the counts, sending an even amount of messages from each one. These accounts already need to be connected to your primary account; you cannot use the API to connect new secondary sending accounts.
- verify, a boolean to tell GMass whether to verify every email address before sending. Default is false.
- ABTest, a boolean telling GMass whether or not to run an A/B test on the campaign.
- ABTestPercentage, the percentage of the campaign that GMass should send as the test portion. This is an integer (so, for instance, 30 would represent GMass sending to 30 percent of recipients).
- ABTestHoursAfter, telling GMass how many hours to wait before determining an A/B test winner. This is an integer.
- ABTestDecision, telling GMass whether to automatically send the winning variation or whether you want to manually pick a winner. a=automatic, m=manual.
- ABTestDecisionFactor. You’ll only need this if ABTestDecision=a for automatic. This parameter then tells GMass which metric to use to determine the winner. o=opens, c=clicks, r=replies.
- replyTo, if you want to include a specific Reply-To address. (This overrides any reply to setting in your Gmail account.)
- suppressionDays, if you want GMass to suppress emails to people who’ve received other campaigns from you within a certain number of days. This is an integer representing the number of days.
- skipSent, a boolean option to skip having your campaign emails go into your Gmail sent folder. The default is false.
- imagesMode, where you specify how GMass should include images. d=default, h=hosted, e=embedded. The default is, well, default.
- previewText, if you want to include preview text.
- friendlyName, if you want to specify a name for this campaign for internal use.
- fromName, if you want to override the From name in your Gmail account.
Sending the campaign
Again, even with all those options, the only value that’s actually required is a campaignDraftId.
And once you pass that using the /api/campaigns endpoint. GMass will create your campaign and send (or create drafts, if you told it to create drafts and not send).

Since I created these as drafts, I can go find them in my Gmail Drafts folder.

I also got the email notification from GMass letting me send (or delete) the drafts.
And I can open the draft to see all the GMass settings I specified. (I specified open tracking on, click tracking off, one auto follow-up, and a friendly name.)

Ready to Create and Send a Campaign Using the GMass API?
That’s it: Those are the steps to create then send campaigns using the GMass API.
- Use the /api/sheets endpoint to find the Google Sheet, then the /api/sheets/{sheetid}/worksheets endpoint to find the worksheet.
- Use the /api/lists endpoint to create a list based on the Google Sheet and worksheet, also specifying any connection criteria like filtering or updating the sheet with reporting data.
- Create your campaign draft with the /api/campaigndrafts endpoint.
- Send the campaign with the /api/campaigns endpoint, using the draft ID and choosing any campaign settings you want to use.
Want to use the GMass API to send GMass campaigns from other software or your own custom applications?
The API is available on GMass’s Premium, Professional, and Team plans (check those out on the GMass pricing page).
And, of course, with any of those plans you can also send campaigns from Gmail in your web browser using the GMass Chrome extension.
See why 300,000+ people love GMass (from unlimited emails, campaigns, and contacts to tracking, incredible deliverability tools, and a whole lot more).
It’s free to try, with no credit card required. Just download the Chrome extension and you’ll be up and running in minutes.
GMass is the only tool for marketing emails, cold emails, and mail merge — all inside Gmail. Tons of power but easy to learn and use.
TRY GMASS FOR FREE
Download Chrome extension - 30 second install!
No credit card required


