
From sending out canned responses to customizing your inbox display, Gmail offers some very powerful features that most users aren’t aware of.
These Gmail tips and tricks can make sending, reading, and managing your emails faster and easier, saving you an incredible amount of time.
In this article, I’ll share 20 useful Gmail tips and tricks to enhance your Gmail experience. I’ll also cover the ultimate productivity hack to take your Gmail productivity to new heights.
Further Reading:
- If you’re a beginner with Gmail, read my post on how to use Gmail.
- Also, check out my step-by-step guide on how to use Gmail Search.
This Article Contains:
(Click on links below to jump to specific sections)
-
- Unsend Emails
- Use Smart Compose
- Use Multiple Gmail Accounts
- Schedule Emails
- Use Gmail Keyboard Shortcuts
- Send Emails from Different Email Addresses
- Organize Emails with Gmail Labels & Filters
- Use Gmail Templates
- Customize Your Gmail Inbox Display
- Snooze Email Notifications
- Mute and Archive Emails
- Create Calendar Events from Emails
- Use Search Operators
- Block Spammers
- Use Gmail Offline
- Send Confidential Emails
- Organize Your Tasks
- Unsubscribe from Newsletters and Junk Mail Easily
- Check Which Apps Have Access to Your Account
- Make Video Calls
Let’s get started.
20 Useful Gmail Tips and Tricks
Here are twenty Gmail tips and tricks you should know about today:
1. Unsend Emails
Ever sent an email but then realized you made a mistake after you pressed the send button?
The Gmail email service can help you when this happens, thanks to the Undo Send feature.
Gmail’s Undo Send feature lets you unsend a sent message within a short cancellation period (a maximum of 30 seconds) after clicking the Send button.
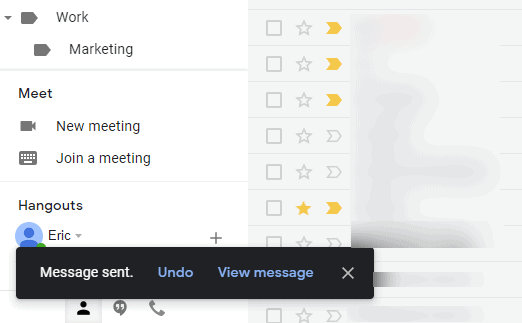
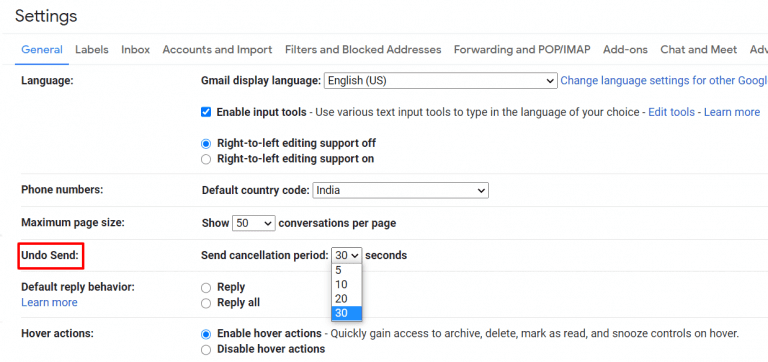
You can also adjust the cancellation time limit for unsending the message.
For this, go to Settings > See all settings > General tab > and then click on the drop down arrow next to Undo Send to select the cancellation period you prefer.
Unsent your email message because you didn’t like how you ended it?
Learn how to write a solid ending to your email message.
2. Use Smart Compose
Gmail’s Smart Compose feature is a convenient Gmail hack that recommends words/phrases to complete your sentences.
When you type out a new message in the Compose window, Gmail will try to understand your email message and predict what you want to say. Press the Tab key to accept Gmail’s suggestions, or ignore them and write your own text.
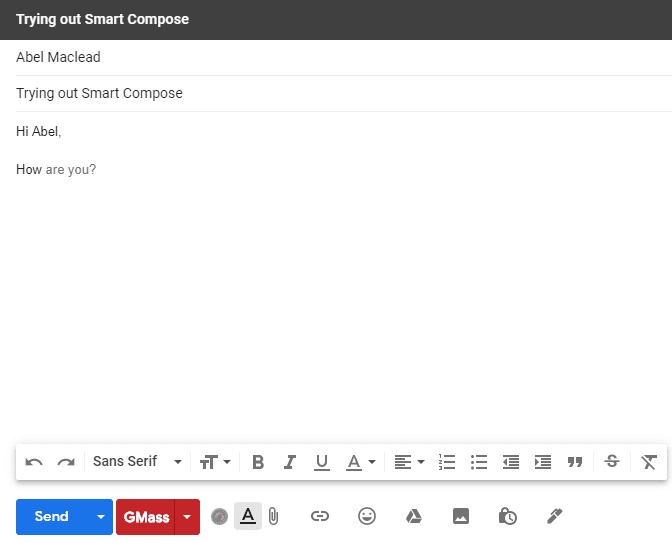
In the desktop version, you can enable Smart Compose through the General tab.
Go to Settings > See all settings > General tab and scroll to Smart Compose. Then, click the radio button next to “Writing suggestions on”.
Want Gmail to personalize suggestions based on your writing style?
Right below Smart Compose, you’ll find Smart Compose personalization.
Click the radio button next to “Personalization on” to personalize Smart Compose to your writing style. You can even provide feedback on Smart Compose suggestions to help Gmail improve its accuracy.
Want to know how to start a killer formal email without Smart Compose?
Check out my guide on how to start a formal email.
3. Use Multiple Gmail Accounts
Any Gmail user can switch between different email accounts and multiple inboxes with ease.
Essentially, you can stay logged in to multiple Gmail accounts and access Gmail from any of these multiple accounts without having to sign in each time.
But first, you’ll need to add your other Gmail account (or accounts).
To do this, click on your Gmail account avatar in the top right corner of the inbox, then click on Add another account.
![]()
Once you’ve added multiple accounts, click on your Gmail account avatar again and select the Gmail account you want to use.
The best part about this Gmail tip?
You don’t have to reenter your Gmail or Google account passwords!
For a more complete guide to using this Gmail login another account technique, check out our full step-by-step guide on the subject.
4. Schedule Emails
You can’t stay online 24×7 to send out emails, right?
That’s why the email scheduling feature inside Gmail helps you plan your outgoing emails in advance!
Just type in your new message and click on the down arrow next to the Send button. Then, pick a date and time you want your email message to be sent, and Gmail will handle the rest.
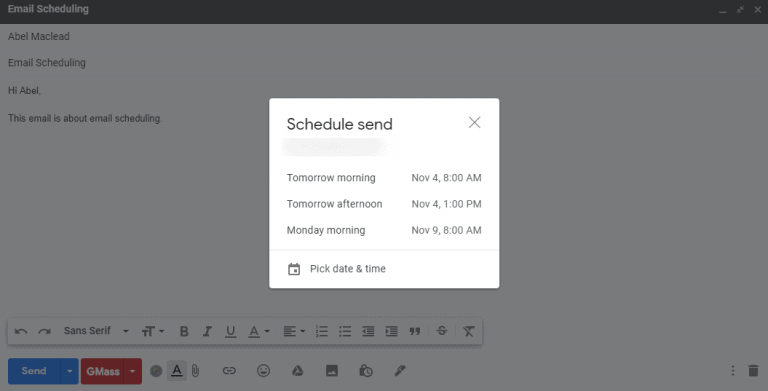
This Gmail hack is also available on the Gmail mobile apps (iPhone app and Android app).
It’s pretty useful when you have recipients in different time zones or if you’re stepping out of the office and need to send some important emails across at a given time in the future.
Need help with scheduling your Gmail emails?
Read my post on how to schedule an email in Gmail using its web and mobile apps.
5. Use Gmail Keyboard Shortcuts
Gmail offers several keyboard shortcuts that make email message management a lot easier on your personal computer.
To access the keyboard shortcut list, just press Shift (+)? / on your keyboard.
In the popup that appears, you’ll see every keyboard shortcut that’s enabled and every keyboard shortcut that’s turned off.
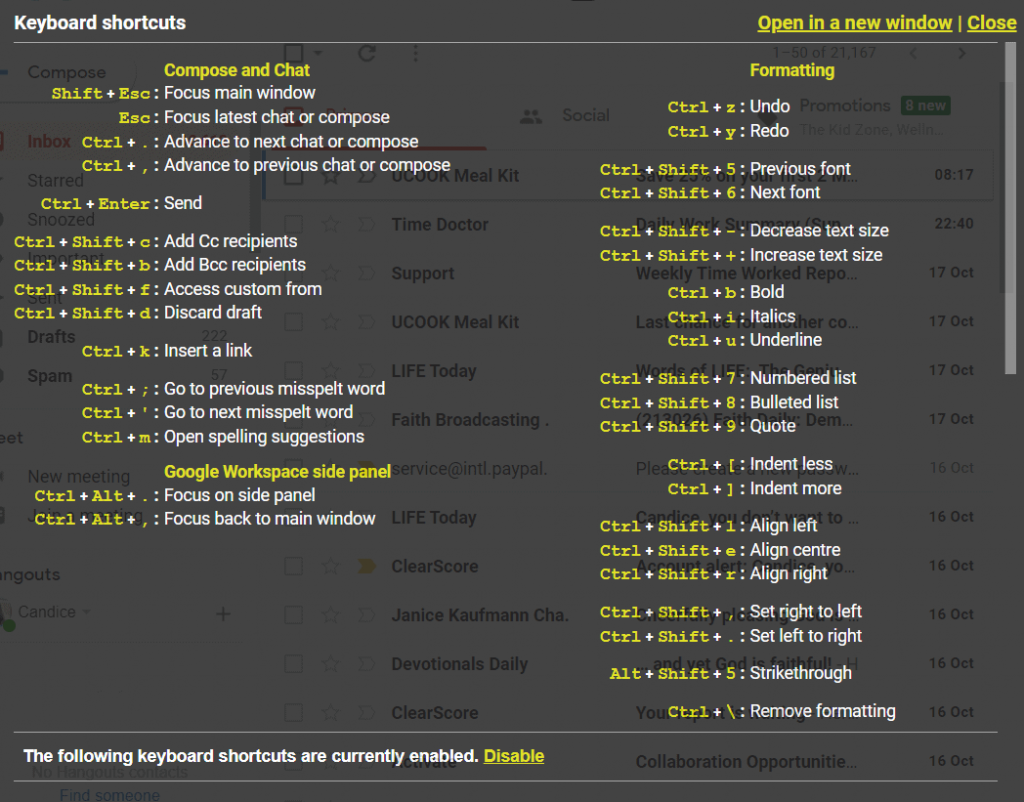
To enable keyboard shortcuts, go to Settings > See all settings > General. Then, scroll to Keyboard shortcuts and select the radio button next to “Keyboard shortcuts on”.

You also have the option to customize these keyboard shortcuts to remap keys to various actions.
6. Send Emails from Different Email Addresses
In Gmail, you can set up all your email accounts in one inbox and send emails from different addresses while using the same inbox.
But first, you’ll need to add your other mail addresses.
To do this, go to Settings > See all settings > Accounts and Import and scroll to Send mail as. Then, click on the link Add another email address.
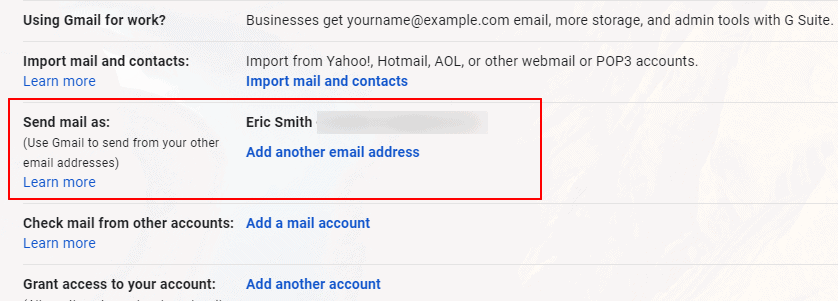
A popup will now appear.
In the popup, enter the name and email address you want to add.

Click Next Step > Send verification, and add your SMTP server details, username, and password for the account.
Finally, click Add Account.
You can easily change your From address in the Compose window to the email ID you want the email to show.
But wait.
How is this different from being able to use multiple Gmail accounts?
Using this Gmail hack, you can send emails from your Gmail mailbox using any email ID you own — not just Gmail accounts. For example, you can use the Gmail mailbox to send emails from your Yahoo/Outlook email addresses (it doesn’t necessarily have to be a Gmail address).
7. Organize Emails with Gmail Labels & Filters
The Gmail email service lets you organize your Gmail inbox by adding labels to your emails.
Labels are similar to tags that you add to emails to categorize them in your mailbox.
In Gmail, you can apply multiple labels to an email.
For example, you can add the labels “Sales” and “Closed” to an email. And then, you’ll find that email under both “Sales” and the “Closed” labels.
To create a new Gmail label, scroll down the left sidebar and click on Create new label. You can also create a new Gmail label by going to the Labels tab in See all settings.
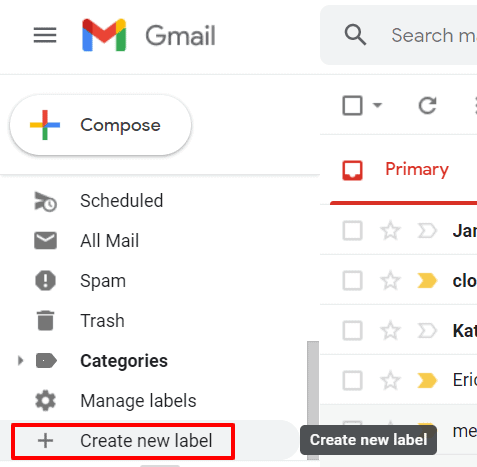
Next, give your label a name.
You can even choose to nest it as a sub-label under any existing label. For example, you can create two Gmail labels — “Work” and “Marketing” — and nest the “Marketing” label under “Work” in your inbox.
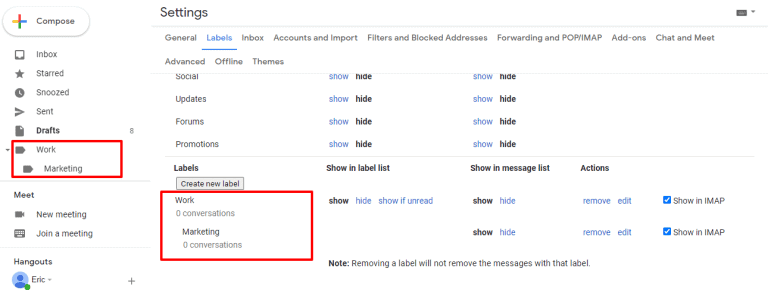
You can create labels on the mobile Gmail app as well.
What if you want to categorize your emails even further?
If you want even more functionality to categorize emails, you can use Gmail filters.
The Gmail filter feature comes in handy when you want to filter emails based on specific criteria. Once you create a custom Gmail filter, you won’t have to manually sort and manage your emails.
You can access the Create filter feature by clicking the down arrow in the Gmail Search box.
Curious about the Gmail Label feature?
Check out my step-by-step guide on How to use Gmail Labels.
8. Use Gmail Templates
Want to send the same email to hundreds of recipients?
With this Gmail trick, you can!
No need to exhaust yourself by creating multiple emails and copy-pasting the same content.
With Gmail’s templates (canned responses), you can import email message templates straight into emails without copy-pasting from anywhere else. This Gmail trick will save you valuable time when handling bulk emails.
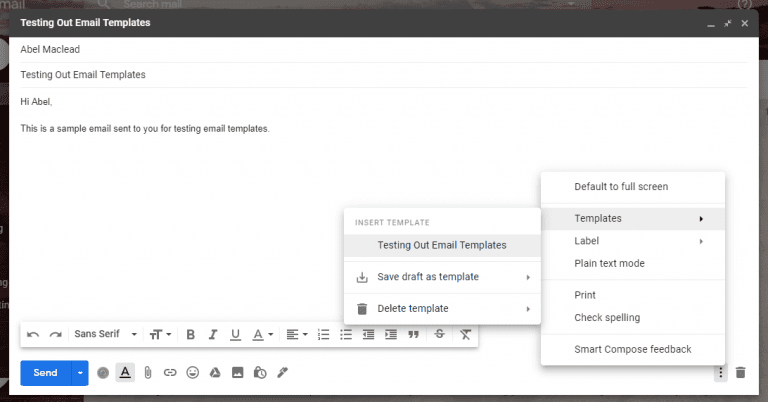
You can even import subject lines directly to your email message.
To turn on these email message templates, follow these steps:
- Click on the Settings icon (gear icon) and then click See all settings.
- Click on Advanced > Templates and switch it to Enable.
- Click Save to save changes to your Gmail settings.
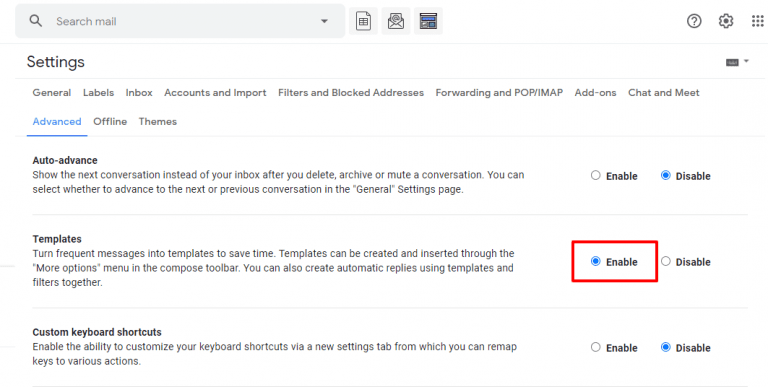
Note: Templates were originally under the Gmail Lab tab. However, Gmail has removed the Gmail Labs feature. You will now find templates under Advanced in the Settings menu.
To save your email templates:
- Go to the Compose window and craft in the template you want to save.
- Click on the three dots at the bottom right.
- Select Templates > Save draft as template.
- Give the template a name and save it.
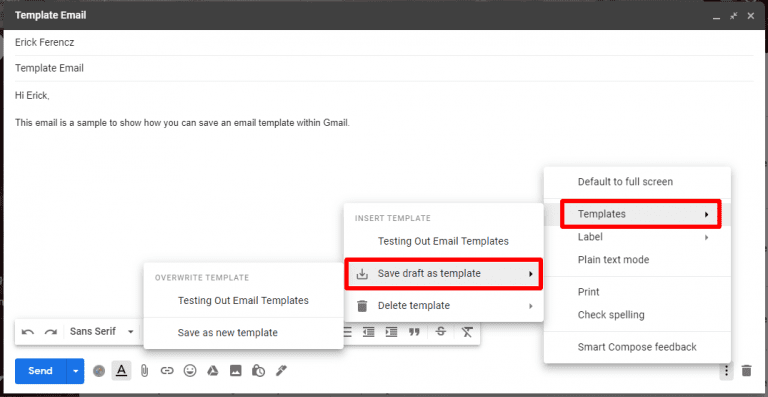
To import a template to your email message, just follow the same steps as above, and select a saved template.
9. Customize Your Gmail Inbox Display
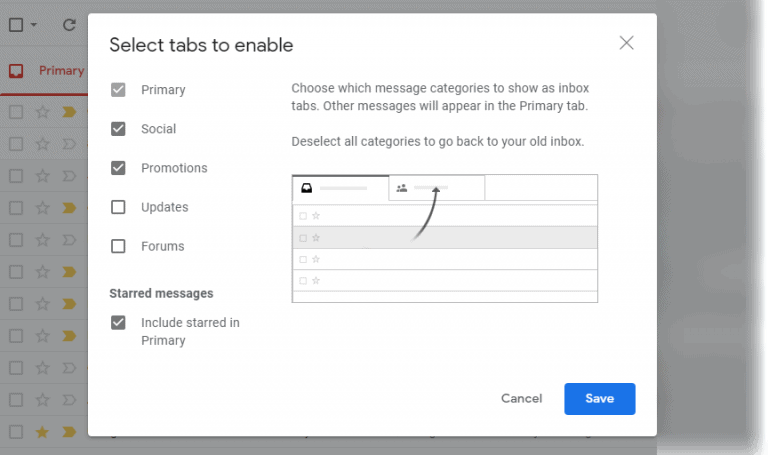
Don’t like your incoming messages being split into different tabs like Primary, Social, and Updates?
Gmail lets you customize your inbox display according to your tastes!
Just click on the Settings icon (gear icon) in the upper right corner above the reading pane and choose Customize under INBOX TYPE.
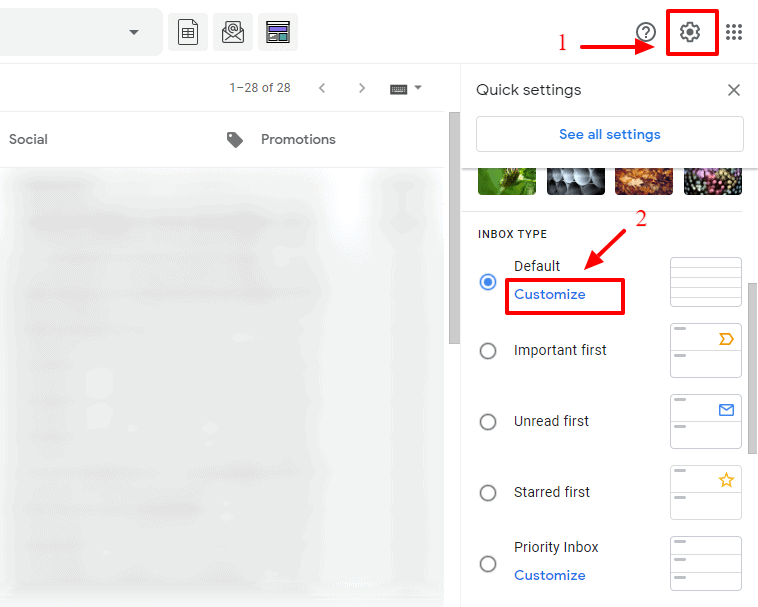
And when the dialog box pops up, you can choose the Gmail message categories you want in your inbox tab.
Want to see important and unread emails first?
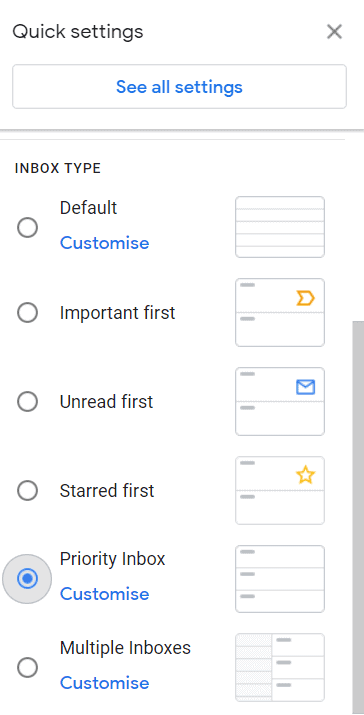
Enable the Gmail setting for Priority Inbox — this displays all your important emails and unread emails first, starred emails second, and everything else at the bottom.
To enable priority inbox, click on the Settings icon (gear icon) on the top right. After that, scroll down and select Priority Inbox by clicking the radio button next to it.
10. Snooze Email Notifications
Nobody wants to be disturbed with one desktop notification after another every time you get an email, right?
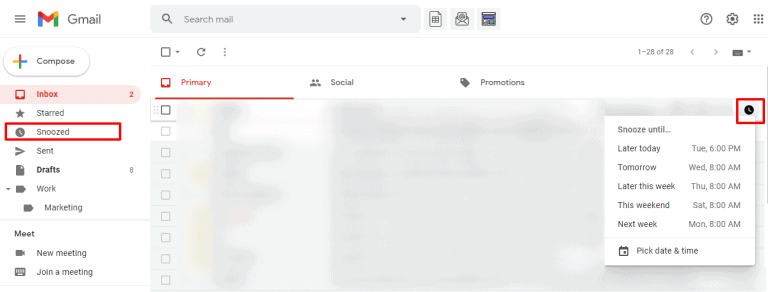
When a Gmail user doesn’t want to reply to or check an email thread at the moment, they can activate Gmail’s Snooze feature. This will hide the email from your inbox, and it will reappear like an unread message at a time of your choice.
To snooze incoming messages, hover over an email and click the clock icon on the right. Then, choose the date and time you would like the email to pop up again.
Any emails you’ve snoozed will be stored in the Snoozed folder (which you can access from the left sidebar).
You can even create Google tasks from emails to ensure that you remember to reply to these snoozed emails.
11. Mute and Archive Emails
Need a more permanent solution to snoozing emails?
Try to mute conversations or archive them.
When you mute an email thread, you’ll stop receiving new notifications about that specific thread. And when an email is archived, it’s removed from your inbox and stored separately.
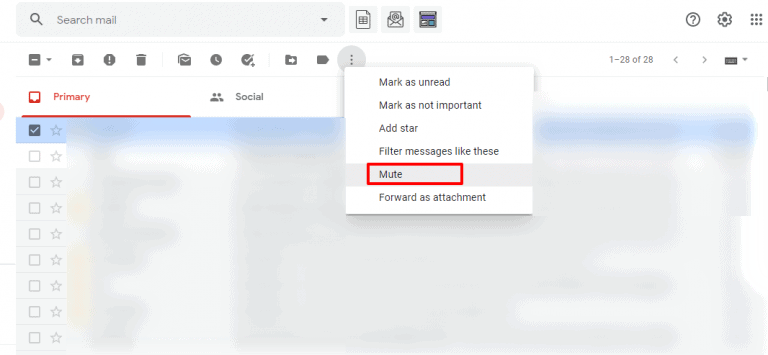
To mute a conversation, select the email, click on the three dots, and then click on Mute.
To unmute an email thread, follow the same steps — the Mute option will now have changed to Unmute.
To archive an email, select it and click on the archive button on the right.
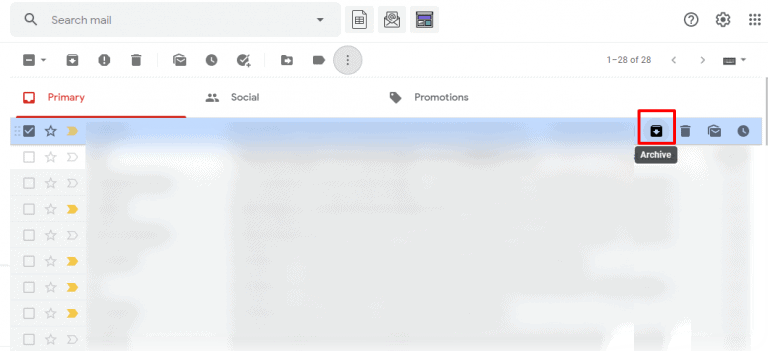
To find an archived email, you’ll have to open the All Mail tab from the left sidebar. To move an email back into the inbox, go to the email and select it by clicking the checkbox on the left. Then click on the Move to inbox icon below the search bar.

12. Create Calendar Events from Emails
A Gmail user can create Google Calendar events straight from their inbox.
You can also use this feature to create reminders for meetings and other important events for yourself and anyone who receives the email.
To create an event from your inbox, go to the email message from which you want to create an event.
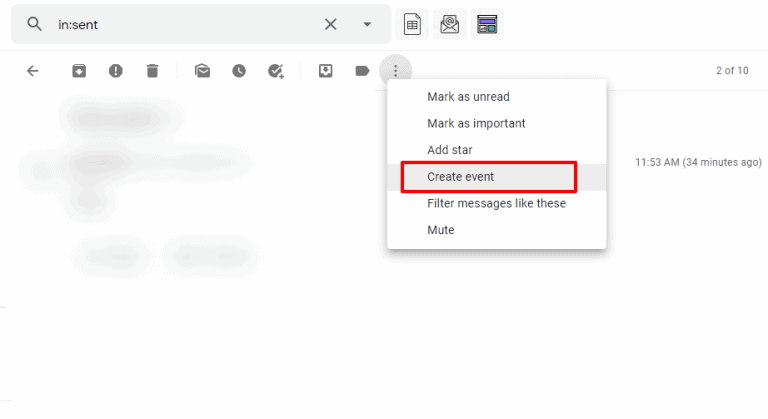
Then, click on the three dots below the Gmail search bar, and click on Create event when the dialog box appears. A Google Calendar window will appear, and you can enter the relevant details.
13. Use Search Operators
Sorting through tons of emails to find a specific message can be challenging.
However, when you use Google’s email client, you can streamline this process with search operators.
Here are a few handy search operators you can use in the Gmail search box:
- “Size:xm” (replace x with a number) — if you type “size:5m” in the Gmail search bar, every Gmail message that is over 5MB will appear.
- “+” (the plus-sign) — search for an exact word in your inbox. For example, typing in “+watch” will return every mention of “watch” in your inbox.
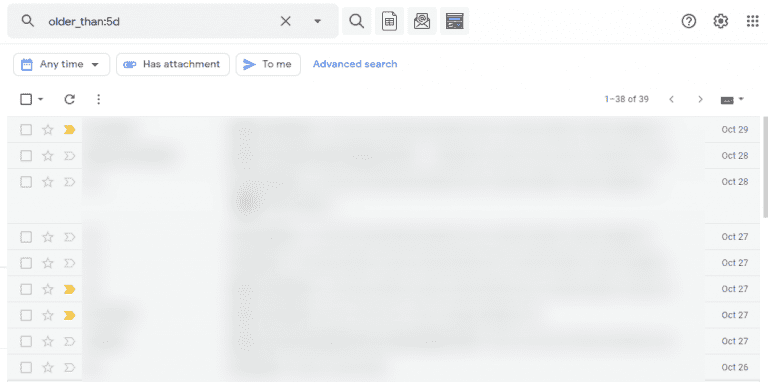
- “older_than:xd” (replace x with a number) — see emails older than x number of days. It’s helpful to filter out and delete old emails.
- “Is:chat” — see chat messages from Google apps like Google Chat.
Note: Google Meet and Google Chat have replaced the Hangouts messaging app, so your messages will be transferred to Chat.
14. Block Spammers
Everyone has a spam messages folder full of unwanted emails, right?
While you can just let the unwanted emails and spam messages be, spam unreads will continue to pile up until Gmail deletes them after 30 days. And having a massive spam folder can reduce your available Gmail storage space.
Fortunately, you can easily block spammers, so they can’t send you any new emails.
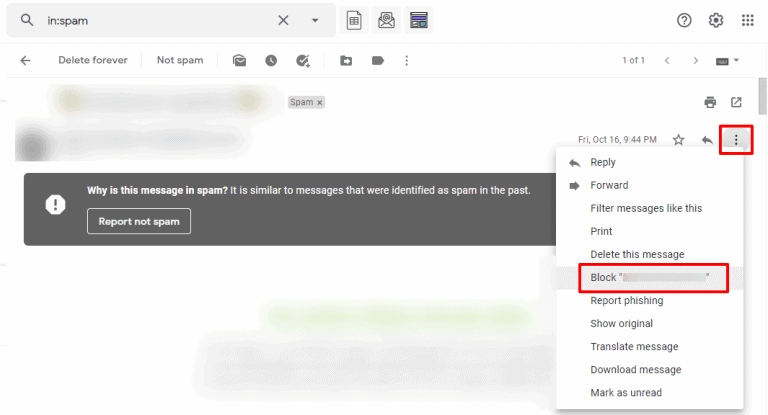
Just go to your Spam messages folder, select an email message of the sender you want to block, and click on the three dots icon on the right.
Then, click on Block “(Name)”.
15. Use Gmail Offline
Gmail allows you to read, search, and reply to emails even when there’s no internet connection. But to use this functionality, you’ll need the Chrome browser.
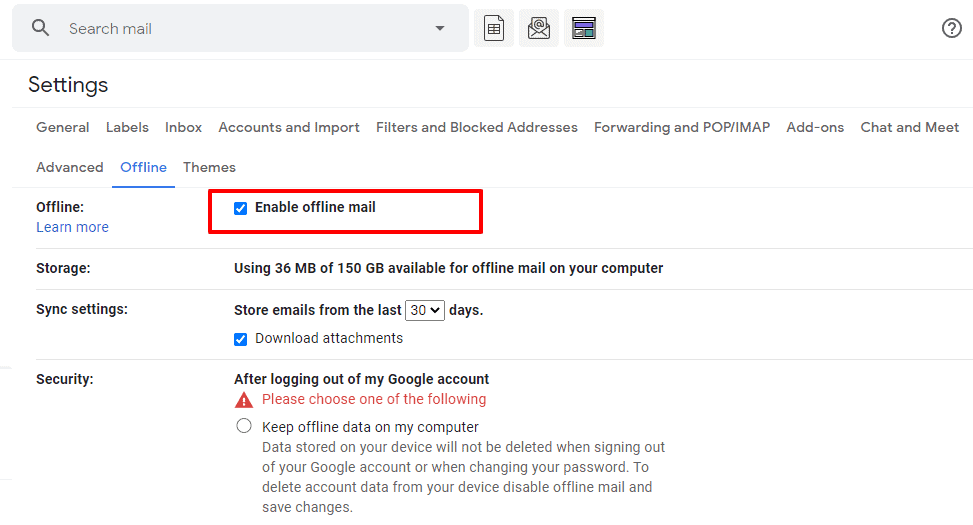
You can enable offline Gmail by going to Gmail Settings > See all settings > Offline tab.
Click on Enable offline mail and choose your settings, how many days of emails you want to sync, and your security options.
16. Send Confidential Emails
Are you sending sensitive information via emails?
With Gmail’s Confidential Mode, you won’t have to worry about it getting into the wrong hands!
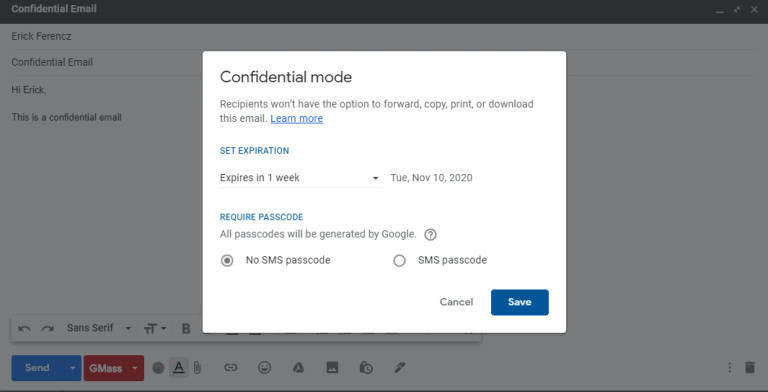
To send a confidential message, open a new Compose window and type your email. At the bottom, click on the lock icon and set the expiration date for the email.
You can grant access to the email through a passcode sent to the recipient via SMS or email. The recipient won’t have the option to copy, print, forward, or download the email.
Note: In confidential mode, both the email and any attachments will be deleted at the moment of expiration.
Thinking of using BCC to protect your recipients’ privacy?
Check out this article on how you should or should not use BCC in email.
17. Organize Your Tasks
Did you know that Gmail has a built-in Task organizer to organize your tasks easily?
Rather than relying on your memory and risk forgetting an important task, having a to-do list that you can tick off as you complete tasks can be a life-saver.
And that’s what you get with Gmail’s built-in list maker. It helps keep your emails and your tasks in sync.
To access your tasks, click on the Tasks icon (a blue circle and checkmark) on the far right panel of your Gmail mailbox.
![]()
You can now add and mark off your to-do tasks.
Note: If the Task icon is not visible, click the small arrow at the bottom right corner of your Gmail window, and the control panel will appear.
18. Unsubscribe From Newsletters and Junk Mail
What do you do when your email is filled with more newsletters and junk mail than relevant messages?
Sure, you can unsubscribe to each newsletter individually by clicking the Unsubscribe link (next to the sender’s name at the top of the email).
But how do you locate all these messages without going through every email in each mailbox?
For a simpler way of unsubscribing, go to Gmail Search and type unsubscribe. A list of every message containing the word “unsubscribe” will appear.
You can then go through these emails and click the unsubscribe link.

19. Check Which Apps Have Access to Your Account
Linking frequently used apps to Gmail can be a time-saver, but you should review the list of apps with access to your Google account regularly.
Why?
Because these apps may have access to personal and sensitive data such as:
- Contact info.
- Banking details.
- Address data.
If this data were to get leaked, you’d be exposed to a major security risk.
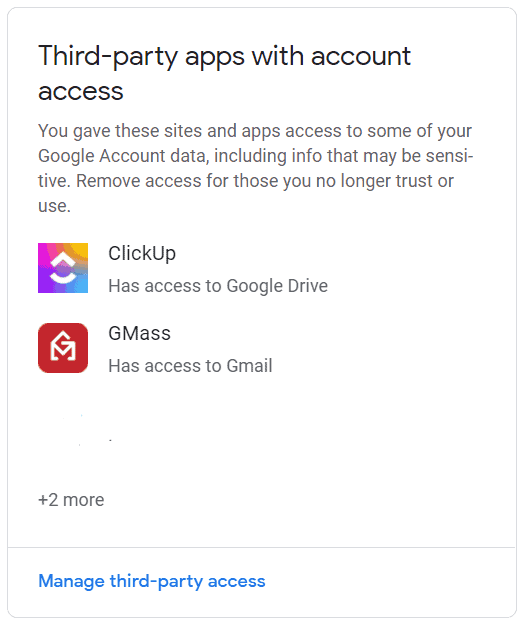
To see which third party tool (or tools) has access to your Google account, go to myaccount.google.com/Security.
Scroll down to the Third-party apps with account access section and click Manage third-party accounts you’ve linked to Google to disconnect any third party tool you don’t use anymore.
20. Make Video Calls
My last Gmail tip is handy if you have an urgent or important message that you want to convey face-to-face. It’s also useful if you don’t want to keep signing in to Zoom or some other video calling app.
You can make face-to-face video calls from Gmail using Google Chat.
But first, you’ll need to give Google access to your device’s camera and microphone.
Here’s how:
- Open Google Chat.
- Click Video call.
- A message will appear at the top of the video call window.
- Click Allow.
Then, you can go ahead and make video calls using Google Chat:
- Click on the Apps icon in the top right corner.
- Click on the Chat icon.
![]()
- A new window will open.
- From your contacts, select who you want to video call.
- Click on the Camera icon.
![]()
Each hack I mentioned here can be incredibly handy. However, to really amp up Gmail’s capabilities, you’ll need a powerful Gmail extension like GMass.
The Ultimate Gmail Productivity Hack: GMass
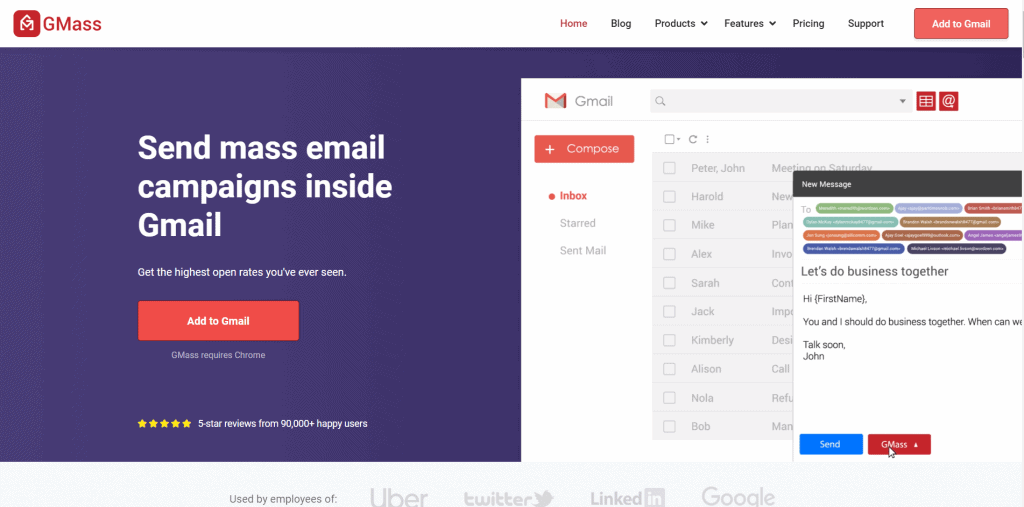
GMass is a powerful email outreach tool that works within Gmail. It’s used by employees of tech companies like Uber, Google, and even social media platforms like Twitter and LinkedIn. It’s also perfect for SMBs, solopreneurs, churches, and individuals looking to send out emails.
With GMass, you’ll be able to:
- Easily schedule and send out multiple emails from the Gmail app on the web or using the GMass add-on for Gmail’s Android app.
- Automatically personalize emails to increase email engagement levels, including paragraphs, images, links, and attachments.
- Track open rates, click rates, and other recipient interactions in real-time using GMass’ Campaign Reports.
- Automate follow-ups to ensure high response rates from email recipients.
- Use Google Sheets to set up mail merges easily.
- Send behavior-based campaigns based on what actions your leads take in your previous or initial email.
- See who your most interested prospects are with a sentiment score for each reply you’ve received.
- A/B test your email outreach campaigns to ensure you’re sending the message likely to get the best response.
- Use the Gate feature to combine automatic personalization, sentiment analysis, and template capabilities to send automatically personalized “replies to replies”.
And the best part?
Anyone can use GMass — all you have to do is download the GMass Chrome extension, sign up, and you’re ready to go!
Wrapping Up
Now you know the twenty best Gmail tips and tricks that you can actually benefit from when you use Gmail.
And when used in conjunction with a powerful tool like GMass, these tips can really help you take your email workflow to the next level — especially if you manage a business.
Then why not download the GMass Chrome extension to get started today?
Only GMass packs every email app into one tool — and brings it all into Gmail for you. Better emails. Tons of power. Easy to use.
TRY GMASS FOR FREE
Download Chrome extension - 30 second install!
No credit card required


Thanks so much