Want to resend an email in Gmail?
In this article, I’ll show you four different ways to resend your Gmail emails — using the Compose, Reply, Forward, and Templates features.
Once I’ve covered how to resend an email in Gmail, I’ll also show you how to do it in Outlook. Then, I’ll go over some reasons for resending emails and share four handy tips to help ensure that your re-sent emails are successful.
Further Reading:
- Want to learn how to undo send, use Gmail keyboard shortcuts, and more? Check out the 20 best Gmail tips and tricks.
- Also, read my step-by-step guide on scheduling emails in Gmail’s web, Android, and iOS apps (iPhone and iPad).
This Article Contains:
(Click on links to jump to specific sections)
- How to Resend an Email in Gmail
- How to Resend an Email in Outlook
- Why Resend Emails?
- 4 Simple Tips to Ensure That Your Re-sent Emails Are Successful
Let’s jump right into it.
How to Resend an Email in Gmail
There are mainly four ways to resend an email in Gmail:
First, I’ll walk you through how to resend emails in Gmail using its Compose feature.
A. How to Resend Emails Using Gmail Compose
One way to resend an email is to copy the original message to a New Message window and then send it as a brand new email.
Follow these steps to resend emails this way:
Step 1
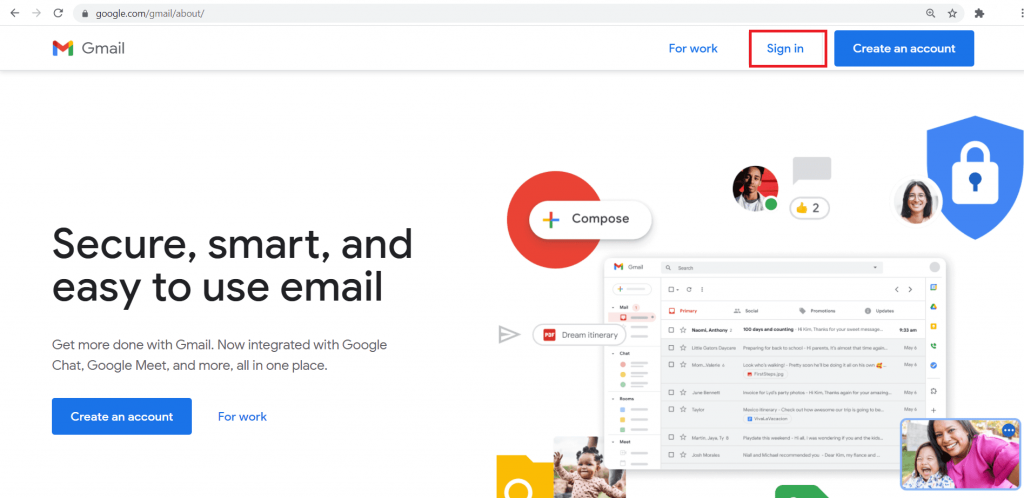
Go to gmail.com and sign in to your account.
Step 2
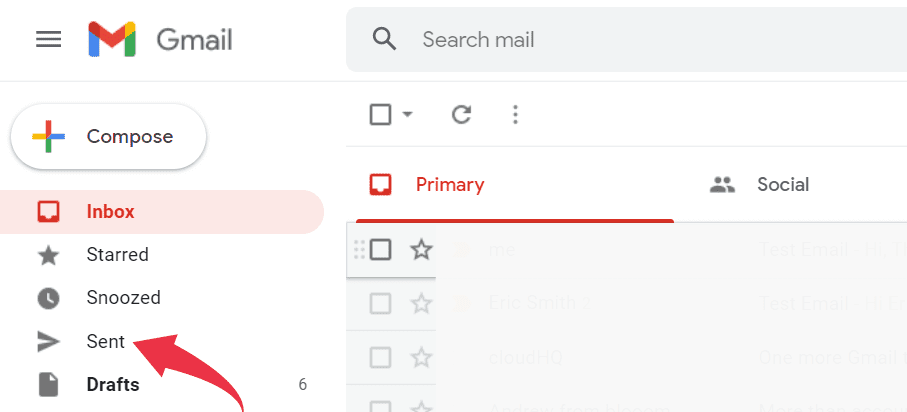
Click on the Sent folder (outbox) from the Main Menu on your left.
Step 3
To find your sent Gmail emails quickly, enter any related keywords in the Search Mail bar at the top and click Search.
Alternatively, you can just skip step 2 and use the search bar directly from your inbox.

Step 4
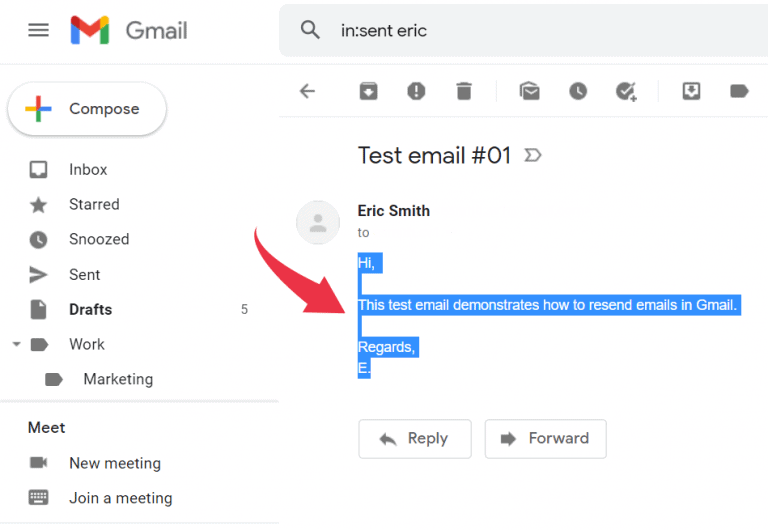
From the results displayed, click on the right email to open it.
Step 5
Copy the body of the email.
Step 6
Click Compose from the Main Menu, and a New Message window will open.

Step 7
Paste the copied content into the Gmail message body. Then, add the recipient email address in the To field, enter the email Subject line, and hit the Send button.
Note: Until you click the Send button, the message will remain in the Drafts folder.
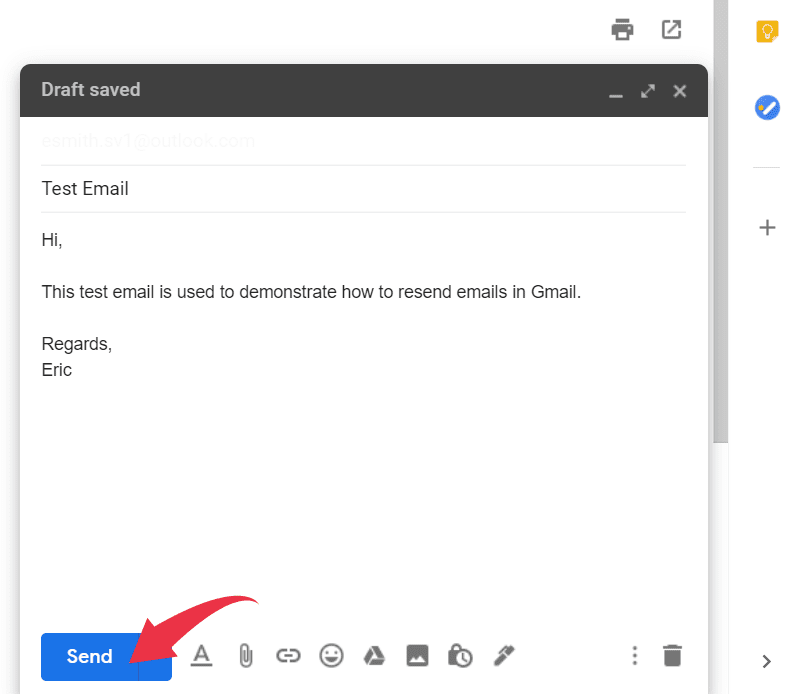
Simple enough, right?
However, manually copy-pasting the entire message can be tiring, especially if you want to resend multiple emails.
What about any attachments?
Gmail users can’t just copy files from an email the same way you copy the message content.
And that’s another limitation of using the Compose feature to resend emails. You’ll have to manually add and upload any attachments when drafting your email to resend.
Next, I’ll show you how to resend emails using the Gmail Reply feature.
B. How to Resend Emails Using Gmail Reply
Follow these steps to resend Gmail emails using the Reply feature:
Step 1
Log in to the Gmail app and click on the Sent folder from the Main Menu. The words “in:sent” will appear in the Search mail bar.
Step 2
Enter any related keywords in the Search mail bar and click Search to find the original email quickly. From the results displayed, click on the email you want to resend to open it.

Step 3
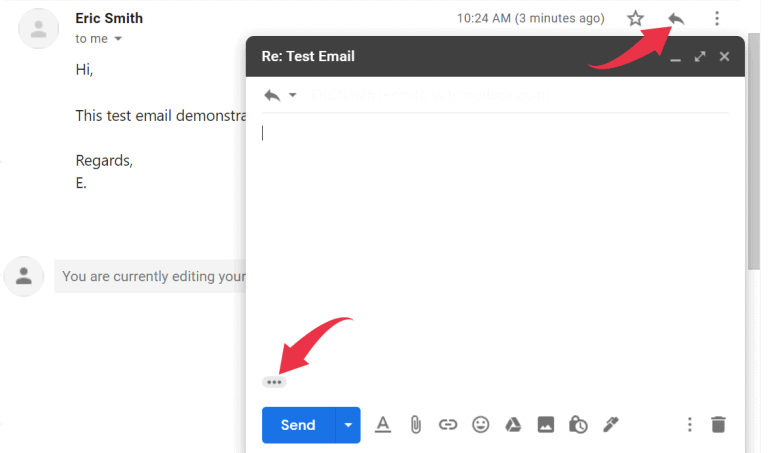
Click the Reply arrow on the top right. In the Compose window that pops up, click the horizontal ellipsis icon to show trimmed content.
Step 4
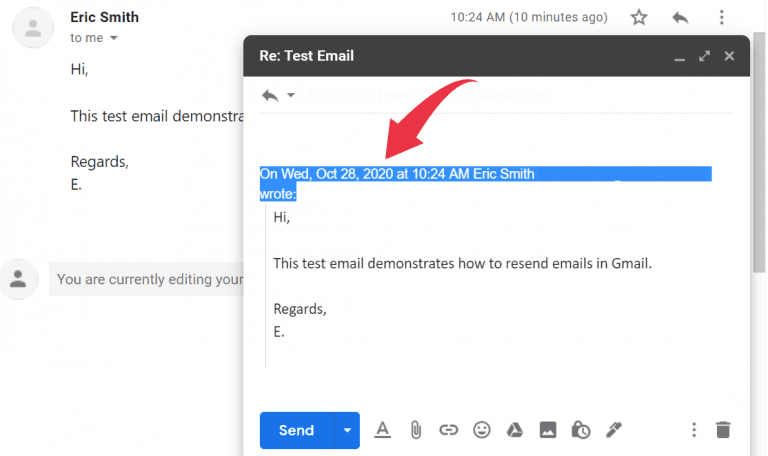
Select the timestamp and other lines at the top, and delete them.
Step 5
Select the remaining part of the text and press ‘Ctrl + [’ on your keyboard to remove the indentation of the sent message. Adjust the formatting if necessary.
Step 6
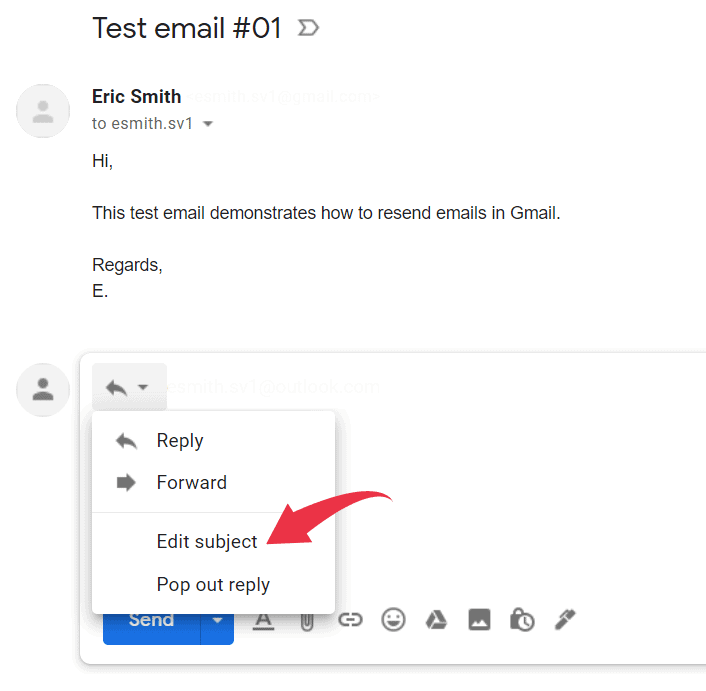
Open the Type of response drop-down menu from the left corner of your message tab and then click Edit subject to open a separate window for your email.
Step 7
Now add or delete email recipient details from the To field (as if it were a brand new email) and click Send.
Like the Compose method, you’ll need to include attachments manually when resending emails using the Reply feature.
Next, I’ll cover how you can resend Gmail emails using the Forward feature.
C. How to Resend Emails Using Gmail Forward
Using Gmail’s Forward emails feature is the easiest way to resend emails with attachments.
Here are the steps for resending emails as forwarded messages:
Step 1
Log in to Gmail and click on the Sent folder from the Main Menu.
Step 2
Open the email you want to resend.
Step 3
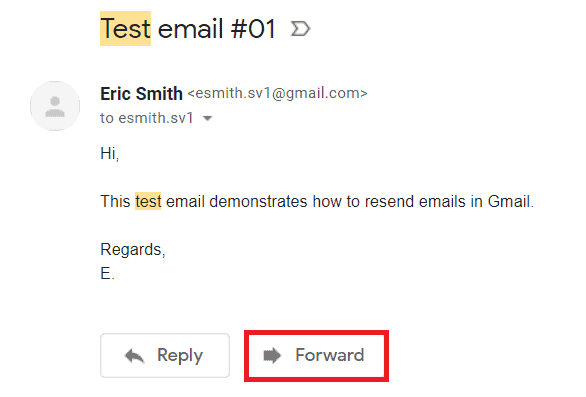
Click Forward to open a separate window for your email.
Step 4
Click Edit subject under the Type of response drop-down menu.

Step 5
Select the timestamp and other header lines at the top and delete them.
Step 6
Modify the email Subject line field, add email recipient details in the To, Cc, and Bcc fields as required. Then, click Send.
This way, all attachments from the previous email are automatically included with the forwarded messages.

However, there are a few caveats:
- When you forward emails, you may have to manually delete a lot of email content and attachments if the email you’re forwarding was part of a long thread of emails.
- With the forwarding method, you can’t forward multiple emails at once.
What if you want to resend specific emails to multiple recipients over some time?
Next, I’ll show you how you can use the Templates feature to resend multiple messages.
D. How to Resend Emails Using Gmail Templates
It’s too much of a hassle to comb through the Sent folder when you’re looking for specific emails to resend.
Fortunately, Gmail users can create email templates to reuse in the future.
Here’s how to do it:
i. How to Enable Gmail Templates
Step 1
Open Gmail and click on the Settings icon (gear icon) on the top right.
Step 2
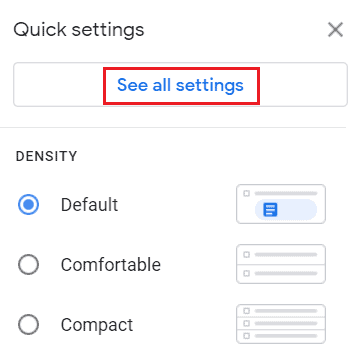
Click on See all settings.
Step 3
Click Advanced.

Step 4
Navigate to the Templates section and click the radio button next to Enable.
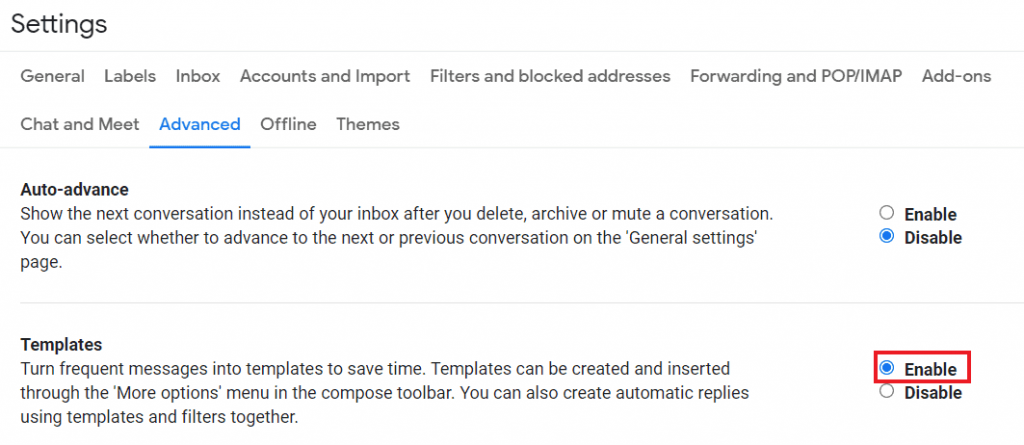
Once you’ve enabled Templates (also known as canned responses), you can save a composed message as a template to reuse in the future.
ii. How to Save a Message as a Template
Here’s how you can save a message as a template:
Step 1
Compose the email you want to save as a template using Gmail Compose.
Step 2
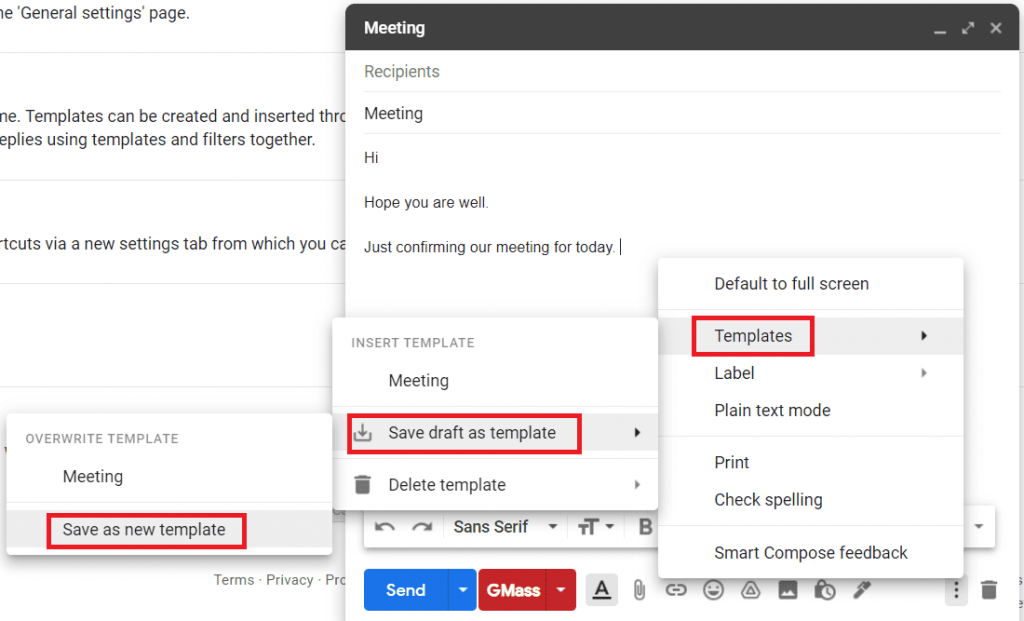
Click on the three dots icon next to the trash icon for more options.
![]()
Step 3
Click on Templates > Save draft as template > Save as new template.
Step 4
In the pop-up window that appears, enter a name for your new template and click Save.
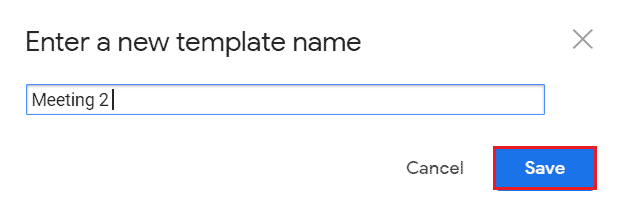
After you’ve saved a template, you can easily reuse it in your next email.
iii. How To Use Templates To Resend
To use a template to resend an email, just follow these steps:
Step 1
Open a Gmail Compose window.
Step 2
Click on the three dots icon for more options.
Step 3
Click Templates and select the template that you saved previously.
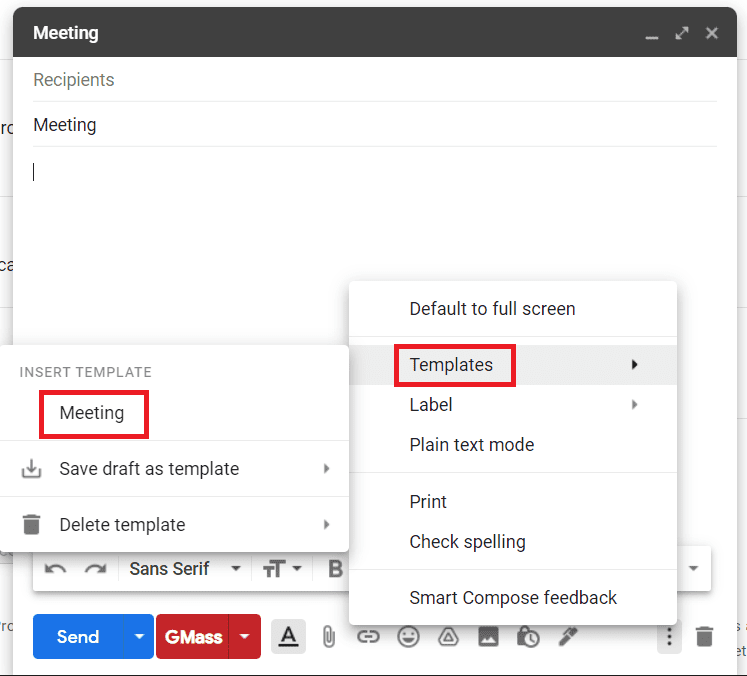
Step 4
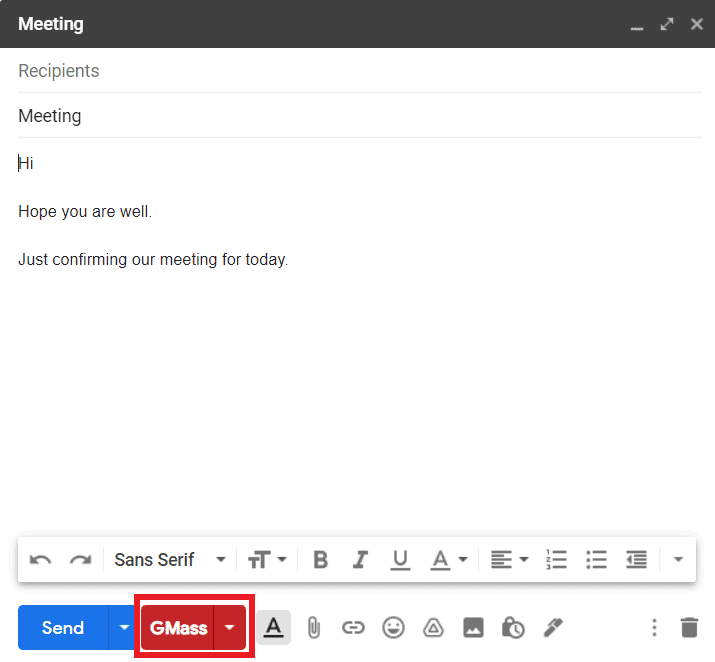
Gmail will automatically paste the template you selected into your outgoing email. Click the GMass button to send out your email.
Note: You can save up to 50 templates without downloading any third-party extension or switching email clients.
There you have it — four ways to resend emails in the Gmail app!
Now, I’ll show you how you can resend an email in Microsoft Outlook.
How to Resend an Email in Outlook
Resending emails in Microsoft Outlook is quite similar to doing it with a Gmail account.
You can either copy-paste the original content to a new email or use Reply/Forward from the Reply option menu to resend emails. Since the copy-paste method is pretty straightforward, let’s see how to use Outlook’s Reply or Forward feature to resend emails.
Note: The steps are nearly the same whether you’re using Outlook for Mac, Windows, or the mobile app.
Here’s how to resend emails using Outlook’s Reply option or Forward feature:
Step 1
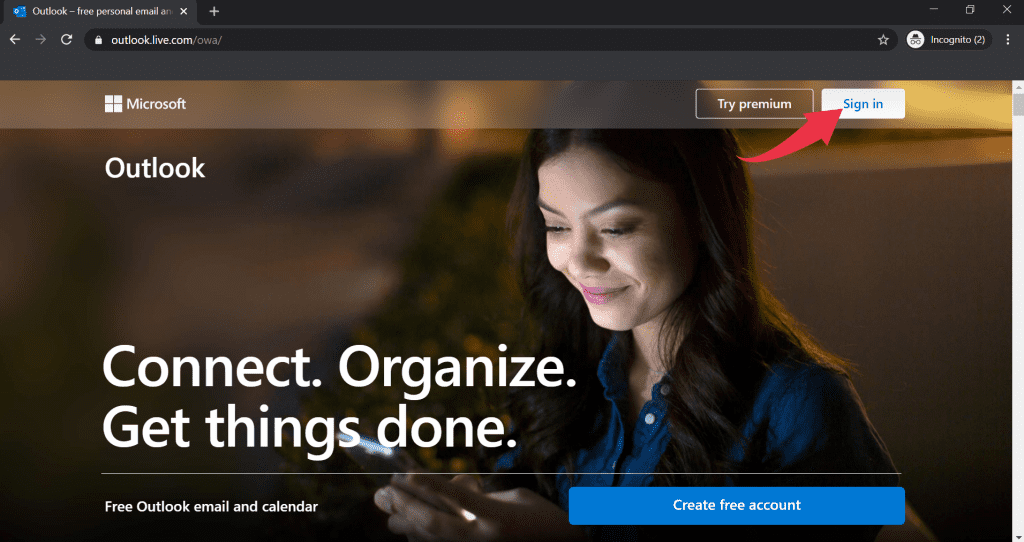
Go to outlook.com and sign in.
Step 2
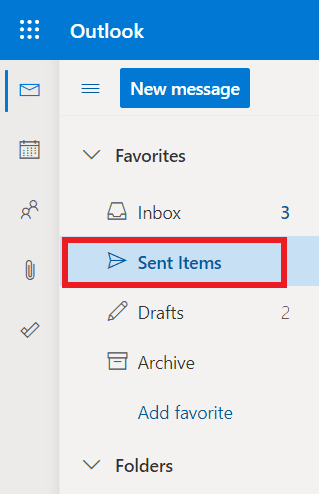
Click the Sent Items folder from the left sidebar.
Step 3
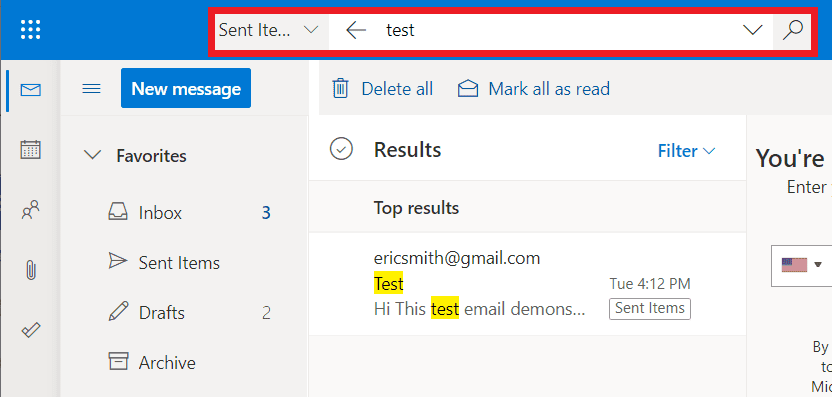
Once you click on Sent Items, enter related keywords in the Search bar at the top, and hit Enter.
Step 4
From the results displayed, open the right email and click Forward at the bottom of the email.
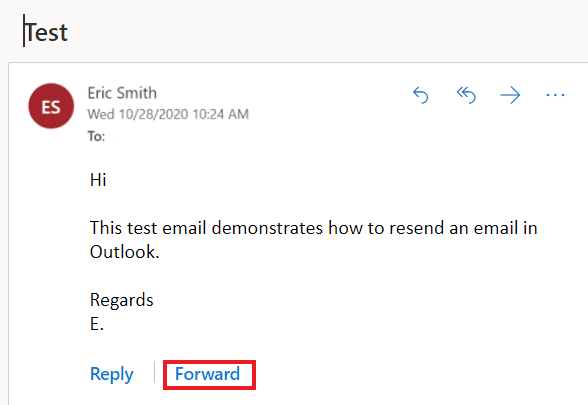
Note: You can also click Reply and proceed with the same steps. However, you’ll have to manually add attachments if you’re using the Reply feature to resend emails.
Step 5
A new window will open. Select the timestamp and other header lines on the top and delete them.
Step 6
Add a recipient address in the To field, modify the Add a subject field as needed, and hit Send.
![]()
As I’d mentioned above, you can also resend an email in Outlook the old-fashioned way — using the copy-paste functions.
Copy-paste the body of the email you’ve sent to a New Message body, attach files and add new recipients manually. Then, just resend your email the same way you send a brand new message.
If you’re still unsure about how these techniques can help you, I’ll cover a few reasons for resending emails next.
Why Resend Emails?
Whether you use Gmail or Outlook’s email service, you’ll want to resend an email at some point. It could be a registration confirmation email, a verification email, or an older email campaign that you’re resending.
Here’s a closer look at why you might want to resend emails:
1. Saves Time
Let’s say your last campaign for a product worked well, and you want to approach another set of people on your mailing list with the same message.
Resending an email is easier than creating the same message from scratch.
You could simply reuse a template from older emails or campaigns and save a ton of time. Similarly, resending an email is an easier way to remind someone about something than drafting an entirely new email message for them.
2. Improve Engagement
Whether you send promotional emails or casual email messages, you’ve probably been in situations when the recipients missed your original email altogether.
In such cases, resending emails to those recipients who haven’t opened your older emails presents another opportunity to engage with them.
If you’re an email marketer and recipients have unread copies of your emails in their mailbox, resending a mail may increase your chances of getting their attention.
Note: Remember not to spam the recipients with your emails as it can lower your sender reputation and email deliverability. This can lead to all your emails ending up in their spam folder.
But remember, resending an email doesn’t guarantee that your recipient will open it.
It just gives them another opportunity to do so.
To help you boost engagement, I’ll highlight some ways you can improve the effectiveness of your re-sent emails.
4 Simple Tips to Ensure That Your Re-sent Emails Are Successful
To ensure that your recipients open your emails the second time around, you may need to consider a few things:
1. Tweak Your Subject Line
Your subject line is the first thing your recipient will see, so it has to be perfect.
For effective emails, opt for simple, concise subject lines that draw the reader into your message.
But finding a subject line you like isn’t enough.
If you’re running an email marketing campaign, it makes sense to run A/B tests where you test different subject lines on your audience.
For example, you can send an email with the subject line “increase your reach on Facebook” to one segment of your mailing list. And send the same email with the subject line “Get more customers through Facebook” to the other.
You can then compare how both emails performed to determine which subject line had better traction.
If you’re looking for some sample subject lines to use, check out my article on 43 great cold email subject lines.
2. Consider Resending Your Email At a Different Time
It’s essential to consider the time of day you’re sending your email because timing plays a huge role in email engagement.
If your first email didn’t get the response you wanted, consider sending it at a different time. Some research suggests weekends are great for sending emails, while other studies show that early morning or late night on weekdays are ideal.
Although there is a lot of contradictory information out there as to what the perfect time is, you can find the time that suits your mailing list best.
How?
By using the A/B testing method.
For example, you could send emails to half your mailing list on the weekend and send emails to the other half during the week. Based on each group’s engagement, you can determine whether weekends or weekdays are best for sending future emails.
3. Give Your Recipients a Chance To Respond
Technically, this isn’t a tip on resending emails, but it’s still crucial.
Too many people jump the gun when it comes to following up on an email. They don’t receive a response within 24 hours and assume the recipient has missed it. They then proceed to shoot them another email.
A good rule of thumb is to wait about three days before resending an email. Most people respond to emails by this time. And if you still haven’t received a response or a read receipt notification (if you have a Google Workspace business account), a follow-up might make sense.
4. Consider Using a Dedicated Email Tool
The problem with resending emails is that you might have to send multiple messages at the same time.
And when you have to test different subject lines and sending times, forward multiple emails, and keep track of when you’ve sent emails, it can all seem very daunting.
That’s why it makes sense to use a dedicated email tool like GMass to simplify the process.
What’s GMass?
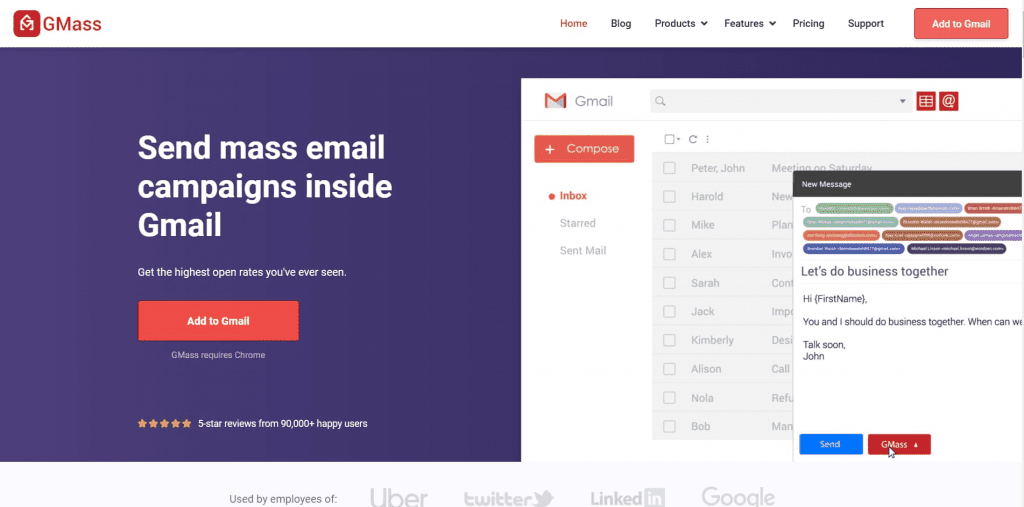
GMass is an email outreach platform that works inside Gmail. Its superior mail merge features and ease-of-use make it a popular tool with employees in large companies like Google and Uber and social media giants like Twitter and LinkedIn.
The tool is also a perfect fit for solopreneurs, small businesses, and even churches to send emails to their target audience.
To get started with GMass, just download the Chrome extension and sign up with your Gmail account.
Why You Should Use GMass to Resend Your Emails
With this mail merge tool, each email you send automatically goes into the Templates drop-down menu, which you can access from the GMass Settings window.
Here’s how simple it’s to load, filter, edit and manage GMass’ campaign templates:
A. Loading GMass Templates
Here’s how to load a template in GMass:
Step 1
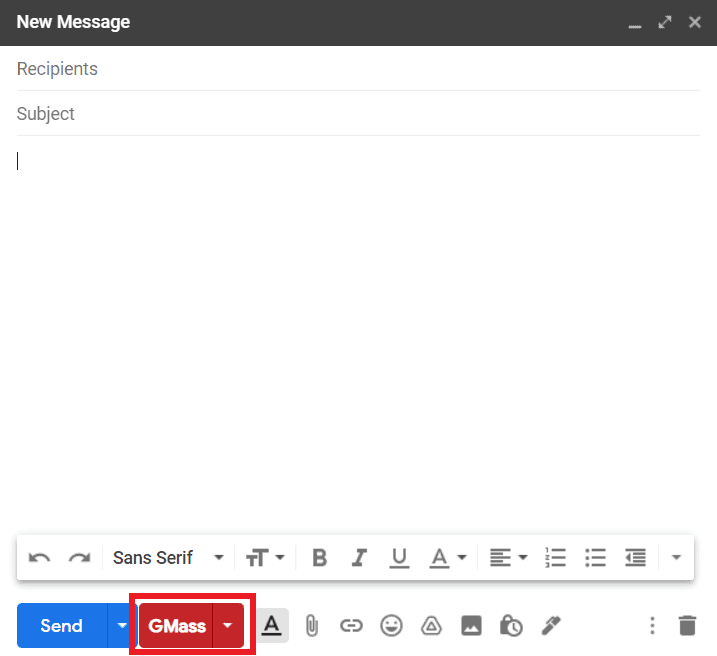
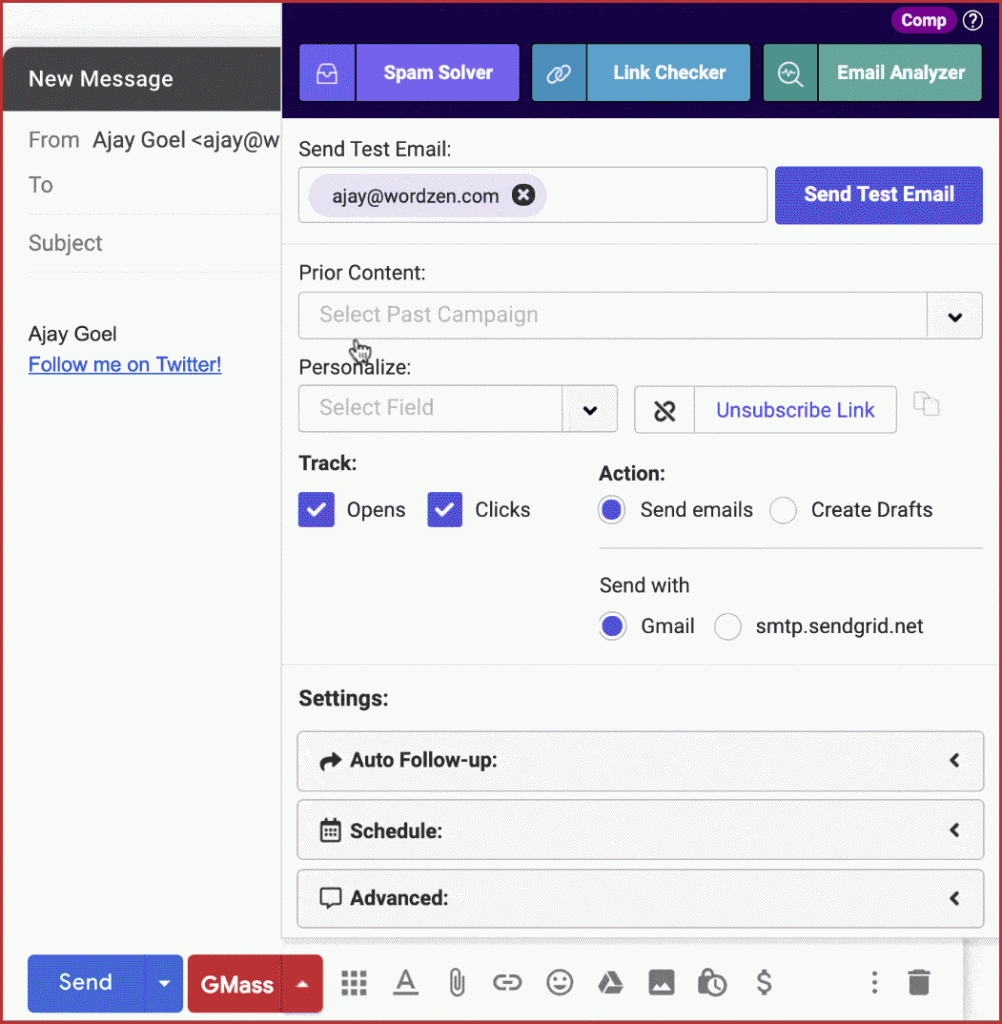
Open the Gmail Compose window and click on the GMass drop-down arrow.
Step 2
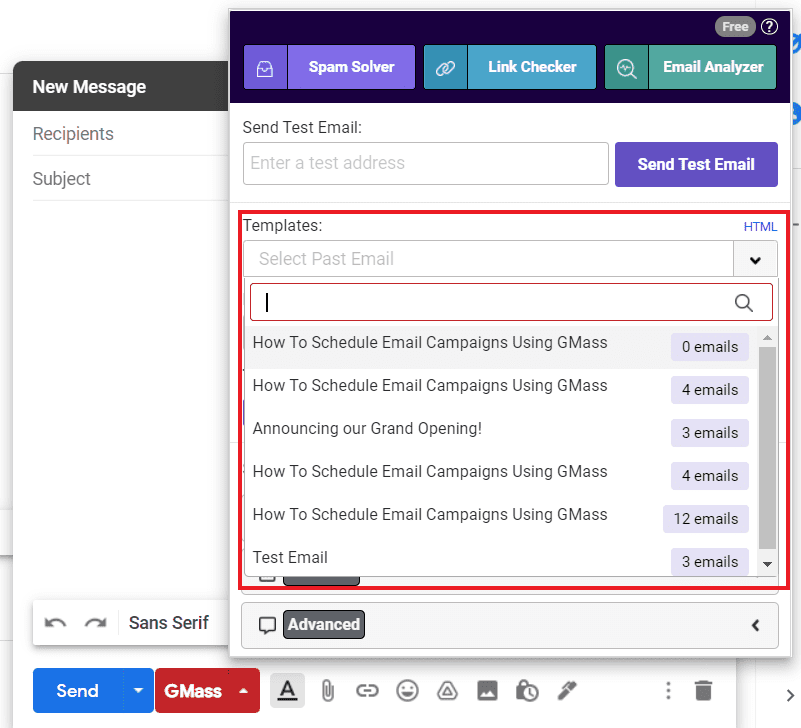
A pop-up window will appear. Click on the Templates drop-down arrow and select your chosen template.
Step 3
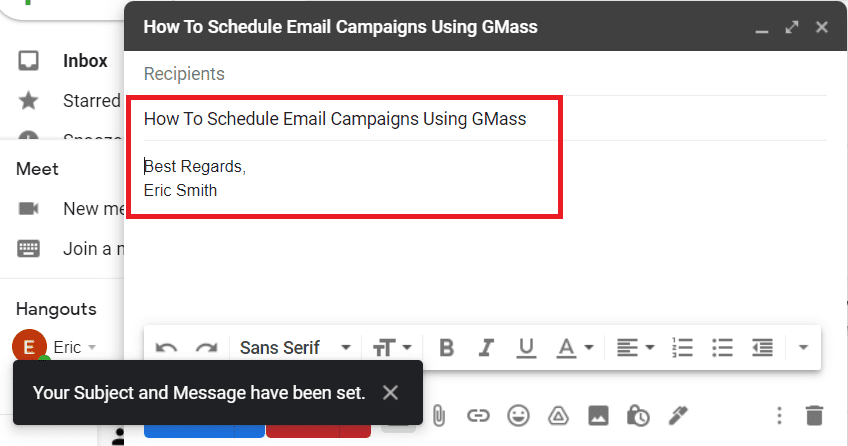
When you’ve selected a template, the Compose window’s Subject and Message will get automatically populated.
But what if you have a lot of templates saved?
In that case, I’ll show you how you can sort through them.
B. Filtering GMass Templates
Here’s how easy it is to filter your GMass templates:
Step 1
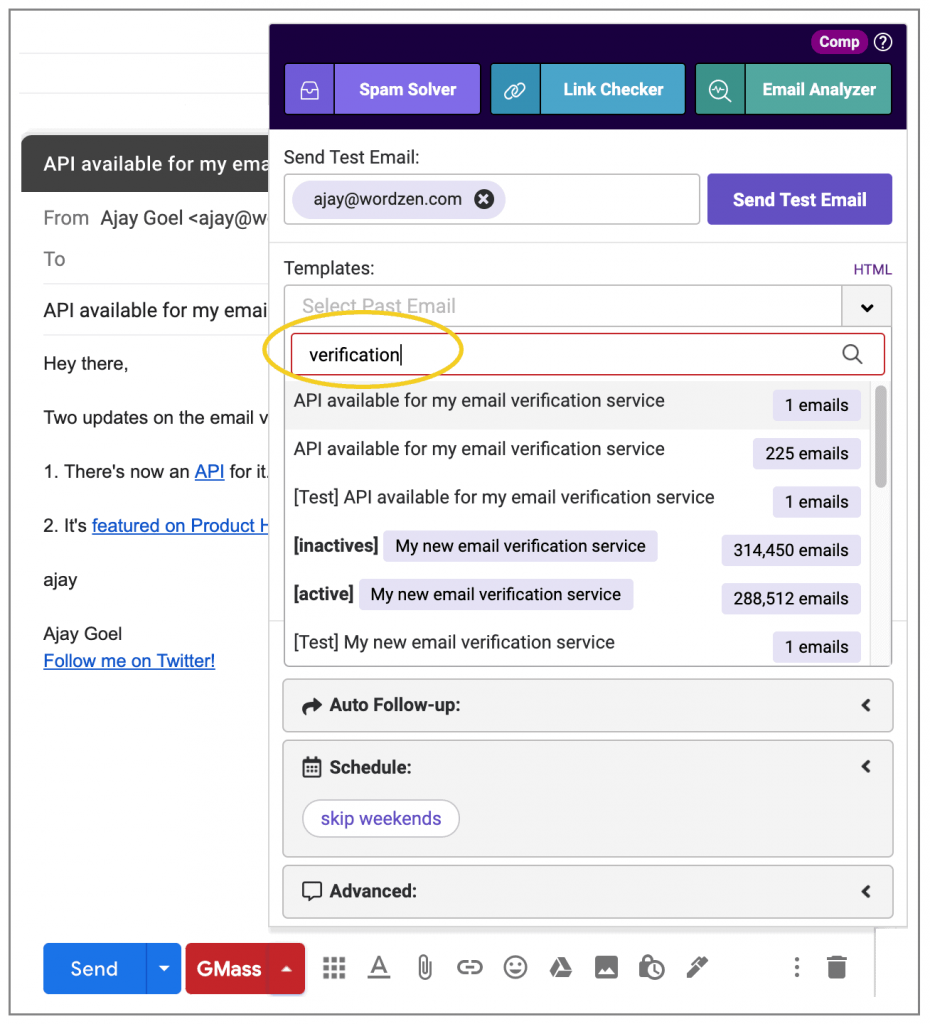
Type a few characters to filter campaigns with matching subject lines or names.
Step 2
Enter the number of recipients to narrow down to campaigns with that many recipients at least.
C. Editing Templates
You can easily edit a template by modifying the email in the Subject or Message area.
Alternatively, click the HTML option to edit the HTML code behind the campaign if you want more control.
![]()
This way, you can add design elements to your emails that the Gmail Compose tools might not support (for example, HTML tables).
Interested in learning more about handling HTML message parts in your email?
Check out my post on the quirky handling of HTML and plain text message parts by the Gmail API.
D. Managing Templates
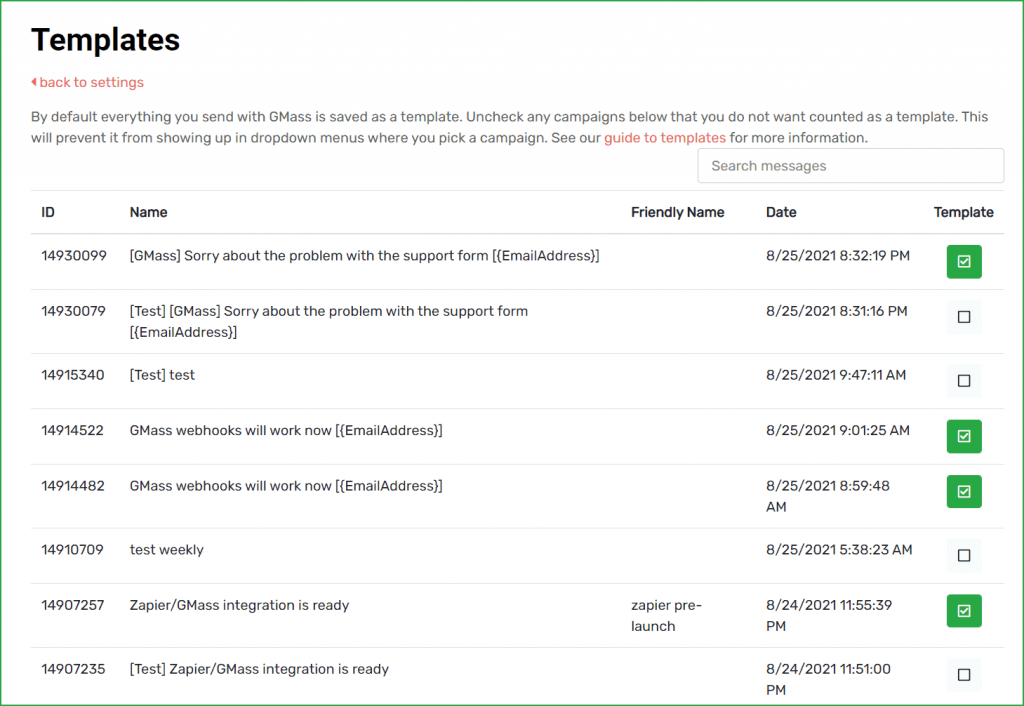
You can easily manage which campaigns show up in the Templates drop-down.
Simply go to the Templates section of the dashboard and uncheck any saved templates you don’t want to see.
That’s not all.
Here are some more ways GMass helps you:
- Automated Follow-up emails: Send automated, personalized follow-ups instead of resending copy-pasted messages that you have to customize manually.
- Overcome Gmail’s sending limits: Ordinarily, you can’t send more than 500 emails a day using Gmail (2,000/day with Google Workspace account). GMass allows you to bypass these sending limits when connected with an SMTP server like SendGrid.
- Campaign Reports: Get detailed reports on how many people opened, clicked, and replied to your Gmail message. GMass also sends you an email notification when a report is ready to view.
- A/B Testing: Vary your subject line and email body using different content sets and see which version gets you the best results.
- Reply Management: You can automatically categorize your incoming Gmail messages to avoid inbox clutter.
- Gmail Mobile App Add-on: Get powerful email outreach capabilities on your Android smartphone with the GMass add-on for the Gmail app.
Note: The mobile app add-on is currently not available for iOS (iPhone and iPad).
Final Thoughts
Resending emails in the Gmail or Outlook email client is a clever way to save yourself tons of time and effort. Additionally, if you’re an email marketer, resending promotional emails as follow-ups is an effective way to target unresponsive subscribers and increase engagement.
But the process can be tedious — you have to edit your message manually and resend it to each person.
Fortunately, sending automated recurring emails to any recipient or subscriber is super easy with GMass! Its powerful email marketing features and advanced customization make it the perfect tool to amp up Gmail’s capabilities.
Sign up for GMass today and join the likes of companies such as Google and Twitter to start resending your best emails today!
Email marketing, cold email, and mail merge all in one tool — that works inside Gmail
TRY GMASS FOR FREE
Download Chrome extension - 30 second install!
No credit card required

